After the DLM Engine is installed on the Ambari host, you must properly configure it.
You can configure the engine on existing clusters or when configuring newly created clusters.
If configuring on new clusters, see the instructions for configuring DLM Engine on new
clusters.
- You must have root access to the Ambari Server host node to perform this task.
- When you install DLM Engine in an existing cluster, a restart is required to get
Ambari to create the service users.
- This task must be completed on all clusters to be used with DLM.
-
“Beacon” is the internal name for the DLM Engine. If you install DLM, you will
see the name Beacon in some paths, commands, etc.
-
Launch Ambari in a browser and log in.
http://<ambari-server-host>:8080
Default credentials are:
- Username: admin
- Password: admin
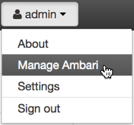
- Click Admin>Manage Ambari.
-
Click Versions, and then do the following on the Versions
page:
-
Click the HDP version in the Name column.
-
Change the Base URL path for the DLM service to point
to the local repository, for example:
http://webserver.com/DLM/centos7/1.1.0.0
URLs shown are for example purposes only. Actual URLs might be different.
-
Click the Ambari logo to return to the main Ambari page.
- In the Ambari Services navigation pane, click Actions>Add
Service.
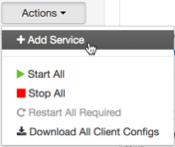
The Add Service Wizard displays.
- On the Choose Services page of the Wizard, select the DPS service to
install in Ambari, and then follow the on-screen instructions.
Other required services are automatically selected.
- When prompted to confirm addition of dependent services, give a positive confirmation to all.
This adds other required services.
-
On the Assign Masters page, you can choose the default
settings.
- On the Customize Services page, fill out all the required username and
password fields that are highlighted.
You can set credentials to whatever you want.
- If doing Hive replication with DLM, navigate to Customize Services and
enable Hive replication.
-
Click Hive in the list of services.
-
On the Settings tab, move the toggle to *off* for "Run
as end user instead of Hive user".
-
Click the Advanced tab and scroll to the
Custom hive-site section.
-
Verify that these properties have the following values, or set the properties
as shown:
hive.metastore.dml.events=true
hive.metastore.transactional.event.listeners=org.apache.hive.hcatalog. \
listener.DbNotificationListener
hive.repl.cm.enabled=true
hive.repl.cmrootdir=/apps/hive/cmroot
hive.repl.rootdir=/apps/hive/repl
-
Click HDFS in the list of services.
-
Scroll to the Custom core-site section and modify the
following parameter:
hadoop.proxyuser.hive.hosts=*
-
Complete the remaining installation wizard steps and exit the wizard.
-
Ensure that all components required for the DLM Service have started
successfully.
See the DLM support requirements for information about required Apache
components.
-
Repeat this procedure on the Ambari hosts on all remaining clusters on which you
install the DLM agent.

