

Chapter 7. Setting Up the DPS Services
After you complete the installation and configuration of DPS Platform, the service plugins you selected, and any engines or agents associated with the services, then you can access DPS Platform. At first login to DPS Platform, you need to set up the LDAP server, register clusters, create users, and enable the services you want to use.
Before starting setup, you should have gathered the information identified in the following sections.
Preparing for DPS Service Setup
There is some information you need to provide during set up of DPS Platform and associated services, such as the LDAP server details, your SmartSense ID, the Ambari UI URL, and so forth.
Locate the Required IP Address if Using Packaged LDAP Server (Non-Production Only)
You can either use the LDAP server that is packaged with Apache Knox, to be used for testing purposes, or you can use an actual LDAP server. You should use your own LDAP server for production environments. If you choose to use the packaged LDAP server, you need to identify and copy the IP address of the packaged LDAP server. You must have the IP address to enter in the LDAP settings when you set up DPS Platform.
![[Important]](../common/images/admon/important.png) | Important |
|---|---|
The LDAP server packaged with Knox is recommended ONLY for non-production use. |
Steps
Navigate to the Consul UI.
http://<dataplane-host>:8500
Click on the Nodes tab.
Click the node that is identified with a hexadecimal string and 0 services.
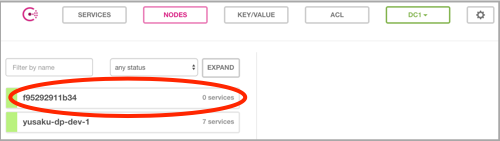
Make note of the IP address from the information panel that appears for the selected node.

Retain this IP address. You need it to complete the configuration of the packaged LDAP server that you can use for testing purposes.
Gather LDAP Server Details if Using Corporate LDAP
If you prefer to use a corporate LDAP server, you need to provide the required configuration information. You can use the table below to collect that information.
Ensure you use the correct LDAP settings. Only the LDAP URL and Bind DN (DPS Admin) user and password can be modified in DPS after LDAP properties are set. If any of the unalterable settings are incorrect, you have to destroy and reinstall the containers.
| LDAP Properties | Corporate Settings |
|---|---|
| LDAP URL | |
| User Search Base | |
| User Search Attribute | |
| Group Search Base | |
| Group Search Attribute | |
| Group Object Class | |
| Group Member Attribute Name | |
| Administrator Bind DN | |
| Administrator Password |
Gather Additional Setup Information
Collect the following information prior to configuring DPS.
| SmartSense ID | You must have a SmartSense ID to activate DPS services. Retrieve the ID from the Hortonworks Support Portal under the Tools tab. |
| Ambari URL |
You need the Ambari URL to connect DPS Platform with Ambari-managed clusters. |
| LDAP users or groups to which you will assign roles in DPS. | You must assign appropriate roles to any users or user groups that will access DPS Platform and DPS plugin services. |
Accessing DPS Platform for the First Time
The first time you log in to DPS Platform, you must configure LDAP, so you can set up users and groups in DPS. You must also register Ambari-managed clusters with DPS.
Before you can use any of the DPS services, such as DLM or DSS, you must enable the services, and then enable the clusters that have been configured for each service.
Configure LDAP for DPS
The first time you log into DPS (DataPlane) Platform, you see a Welcome page that directs you to configure the LDAP server and to add clusters to DPS Platform.
Prerequisities
If using the packaged LDAP server, ensure that you completed the task Locate the Required IP Address if Using Packaged LDAP Server.
About This Task
DPS comes with a pre-packaged "admin" user with permissions to perform initial bootstrapping actions.
Steps
In a browser, enter the FQDN of the DPS Platform host.
http://<DPS-host-FQDN>.You can also use the IP address of the DPS Platform instance, but the FQDN is recommended.
Important You must use a consistent method for accessing DPS Platform (either the FQDN, host name, or IP address) to avoid potential conflict issues with Apache Knox.
![[Tip]](../common/images/admon/tip.png)
Tip If a screen appears stating "Welcome to NGINX", the underlying services have not all started. Wait a moment and try again.
Log in as the DPS Super Admin:
Username:
adminPassword: Use the password specified during DPS install
The DPS Platform Welcome page displays, showing the two-step setup process.
Click Get Started.
The Setup Authentication page displays the LDAP Configuration settings.
Do one of the following:
Enter the settings for your own LDAP server.
Use the corporate LDAP values that you collected during the preparatory steps, the section called “Gather LDAP Server Details if Using Corporate LDAP”.
If using the LDAP server packaged with DPS, enter the following LDAP settings.
The URL you enter includes the IP address you previously located in the Consul UI.
URL ldap://<IP-from-Consul-UI>:33389 User Search Base ou=people,dc=hadoop,dc=apache,dc=org User Search Attribute uid Group Search Base ou=groups,dc=hadoop,dc=apache,dc=org Group Search Attribute cn Group Object Class groupofnames Group Member Attribute Name member Administrator Bind DN uid=admin,ou=people,dc=hadoop,dc=apache,dc=org Administrator Password admin-password
Important Ensure you enter the correct LDAP information before clicking Next. Only the LDAP URL and Bind DN (DPS Admin) user and password can be modified in DPS after LDAP properties are set. If any of the unalterable settings are incorrect, you have to destroy and reinstall the containers.
Click Next.
A success message displays on the page.
Add users or groups.
You can look up the users and groups from the LDAP server that you previously added, and add them as DPS Admin users. The DPS Admin should be used for all future logins, rather than the local admin superuser, under which you are currently logged in.
For test LDAP scenarios, you can use the predefined LDAP users listed in “Add Users and Assign Roles for Services”.
Click Save & Login.
Log in as DPS Admin, using your SSO credentials.
Any users who have been assigned the DPS Admin role can now login with their username and password.
The Welcome page displays, showing the setup actions you perform in DPS Platform.
More Information
Add Users and Assign Roles for Services
After you set up the LDAP configuration for DPS Platform, you need to add users for the services you plan to enable. During LDAP configuration, you added users and groups that can log in as DPS Admin. You must now assign roles to users and groups, which allow users to access the services that plug into DPS. Each service has a predefined role associated with it. You can select one or more roles for each user.
Prerequisites
User accounts must already exist within your corporate LDAP prior to adding the user to DPS Platform. (This does not apply to the predefined users included with the LDAP server packaged with DPS.)
About This Task
The DPS Admin role is required to perform this task.
The LDAP server packaged with Apache Knox includes several predefined users and groups. You can assign roles to any of these users from DPS Platform. Only the "admin" (super admin) user has been granted permissions, by default, to perform all actions in DPS Platform.
The predefined LDAP users are:
admin (super admin)
Password = admin-password
guest
Password = guest-password
sam
Password = sam-password
tom
Password = tom-password
The predefined LDAP groups are:
analyst: Contains users “sam” and “tom”.
scientist: Contains user “sam”.
| Tip |
|---|---|
Settings assigned to a user override the settings in any groups the user belongs to. |
Steps
On the Welcome page, click Getting Started>Users.
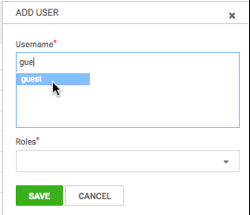
Click Add User.
Enter the name of the user.
If using your own LDAP server, the user must already exist within your corporate LDAP.
If using the packaged LDAP, enter one of the predefined users (guest, sam, tom). The name autopopulates as you type.
Tip You must click the name of the user when it displays and ensure it appears in the Username field on a dark background.

If the name appears on a white background, it means the name is not recognized and the action fails.
Select one or more of the following roles to assign to the user:
- DataPlane Admin
Can perform all actions in DPS (DataPlane) Platform, and can access and perform all actions in the UI of enabled services.
- Infra Admin
Can perform all actions in the Data Lifecycle Manage (DLM) service UI, and can manage DLM-enabled clusters in DPS Platform.
- Data Steward
Can perform all actions in the Data Steward Studio (DSS) service UI, and can manage DSS-enabled clusters in DPS Platform.
Click Save.
The new user displays in the list on the Users page.
Optional: Add groups.
Note that user-level assignments override group-level assignments.
Click the Groups tab above the list of users.
Click Add Group.
Enter the group name and select one or more roles.
The group must already exist within your corporate LDAP, if you are not using a predefined group.
Click Save.
The new group displays in the list on the Groups page.
More Information
Register Clusters with DPS
You must register clusters with DPS before you can view or manage data on the clusters.
Prerequisites
All clusters used with DPS must be managed by Ambari.
All clusters must meet the requirements identified in Planning for a DPS Installation and Configuring DPS for Secure Clusters.
Steps
On the Welcome page, click Getting Started>Clusters.
The Add Cluster page displays.
In a browser, enter the URL of the Ambari host for the cluster you want to add.
Enter the URL using the format
http://<FQDN>:<port>.You can also enter the IP address instead of the FQDN, but the FQDN is recommended.
Important DPS Platform host must be able to resolve and reach the Ambari URL, whether you are using the FQDN or the IP Address. That is, you should be able to use curl or wget to access the Ambari URL from the DPS Platform host. If this requirement is not met, cluster registration fails.
If host names are resolved from
/etc/hosts, you should explicitly register the cluster host names on the DPS container before the cluster is registered with DPS.Click Go.
Information about the cluster displays.
Select an item from the Cluster Location field.
If you start typing the name of a city or country in the field, it autocompletes the text.
In the Data Center field, enter the name of the data center associated with the cluster.
This property cannot be changed after it is set.
Optional: Add text strings in the Tags or Description fields and click Enter.
Click Add.
The Clusters page appears. The cluster you added displays in the list and as a marker on the map.
To add more clusters, click the
 (Clusters) icon and complete the form for the new
cluster.
(Clusters) icon and complete the form for the new
cluster.
More Information
Add Host Entries to the /etc/hosts File on the Container
Enable Services
You must enable, through DPS Platform, any DPS service you want to use. Before enabling a service, you must have properly installed and configured the service UI on the DPS host, as well as the management pack for the service engine or agent on each cluster.
Prerequisites
You must have a SmartSense ID available.
About This Task
The DPS Admin role is required to perform this task.
Steps
Click the
 (Services) icon in the DPS Platform navigation pane.
The Services page displays. Services listed in the table have been enabled. Services identified by a tile icon are available to be enabled.
Move the cursor over the tile for the service you want to enable and click the Enable button that appears.
A verification page displays.
Enter the SmartSense ID and click Verify.
The ID is case-sensitive.
You can retrieve the SmartSense ID from the Hortonworks Support Portal under the Tools tab.
Click Next.
The enabled service displays in the Enabled list on the Services page.
Enable Clusters for a Service
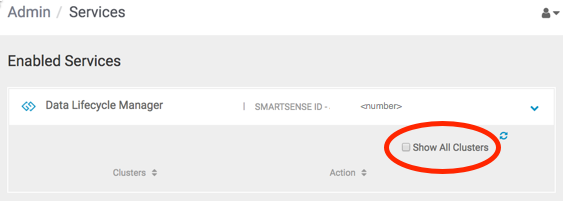
Each DPS service has specific configuration requirements that a cluster must meet before it can be used with the service. When you enable a service, a check is run to determine if the required service engine, such as DLM Engine, has been installed on any clusters. If the engine is installed but some configuration is still required, the cluster displays on the Services page with the action button Enable. If the cluster meets all requirements for the service it is automatically enabled, and the enabled cluster can only be viewed on the Services page by selecting the Show All Clusters action for the service.
Prerequisites
Clusters must be managed by Apache Ambari and registered with DPS Platform.
Before you can enable a cluster for a specific service, you must have enabled that service in DPS Platform.
About This Task
The DPS Admin role is required to perform this task.
Data Lifecycle Manager requires a minimum of two enabled clusters to perform replication jobs.
Steps
Click the
(Services) icon in the DPS Platform navigation pane.The Services page displays. Services listed in the table have been enabled. Services identified by a tile icon are available to be enabled.
Click on the row for a service.
A list displays of any clusters that have the required service engine installed but have not yet been configured for use with the service.
If no clusters display for the service, verify that the clusters you expect to see have been registered with DPS Platform, and that the proper service engine has been installed on the clusters.
Click Enable for the clusters you want to use with the service.
A check is run to determine what configuration is required on the cluster for the service you selected. For example, a required service such as Apache Ranger might have been installed on the clusters, but has not been enabled in Apache Ambari.
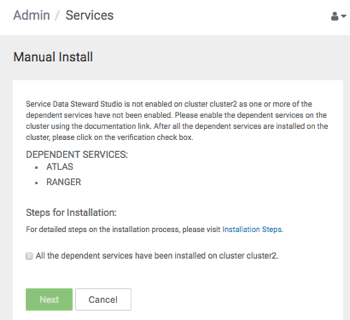
The Manual Install page displays, indicating what you need to configure on the cluster to make the cluster usable by the service.
Perform the actions stated on the Manual Install page.
The required actions often involve enabling a service from Ambari. For example:
When you complete the required actions, go to step 4.
On the Manual Install page, select the item "All the dependent services have been installed..." and click Next.
Another configuration check is run and if all requirements are met, a verification message displays, indicating that the cluster meets requirements for the service.
Click the name of the service for which you enabled the cluster, then enable Show All Clusters.
The new cluster displays in the list on the Clusters page.
Navigating Between Services
You can access any service for which you have been assigned the proper role. The DPS Admin has access to all DPS services.
Prerequisites
The DPS Admin must have assigned you the required role for any service you want to access.
Steps
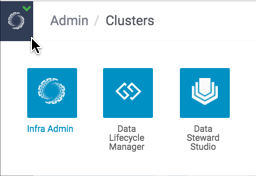
Click the
 (Service Navigation) icon in the upper left corner of any
page in DPS Platform.
(Service Navigation) icon in the upper left corner of any
page in DPS Platform.Click the tile for the service you want.
If the service you want to access is not displayed, either the service is not enabled or you have not been assigned the role required to access the service. The DPS Admin can enable services and assign roles.