Configuring Wire Encryption
Also available as:
PDF
loading table of contents...

Configure the Ranger HDFS Plugin for SSL

How to configure the Ranger HDFS Plugin for SSL, when setting up Ambari Ranger SSL using self-signed certificates. The following steps show how to configure the Ranger HDFS plugin for SSL. You can use the same procedure for other Ranger components.

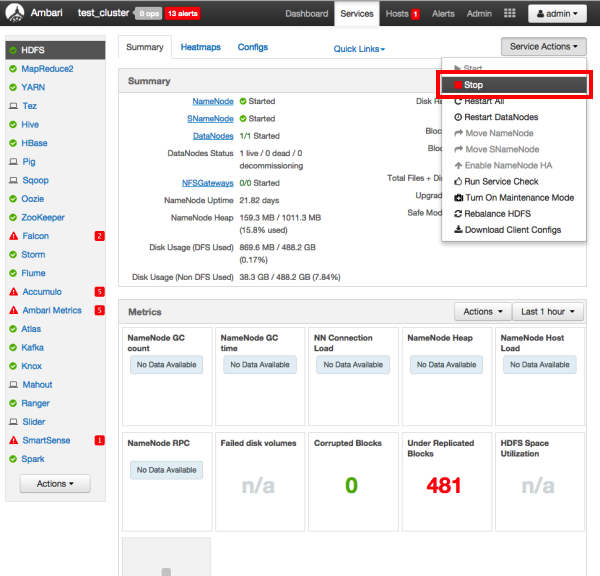
  1. Stop HDFS by selecting Service Actions > Stop.
  2. Change to the Ranger HDFS plugin directory and create a self-signed certificate.
    cd /etc/hadoop/conf
    keytool -genkey -keyalg RSA -alias rangerHdfsAgent -keystore ranger-plugin-keystore.jks -storepass myKeyFilePassword -validity 360 -keysize 2048
    chown hdfs:hdfs ranger-plugin-keystore.jks
    chmod 400 ranger-plugin-keystore.jks
  3. When prompted, provide an identifiable string as the value for the "What is your first and last name?" question. then provide answers to the subsequent questions to create the keystore. When prompted for a password, press the Enter key.
    Note
    Note

    Important note: In the case where multiple servers talking to ranger admin for downloading policies for the same service/repository (e.g. HBase Master and Region servers, multiple NameNodes or Hive servers in an HA environment, be sure to use the repo name or a common string across all of the nodes (such as HbasePlugin, HdfsPlugin etc). (Note this and enter the same value in Common Name For Certificate field in the edit repository page in the Policy Manager UI).

  4. Create a truststore for the agent and add the Admin public key as a trusted entry. When prompted for a password, press the Enter key.
    cd /etc/hadoop/conf
    keytool -export -keystore /etc/ranger/admin/conf/ranger-admin-keystore.jks -alias rangeradmin -file ranger-admin-trust.cer
    keytool -import -file ranger-admin-trust.cer -alias rangeradmintrust -keystore ranger-plugin-truststore.jks -storepass changeit
    chown hdfs:hdfs ranger-plugin-truststore.jks
    chmod 400 ranger-plugin-truststore.jks
  5. Under Ranger Settings, provide the value in the External URL box in the format https://<hostname of policy manager>:<https port>.
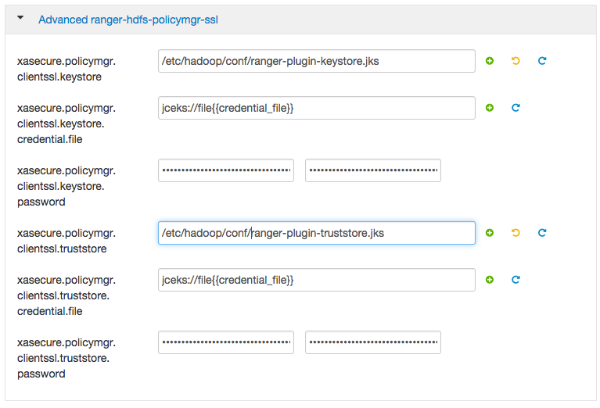
  6. Select Advanced ranger-hdfs-policymgr-ssl and set the following properties:
    • xasecure.policymgr.clientssl.keystore -- Enter the location of the keystore created in the previous step.
    • xasecure.policymgr.clientssl.keystore.password -- Enter the keystore password.
    • xasecure.policymgr.clientssl.truststore -- Enter the location of the truststore created in the previous step.
    • xasecure.policymgr.clientssl.truststore.password -- Enter the truststore password.
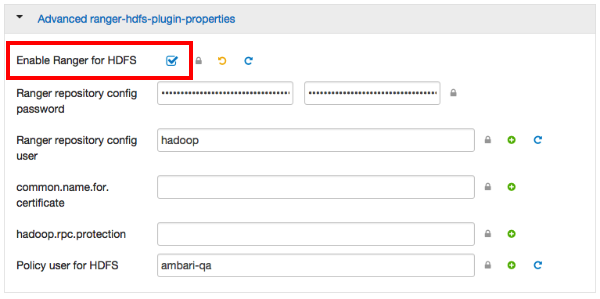
  7. Select Advanced ranger-hdfs-plugin-properties, then select the Enable Ranger for HDFS check box.
  8. Click Save.
  9. Start HDFS by selecting Service Actions > Start.
  10. Stop Ranger Admin by selecting Service Actions > Stop.
  11. Add the agent's self-signed cert to the Admin's trustedCACerts.
    cd /etc/ranger/admin/conf
    keytool -export -keystore /etc/hadoop/conf/ranger-plugin-keystore.jks -alias rangerHdfsAgent -file ranger-hdfsAgent-trust.cer -storepass myKeyFilePassword
    keytool -import -file ranger-hdfsAgent-trust.cer -alias rangerHdfsAgentTrust -keystore <Truststore file used by Ranger Admin - can be the JDK cacerts> -storepass changeit
  12. Restart Ranger Admin.
  13. Log into the Ranger Policy Manager UI as the admin user. Click the Edit button of your repository (in this case, hadoopdev) and provide the CN name of the keystore as the value for Common Name For Certificate, then save your changes.
  14. Start the HDFS service.
  15. In the Policy Manager UI, select Audit > Plugins.
    You should see an entry for your repo name with HTTP Response Code 200.