Installing Cloudera Data Science Workbench 1.8.1 Using Cloudera Manager
Use the following steps to install Cloudera Data Science Workbench using Cloudera Manager.
Prerequisites
Before you begin installing Cloudera Data Science Workbench, make sure you have completed the steps to secure your hosts, set up DNS subdomains, and configure block devices.
Configure Apache Spark 2
Depending on the platform you are using, use one of the following sections to configure Apache Spark 2.
CDH 5
-
Install and configure the CDS 2.x Powered by Apache Spark parcel and CSD. For instructions, see Installing CDS 2.x Powered by Apache Spark.
-
To be able to use Spark 2, each user must have their own /home directory in HDFS. If you sign in to Hue first, these directories will automatically be created for you. Alternatively, you can have cluster administrators create these directories.
hdfs dfs -mkdir /user/<username>
hdfs dfs -chown <username>:<username> /user/<username>
If you are using CDS 2.3 release 2 (or higher), review the associated known issues here: CDS Powered By Apache Spark.
-
Use Cloudera Manager to create add gateway hosts to your CDH cluster.
-
Create a new host template that includes gateway roles for HDFS, YARN, and Spark 2.
(Required for CDH 6 and CDP Data Center) If you want to run workloads on dataframe-based tables, such as tables from PySpark, sparklyr, SparkSQL, or Scala, you must also add the Hive gateway role to the template.
- Use the instructions at Adding a Host to the Cluster to add gateway hosts to the cluster. Apply the template created in the previous step to these gateway hosts. If your cluster is kerberized, confirm that the krb5.conf file on your gateway hosts is correct.
-
-
Test Spark 2 integration on the gateway hosts.
- SSH to a gateway host.
- If your cluster is kerberized, run kinit to authenticate to the CDH cluster’s Kerberos Key Distribution Center. The Kerberos ticket you create is not visible to Cloudera Data Science Workbench users.
-
Submit a test job to Spark by executing the following command:
CDH 5
spark2-submit --class org.apache.spark.examples.SparkPi --master yarn \
--deploy-mode client /opt/cloudera/parcels/SPARK2/lib/spark2/examples/jars/spark-example*.jar 100
To view a sample command, click Showspark2-submit --class org.apache.spark.examples.SparkPi --master yarn \ --deploy-mode client /opt/cloudera/parcels/SPARK2/lib/spark2/examples/jars/spark-examples*.jar 100
CDH 6 and CDP Data Center 7
spark-submit --class org.apache.spark.examples.SparkPi --master yarn \
--deploy-mode client SPARK_HOME/lib/spark-examples*.jar 100
To view a sample command, click Showspark-submit --class org.apache.spark.examples.SparkPi --master yarn \ --deploy-mode client /opt/cloudera/parcels/CDH/lib/spark/examples/jars/spark-examples*.jar 100
-
View the status of the job in the CLI output or in the Spark web UI to confirm that the host you want to use for the Cloudera Data Science Workbench master functions properly as a Spark gateway.
To view sample CLI output, click Show19/02/15 09:37:39 INFO spark.SparkContext: Running Spark version 2.4.0-cdh6.1.0 19/02/15 09:37:39 INFO spark.SparkContext: Submitted application: Spark Pi ... 19/02/15 09:37:40 INFO util.Utils: Successfully started service 'sparkDriver' on port 37050. ... 19/02/15 09:38:06 INFO scheduler.DAGScheduler: Job 0 finished: reduce at SparkPi.scala:38, took 18.659033 s
CDH 6 or CDP Data Center 7
-
To be able to use Spark 2, each user must have their own /home directory in HDFS. If you sign in to Hue first, these directories will automatically be created for you. Alternatively, you can have cluster administrators create these directories.
hdfs dfs -mkdir /user/<username>
hdfs dfs -chown <username>:<username> /user/<username>
-
Use Cloudera Manager to create add gateway hosts to your CDH cluster.
-
Create a new host template that includes gateway roles for HDFS, YARN, and Spark 2.
If you want to run workloads on dataframe-based tables, such as tables from PySpark, sparklyr, SparkSQL, or Scala, you must also add the Hive gateway role to the template.
- Use the instructions at Adding a Host to the Cluster to add gateway hosts to the cluster. Apply the template created in the previous step to these gateway hosts. If your cluster is kerberized, confirm that the krb5.conf file on your gateway hosts is correct.
-
-
Test Spark 2 integration on the gateway hosts.
- SSH to a gateway host.
- If your cluster is kerberized, run kinit to authenticate to the CDH cluster’s Kerberos Key Distribution Center. The Kerberos ticket you create is not visible to Cloudera Data Science Workbench users.
-
Submit a test job to Spark by executing the following command:
spark-submit --class org.apache.spark.examples.SparkPi --master yarn \
--deploy-mode client SPARK_HOME/lib/spark-examples*.jar 100
To view a sample command, click Showspark-submit --class org.apache.spark.examples.SparkPi --master yarn \ --deploy-mode client /opt/cloudera/parcels/CDH/lib/spark/examples/jars/spark-examples*.jar 100
-
View the status of the job in the CLI output or in the Spark web UI to confirm that the host you want to use for the Cloudera Data Science Workbench master functions properly as a Spark gateway.
To view sample CLI output, click Show19/02/15 09:37:39 INFO spark.SparkContext: Running Spark version 2.4.0-cdh6.1.0 19/02/15 09:37:39 INFO spark.SparkContext: Submitted application: Spark Pi ... 19/02/15 09:37:40 INFO util.Utils: Successfully started service 'sparkDriver' on port 37050. ... 19/02/15 09:38:06 INFO scheduler.DAGScheduler: Job 0 finished: reduce at SparkPi.scala:38, took 18.659033 s
Configure JAVA_HOME
On CSD-based deployments, Cloudera Manager automatically detects the path and version of Java installed on Cloudera Data Science Workbench gateway hosts. You do not need to explicitly set the value for JAVA_HOME unless you want to use a custom location, use JRE, or (in the case of Spark 2) force Cloudera Manager to use JDK 1.8 as explained below.
Setting a value for JAVA_HOME - The value for JAVA_HOME depends on whether you are using JDK or JRE. For example, if you're using JDK 1.8_162, set JAVA_HOME to /usr/java/jdk1.8.0_162. If you are only using JRE, set it to /usr/java/jdk1.8.0_162/jre.
Issues with Spark 2.2 and higher - Spark 2.2 (and higher) requires JDK 1.8. However, if a host has both JDK 1.7 and JDK 1.8 installed, Cloudera Manager might choose to use JDK 1.7 over JDK 1.8. If you are using Spark 2.2 (or higher), this will create a problem during the first run of the service because Spark will not work with JDK 1.7. To work around this, explicitly configure Cloudera Manager to use JDK 1.8 on the gateway hosts that are running Cloudera Data Science Workbench.
For instructions on how to set JAVA_HOME, see Configuring a Custom Java Home Location in Cloudera Manager.
To upgrade the whole CDH cluster to JDK 1.8, see Upgrading to JDK 1.8.
Download and Install the Cloudera Data Science Workbench CSD
-
Download the Cloudera Data Science Workbench CSD. Make sure you download the CSD that corresponds to the version of CDH or Cloudera Runtime you are using.
-
CDP Data Center
https://archive.cloudera.com/p/cdsw1/1.8.0/csd/CLOUDERA_DATA_SCIENCE_WORKBENCH-CDPDC-1.8.0.jarOR
-
CDH 6
https://archive.cloudera.com/p/cdsw1/1.8.0/csd/CLOUDERA_DATA_SCIENCE_WORKBENCH-CDH6-1.8.0.jarOR
-
CDH 5
https://archive.cloudera.com/p/cdsw1/1.8.0/csd/CLOUDERA_DATA_SCIENCE_WORKBENCH-CDH5-1.8.0.jar
-
- Log on to the Cloudera Manager Server host, and place the CSD file under /opt/cloudera/csd, which is the default location for CSD files. To configure a custom location for CSD files, refer to the Cloudera Manager documentation at Configuring the Location of Custom Service Descriptor Files.
- Set the file ownership to cloudera-scm:cloudera-scm with permission 644.
Set the file ownership.
CDHchown cloudera-scm:cloudera-scm CLOUDERA_DATA_SCIENCE_WORKBENCH-CDH<X>-1.8.<Y>.jarCDP Data Centerchown cloudera-scm:cloudera-scm CLOUDERA_DATA_SCIENCE_WORKBENCH-CDPDC-1.8.<Y>.jar -
Set the file permissions.
CDHchmod 644 CLOUDERA_DATA_SCIENCE_WORKBENCH-CDH<X>-1.8.<Y>.jarCDP Data Centerchmod 644 CLOUDERA_DATA_SCIENCE_WORKBENCH-CDPDC-1.8.<Y>.jar - Restart the Cloudera Manager Server:
service cloudera-scm-server restart - Log into the Cloudera Manager Admin Console and restart the Cloudera Management Service:
- Select .
- Select .
Install the Cloudera Data Science Workbench Parcel
- Log into the Cloudera Manager Admin Console.
- Click in the main navigation bar.
-
Add the remote parcel repository URL to Cloudera Manager. For detailed steps, click Show Me How
- On the Parcels page, click Configuration.
- In the Remote Parcel Repository URLs list, click the addition symbol to open an additional row.
- Enter the path to the repository. Cloudera Data Science Workbench publishes placeholder parcels for other
operating systems as well. However, note that these do not work and have only been included to support mixed-OS clusters.
Version Remote Parcel Repository URL Cloudera Data Science Workbench 1.8.0 https://archive.cloudera.com/p/cdsw1/1.8.0/parcels/ - Click Save Changes.
- Go to the page. The external parcel should now appear in the set of parcels available for download.
- Click Download. Once the download is complete, click Distribute to distribute the parcel to all the CDH hosts in your cluster. Then click Activate. For more detailed information on each of these tasks, see Managing Parcels.
Add the Cloudera Data Science Workbench Service
Perform the following steps to add the Cloudera Data Science Workbench service to your cluster:
- Log into the Cloudera Manager Admin Console.
- On the tab, click
 to the right of the cluster name and select Add a Service to launch the wizard. A list of services
will be displayed.
to the right of the cluster name and select Add a Service to launch the wizard. A list of services
will be displayed. - Select the Cloudera Data Science Workbench service and click Continue.
- Select the services which the new CDSW service should depend on. At a minimum, the HDFS, Spark 2, and YARN services are required for the CDSW service to run successfully. Click
Continue.
(Required for CDH 6) If you want to run SparkSQL workloads, you must also add the Hive service as a dependency.
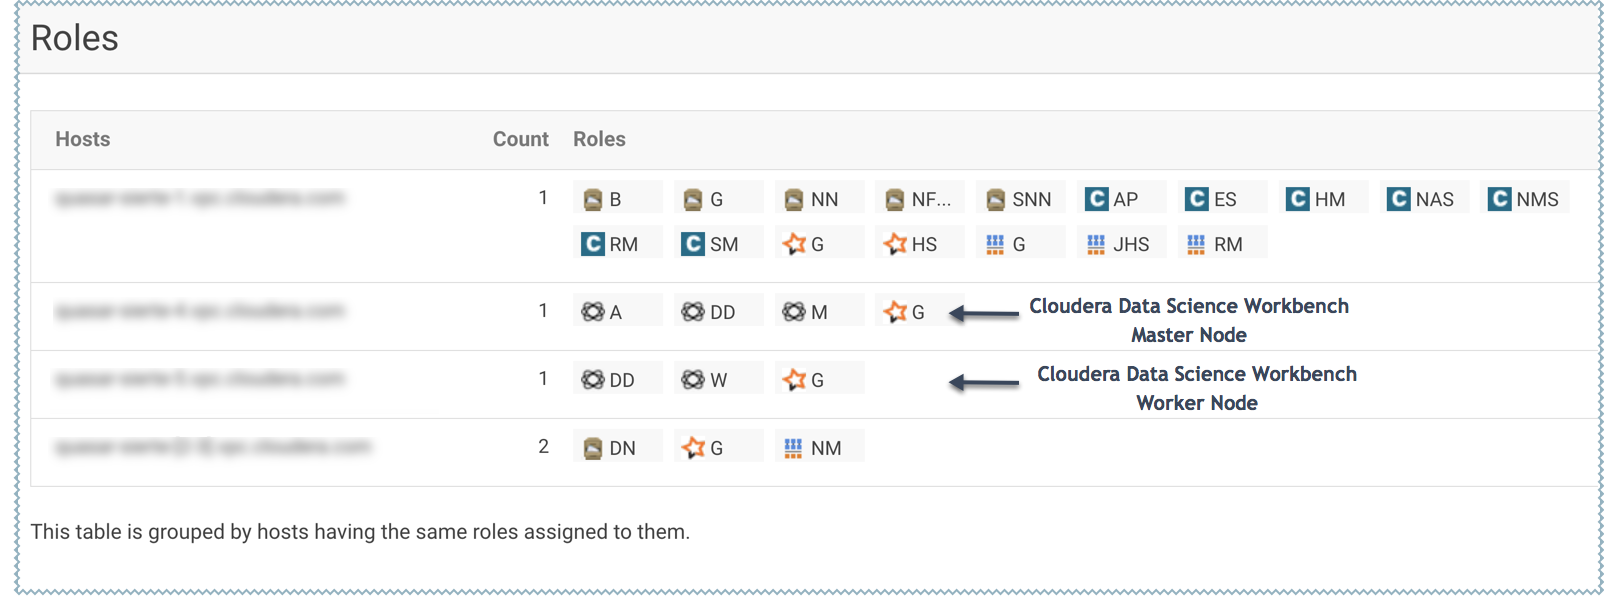
- Assign the Cloudera Data Science Workbench roles, HDFS, Spark 2, and YARN, to gateway hosts.
- Master
- Assign the Master role to a gateway host that is the designated Master host. This is the host that should have the Application Block Device mounted to it.
- Worker
-
Assign the Worker role to any other gateway hosts that will be used for Cloudera Data Science Workbench. Note that Worker hosts are not required for a fully-functional Cloudera Data Science Workbench deployment. For proof-of-concept deployments, you can deploy a 1-host cluster with just a Master host. The Master host can run user workloads just as a worker host can.
Even if you are setting up a multi-host deployment, do not assign the Master and Worker roles to the same host. By default, the Master host doubles up to perform both functions: those of the Master, outlined here, and those of a worker.
- Docker Daemon
-
This role runs underlying Docker processes on all Cloudera Data Science Workbench hosts. The Docker Daemon role must be assigned to every Cloudera Data Science Workbench gateway host.
On First Run, Cloudera Manager will automatically assign this role to each Cloudera Data Science Workbench gateway host. However, if any more hosts are added or reassigned to Cloudera Data Science Workbench, you must explicitly assign the Docker Daemon role to them.
- Application
-
This role runs the Cloudera Data Science Workbench application. This role runs only on the CDSW Master host.
On First Run, Cloudera Manager will assign the Application role to the host running the Cloudera Data Science Workbench Master role. The Application role is always assigned to the same host as the Master. Consequently, this role must never be assigned to a Worker host.
- Configure the following parameters and click Continue.
Properties Description Cloudera Data Science Workbench Domain
DNS domain configured to point to the master host.
If the previously configured DNS subdomain entries are cdsw.<your_domain>.com and *.cdsw.<your_domain>.com, then this parameter should be set to cdsw.<your_domain>.com.
Users' browsers contact the Cloudera Data Science Workbench web application at http://cdsw.<your_domain>.com.
This domain for DNS only and is unrelated to Kerberos or LDAP domains.
Master Node IPv4 Address
IPv4 address for the master host that is reachable from the worker host. By default, this field is left blank and Cloudera Manager uses the IPv4 address of the Master host.
Within an AWS VPC, set this parameter to the internal IP address of the master host; for instance, if your hostname is ip-10-251-50-12.ec2.internal, set this property to the corresponding IP address, 10.251.50.12.
Install Required Packages
When this parameter is enabled, the Prepare Node command will install all the required package dependencies on First Run. If you choose to disable this property, you must manually install the following packages on all gateway hosts running Cloudera Data Science Workbench roles:nfs-utils libseccomp lvm2 bridge-utils libtool-ltdl iptables rsync policycoreutils-python selinux-policy-base selinux-policy-targeted ntp ebtables bind-utils nmap-ncat openssl e2fsprogs redhat-lsb-core conntrack-tools socatDocker Block Device
Block device(s) for Docker images. Use the full path to specify the image(s), for instance, /dev/xvde.
The Cloudera Data Science Workbench installer will format and mount Docker on each gateway host that is assigned the Docker Daemon role. Do not mount these block devices prior to installation.
- The wizard will now begin a First Run of the Cloudera Data Science Workbench service. This includes deploying client configuration for HDFS, YARN and Spark 2, installing the package dependencies on all hosts, and formatting the Docker block device. The wizard will also assign the Application role to the host running Master and the Docker Daemon role to all the gateway hosts running Cloudera Data Science Workbench.
- Once the First Run command has completed successfully, click Finish to go back to the Cloudera Manager home page.
Create the Administrator Account
After your installation is complete, set up the initial administrator account. Go to the Cloudera Data Science Workbench web application at http://cdsw.<your_domain>.com.
You must access Cloudera Data Science Workbench from the Cloudera Data Science Workbench Domain configured when setting up the service, and not the hostname of the master host. Visiting the hostname of the master host will result in a 404 error.
The first account that you create becomes the site administrator. You may now use this account to create a new project and start using the workbench to run data science workloads. For a brief example, see Getting Started with the Cloudera Data Science Workbench.
Next Steps
You can also start using the product by configuring your personal account and creating a new project. For a quickstart that walks you through creating and running a simple template project, see Getting Started with Cloudera Data Science Workbench. For more details on collaborating with teams, working on projects, and sharing results, see the Managing Cloudera Data Science Workbench Users.
