HDFS Replication
Minimum Required Role: BDR Administrator (also provided by Full Administrator)
HDFS replication enables you to copy (replicate) your HDFS data from one HDFS service to another, synchronizing the data set on the destination service with the data set on the source service, based on a specified replication schedule. You can also replicate HDFS data to and from Amazon S3. The destination service must be managed by the Cloudera Manager Server where the replication is being set up, and the source service can be managed by that same server or by a peer Cloudera Manager Server. You can also replicate HDFS data within a cluster by specifying different source and destination directories.
Remote BDR Replication automatically copies HDFS metadata to the destination cluster as it copies files. HDFS metadata need only be backed up locally. For information about how to backup HDFS metadata locally, see Backing Up and Restoring NameNode Metadata.
Source Data
While a replication runs, ensure that the source directory is not modified. A file added during replication does not get replicated. If you delete a file during replication, the replication fails.
Additionally, ensure that all files in the directory are closed. Replication fails if source files are open. If you cannot ensure that all source files are closed, you can configure the replication to continue despite errors. Uncheck the Abort on Error option for the HDFS replication. For more information, see Configuring Replication of HDFS Data
After the replication completes, you can view the log for the replication to identify opened files. Ensure these files are closed before the next replication occurs.
Network Latency and Replication
High latency among clusters can cause replication jobs to run more slowly, but does not cause them to fail. For best performance, latency between the source cluster NameNode and the destination cluster NameNode should be less than 80 milliseconds. (You can test latency using the Linux ping command.) Cloudera has successfully tested replications with latency of up to 360 milliseconds. As latency increases, replication performance degrades.
Performance and Scalability Limitations
- Maximum number of files for a single replication job: 100 million.
- Maximum number of files for a replication schedule that runs more frequently than once in 8 hours: 10 million.
- The throughput of the replication job depends on the absolute read and write throughput of the source and destination clusters.
- Regular rebalancing of your HDFS clusters is required for efficient operation of replications. See HDFS Balancers.
Configuring Replication of HDFS Data
- Verify that your cluster conforms to one of the Supported Replication Scenarios.
- If you are using different Kerberos principals for the source and destination clusters, add the destination principal as a proxy user on the source cluster. For example, if you are using the hdfssrc principal on the source cluster and the hdfsdest principal on the
destination cluster, add the following properties to the HDFS service Cluster-wide Advanced Configuration Snippet (Safety Valve) for core-site.xml property on the
source cluster:
<property>
    <name>hadoop.proxyuser.hdfsdest.groups</name>
    <value>*</value>
</property>
<property>
    <name>hadoop.proxyuser.hdfsdest.hosts</name>
    <value>*</value>
</property>
Deploy the client configuration and restart all services on the source cluster.
- If the source cluster is managed by a different Cloudera Manager server than the destination cluster, configure a peer relationship. If the source or destination is Amazon S3, you must configure AWS credentials.
- Do one of the following:
- Select
- Click .
or
- Select .
- Select .
- Click .
The Create HDFS Replication dialog box displays, and opens displaying the General tab. Click the Peer or AWS Credentials link if your replication job requires them and you need to create these entities.
- Select the General tab to configure the following:
- Click the Source field and select the source HDFS service. You can select HDFS services managed by a peer Cloudera Manager Server, local HDFS services (managed by the Cloudera Manager Server for the Admin Console you are logged into), or you can select AWS Credentials.
- Enter the Source Path to the directory (or file) you want to replicate. For replication to Amazon S3, enter the path using the following form:
s3a://bucket name/path
- Click the Destination field and select the destination HDFS service from the HDFS services managed by the Cloudera Manager Server for the Admin Console you are logged into, or select AWS Credentials.
- Enter the Destination Path where the source files should be saved. For replication to Amazon S3, enter the path using the following form:
s3a://bucket name/path
- Select a Schedule:
- Immediate - Run the schedule Immediately.
- Once - Run the schedule one time in the future. Set the date and time.
- Recurring - Run the schedule periodically in the future. Set the date, time, and interval between runs.
- Enter the user to run the replication job in the Run As Username field. By default this is hdfs. If you want to run the job as a different user, enter the user name here. If you are using Kerberos, you must provide a user name here, and it must be
one with an ID greater than 1000. (You can also configure the minimum user ID number with the min.user.id property in the YARN or MapReduce service.) Verify that the
user running the job has a home directory, /user/username, owned by username:supergroup in HDFS. This user must have permissions to read from the source directory and write to the destination directory.
Note the following:
- The User must not be present in the list of banned users specified with the Banned System Users property in the YARN configuration (Go to the YARN service, select Configuration tab and search for the property). For security purposes, the hdfs user is banned by default from running YARN containers.
- The requirement for a user ID that is greater than 1000 can be overridden by adding the user to the "white list" of users that is specified with the Allowed System Users property. (Go to the YARN service, select Configuration tab and search for the property.)
- Select the Resources tab to configure the following:
- Scheduler Pool – (Optional) Enter the name of a resource pool in the field. The value you enter is used by the MapReduce
Service you specified when Cloudera Manager executes the MapReduce job for the replication. The job specifies the value using one of these properties:
- MapReduce – Fair scheduler: mapred.fairscheduler.pool
- MapReduce – Capacity scheduler: queue.name
- YARN – mapreduce.job.queuename
- Maximum Map Slots - Limits for the number of map slots per mapper. The default value is 20.
- Maximum Bandwidth - Limits for the bandwidth per mapper. The default is 100 MB.
- Replication Strategy - Whether file replication tasks should be distributed among the mappers statically or dynamically. (The default is Dynamic.) Static replication distributes file replication tasks among the mappers up front to achieve a uniform distribution based on the file sizes. Dynamic replication distributes file replication tasks in small sets to the mappers, and as each mapper completes its tasks, it dynamically acquires and processes the next unallocated set of tasks. There are additional tuning options you can use to improve performance when using the Dynamic strategy. See HDFS Replication Tuning.
- Scheduler Pool – (Optional) Enter the name of a resource pool in the field. The value you enter is used by the MapReduce
Service you specified when Cloudera Manager executes the MapReduce job for the replication. The job specifies the value using one of these properties:
- Select the Advanced Options tab, to configure the following:
- Add Exclusion click the link to exclude one or more paths from the replication.
The Regular Expression-Based Path Exclusion field displays, where you can enter a regular expression-based path.
Click
 to add additional regular expressions.
 - MapReduce Service - The MapReduce or YARN service to use.
- Log path - An alternate path for the logs.
- Error Handling You can select the following:
- Abort on Error - Whether to abort the job on an error. If selected, files copied up to that point remain on the destination, but no additional files are copied. Abort on Error is off by default.
- Skip Checksum Checks - Whether to skip checksum checks on the copied files. If checked, checksums are not validated. Checksums are checked by default.
- Preserve - Whether to preserve the block size, replication count, permissions (including ACLs), and extended
attributes (XAttrs) as they exist on the source file system, or to use the settings as configured on the destination file system. By default source system settings are preserved. When Permission is checked, and both the source and destination clusters support ACLs, replication preserves ACLs. Otherwise, ACLs are not replicated. When Extended attributes is checked, and both the source and destination clusters support extended attributes, replication preserves them. (This option only displays when both source
and destination clusters support extended attributes.)
If you select one or more of the Preserve options and you are replicating to Amazon S3, the values all of these items are saved in meta data files on S3. When you replicate from Amazon S3 to HDFS, you can select which of these options you want to preserve.
See Replication of Encrypted Data and HDFS Transparent Encryption.
- Delete Policy - Whether files that were deleted on the source should also be deleted from the destination
directory. This policy also determines the handling of files in the destination location that are unrelated to the source. Options include:
- Keep Deleted Files - Retains the destination files even when they no longer exist at the source. (This is the default.).
- Delete to Trash - If the HDFS trash is enabled, files are moved to the trash folder. (Not supported when replicating to Amazon S3.)
- Delete Permanently - Uses the least amount of space; use with caution.
- Alerts - Whether to generate alerts for various state changes in the replication workflow. You can alert on failure, on start, on success, or when the replication workflow is aborted.
- Add Exclusion click the link to exclude one or more paths from the replication.
- Click Save Schedule.
The replication task now appears as a row in the Replications Schedule table. (It can take up to 15 seconds for the task to appear.)
If you selected Immediate in the Schedule field, the replication job begins running when you click Save Schedule.
To specify additional replication tasks, select .
Limiting Replication to Specific DataNodes
If your cluster has clients installed on hosts with limited resources, HDFS replication may use these hosts to run commands for the replication, which can cause performance degradation. You can limit HDFS replication to run only on selected DataNodes by specifying a "whitelist" of DataNode hosts.
- Click .
- Type HDFS Replication in the search box.
- Locate the HDFS Replication Environment Advanced Configuration Snippet (Safety Valve) property.
- Add the HOST_WHITELIST property. Enter a comma-separated list of DataNode hostnames to use for HDFS replication. For example:
HOST_WHITELIST=host-1.mycompany.com,host-2.mycompany.com
- Click Save Changes to commit the changes.
Viewing Replication Schedules
The Replications Schedules page displays a row of information about each scheduled replication job. Each row also displays recent messages regarding the last time the Replication job ran.
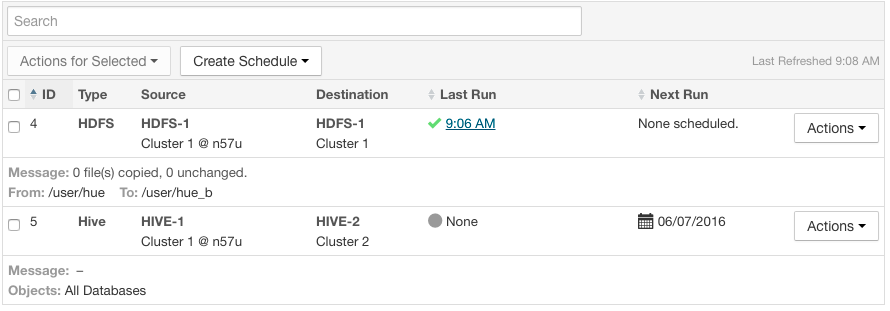
Only one job corresponding to a replication schedule can occur at a time; if another job associated with that same replication schedule starts before the previous one has finished, the second one is canceled.
You can limit the replication jobs that are displayed by selecting filters on the left. If you do not see an expected schedule, adjust or clear the filters. Use the search box to search the list of schedules for path, database, or table names.
| Column | Description |
|---|---|
| ID | An internally generated ID number that identifies the schedule. Provides a convenient way to identify a schedule.
Click the ID column label to sort the replication schedule table by ID. |
| Type | The type of replication scheduled, either HDFS or Hive. |
| Source | The source cluster for the replication. |
| Destination | The destination cluster for the replication. |
| Objects | Displays on the bottom line of each row, depending on the type of replication:
For example: 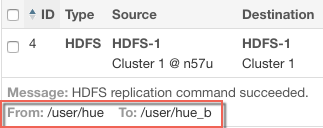 |
| Last Run | The date and time when the replication last ran. Displays None if the scheduled
replication has not yet been run. Click the date and time link to view the Replication History page for the replication.
Displays one of the following icons:
Click the Last Run column label to sort the Replication Schedules table by the last run date. |
| Next Run | The date and time when the next replication is scheduled, based on the schedule parameters specified for the schedule.
Hover over the date to view additional details about the scheduled replication.
Click the Next Run column label to sort the Replication Schedules table by the next run date. |
| Actions | The following items are available from the Action button:
|
 - Successful. Displays the date and time of the last run replication.
 - Failed. Displays the date and time of a failed replication.
 - None. This scheduled replication has not yet run.
- While a job is in progress, the Last Run column displays a spinner and progress bar, and each stage of the replication task is indicated in the message beneath the job's row. Click the Command Details link to view details about the execution of the command.
- If the job is successful, the number of files copied is indicated. If there have been no changes to a file at the source since the previous job, then that file is not copied. As a result, after the initial job, only a subset of the files may actually be copied, and this is indicated in the success message.
- If the job fails, the
 icon displays.
 - To view more information about a completed job, select . See Viewing Replication History.
Enabling, Disabling, or Deleting A Replication Schedule
When you create a new replication schedule, it is automatically enabled. If you disable a replication schedule, it can be re-enabled at a later time.
- Click in the row for a replication schedule.
- Select one or more replication schedules in the table by clicking the check box the in the left column of the table.
- Click .
Viewing Replication History
You can view historical details about replication jobs on the Replication History page.
To view the history of a replication job:
- Select to go to the Replication Schedules page.
- Locate the row for the job.
- Click .

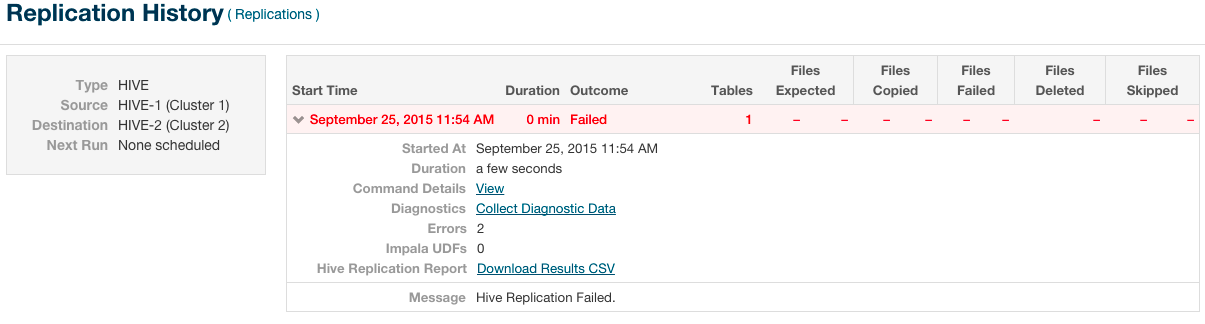
The Replication History page displays a table of previously run replication jobs with the following columns:
| Column | Description |
|---|---|
| Start Time | Time when the replication job started.
Click
|
| Duration | Amount of time the replication job took to complete. |
| Outcome | Indicates success or failure of the replication job. |
| Files Expected | Number of files expected to be copied, based on the parameters of the replication schedule. |
| Files Copied | Number of files actually copied during the replication. |
| Tables | (Hive only) Number of tables replicated. |
| Files Failed | Number of files that failed to be copied during the replication. |
| Files Deleted | Number of files that were deleted during the replication. |
| Files Skipped | Number of files skipped during the replication. The replication process skips files that already exist in the destination and have not changed. |
HDFS Replication To and From Amazon S3
You can use Cloudera Manager to replicate HDFS data to and from Amazon S3, however you cannot replicate data from one Amazon S3 instance to another using Cloudera Manager. You must have the appropriate credentials to access the Amazon S3 account and you must create buckets in Amazon S3 to store the replicated files.
When you replicate data to cloud storage with BDR, BDR backs up file metadata, including extended attributes and ACLs.
- Create AWS Credentials. See How to Configure AWS Credentials
- Create an HDFS Replication Schedule. See HDFS Replication.
