How To Renew and Redistribute Certificates
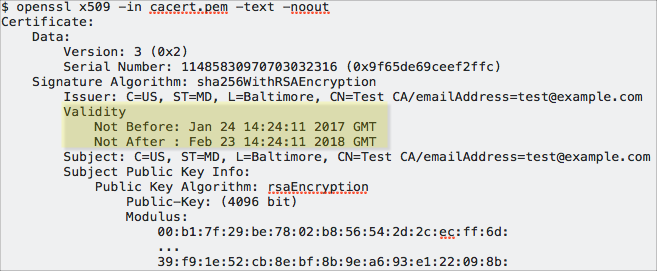
Certificates installed throughout TLS/SSL-configured clusters have a defined lifetime. That lifetime begins on a certain date and ends on another date, typically a year or two later as specified in the certificate's validity attribute. For example, the following certificate is valid between January 24, 2017 and February 23, 2018 only:
If any certificates used for TLS/SSL in the Cloudera cluster expire, the cluster can fail completely or can exhibit various issues related to connectivity between components. For example, an expired server certificate on the Cloudera Manager Server host will be rejected by the Cloudera Manager Agent host and prevent the cluster node from launching.
Obtaining certificates with new expiration dates takes just as much time as it did to obtain them in the first place. This guide steps you through the process.
Assumptions and Requirements
| Example | Description |
|---|---|
| /opt/cloudera/security | Base path for security-related files. |
| /opt/cloudera/security/pki | Path for all security artifacts associated with TLS/SSL, including keys, keystores (keystore.jks), CSR, and root- and intermediate-CA certificates. |
| /usr/java/jdk1.7.0_67-cloudera/jre/lib/security/jssecacerts | Path to the default alternative Java truststore on a Cloudera Manager Server host system. |
This guide assumes that the Cloudera Manager Server host uses the jssecacerts truststore and includes all CA certs from cacerts and any intermediate CA certificates needed to enable successful chain of trust traversal during handshake.
$ sudo cp $JAVA_HOME/jre/lib/security/cacerts $JAVA_HOME/jre/lib/security/jssecacerts
Use Cloudera Manager Admin Console to check TLS/SSL configuration details for the cluster and services, and to verify paths to keys and keystores, certificates, and trust stores configured for each service. These do not need to be re-enabled or changed (unless you replace existing keys with new ones as part of this process), but you can note all paths and names of all TLS-related security artifacts before you begin.
Certificates and keys may have been converted from one format to another (as detailed in How to Convert File Encodings (DER, JKS, PEM) for TLS/SSL Certificates and Keys). That means that a CSR may have been used to obtain a JKS formatted certificate for one service that was then converted to PEM for use by another service (or services) running on the same node of the cluster as needed.
Check Certificate Expiration Dates
If you do not know the expiration dates for certificates installed on the cluster, use OpenSSL (for PEM-formatted certificates) or use Java Keytool (for JKS-formatted certificates) to determine certificate expiration dates.
PEM-formatted certificates (PKCS #8) are used by Cloudera Manager Agent hosts, Hue, Impala and other Python-based services, while JKS-formatted certificates are used by HDFS, MapReduce, and YARN, for example. See Certificate Formats (JKS, PEM) and Cluster Components for more information.
Using OpenSSL to Obtain Certificate Details
openssl x509 -enddate -noout -in /opt/cloudera/security/pki/$(hostname -f)-server.cert.pem
To check expiration dates by querying the active listener ports for any TLS-enabled services from the command line, use OpenSSL as in this example of querying the Cloudera Manager TLS listener port (7183):
echo | openssl s_client -connect fqdn.example.com:7183 2>/dev/null | openssl x509 -noout -subject -dates
subject=/C=US/ST=California/L=Los Angeles/O=Internet Corporation for Assigned Names
and Numbers/OU=Technology/CN=www.example.org
notBefore=Nov 3 00:00:00 2015 GMT
notAfter=Nov 28 12:00:00 2018 GMT
Using Java Keytool to Obtain Certificate Details
keytool -list -v -keystore keystore_name.jks
Renewing and Replacing Certificates Before Expiration
- Use the existing key to generate a new CSR for a certificate to replace the one currently associated with the key, as detailed in Step 1 below. This requires knowing the key/keystore password.
- Create a new private key and public key to replace those already in use and generate a new CSR to obtain a completely new certificate to use with the public key. To use this approach, follow steps in How To Obtain and Deploy Keys and Certificates for TLS/SSL.
- Submit the original CSR to the CA and obtain a new certificate. If you have the CSR that matches the key used by the service, you can skip Step 1 and start with Step 2 below.
Step 1: Generate a New CSR from the Key
You must know the password for the key and keystore to generate a new signing request from it. Use the same alias used for the key when it was created.
- Use keytool to generate the CSR as follows:
$ sudo keytool -certreq -keystore server-key.jks -file newcert.csr
Enter keystore password:
Step 2: Submit the CSR to the CA
- Submit the CSR file to your certificate authority using the process and means required by the CA, for example, email or web submission. For the certificate format, specify PEM (base64 ASCII) (see Step 3 below for an example of PEM formatted certificate heading and closing structure).
- The public CA will request specific details from you, to verify that you own the domain name contained in the CSR, before they issue the certificate.
- When you receive the signed certificate from the CA, you can proceed with Step 3.
Step 3: Verify the Certificate
-----BEGIN CERTIFICATE-----
<The encoded certificate is represented by multiple lines of exactly 64 characters, except
for the last line, which can contain 64 characters or fewer.>
-----END CERTIFICATE-----
If your issued certificate is in binary (DER) format, convert it to PEM format before continuing. See How to Convert Formats (PEM, JKS) for TLS/SSL Clients and Services for details.
Along with the certificate, the CA also provides several other digital artifacts, including root CA and possibly one (or more) intermediate CA certificates. The intermediate certificates may need to be added to the trust store in the following situations:
For certificates obtained from a public (commercial) CA—Intermediate or root certificates do not need to be installed in the trust stores for the cluster. The JDK trust store already includes the certificates needed to establish chain of trust for certificates obtained from commercial CAs.
For certificates obtained from an internal CA—To modify the truststore (jssecacerts) to explicitly trust certificates or certificate chain (as you might for certificates signed by an internal CA), follow the steps in How to Add Root and Intermediate CAs to Truststore for TLS/SSL.
Step 4: Import the Certificate into the Keystore
cp cert-file-recd /opt/cloudera/security/pki/$(hostname -f)-server.cert.pem
$ sudo keytool -importcert -alias $(hostname -f)-server \
-file /opt/cloudera/security/pki/$(hostname -f)-server.cert.pem \
-keystore /opt/cloudera/security/pki/$(hostname -f)-server.jks
... is not trusted. Install reply anyway? [no]: yes
Certificate reply was installed in keystore
If you do not see this response, double-check all your steps up to this point: are you working in the correct path? Do you have the proper certificate? and so on. See Getting Support for information about how to contact Cloudera Support and to find out about other sources of help if you cannot successfully import the certificates.
Replacing Certificates After a Certificate Expires
If the cluster cannot start up because of an expired certificate, then perform the steps in Renewing and Replacing Certificates Before Expiration to resolve the issue.
If the replacement certificate has not been obtained yet, you can use a self-signed certificate for the short term, until you receive the CA signed certificate.
