

Register image catalog
Once you've created your image catalog JSON file, register it with your Cloudbreak instance.
- Cloudbreak web UI
- Cloudbreak CLI
- By editing the Profile file
 | Note |
|---|---|
The content type of your image catalog file should be “application/json” for Cloudbreak to be able to process it. |
Register image catalog in the UI
Use these steps to register your custom image catalog in the Cloudbreak web UI.
Steps
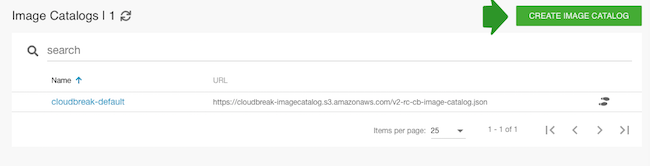
- In the Cloudbreak UI, select External Sources > Image Catalogs from the navigation menu.
- Click Create Image Catalog:
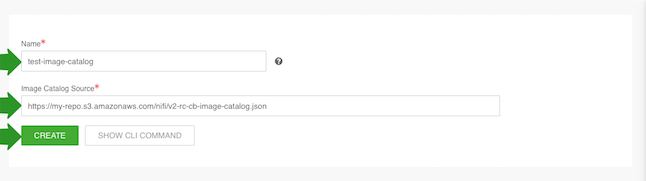
- Enter name for your image catalog and the URL to the location where it is stored.
- Click Create:
After performing these steps, the image catalog will be available and automatically selected as the default entry in the image catalog drop-down list in the create cluster wizard.
Register image catalog in the CLI
To register your custom image catalog using the CLI, use the cb imagecatalog
create command. For more information, refer to CLI documentation.
Register image catalog in the Profile
As an alternative to using the web UI or CLI, it is possible to place the catalog file to the Cloudbreak deployer`s etc directory and then set CB_IMAGE_CATALOG_URL variable in your Profile to IMAGE_CATALOG_FILE_NAME.JSON.
Steps
- On the Cloudbreak machine, switch to the root user by using
sudo su - Save the image catalog file on your Cloudbreak machine in the /var/lib/cloudbreak-deployment/etc directory.
- Edit the Profile file located in /var/lib/cloudbreak-deployment by adding export
CB_IMAGE_CATALOG_URL to the file and set it to the name of your JSON file which
declares your custom images. For example:
export CB_IMAGE_CATALOG_URL=custom-image-catalog.json - Save the Profile file.
- Restart Cloudbreak by using:
cbd restart