Experiments
Starting with version 1.4, Cloudera Data Science Workbench allows data scientists to run batch experiments that track different versions of code, input parameters, and output (both metrics and files).
Demo: Watch the following video for a quick demonstration of the steps described in this topic:
Continue reading:
Purpose
Challenge
As data scientists iteratively develop models, they often experiment with datasets, features, libraries, algorithms, and parameters. Even small changes can significantly impact the resulting model. This means data scientists need the ability to iterate and repeat similar experiments in parallel and on demand, as they rely on differences in output and scores to tune parameters until they obtain the best fit for the problem at hand. Such a training workflow requires versioning of the file system, input parameters, and output of each training run.
Without versioned experiments you would need intense process rigor to consistently track training artifacts (data, parameters, code, etc.), and even then it might be impossible to reproduce and explain a given result. This can lead to wasted time/effort during collaboration, not to mention the compliance risks introduced.
Solution
Starting with version 1.4, Cloudera Data Science Workbench uses experiments to facilitate ad-hoc batch execution and model training. Experiments are batch executed workloads where the code, input parameters, and output artifacts are versioned. This feature also provides a lightweight ability to track output data, including files, metrics, and metadata for comparison.
Concepts
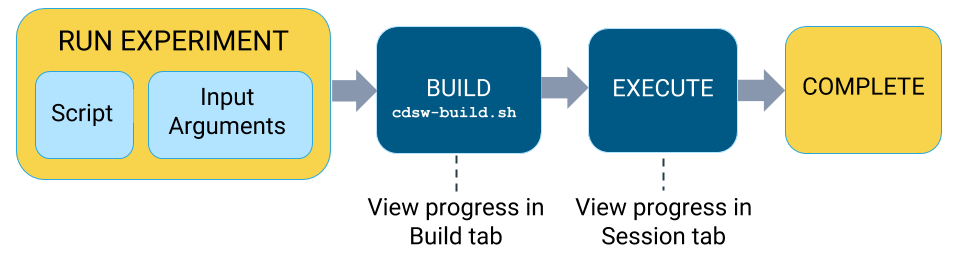
The term experiment refers to a non interactive batch execution script that is versioned across input parameters, project files, and output. Batch experiments are associated with a specific project (much like sessions or jobs) and have no notion of scheduling; they run at creation time. To support versioning of the project files and retain run-level artifacts and metadata, each experiment is executed in an isolated container.
Lifecycle of an Experiment
-
- Launch Experiment
-
In this step you will select a script from your project that will be run as part of the experiment, and the resources (memory/GPU) needed to run the experiment. The engine kernel will be selected by default based on your script. For detailed instructions on how to launch an experiment, see Running an Experiment (QuickStart).
-
- Build
-
When you launch the experiment, Cloudera Data Science Workbench first builds a new versioned engine image where the experiment will be executed in isolation. This new engine includes:
- the base engine image used by the project (check )
- a snapshot of the project filesystem
- environmental variables inherited from the project.
- packages explicitly specified in the project's build script (cdsw-build.sh)
It is your responsibility to provide the complete list of dependencies required for the experiment via the cdsw-build.sh file. As part of the engine's build process, Cloudera Data Science Workbench will run the cdsw-build.sh script and install the packages or libraries requested there on the new image.
For details about the build process and examples on how to specify dependencies, see Engines for Experiments and Models.
-
- Schedule
-
Once the engine is built the experiment is scheduled for execution like any other job or session. Once the requested CPU/GPU and memory have been allocated to the experiment, it will move on to the execution stage.
Note that if your deployment is running low on memory and CPU, your runs may spend some time in this stage.
-
- Execute
-
This is the stage where the script you have selected will be run in the newly built engine environment. This is the same output you would see if you had executed the script in a session in the Workbench console.
You can watch the execution in progress in the individual run's Session tab.
You can also go to the project page to see a table of all the experiments launched within that project and their current status.
Run ID: A numeric ID that tracks all experiments launched on a Cloudera Data Science Workbench deployment. It is not limited to the scope of a single user or project.
Running an Experiment (QuickStart)
- Go to the project Overview page.
- Click Open Workbench.
-
Create/modify any project code as needed. You can also launch a session to simultaneously test code changes on the interactive console as you launch new experiments.
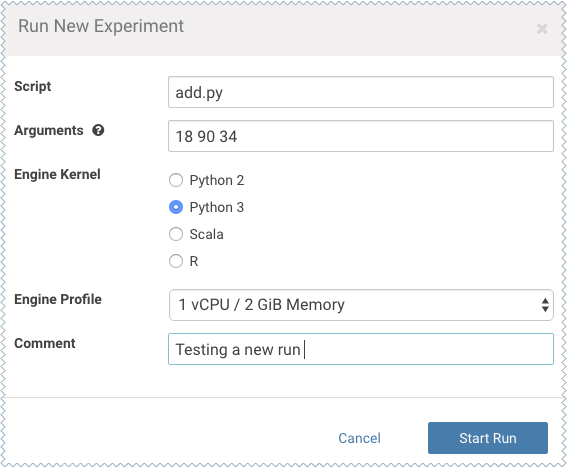
As an example, you can run this Python script that accepts a series of numbers as command-line arguments and prints their sum.
add.py
import sys
import cdsw

args = len(sys.argv) - 1
sum = 0
x = 1

while (args >= x):
    print ("Argument %i: %s" % (x, sys.argv[x]))
    sum = sum + int(sys.argv[x])
    x = x + 1

print ("Sum of the numbers is: %i." % sum)
To test the script, launch a Python session and run the following command from the workbench command prompt:!python add.py 1 2 3 4 -
Click Run Experiment. If you're already in an active session, click . Fill out the following fields:
-
Script - Select the file that will be executed for this experiment.
-
Arguments - If your script requires any command line arguments, enter them here.
-
Engine Kernel and Engine Profile - Select the kernel and computing resources needed for this experiment.
For this example we will run the add.py script and pass some numbers as arguments.
-
- Click Start Run.
-
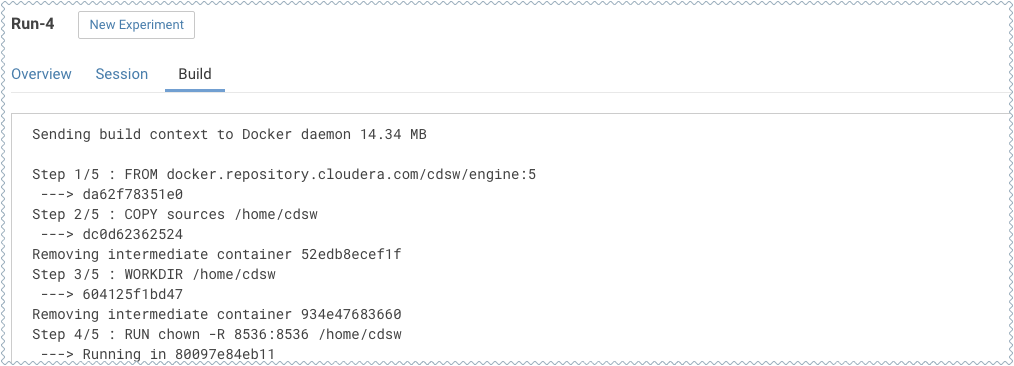
To track progress for the run, go back to the project Overview. On the left navigation bar click Experiments. You should see the experiment you've just run at the top of the list. Click on the Run ID to view an overview for each individual run. Then click Build.
On this Build tab you can see realtime progress as Cloudera Data Science Workbench builds the Docker image for this experiment. This allows you to debug any errors that might occur during the build stage.
-
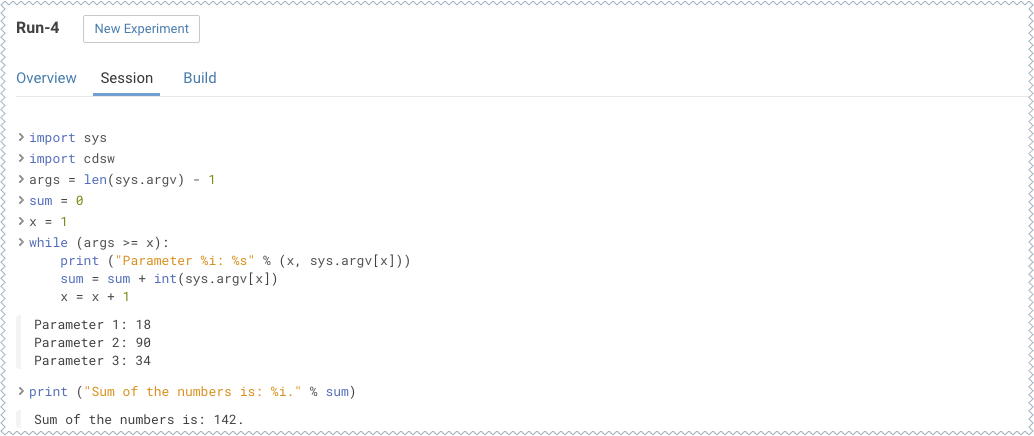
Once the Docker image is ready, the run will begin execution. You can track progress for this stage by going to the Session tab.
For example, the Session pane output from running add.py is:
-
(Optional) The cdsw library that is bundled with Cloudera Data Science Workbench includes some built-in functions that you can use to compare experiments and save any files from your experiments.
For example, to track the sum for each run, add the following line to the end of the add.py script.
cdsw.track_metric("Sum", sum)This will be tracked in the Experiments table:

For more details, see Tracking Metrics and Saving Files.
Tracking Metrics
The cdsw library includes a track_metric function that can be used to log up to 50 metrics associated with a run, thus allowing accuracy and scores to be tracked over time.
cdsw.track_metric(key, value)Python
cdsw.track_metric(“R_squared”, 0.79)
cdsw::track.metric(“R_squared”, 0.62)These metrics will be available on the project's Experiments tab where you can view, sort, and filter experiments on the values. The table on the Experiments page will allow you to display only three metrics at a time. You can select which metrics are displayed from the metrics dropdown.
Saving Files
Cloudera Data Science Workbench allows you to select which artifacts you'd like to access and evaluate after an experiment is complete. These artifacts could be anything from a text file to an image or a model that you have built through the run.
The cdsw library includes a track_file function that can be used to specify which artifacts should be retained after the experiment is complete.
Python
cdsw.track_file('model.pkl')R
cdsw::track.file('model.pkl')Specified artifacts can be accessed from the run's Overview page. These files can also be saved to the top-level project filesystem and downloaded from there.
Disabling the Experiments Feature
Required Role: Site Administrator
To disable this feature on your Cloudera Data Science Workbench deployment:
- Log in to Cloudera Data Science Workbench.
- Click .
- Under the Feature Flags section, disable the Enable users to run experiments. checkbox.
Limitations
-
Experiments do not store snapshots of project files. You cannot automatically restore code that was run as part of an experiment.
-
Experiments will fail if your project filesystem is too large for the Git snapshot process. As a general rule, any project files (code, generated model artifacts, dependencies, etc.) larger than 50 MB must be part of your project's .gitignore file so that they are not included in snapshots for experiment builds.
-
Experiments cannot be deleted. As a result, be conscious of how you use the track_metrics and track_file functions.
- Do not track files larger than 50MB.
- Do not track more than 100 metrics per experiment. Excessive metric calls from an experiment may cause Cloudera Data Science Workbench to hang.
-
The Experiments table will allow you to display only three metrics at a time. You can select which metrics are displayed from the metrics dropdown. If you are tracking a large number of metrics (100 or more), you might notice some performance lag in the UI.
-
Arguments are not supported with Scala experiments.
-
The track_metrics and track_file functions are not supported with Scala experiments.
-
The UI does not display a confirmation when you start an experiment or any alerts when experiments fail.
