Customized Engine Images
By default, Cloudera Data Science Workbench engines are preloaded with a few common packages and libraries for R, Python, and Scala. In addition to these, Cloudera Data Science Workbench also allows you to install any other packages or libraries that are required by your projects. However, directly installing a package to a project as described above might not always be feasible. For example, packages that require root access to be installed, or that must be installed to a path outside /home/cdsw (outside the project mount), cannot be installed directly from the workbench.
For such circumstances, Cloudera Data Science Workbench allows you to extend the base Docker image and create a new Docker image with all the libraries and packages you require. Site administrators can then whitelist this new image for use in projects, and project administrators set the new white-listed image to be used as the default engine image for their projects. For an end-to-end example of this process, see End-to-End Example: MeCab.
Note that this approach can also be used to accelerate project setup across the deployment. For example, if you want multiple projects on your deployment to have access to some common dependencies (package or software or driver) out of the box, or even if a package just has a complicated setup, it might be easier to simply provide users with an engine that has already been customized for their project(s).
Creating a Customized Engine Image
This section walks you through the steps required to create your own custom engine based on the Cloudera Data Science Workbench base image. For a complete example, see End-to-End Example: MeCab.
Create a Dockerfile for the New Custom Image
The first step when building a customized image is to create a Dockerfile that specifies which packages you would like to install in addition to the base image.
# Dockerfile

# Specify a Cloudera Data Science Workbench base image
FROM docker.repository.cloudera.com/cdsw/engine:8
RUN rm /etc/apt/sources.list.d/*
# Update packages on the base image and install beautifulsoup4
RUN apt-get update
RUN pip install beautifulsoup4 && pip3 install beautifulsoup4
Build the New Image
docker build -t <image-name>:<tag> . -f Dockerfiledocker build --network=host -t <image-name>:<tag> . -f DockerfileDistribute the Image
- Push the image to a public registry such as DockerHub
-
For instructions, refer the Docker documentation: docker push.
- Push the image to your company's Docker registry
-
When using this method, make sure to tag your image with the following schema:
docker tag <image-name> <company-registry>/<user-name>/<image-name>:<tag>Once the image has been tagged properly, use the following command to push the image:
docker push <company-registry>/<user-name>/<image-name>:<tag>The MeCab example at the end of this topic uses this method.
- Distribute the image manually
-
Use the following steps to manually distribute the image on the cluster:
- Save the docker image as a tarball on the host where it was built
docker image save -o ./<new_customized_engine>.tar <image-name> - Distribute the image to all the Cloudera Data Science Workbench gateway hosts.
scp ./<new_customized_engine>.tar root@<cdsw.your_company.com>:/tmp/ - Load the image on all the Cloudera Data Science Workbench gateway hosts.
docker load --input /tmp/./<new_customized_engine>.tar - To verify that the image was successfully distributed and loaded, run:
docker images
- Save the docker image as a tarball on the host where it was built
Whitelist the Image in Cloudera Data Science Workbench
White-listing a customized image in Cloudera Data Science Workbench is a two-step process.
- Whitelist Image for the Deployment
First, a site administrator will need to clear the new image for use on the deployment.
- Log in as a site administrator.
- Click .
- Add <company-registry>/<user-name>/<image-name>:<tag> to the list of whitelisted engine images.
- Whitelist Image for Per-Project
If you want to start using the image in a project, the project administrator will need to set this image as the default image for the project.
- Go to the project Settings page.
- Click Engines.
- Select the new customized engine from the dropdown list of available Docker images. Sessions and jobs you run in your project will now have access to this engine.
End-to-End Example: MeCab
This section demonstrates how to customize the Cloudera Data Science Workbench base engine image to include the MeCab (a Japanese text tokenizer) library.
This is a sample Dockerfile that adds MeCab to the Cloudera Data Science Workbench base image.
# Dockerfile

FROM docker.repository.cloudera.com/cdsw/engine:8
RUN rm /etc/apt/sources.list.d/*
RUN apt-get update && \
    apt-get install -y -q mecab \
                          libmecab-dev \
                          mecab-ipadic-utf8 && \
    apt-get clean && \
    rm -rf /var/lib/apt/lists/*
RUN cd /tmp && \
    git clone --depth 1 https://github.com/neologd/mecab-ipadic-neologd.git && \
    /tmp/mecab-ipadic-neologd/bin/install-mecab-ipadic-neologd -y -n -p /var/lib/mecab/dic/neologd && \
    rm -rf /tmp/mecab-ipadic-neologd
RUN pip install --upgrade pip
RUN pip install mecab-python==0.996
- Build a new image with the Dockerfile.
docker build --network=host -t <company-registry>/user/cdsw-mecab:latest . -f Dockerfile - Push the image to your company's Docker registry.
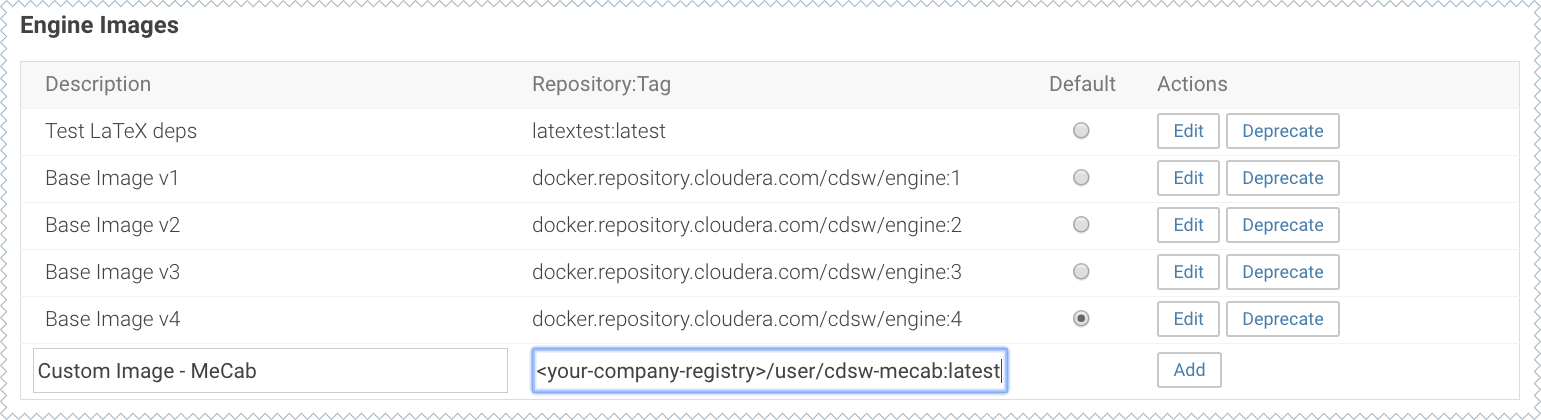
docker push <your-company-registry>/user/cdsw-mecab:latest - Whitelist the image, <your-company-registry>/user/cdsw-mecab:latest. Only a site administrator can do this.
Go to and add <company-registry>/user/cdsw-mecab:latest to the list of whitelisted engine images.
-
Ask a project administrator to set the new image as the default for your project. Go to the project Settings, click Engines, and select company-registry/user/cdsw-mecab:latest from the dropdown.

You should now be able to run this project on the customized MeCab engine.
Limitations
-
Cloudera Data Science Workbench only supports customized engines that are based on the Cloudera Data Science Workbench base image.
-
Cloudera Data Science Workbench does not support creation of custom engines larger than 10 GB.
Cloudera Bug: DSE-4420
-
Cloudera Data Science Workbench does not support pulling images from registries that require Docker credentials.
Cloudera Bug: DSE-1521
-
The contents of certain pre-existing standard directories such as /home/cdsw, /tmp, /opt/cloudera, and so on, cannot be modified while creating customized engines. This means any files saved in these directories will not be accessible from sessions that are running on customized engines.
Workaround: Create a new custom directory in the Dockerfile used to create the customized engine, and save your files to that directory. Or, create a new custom directory on all the Cloudera Data Science Workbench gateway hosts and save your files to those directories. Then, mount this directory to the custom engine.
