Models
Starting with version 1.4, Cloudera Data Science Workbench allows data scientists to build, deploy, and manage models as REST APIs to serve predictions.
Demo: Watch the following video for a quick demonstration of the steps described in this topic:
Continue reading:
Purpose
Challenge
Data scientists often develop models using a variety of Python/R open source packages. The challenge lies in actually exposing those models to stakeholders who can test the model. In most organizations, the model deployment process will require assistance from a separate DevOps team who likely have their own policies about deploying new code.
For example, a model that has been developed in Python by data scientists might be rebuilt in another language by the devops team before it is actually deployed. This process can be slow and error-prone. It can take months to deploy new models, if at all. This also introduces compliance risks when you take into account the fact that the new re-developed model might not be even be an accurate reproduction of the original model.
Once a model has been deployed, you then need to ensure that the devops team has a way to rollback the model to a previous version if needed. This means the data science team also needs a reliable way to retain history of the models they build and ensure that they can rebuild a specific version if needed. At any time, data scientists (or any other stakeholders) must have a way to accurately identify which version of a model is/was deployed.
Solution
- Create a snapshot of model code, model parameters, and dependencies.
- Package a trained model into an immutable artifact and provide basic serving code.
- Add a REST endpoint that automatically accepts input parameters matching the function, and that returns a data structure that matches the function’s return type.
- Save the model along with some metadata.
- Deploy a specified number of model API replicas, automatically load balanced.
Concepts and Terminology
- Model
-
Model is a high level abstract term that is used to describe several possible incarnations of objects created during the model deployment process. For the purpose of this discussion you should note that 'model' does not always refer to a specific artifact. More precise terms (as defined later in this section) should be used whenever possible.
Stages of the Model Deployment Process
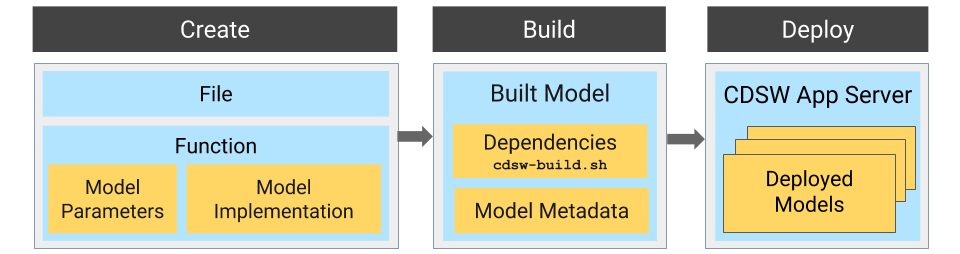
- Create
-
- File - The R or Python file containing the function to be invoked when the model is started.
- Function - The function to be invoked inside the file. This function should take a single JSON-encoded object (for example, a python dictionary) as input
and return a JSON-encodable object as output to ensure compatibility with any application accessing the model using the API. JSON decoding and encoding for model input/output is built into Cloudera
Data Science Workbench.
The function will likely include the following components:
- Model Implementation
The code for implementing the model (e.g. decision trees, k-means). This might originate with the data scientist or might be provided by the engineering team. This code implements the model's predict function, along with any setup and teardown that may be required.
- Model Parameters
A set of parameters obtained as a result of model training/fitting (using experiments). For example, a specific decision tree or the specific centroids of a k-means clustering, to be used to make a prediction.
- Model Implementation
- Build
-
This stage takes as input the file that calls the function and returns an artifact that implements a single concrete model, referred to as a model build.
- Built Model
A built model is a static, immutable artifact that includes the model implementation, its parameters, any runtime dependencies, and its metadata. If any of these components need to be changed, for example, code changes to the implementation or its parameters need to be retrained, a new build must be created for the model. Model builds are versioned using build numbers.
To create the model build, Cloudera Data Science Workbench creates a Docker image based on the engine designated as the project's default engine. This image provides an isolated environment where the model implementation code will run.
To configure the image environment, you can specify a list of dependencies to be installed in a build script called cdsw-build.sh.
For details about the build process and examples on how to install dependencies, see Engines for Experiments and Models. - Build Number:
Build numbers are used to track different versions of builds within the scope of a single model. They start at 1 and are incremented with each new build created for the model.
- Built Model
- Deploy
-
This stage takes as input the memory/CPU resources required to power the model, the number of replicas needed, and deploys the model build created in the previous stage to a REST API.
Creating and Deploying a Model (QuickStart)
Using Cloudera Data Science Workbench, you can create any function within a script and deploy it to a REST API. In a machine learning project, this will typically be a predict function that will accept an input and return a prediction based on the model's parameters.
For the purpose of this quick start demo we are going to create a very simple function that adds two numbers and deploy it as a model that returns the sum of the numbers. This function will accept two numbers in JSON format as input and return the sum.
- Create a new project. Note that models are always created within the context of a project.
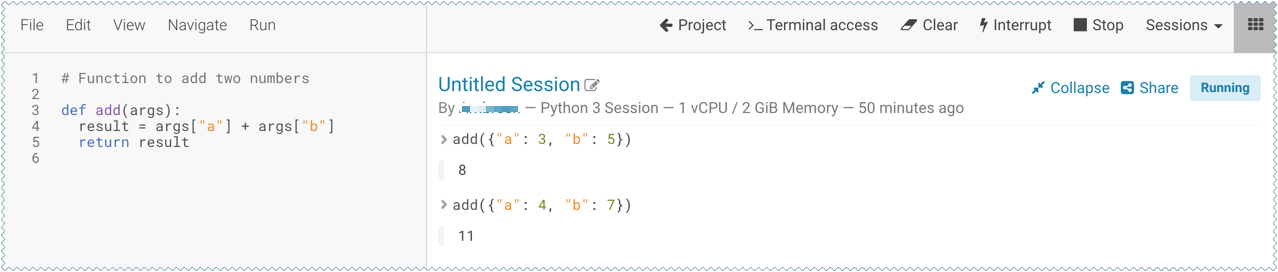
- Click Open Workbench and launch a new Python 3 session.
- Create a new file within the project called add_numbers.py. This is the file where we define the function that will be called when the model is run. For
example:
add_numbers.py
def add(args): result = args["a"] + args["b"] return result -
Before deploying the model, test it by running the add_numbers.py script, and then calling the add function directly from the interactive workbench session. For example:
add({"a": 3, "b": 5})
- Deploy the add function to a REST endpoint.
- Go to the project Overview page.
- Click .
- Give the model a Name and Description.
-
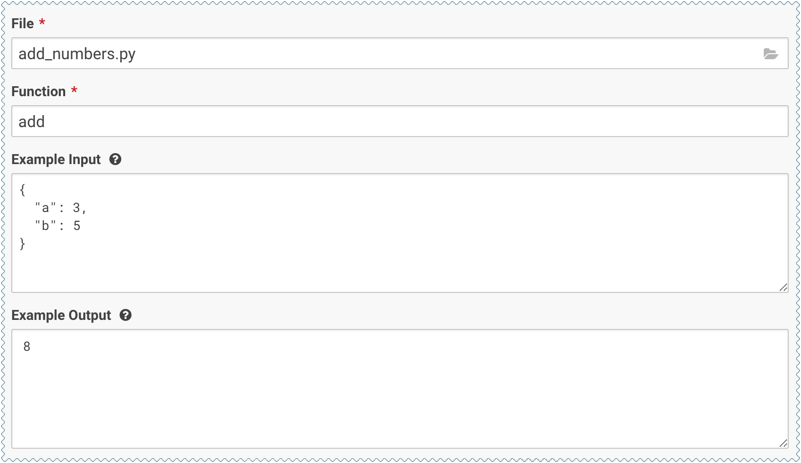
Enter details about the model that you want to build. In this case:
- File: add_numbers.py
- Function: add
- Example Input: {"a": 3, "b": 5}
- Example Output: 8
- Select the resources needed to run this model, including any replicas for load balancing.
- Click Deploy Model.
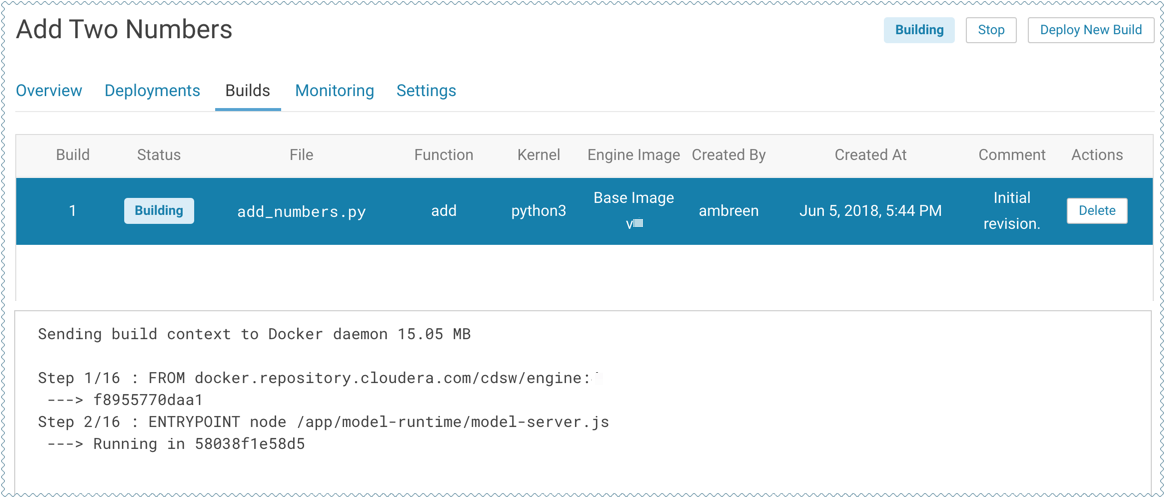
-
Click on the model to go to its Overview page. Click Builds to track realtime progress as the model is built and deployed. This process essentially creates a Docker container where the model will live and serve requests.
-
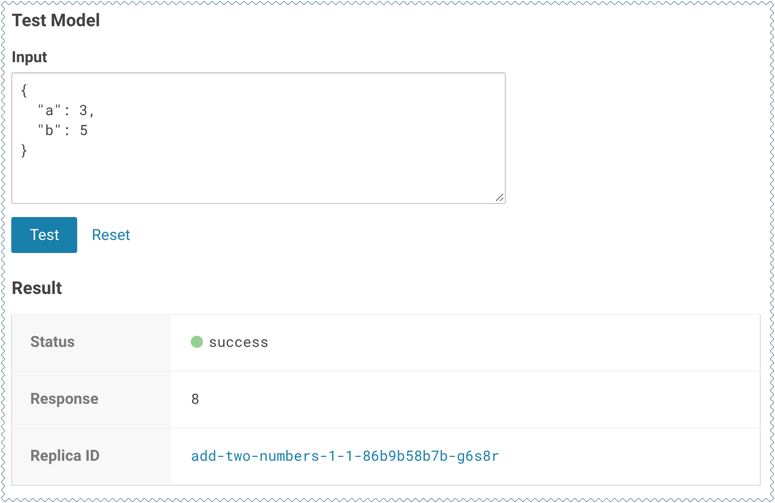
Once the model has been deployed, go back to the model Overview page and use the Test Model widget to make sure the model works as expected.
If you entered example input when creating the model, the Input field will be pre-populated with those values. Click Test. The result returned includes the output response from the model, as well as the ID of the replica that served the request.
Model response times depend largely on your model code. That is, how long it takes the model function to perform the computation needed to return a prediction. It is worth noting that model replicas can only process one request at a time. Concurrent requests will be queued until the model can process them.
Calling a Model
(Requirement) JSON for Model Requests/Responses
Every model function in Cloudera Data Science Workbench takes a single argument in the form of a JSON-encoded object, and returns another JSON-encoded object as output. This format ensures compatibility with any application accessing the model using the API, and gives you the flexibility to define how JSON data types map to your model's datatypes.
Model Requests
When making calls to a model, keep in mind that JSON is not suitable for very large requests and has high overhead for binary objects such as images or video. Consider calling the model with a reference to the image or video such as a URL instead of the object itself. Requests to models should not be more than 5 MB in size. Performance may degrade and memory usage increase for larger requests.
Ensure that the JSON request represents all objects in the request or response of a model call. For example, JSON does not natively support dates. In such cases consider passing dates as strings, for example in ISO-8601 format, instead.
For a simple example of how to pass JSON arguments to the model function and make calls to deployed model, see Creating and Deploying a Model (QuickStart).
Model Responses
Models return responses in the form of a JSON-encoded object. Model response times depend on how long it takes the model function to perform the computation needed to return a prediction. Model replicas can only process one request at a time. Concurrent requests are queued until a replica is available to process them.
When Cloudera Data Science Workbench receives a call request for a model, it attempts to find a free replica that can answer the call. If the first arbitrarily selected replica is busy, Cloudera Data Science Workbench will keep trying to contact a free replica for 30 seconds. If no replica is available, Cloudera Data Science Workbench will return a model.busy error with HTTP status code 429 (Too Many Requests). If you see such errors, re-deploy the model build with a higher number of replicas.
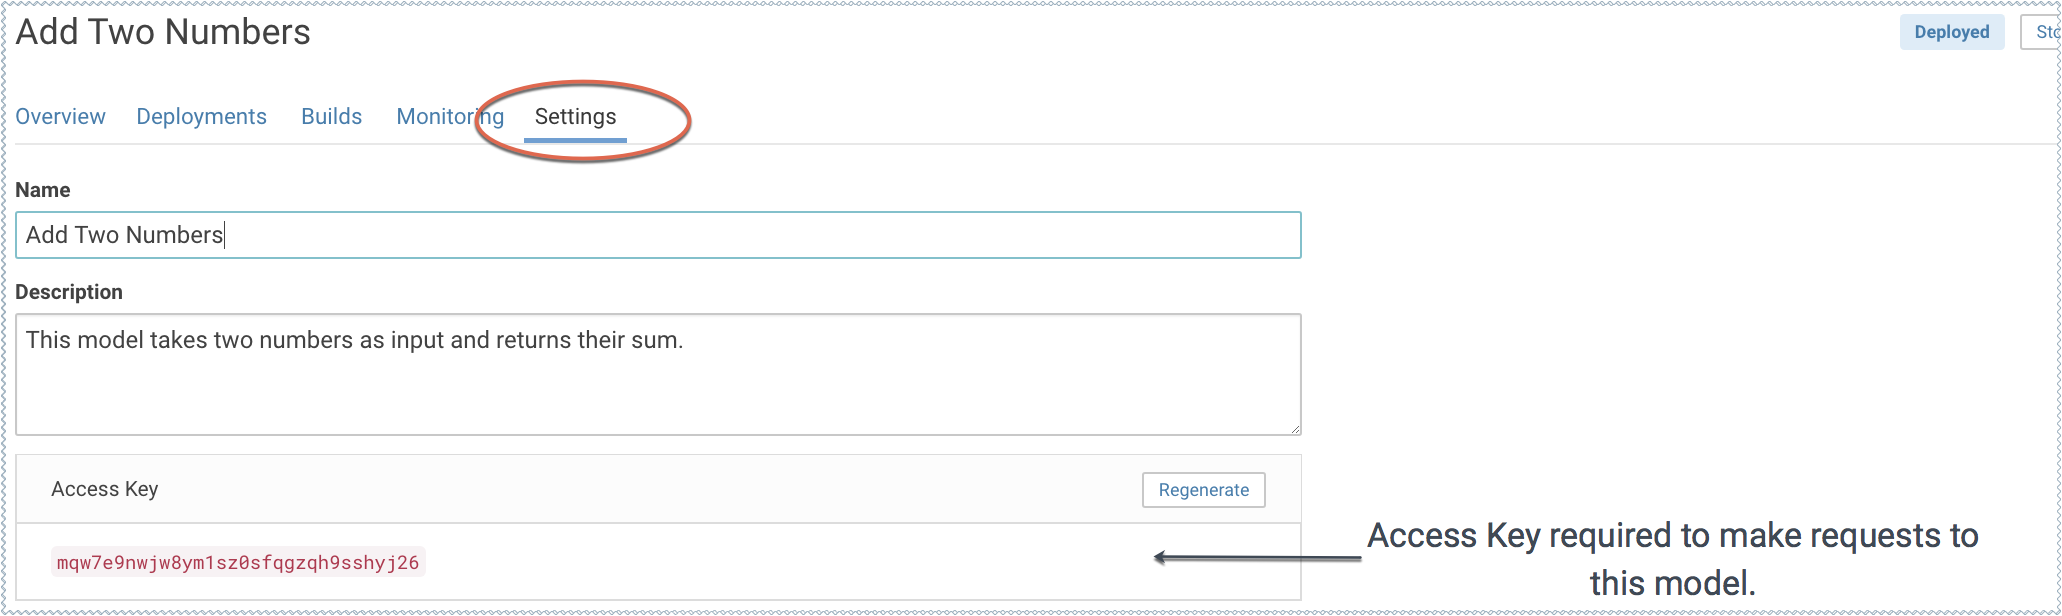
(Requirement) Access Key
Each model in Cloudera Data Science Workbench has a unique access key associated with it. This access key serves two purposes: 1) it is a unique identifier for the model, and 2) it serves as an authentication token that allows you to make calls to the model.
Models deployed using Cloudera Data Science Workbench are not public. In order to call an active model your request must include the model's access key for authentication (as demonstrated in the sample calls above).
To locate the access key for a model, go to the model Overview page and click Settings.
Testing Calls to a Model
-
Test Model Widget
On each model's Overview page, Cloudera Data Science Workbench provides a widget that makes a sample call to the deployed model to ensure it is receiving input and returning results as expected.
-
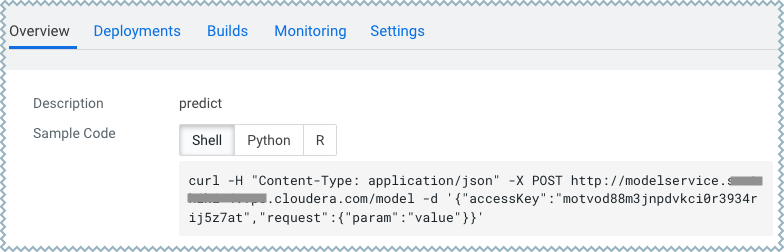
Sample Request Strings
On the model Overview page, Cloudera Data Science Workbench also provides sample curl and POST request strings that you can use to test calls to the model. Copy/paste the curl request directly into a Terminal to test the call.
Note that these sample requests already include the example input values you entered while building the model, and the access key required to query the model.
Updating Active Models
Active Model - A model that is in the Deploying, Deployed, or Stopping stages.
You can make changes to a model even after it has been deployed and is actively serving requests. Depending on business factors and changing resource requirements, such changes will likely range from changes to the model code itself, to simply modifying the number of CPU/GPUs requested for the model. In addition, you can also stop and restart active models.
Depending on your requirement, you can perform one of the following actions:
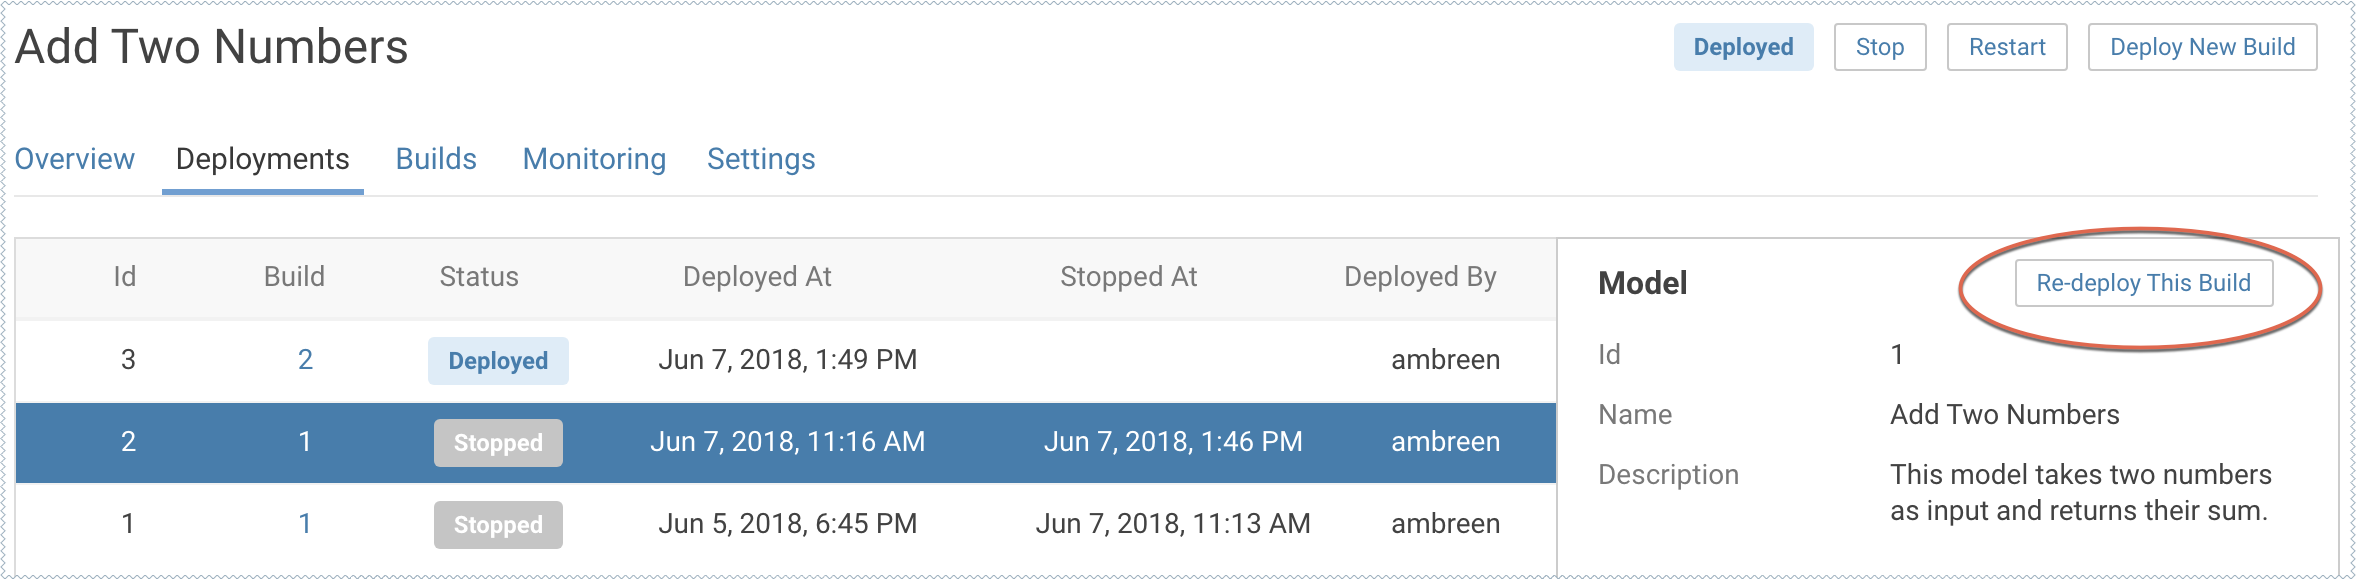
Re-deploy an Existing Build
- An active model that previously requested a large number of CPUs/GPUs that are not being used efficiently.
- An active model that is dropping requests because it is falling short of replicas.
- An active model needs to be rolled back to one of its previous versions.
- Go to the model Overview page.
- Click Deployments.
-
Select the version you want to deploy and click Re-deploy this Build.
- Modify the model serving environment as needed.
- Click Deploy Model.
Deploy a New Build for a Model
- Code changes to the model implementation.
- Renaming the function that is used to invoke the model.
- Go to the model Overview page.
-
Click Deploy New Build.
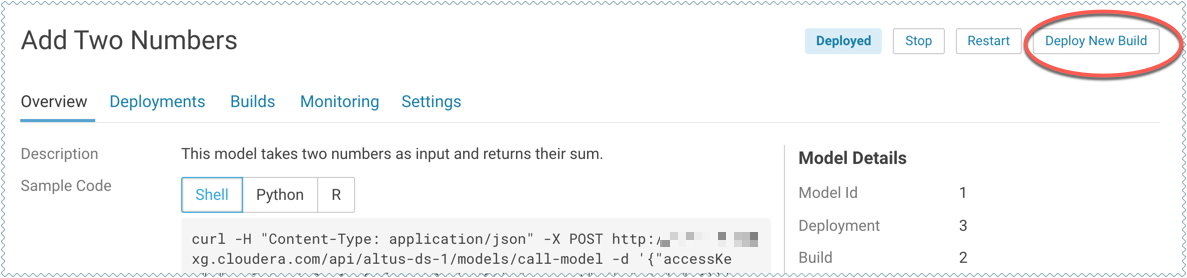
- Complete the form and click Deploy Model.
Usage Guidelines
- Model Code
-
Models in Cloudera Data Science Workbench are designed to execute any code that is wrapped into a function. This means you can potentially deploy a model that returns the result of a SELECT * query on a very large table. However, Cloudera strongly recommends against using the models feature for such use cases.
As a best practice, your models should be returning simple JSON responses in near-real time speeds (within a fraction of a second). If you have a long-running operation that requires extensive computing and takes more than 15 seconds to complete, consider using batch jobs instead.
- Model Artifacts
-
Once you start building larger models, make sure you are storing these model artifacts in HDFS, S3, or any other external storage. Do not use the project filesystem to store large output artifacts.
In general, any project files larger than 50 MB must be part of your project's .gitignore file so that they are not included in snapshots for future experiments/model builds. Note that in case your models require resources that are stored outside the model itself, it is up to you to ensure that these resources are available and immutable as model replicas may be restarted at any time.
- Resource Consumption and Scaling
-
Models should be treated as any other long-running applications that are continuously consuming memory and computing resources. If you are unsure about your resource requirements when you first deploy the model, start with a single replica, monitor its usage, and scale as needed.
If you notice that your models are getting stuck in various stages of the deployment process, check the monitoring page to make sure that the cluster has sufficient resources to complete the deployment operation.
- Security Considerations
-
As stated previously, models do not impose any limitations on the code they can execute. Additionally, models run with the permissions of the user that creates the model (same as sessions and jobs). Therefore, be conscious of potential data leaks especially when querying underlying data sets to serve predictions.
Cloudera Data Science Workbench models are not public by default. Each model has an access key associated with it. Only users/applications who have this key can make calls to the model. Be careful with who has permission to view this key.
Cloudera Data Science Workbench also prints stderr/stdout logs from models to an output pane in the UI. Make sure you are not writing any sensitive information to these logs.
- Deployment Considerations
-
Cloudera Data Science Workbench does not currently support high availability for models. Additionally, there can only be one active deployment per model at any given time. This means you should plan for model downtime if you want to deploy a new build of the model or re-deploy with more/less replicas.
Keep in mind that models that have been developed and trained using Cloudera Data Science Workbench are essentially Python/R code that can easily be persisted and exported to external environments using popular serialization formats such as Pickle, PMML, ONNX, and so on.
Known Issues and Limitations
- Known Issues with Model Builds and Deployed Models
-
Re-deploying or re-building models results in model downtime (usually brief).
-
Re-starting Cloudera Data Science Workbench does not automatically restart active models. These models must be manually restarted so they can serve requests again.
Cloudera Bug: DSE-4950
-
Model deployment will fail if your project filesystem is too large for the Git snapshot process. As a general rule, any project files (code, generated model artifacts, dependencies, etc.) larger than 50 MB must be part of your project's .gitignore file so that they are not included in snapshots for model builds.
-
Model builds will fail if your project filesystem includes a .git directory (likely hidden or nested). Typical build stage errors include:
Error: 2 UNKNOWN: Unable to schedule build: [Unable to create a checkpoint of current source: [Unable to push sources to git server: ...To work around this, rename the .git directory (for example, NO.git) and re-build the model.
Cloudera Bug: DSE-4657
-
JSON requests made to active models should not be more than 5 MB in size. This is because JSON is not suitable for very large requests and has high overhead for binary objects such as images or video. Call the model with a reference to the image or video, such as a URL, instead of the object itself.
-
Any external connections, for example, a database connection or a Spark context, must be managed by the model's code. Models that require such connections are responsible for their own setup, teardown, and refresh.
-
Model logs and statistics are only preserved so long as the individual replica is active. Cloudera Data Science Workbench may restart a replica at any time it is deemed necessary (such as bad input to the model).
-
- Limitations
-
Scala models are not supported.
-
Spawning worker threads is not supported with models.
-
Models deployed using Cloudera Data Science Workbench are not highly-available.
-
Dynamic scaling and auto-scaling are not currently supported. To change the number of replicas in service, you will have to re-deploy the build.
-
