Accessing Metadata
Minimum Required Role: Metadata Viewer (also provided by Metadata Administrator, Full Administrator)
You can access metadata through the Navigator UI or through the Navigator API.
Navigator Metadata UI
Searching Metadata
- Start and log in to the Cloudera Navigator data management component UI.
- To display all entities, click Clear all filters.
- Filter the search results by specifying filters or typing search strings in the Search box.
Filter Example
The following filter example demonstrates how to narrow search results by selecting a built-in Source Type filter set to HDFS and the managed property BLOCK SIZE (MIB) with the value >=1024. This example also shows the full query, which you can see by clicking Show full query in the results pane.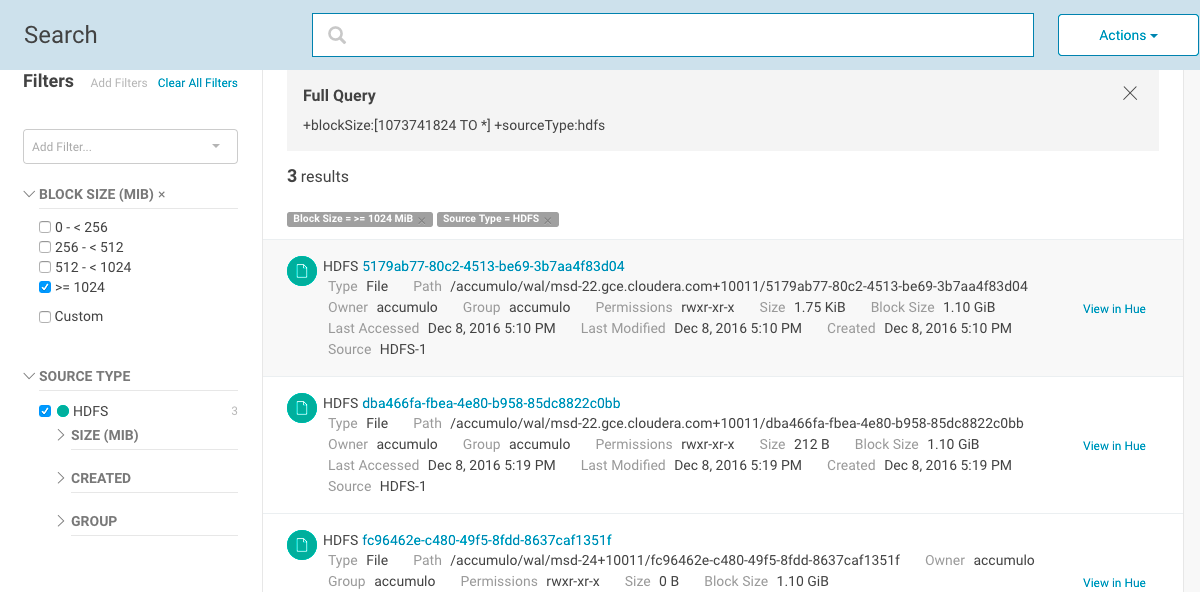
Search Results
The Search Results pane displays the number of matching entries in pages listing 25 entities per page. You can view the pages using the page control at the bottom of each page.
- Source type
- Name - A link to a page that displays the entity details and lineage diagram
- Properties
- If Hue is running, a link at the far right labeled View in Hue that opens the Hue browser for the entity:
- HDFS directories and files - File Browser
- Hive database and tables - Metastore Manager
- MapReduce, YARN, Pig - Job Browser
For example:

Displaying Entity Details
- HDFS directories - Directory contents
- HDFS datasets and fields - Schema
- Hive and Impala databases - Tables and views
- Hive tables - Extended attributes, table schema, partitions
- Impala tables - Table schema
- MapReduce, YARN, and Spark operations - Instances
- Pig operation executions - Tables
- S3 buckets and folders - Folder contents
If managed properties have been defined for a particular entity type, the Show All checkbox in the Managed Metadata pane displays all properties that can be assigned values for the selected entity. To display only those properties that have values, clear the checkbox. If all properties have values, the checkbox has no effect.
To display entity details:
- Perform a search.
- In the search results, click an entity name link. The Details tab displays.
Hive Table Entity Details
For example, if you click the Hive table weblogs link in the search result displayed in preceding example, you see the following details:
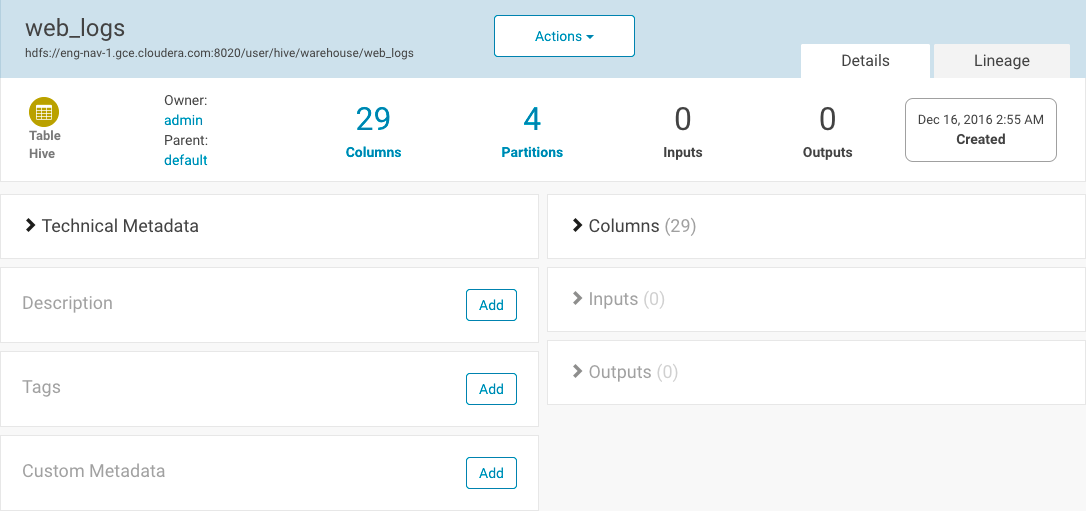
The caret > indicates fields with content; click to expand them. In addition to the technical metadata, you can view the names of the columns and the inputs and outputs.
Managed Metadata Example
The following account table entity has two managed properties in the realestate namespace: Department and AccessAttempts.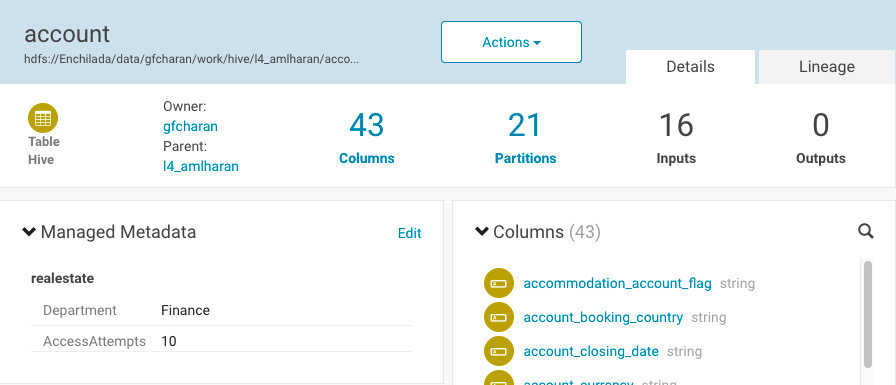
Filtering Search Results
To filter search results, specify filters in the Filters pane or type search strings in the Search box.
The Filters pane contains a set of default properties (source type, type, owner, cluster, and tags) and property values (also called facets). You can add a filter by clicking in Add Filters... and scrolling or by typing in the filter combo box to search for it. To remove nondefault filter properties, click the x in the filter.
Specify a property value as follows:
- Boolean - Select the option to respectively not display, or display only those entries, with the value set to true: Do not show XXX (the default) or Show XXX only, where XXX is the Boolean property.
- Enumerated or freeform string
- Select the checkbox next to a value or click a value link.
- If a property has no values, click add a new value, click the text box, and select from the populated values in the drop-down list or type a value.
- Timestamp - Timestamps are used for started, ended, created, last accessed, and last modified properties. The server stores the timestamp in UTC, and the
UI displays the timestamp converted to the local timezone. Select one of the timestamp options:
- A Last XXX day(s) link.
- The Last checkbox, type or specify the value using the spinner control
 and select the unit minutes, hours, or days.
 - The Custom period checkbox and specify the start and end date.
- Date - Click the down arrow to display a calendar and select a date, or click a field and click the spinner arrows or press the up and down arrow keys.
- Time - Click the hour, minute, and AM/PM fields and click the spinner arrows or press the up and down arrow keys to specify the value.
- Move between fields by clicking fields or by using the right and left arrow keys.
To remove filter values, clear the checkbox.
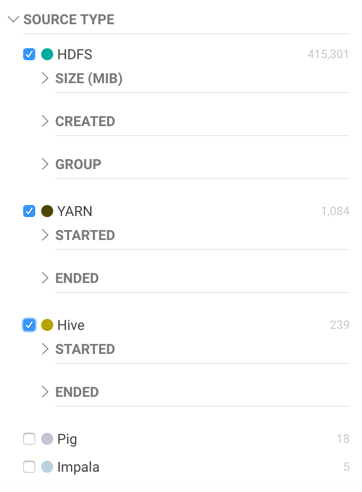
When you select a specific source type value, additional properties that apply to that source type display. For example, HDFS has size, created, and group properties:
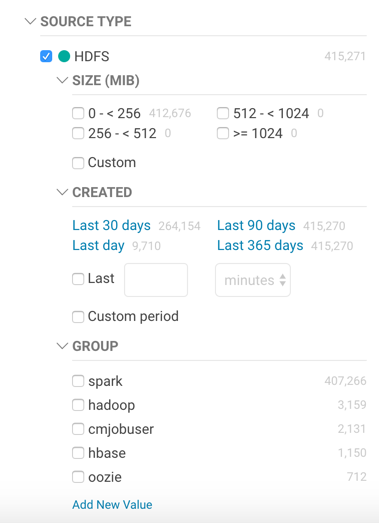
The number to the right a property value is the number of extracted entities that have that property value:
Facet values with the count 0 are not displayed.
- Typing "sample_*" in the originalName property returns only entities whose names match that exact string.
- To perform a wildcard search, type the wildcard string in the Search box. For example, typing the string "sample_*" in the Search box returns all entities with "sample_" at the beginning of their original name.
+(sourceType:hdfs sourceType:hive) +(type:file type:directory)and:
((+sourceType:hdfs +created:[NOW/DAY-30DAYS TO NOW/DAY+1DAY]) sourceType:hive)
Navigator Metadata API
The Navigator API allows you to search entity metadata using a REST API. For information about the API, see Cloudera Navigator Data Management API.