Upgrading version 2.1.0 to 2.1.3 of Workload XM
Steps for upgrading version 2.1.0 to 2.1.3 of Workload XM.
These steps assume that you have:
- Scheduled the upgrade and informed your users of the Workload XM service interruption.
- Verified that your Workload XM cluster is running a supported version of Cloudera Manager and the Cloudera Data Platform (CDP) and that your Workload clusters are running a supported version of Cloudera Manager and Cloudera Platform.
- Recorded the Cloudera Manager host name of the server that contains an installation of Workload Manager, as this value is required during upgrading.
- Downloaded the 2.1.3 version of the Workload XM installation parcel and checksum from the Cloudera Downloads website.
- Downloaded the 2.1.3 version of the Workload XM installation CSD (.jar) file from the Cloudera Downloads website.
- Verified that there are no remaining messages in the ZooKeeper queue, by
doing the following:
- In a terminal log in to a host running ZooperKeeper and list the
current queues by running the following
command:
/opt/cloudera/parcels/CDH/lib/zookeeper/bin/zkCli.sh -server [zk_server]:2181 ls /wxm/onprem/zkqueue
The following terminal output is an example of a current queue output:HiveAudit, HiveHistoryProtobuf, HiveOnMrTable, ImpalaQueryProfile, LlapHistoryProtobuf, MrJhist, MrTaskLog, OozieWorkflow, Pse, SdxDetails, SparkEventLog, SparkTaskLog, TezHistoryProtobuf, YarnApp, YarnAppMetrics, sigmaadb-broadcast, upload-processing-update-queue
- Verify that all the queues are empty by running the
following:
for q_n in HiveAudit HiveHistoryProtobuf HiveOnMrTable ImpalaQueryProfile LlapHistoryProtobuf MrJhist MrTaskLog OozieWorkflow Pse SdxDetails SparkEventLog SparkTaskLog TezHistoryProtobuf YarnApp YarnAppMetrics sigmaadb-broadcast upload-processing-update-queue do echo $q_n: $(/opt/cloudera/parcels/CDH/lib/zookeeper/bin/zkCli.sh -server [zk_server]:2181 stat -w /wxm/onprem/zkqueue/${q_n} | grep "numChildren") done - Verify that all the count values are 0.
- If there are messages in the queue, do the following:
- Stop the DBUS services, which stops any new incoming data.
- Allow Workload XM to finish processing any existing messages.
- Stop any remaining components.
- In a terminal log in to a host running ZooperKeeper and list the
current queues by running the following
command:
- Stopped the Workload XM service and its services.
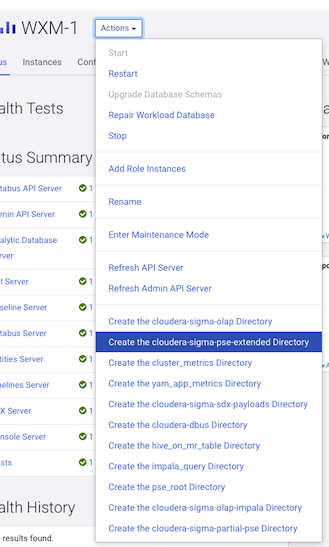
-
Navigate to the Workload XM service in the Cloudera Manager UI and then from
the Actions menu do the following:
- Run the command to create the Cloudera Sigma PSE extended directory by selecting Create the cloudera-sigma-pse-extended Directory.
- Run the command to upgrade the database schemas by selecting Upgrade Database Schemas.
- Restart the Workload XM service, by selecting Restart.
As shown in the following image: