Configure DNS using custom DNS server
Follow these general steps to configure reverse DNS using a custom DNS server.
Step 1: Create a new VPC or use your existing VPC
- You can create a new VPC from the Amazon VCP console (for example by using Start
VPC Wizard):
- CIDR block example: 10.1.0.0/16
- Subnet’s CIDR example: 10.1.1.0/28
- Make sure to:
- Enable DNS resolution for the VPC. You can do this by selecting the VPC, selecting Actions > Edit DNS resolution and choosing Yes.
- Enable DNS hostnames for the VPC. You can do this by selecting the VPC, selecting Actions > Edit DNS hostnames and choosing Yes.
 | Note |
|---|---|
Optionally, you may want to set up an Internet Gateway for the VPC and add a default route to the routing table for the Internet Gateway. Additionally, you may want to enable the Auto-assign Public IP option. This way Cloudbreak would reach the cluster from outside of the VPC and the cluster would have internet access. |
Step2: Set up DNS server in your VPC/subnet
- In the configuration ensure that you have DNS records and reverse DNS pointers for all IP address (for example 10.3.3.4-14)
-
Example unbound configuration:
[root@ip-10-3-3-9 conf.d]# cat 00-cloudbreak.cloud.conf
   server:
      local-zone: "cloudbreak.cloud." static
      local-data: "aww1.cloudbreak.cloud. IN A 10.3.3.4"
      local-data-ptr: "10.3.3.4 aww1.cloudbreak.cloud."
      local-data: "aww2.cloudbreak.cloud. IN A 10.3.3.5"
      local-data-ptr: "10.3.3.5 aww2.cloudbreak.cloud."
      local-data: "aww3.cloudbreak.cloud. IN A 10.3.3.6"
      local-data-ptr: "10.3.3.6 aww3.cloudbreak.cloud."
      local-data: "aww4.cloudbreak.cloud. IN A 10.3.3.7"
      local-data-ptr: "10.3.3.7 aww4.cloudbreak.cloud."
      local-data: "aww5.cloudbreak.cloud. IN A 10.3.3.8"
      local-data-ptr: "10.3.3.8 aww5.cloudbreak.cloud."
      local-data: "aww6.cloudbreak.cloud. IN A 10.3.3.9"
      local-data-ptr: "10.3.3.9 aww6.cloudbreak.cloud."
      local-data: "aww7.cloudbreak.cloud. IN A 10.3.3.10"
      local-data-ptr: "10.3.3.10 aww7.cloudbreak.cloud."
      local-data: "aww8.cloudbreak.cloud. IN A 10.3.3.11"
      local-data-ptr: "10.3.3.11 aww8.cloudbreak.cloud."
      local-data: "aww9.cloudbreak.cloud. IN A 10.3.3.12"
      local-data-ptr: "10.3.3.12 aww9.cloudbreak.cloud."
      local-data: "aww10.cloudbreak.cloud. IN A 10.3.3.13"
      local-data-ptr: "10.3.3.13 aww10.cloudbreak.cloud."
      local-data: "aww11.cloudbreak.cloud. IN A 10.3.3.14"
      local-data-ptr: "10.3.3.14 aww11.cloudbreak.cloud."
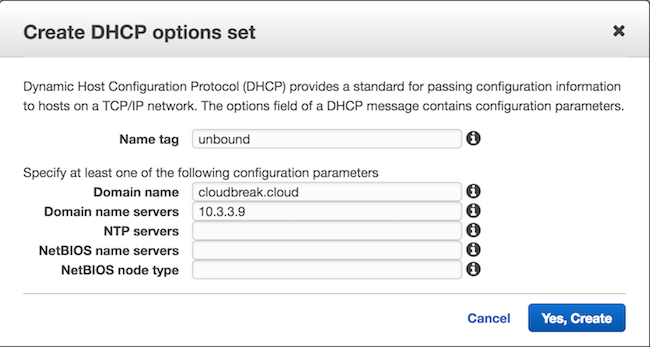
Step 3: Create a DHCP options set
Perform this step from the Amazon VPC console. Select DHCP Options Sets from the left pane and click on Create a DHCP options set. Make sure to:
- Set the Domain name to your preferred domain, for example
cloudbreak.cloud - Set Domain name servers to the previously created DNS server
-
Optionally, set a Name tag

For detailed steps, refer to AWS documentation.
Step 4: Assign the newly created DHCP options set to your VPC
- From the Amazon VPC console, select Your VPCs from the left pane.
- Select the VPC created earlier.
- Click on Actions > Edit DHCP Options Set.
- Select the newly created DHCP option set.
 | Note |
|---|---|
Since you don’t have control the order over the IP addresses leased to the machines, the names may not be in order. |

