
Accessing Iceberg files in Ozone
Learn how to set up policies to give users access to Iceberg files in Ozone. For example, if you query Iceberg tables from Impala, you must set up a Hadoop SQL access policy and Ozone file system access policy.
When Ranger is enabled in the cluster, any user other than the default admin user, "om" requires the necessary Ranger permissions and policy updates to access the Ozone filesystem. To create an Iceberg table on the Ozone file system, you need Ranger permissions.
In this task, you first enable Ozone in the Ranger service, and then set up the required policies.
-
Click , enter your user name and password, then click Sign
In.
The Service Manager for Resource Based Policies page is displayed in the Ranger console.

-
In the cm_ozone policies page, click the
Policy ID or click
 Edit against the "all - volume,
bucket, key" policy to modify the policy details.
Edit against the "all - volume,
bucket, key" policy to modify the policy details.
-
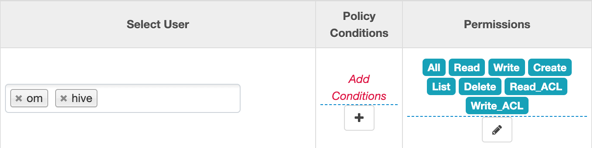
In the Allow Conditions pane, add roles, groups, or
users, choose the necessary permissions, and then click
Save.
-
Click the Service Manager link in the
breadcrumb
trail and then click the
Hadoop SQL preloaded resource-based service to update
the Hadoop SQL URL policy.

-
In the Hadoop SQL policies page, click the
Policy ID or click Edit against the "all - url" policy
to modify the policy details.
-
Select roles, users, or groups in
addition to the default.
By default, "hive", "hue", "impala", "admin" and a few other users are provided access to all the Ozone URLs. To grant everyone access, add the "public" group to the group list. Every user is then subject to your allow conditions.

