Configuring the Hive Metastore for CDH
The HMS service stores the metadata for Hive tables and partitions in a relational database, and provides clients (including Hive) access to this information using the metastore service API. This page explains deployment options and provides instructions for setting up a database in a recommended configuration.
Metastore Deployment Modes
Embedded Mode
Cloudera recommends using this mode for experimental purposes only.
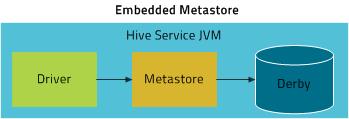
Embedded mode is the default metastore deployment mode for CDH. In this mode, the metastore uses a Derby database, and both the database and the metastore service are embedded in the main HiveServer2 process. Both are started for you when you start the HiveServer2 process. This mode requires the least amount of effort to configure, but it can support only one active user at a time and is not certified for production use.
Local Mode
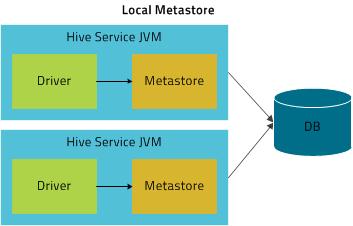
In Local mode, the Hive metastore service runs in the same process as the main HiveServer2 process, but the metastore database runs in a separate process, and can be on a separate host. The embedded metastore service communicates with the metastore database over JDBC.
Remote Mode
Cloudera recommends that you use this mode.
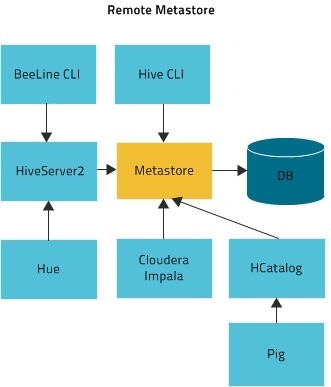
In Remote mode, the Hive metastore service runs in its own JVM process. HiveServer2, HCatalog, Impala, and other processes communicate with it using the Thrift network API (configured using the hive.metastore.uris property). The metastore service communicates with the metastore database over JDBC (configured using the javax.jdo.option.ConnectionURL property). The database, the HiveServer2 process, and the metastore service can all be on the same host, but running the HiveServer2 process on a separate host provides better availability and scalability.
The main advantage of Remote mode over Local mode is that Remote mode does not require the administrator to share JDBC login information for the metastore database with each Hive user. HCatalog requires this mode.
Supported Metastore Databases
Metastore Memory and Hardware Requirements
| Component | Java Heap | CPU | Disk | |
|---|---|---|---|---|
| HiveServer 2 | Single Connection | 4 GB | Minimum 4 dedicated cores |
Minimum 1 disk This disk is required for the following:
|
| 2-10 connections | 4-6 GB | |||
| 11-20 connections | 6-12 GB | |||
| 21-40 connections | 12-16 GB | |||
| 41 to 80 connections | 16-24 GB | |||
|
Cloudera recommends splitting HiveServer2 into multiple instances and load balancing them once you start allocating more than 16 GB to HiveServer2. The objective is to adjust the size to reduce the impact of Java garbage collection on active processing by the service. |
||||
|
Set this value using the Java Heap Size of HiveServer2 in Bytes Hive configuration property. For more information, see Tuning Hive in CDH. |
||||
| Hive Metastore | Single Connection | 4 GB | Minimum 4 dedicated cores |
Minimum 1 disk This disk is required so that the Hive metastore can store the following artifacts:
|
| 2-10 connections | 4-10 GB | |||
| 11-20 connections | 10-12 GB | |||
| 21-40 connections | 12-16 GB | |||
| 41 to 80 connections | 16-24 GB | |||
|
Set this value using the Java Heap Size of Hive Metastore Server in Bytes Hive configuration property. For more information, see Tuning Hive in CDH. |
||||
| Beeline CLI | Minimum: 2 GB | N/A | N/A | |
For information on configuring heap for the Hive metastore, as well as HiveServer2 and Hive clients, see Tuning Apache Hive in CDH.
General Metastore Tuning Recommendations
Generally, you need to limit concurrent connections to Hive metastore. A large number of open connections affects performance as does issues with the backend database, improper Hive use, such as extremely complex queries, a connection leak, and other issues. Try making the following changes:
- Buy an SSD for one or more Hive metastores.
- Cloudera recommends that a single query access no more than 10,000 table partitions. If the query joins tables, calculate the combined partition count accessed across all tables.
- Tune the backend (the RDBMS). HiveServer connects to HMS, and only HMS connects to the RDBMS. The longer the backend takes, the more memory the HMS needs to respond to the same
requests. Limit the number of connections in the backend database.
MySQL: For example, in /etc/my.cnf:
[mysqld]
datadir=/var/lib/mysql
max_connections=8192
. . .
MariaDB: For example, in /etc/systemd/system/mariadb.service.d/limits.conf:
[Service]
LimitNOFILE=24000
. . .
- Use default thrift properties (8K):
hive.server2.async.exec.threads 8192
hive.server2.async.exec.wait.queue.size 8192
hive.server2.thrift.max.worker.threads 8192
- Set datanucleus.connectionPool.maxPoolSize for your applications. For example, if poolSize = 100, with 3 HMS instances (one dedicated to compaction), and with 4 pools per server, you can accommodate 1200 connections.
Configuring the Metastore Database
This section describes how to configure Hive to use a remote database, with examples for MySQL, PostgreSQL, and Oracle.
The configuration properties for the Hive metastore are documented in the Hive Metastore Administration documentation on the Apache wiki.
Configuring a Remote MySQL Database for the Hive Metastore
- Install and start MySQL if you have not already done so
To install MySQL on a RHEL system:
sudo yum install mysql-serverTo install MySQL on a SLES system:sudo zypper install mysql sudo zypper install libmysqlclient_r17
To install MySQL on a Debian/Ubuntu system:sudo apt-get install mysql-serverAfter using the command to install MySQL, you may need to respond to prompts to confirm that you do want to complete the installation. After installation completes, start the mysql daemon.On RHEL systemssudo service mysqld startOn SLES and Debian/Ubuntu systemssudo service mysql start - Configure the MySQL service and JDBC driver
Before you can run the Hive metastore with a remote MySQL database, you must install the MySQL JDBC driver, set up the initial database schema, and configure the MySQL user account for the Hive user.
For instructions on installing the MySQL JDBC driver, see Installing the MySQL JDBC Driver.
Configure MySQL to use a strong password and to start at boot. Note that in the following procedure, your current root password is blank. Press the Enter key when you're prompted for the root password.
To set the MySQL root password:
$ sudo /usr/bin/mysql_secure_installation
[...]
Enter current password for root (enter for none):
OK, successfully used password, moving on...
[...]
Set root password? [Y/n] y
New password:
Re-enter new password:
Remove anonymous users? [Y/n] Y
[...]
Disallow root login remotely? [Y/n] N
[...]
Remove test database and access to it [Y/n] Y
[...]
Reload privilege tables now? [Y/n] Y
All done!
To make sure the MySQL server starts at boot:
- On RHEL systems:
$ sudo /sbin/chkconfig mysqld on
sudo /sbin/chkconfig --list mysqld
mysqld          0:off   1:off   2:on    3:on    4:on    5:on    6:off
- On SLES systems:
sudo chkconfig --add mysql- On Debian/Ubuntu systems:
sudo chkconfig mysql on - Create the database and user
The instructions in this section assume you are using Remote mode, and that the MySQL database is installed on a separate host from the metastore service, which is running on a host named metastorehost in the example.
Create the initial database schema. Cloudera recommends using the Metastore Schema Tool to do this.
If for some reason you decide not to use the schema tool, you can use the hive-schema-n.n.n.mysql.sql file instead; that file is located in the /usr/lib/hive/scripts/metastore/upgrade/mysql/ directory. (n.n.n is the current Hive version, for example 1.1.0.) Proceed as follows if you decide to use hive-schema-n.n.n.mysql.sql.
Example using hive-schema-n.n.nmysql.sql
$ mysql -u root -p
Enter password:
mysql> CREATE DATABASE metastore;
mysql> USE metastore;
mysql> SOURCE /usr/lib/hive/scripts/metastore/upgrade/mysql/hive-schema-n.n.n.mysql.sql;
You also need a MySQL user account for Hive to use to access the metastore. It is very important to prevent this user account from creating or altering tables in the metastore database schema.
Example
mysql> CREATE USER 'hive'@'metastorehost' IDENTIFIED BY 'mypassword';
...
mysql> REVOKE ALL PRIVILEGES, GRANT OPTION FROM 'hive'@'metastorehost';
mysql> GRANT ALL PRIVILEGES ON metastore.* TO 'hive'@'metastorehost';
mysql> FLUSH PRIVILEGES;
mysql> quit;
- Configure the metastore service to communicate with the MySQL database
This step shows the configuration properties you need to set in hive-site.xml (/usr/lib/hive/conf/hive-site.xml) to configure the metastore service to communicate with the MySQL database, and provides sample settings. Though you can use the same hive-site.xml on all hosts (client, metastore, HiveServer2), hive.metastore.uris is the only property that must be configured on all of them; the others are used only on the metastore host.
Given a MySQL database running on myhost and the user account hive with the password mypassword, set the configuration as follows (overwriting any existing values).
<property>
  <name>javax.jdo.option.ConnectionURL</name>
  <value>jdbc:mysql://myhost/metastore</value>
  <description>the URL of the MySQL database</description>
</property>

<property>
  <name>javax.jdo.option.ConnectionDriverName</name>
  <value>com.mysql.jdbc.Driver</value>
</property>

<property>
  <name>javax.jdo.option.ConnectionUserName</name>
  <value>hive</value>
</property>

<property>
  <name>javax.jdo.option.ConnectionPassword</name>
  <value>mypassword</value>
</property>

<property>
  <name>datanucleus.autoCreateSchema</name>
  <value>false</value>
</property>

<property>
  <name>datanucleus.fixedDatastore</name>
  <value>true</value>
</property>

<property>
  <name>datanucleus.autoStartMechanism</name>
  <value>SchemaTable</value>
</property>

<property>
  <name>hive.metastore.uris</name>
  <value>thrift://<n.n.n.n>:9083</value>
  <description>IP address (or fully-qualified domain name) and port of the metastore host</description>
</property>

<property>
<name>hive.metastore.schema.verification</name>
<value>true</value>
</property>
Configuring a Remote PostgreSQL Database for the Hive Metastore
- Install and start PostgreSQL if you have not already done so
To install PostgreSQL on a RHEL system:
sudo yum install postgresql-serverTo install PostgreSQL on a SLES system:
sudo zypper install postgresql-serverTo install PostgreSQL on a Debian/Ubuntu system:
sudo apt-get install postgresqlAfter using the command to install PostgreSQL, you may need to respond to prompts to confirm that you do want to complete the installation. In order to finish installation on RHEL compatible systems, you need to initialize the database. Please note that this operation is not needed on Ubuntu and SLES systems as it's done automatically on first start:
To initialize database files on RHEL compatible systems
sudo service postgresql initdbTo ensure that your PostgreSQL server will be accessible over the network, you need to do some additional configuration.
First you need to edit the postgresql.conf file. Set the listen_addresses property to *, to make sure that the PostgreSQL server starts listening on all your network interfaces. Also make sure that the standard_conforming_strings property is set to off.
You can check that you have the correct values as follows:
On Red-Hat-compatible systems:
$ sudo cat /var/lib/pgsql/data/postgresql.conf  | grep -e listen -e standard_conforming_strings
listen_addresses = '*'
standard_conforming_strings = off
On SLES systems:
$ sudo cat /var/lib/pgsql/data/postgresql.conf  | grep -e listen -e standard_conforming_strings
listen_addresses = '*'
standard_conforming_strings = off
On Ubuntu and Debian systems:
$ cat /etc/postgresql/9.1/main/postgresql.conf | grep -e listen -e standard_conforming_strings
listen_addresses = '*'
standard_conforming_strings = off
You also need to configure authentication for your network in pg_hba.conf. You need to make sure that the PostgreSQL user that you will create later in this procedure will have access to the server from a remote host. To do this, add a new line into pg_hba.con that has the following information:
host <database> <user> <network address> <mask> md5
The following example allows all users to connect from all hosts to all your databases:
host all all 0.0.0.0 0.0.0.0 md5
After completing the installation and configuration, you can start the database server:
Start PostgreSQL Server
sudo service postgresql startUse chkconfig utility to ensure that your PostgreSQL server will start at a boot time. For example:
chkconfig postgresql on
You can use the chkconfig utility to verify that PostgreSQL server will be started at boot time, for example:
chkconfig --list postgresql
- Install the PostgreSQL JDBC driver
Before you can run the Hive metastore with a remote PostgreSQL database, you must configure a JDBC driver to the remote PostgreSQL database, set up the initial database schema, and configure the PostgreSQL user account for the Hive user.
To install the PostgreSQL JDBC Driver on a RHEL 6 system:
On the Hive metastore server host, install postgresql-jdbc package and create symbolic link to the /usr/lib/hive/lib/ directory. For example:
sudo yum install postgresql-jdbc
ln -s /usr/share/java/postgresql-jdbc.jar /usr/lib/hive/lib/postgresql-jdbc.jar
To install the PostgreSQL JDBC Driver on a SLES system:
On the Hive metastore server host, install postgresql-jdbc and symbolically link the file into the /usr/lib/hive/lib/ directory.
$ sudo zypper install postgresql-jdbc
$ ln -s /usr/share/java/postgresql-jdbc.jar
/usr/lib/hive/lib/postgresql-jdbc.jar
To install the PostgreSQL JDBC Driver on a Debian/Ubuntu system:
On the Hive metastore server host, install libpostgresql-jdbc-java and symbolically link the file into the /usr/lib/hive/lib/ directory.
sudo apt-get install libpostgresql-jdbc-java
ln -s /usr/share/java/postgresql-jdbc4.jar /usr/lib/hive/lib/postgresql-jdbc4.jar
- Create the metastore database and user account
Proceed as in the following example, using the appropriate script in /usr/lib/hive/scripts/metastore/upgrade/postgres/ n.n.n is the current Hive version, for example 1.1.0:
$ sudo -u postgres psql
postgres=# CREATE USER hiveuser WITH PASSWORD 'mypassword';
postgres=# CREATE DATABASE metastore;
postgres=# \c metastore;
You are now connected to database 'metastore'.
postgres=# \i /usr/lib/hive/scripts/metastore/upgrade/postgres/hive-schema-n.n.n.postgres.sql
SET
SET
...
Now you need to grant permission for all metastore tables to user hiveuser. PostgreSQL does not have statements to grant the permissions for all tables at once; you'll need to grant the permissions one table at a time. You could automate the task with the following SQL script:bash# sudo -u postgres psql metastore=# \c metastore metastore=# \pset tuples_only on metastore=# \o /tmp/grant-privs metastore=# SELECT 'GRANT SELECT,INSERT,UPDATE,DELETE ON "' || schemaname || '". "' ||tablename ||'" TO hiveuser ;' metastore-# FROM pg_tables metastore-# WHERE tableowner = CURRENT_USER and schemaname = 'public'; metastore=# \o metastore=# \pset tuples_only off metastore=# \i /tmp/grant-privs
You can verify the connection from the machine where you'll be running the metastore service as follows:
psql -h myhost -U hiveuser -d metastore
metastore=#
- Configure the metastore service to communicate with the PostgreSQL database
This step shows the configuration properties you need to set in hive-site.xml (/usr/lib/hive/conf/hive-site.xml) to configure the metastore service to communicate with the PostgreSQL database. Though you can use the same hive-site.xml on all hosts (client, metastore, HiveServer2), hive.metastore.uris is the only property that must be configured on all of them; the others are used only on the metastore host.
Given a PostgreSQL database running on host myhost under the user account hive with the password mypassword, you would set configuration properties as follows.
<property>
  <name>javax.jdo.option.ConnectionURL</name>
  <value>jdbc:postgresql://myhost/metastore</value>
</property>

<property>
  <name>javax.jdo.option.ConnectionDriverName</name>
  <value>org.postgresql.Driver</value>
</property>

<property>
  <name>javax.jdo.option.ConnectionUserName</name>
  <value>hiveuser</value>
</property>

<property>
  <name>javax.jdo.option.ConnectionPassword</name>
  <value>mypassword</value>
</property>

<property>
  <name>datanucleus.autoCreateSchema</name>
  <value>false</value>
</property>

<property>
  <name>hive.metastore.uris</name>
  <value>thrift://<n.n.n.n>:9083</value>
  <description>IP address (or fully-qualified domain name) and port of the metastore host</description>
</property>

<property>
<name>hive.metastore.schema.verification</name>
<value>true</value>
</property>
- Test connectivity to the metastore
hive –e “show tables;”
Configuring a Remote Oracle Database for the Hive Metastore
Before you can run the Hive metastore with a remote Oracle database, you must configure a connector to the remote Oracle database, set up the initial database schema, and configure the Oracle user account for the Hive user.
- Install and start Oracle
The Oracle database is not part of any Linux distribution and must be purchased, downloaded and installed separately. You can use the Express edition, which can be downloaded free from the Oracle website.
- Install the Oracle JDBC Driver
You must download the Oracle JDBC Driver from the Oracle website and put the JDBC JAR file into the /usr/lib/hive/lib/ directory. For example, the version 6 JAR file is named ojdbc6.jar. To download the JDBC driver, visit the Oracle JDBC and UCP Downloads page, and click on the link for your Oracle Database version. Download the ojdbc6.jar file (or ojdbc8.jar, for Oracle Database 12.2).
sudo mv ojdbc<version_number>.jar /usr/lib/hive/lib/ - Create the metastore database and user account
Connect to your Oracle database as an administrator and create the user that will use the Hive metastore.
$ sqlplus "sys as sysdba"
SQL> create user hiveuser identified by mypassword;
SQL> grant connect to hiveuser;
SQL> grant all privileges to hiveuser;
Connect as the newly created hiveuser user and load the initial schema, as in the following example. Use the appropriate script for the current release (for example hive-schema-1.1.0.oracle.sql) in /usr/lib/hive/scripts/metastore/upgrade/oracle/ :
$ sqlplus hiveuser
SQL> @/usr/lib/hive/scripts/metastore/upgrade/oracle/hive-schema-n.n.n.oracle.sql
Connect back as an administrator and remove the power privileges from user hiveuser. Then grant limited access to all the tables:
$ sqlplus "sys as sysdba"
SQL> revoke all privileges from hiveuser;
SQL> BEGIN
  2     FOR R IN (SELECT owner, table_name FROM all_tables WHERE owner='HIVEUSER') LOOP
  3        EXECUTE IMMEDIATE 'grant  SELECT,INSERT,UPDATE,DELETE on '||R.owner||'.'||R.table_name||' to hiveuser';
  4     END LOOP;
  5  END;
  6
  7  /
- Configure the metastore service to Communicate with the Oracle Database
This step shows the configuration properties you need to set in hive-site.xml (/usr/lib/hive/conf/hive-site.xml) to configure the metastore service to communicate with the Oracle database, and provides sample settings. Though you can use the same hive-site.xml on all hosts (client, metastore, HiveServer2), hive.metastore.uris is the only property that must be configured on all of them; the others are used only on the metastore host.
Example
Given an Oracle database running on myhost and the user account hiveuser with the password mypassword, set the configuration as follows (overwriting any existing values):
<property>
  <name>javax.jdo.option.ConnectionURL</name>
  <value>jdbc:oracle:thin:@//myhost/xe</value>
</property>

<property>
  <name>javax.jdo.option.ConnectionDriverName</name>
  <value>oracle.jdbc.OracleDriver</value>
</property>

<property>
  <name>javax.jdo.option.ConnectionUserName</name>
  <value>hiveuser</value>
</property>

<property>
  <name>javax.jdo.option.ConnectionPassword</name>
  <value>mypassword</value>
</property>

<property>
  <name>datanucleus.autoCreateSchema</name>
  <value>false</value>
</property>

<property>
  <name>datanucleus.fixedDatastore</name>
  <value>true</value>
</property>

<property>
  <name>hive.metastore.uris</name>
  <value>thrift://<n.n.n.n>:9083</value>
  <description>IP address (or fully-qualified domain name) and port of the metastore host</description>
</property>

<property>
<name>hive.metastore.schema.verification</name>
<value>true</value>
</property>
