Install and Configure Oracle Database for Cloudera Software
To use an Oracle database, follow these procedures. For information on compatible versions of the Oracle database, see CDH and Cloudera Manager Supported Databases.
- Collecting Oracle Database Information
- Configuring the Oracle Server
- Installing the Oracle JDBC Connector
- Creating Databases for Cloudera Software
- Configuring the Hue Server to Store Data in Oracle (Client Parcel)
- Configuring the Hue Server to Store Data in Oracle (Client Package)
- Configuring an Oracle Database for Cloudera Manager
Collecting Oracle Database Information
To configure Cloudera Manager to work with an Oracle database, get the following information from your Oracle DBA:
- Hostname - The DNS name or the IP address of the host where the Oracle database is installed.
- SID - The name of the schema that will store Cloudera Manager information.
- Username - A username for each schema that is storing information. You could have four unique usernames for the four schema.
- Password - A password corresponding to each username.
Configuring the Oracle Server
Adjusting Oracle Settings to Accommodate Larger Clusters
- Enable direct and asynchronous I/O by setting the FILESYSTEMIO_OPTIONS parameter to SETALL.
- Increase the RAM available to Oracle by changing the MEMORY_TARGET parameter. The amount of memory to assign depends on the size of the Hadoop cluster.
- Create more redo log groups and spread the redo log members across separate disks or logical unit numbers.
- Increase the size of redo log members to be at least 1 GB.
Reserving Ports for HiveServer 2
HiveServer2 uses port 10000 by default, but Oracle database changes the local port range. This can cause HiveServer2 to fail to start.
Manually reserve the default port for HiveServer2. For example, the following command reserves port 10000 and inserts a comment indicating the reason:
echo << EOF > /etc/sysctl.cnf
# HS2 uses port 10000
net.ipv4.ip_local_reserved_ports = 10000
EOF
sysctl -q -w net.ipv4.ip_local_reserved_ports=10000Modifying the Maximum Number of Oracle Connections
Work with your Oracle database administrator to ensure appropriate values are applied for your Oracle database settings. You must determine the number of connections, transactions, and sessions to be allowed.
Allow 100 maximum connections for each service that requires a database and then add 50 extra connections. For example, for two services, set the maximum connections to 250. If you have five services that require a database on one host (the databases for Cloudera Manager Server, Activity Monitor, Reports Manager, Cloudera Navigator, and Hive metastore), set the maximum connections to 550.
From the maximum number of connections, you can determine the number of anticipated sessions using the following formula:
sessions = (1.1 * maximum_connections) + 5
For example, if a host has a database for two services, anticipate 250 maximum connections. If you anticipate a maximum of 250 connections, plan for 280 sessions.
Once you know the number of sessions, you can determine the number of anticipated transactions using the following formula:
transactions = 1.1 * sessions
Continuing with the previous example, if you anticipate 280 sessions, you can plan for 308 transactions.
Work with your Oracle database administrator to apply these derived values to your system.
Using the sample values above, Oracle attributes would be set as follows:
alter system set processes=250;
alter system set transactions=308;
alter system set sessions=280;
Ensuring Your Oracle Database Supports UTF8
The database you use must support UTF8 character set encoding. You can implement UTF8 character set encoding in Oracle databases by using the dbca utility. In this case, you can use the characterSet AL32UTF8 option to specify proper encoding. Consult your DBA to ensure UTF8 encoding is properly configured.
Installing the Oracle JDBC Connector
You must install the JDBC connector on the Cloudera Manager Server host and any other hosts that use a database.
Cloudera recommends that you assign all roles that require a database on the same host and install the connector on that host. Locating all such roles on the same host is recommended but not required. If you install a role, such as Activity Monitor, on one host and other roles on a separate host, you would install the JDBC connector on each host running roles that access the database.
- Download the Oracle JDBC Driver from the Oracle website. For example, the version 6 JAR file is named ojdbc6.jar.
For more information about supported Oracle Java versions, see CDH and Cloudera Manager Supported JDK Versions.
To download the JDBC driver, visit the Oracle JDBC and UCP Downloads page, and click on the link for your Oracle Database version. Download the ojdbc6.jar file (or ojdbc8.jar, for Oracle Database 12.2).
- Copy the Oracle JDBC JAR file to /usr/share/java/oracle-connector-java.jar. The Cloudera Manager databases and the Hive Mestastore database use this
shared file. For example:
mkdir /usr/share/java
cp /tmp/ojdbc6.jar /usr/share/java/oracle-connector-java.jar
Creating Databases for Cloudera Software
- Cloudera Manager Server
- Cloudera Management Service roles:
- Activity Monitor (if using the MapReduce service in a CDH 5 cluster)
- Reports Manager
- Hue
- Each Hive metastore
- Sentry Server
- Cloudera Navigator Audit Server
- Cloudera Navigator Metadata Server
- Oozie
You can create the Oracle database, schema and users on the host where the Cloudera Manager Server will run, or on any other hosts in the cluster. For performance reasons, you should install each database on the host on which the service runs, as determined by the roles you assign during installation or upgrade. In larger deployments or in cases where database administrators are managing the databases the services use, you can separate databases from services, but use caution.
The database must be configured to support UTF-8 character set encoding.
Record the values you enter for database names, usernames, and passwords. The Cloudera Manager installation wizard requires this information to correctly connect to these databases.
- Log into the Oracle client:
sqlplus system@localhostEnter password: ******
- Create a user and schema for each service you are using from the below table:
create user <user> identified by <password> default tablespace <tablespace>;
grant CREATE SESSION to <user>;
grant CREATE TABLE to <user>;
grant CREATE SEQUENCE to <user>;
grant EXECUTE on sys.dbms_lob to <user>;
You can use any value you want for <schema>, <user>, and <password>. The following examples are the default names provided in the Cloudera Manager configuration settings, but you are not required to use them:
Databases for Cloudera Software Service Database User Cloudera Manager Server scm scm Activity Monitor amon amon Reports Manager rman rman Hue hue hue Hive Metastore Server metastore hive Sentry Server sentry sentry Cloudera Navigator Audit Server nav nav Cloudera Navigator Metadata Server navms navms Oozie oozie oozie - Grant a quota on the tablespace (the default tablespace is SYSTEM) where tables will be created:
ALTER USER <user> quota 100m on <tablespace>;or for unlimited space:ALTER USER username quota unlimited on <tablespace>; - Set the following additional privileges for Oozie:
grant alter index to oozie;
grant alter table to oozie;
grant create index to oozie;
grant create sequence to oozie;
grant create session to oozie;
grant create table to oozie;
grant drop sequence to oozie;
grant select dictionary to oozie;
grant drop table to oozie;
alter user oozie quota unlimited on <tablespace>;
- Set the following additional privileges for the Cloudera Navigator Audit Server database:
GRANT EXECUTE ON sys.dbms_crypto TO nav;
GRANT CREATE VIEW TO nav;
where <nav> is the Navigator Audit Server user you specified above when you created the database.
For further information about Oracle privileges, see Authorization: Privileges, Roles, Profiles, and Resource Limitations.
Configuring the Hue Server to Store Data in Oracle (Client Parcel)
To install and configure the Oracle server and client repository for Hue, see Connect Hue to Oracle with Client Parcel
Connect Hue Service to Oracle
You can connect Hue to your Oracle database while installing CDH (and Hue) or with an existing installation. With existing CDH installations, you can connect and restart Hue, without saving the data in your current database, or you can migrate the old data into Oracle.
New CDH Installation
See Cloudera Installation Guide to install Cloudera Manager (and its Installation Wizard), which you will use here to install CDH and the Oracle client.
Install CDH and Oracle Parcel
- Open the Cloudera Manager Admin Console and run the Cloudera Manager Installation Wizard to install CDH (and Hue). The URL for Cloudera Manager is: http://<cm server hostname>:7180
- Stop at Select Repository to add the Oracle client parcel repository (Cluster Installation, step 1):
- Choose Method Use Parcels and click More Options.
- Click
 and add the URL for your Oracle Remote
Parcel Repository:
and add the URL for your Oracle Remote
Parcel Repository:

- Click Save Changes.
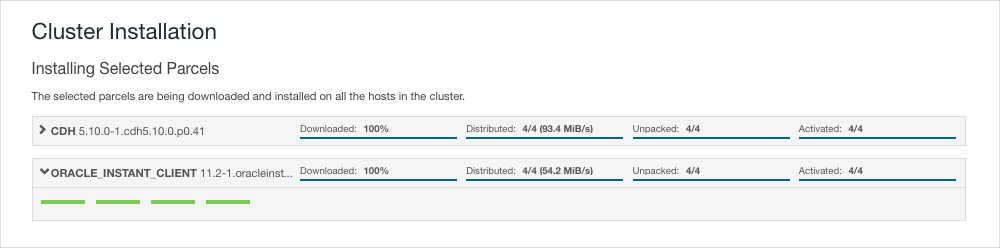
- Select the newly added radio button by ORACLE_INSTANT_CLIENT and click Continue.

The Oracle parcel is downloaded, distributed, and activated at Cluster Installation, step 6 (Installing Selected Parcels).
Connect Hue to Oracle
Continuing with Cloudera Manager Installation Wizard …
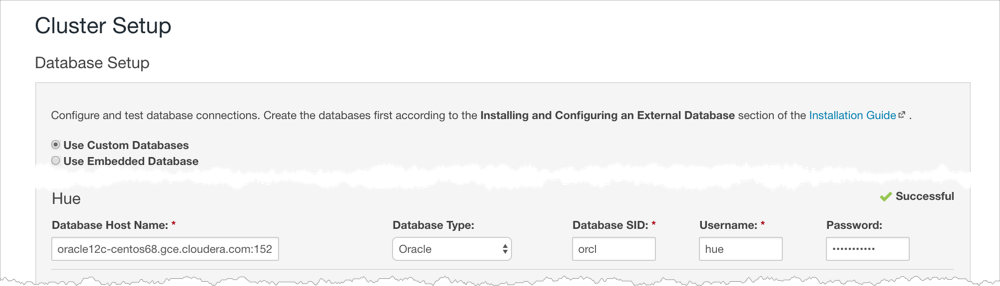
- Stop at Database Setup to set connection properties (Cluster Setup, step 3).
- Select Use Custom Database.
- Under Hue, set the connection properties to the Oracle database.
Database Hostname (and port): <fqdn of host with Oracle server>:1521
Database Type (or engine): Oracle
Database SID (or name): orcl
Database Username: hue
Database Password: <hue database password>
- Click Test Connection and click Continue when successful.
- Continue with the installation and click Finish to complete.
- Add support for a multi-threaded environment:
- Go to .
- Filter by Category, Hue-service and Scope, Advanced.
- Add support for a multi-threaded environment by setting Hue Service Advanced Configuration Snippet (Safety Valve) for hue_safety_valve.ini:
[desktop] [[database]] options={"threaded":true} - Click Save Changes.
- Restart the Hue service: select and click Restart.
- Log on to Hue by clicking Hue Web UI.
Existing CDH Installation
Activate Oracle Client Parcel
- Log on to Cloudera Manager.
- Go to the Parcels page by clicking (or clicking the parcels icon
 ).
). - Click the .
- Find ORACLE_INSTANT_CLIENT and click Download, Distribute, and Activate.

Connect Hue to Oracle
If you are not migrating the current (or old) database, simply connect to your new Oracle database and restart Hue. See Connect Hue to an External Database.
- [migration only] Stop Hue Service
- In Cloudera Manager, navigate to .
- Select .
- [migration only] Dump Current Database
- Select .
- Click Dump Database. The file is written to /tmp/hue_database_dump.json on the host of the Hue server.
- Log on to the host of the Hue server in a command-line terminal.
- Edit /tmp/hue_database_dump.json by removing all objects with useradmin.userprofile in the
model field. For example:
# Count number of objects
grep -c useradmin.userprofile /tmp/hue_database_dump.json
vi /tmp/hue_database_dump.json
{
  "pk": 1,
  "model": "useradmin.userprofile",
  "fields": {
    "last_activity": "2016-10-03T10:06:13",
    "creation_method": "HUE",
    "first_login": false,
    "user": 1,
    "home_directory": "/user/admin"
  }
},
{
  "pk": 2,
  "model": "useradmin.userprofile",
  "fields": {
    "last_activity": "2016-10-03T10:27:10",
    "creation_method": "HUE",
    "first_login": false,
    "user": 2,
    "home_directory": "/user/alice"
  }
},
- Connect to New Database
- Configure Database connections:
- Go to and filter by category, Database.
- Set database properties and click Save Changes:
Hue Database Type (or engine): Oracle
Hue Database Hostname: <fqdn of host with Oracle server>
Hue Database Port: 1521
Hue Database Username: hue
Hue Database Password: <hue database password>
Hue Database Name (or SID): orcl
- Add support for a multi-threaded environment:
- Filter by Category, Hue-service and Scope, Advanced.
- Set Hue Service Advanced Configuration Snippet (Safety Valve) for hue_safety_valve.ini and click Save Changes:
[desktop]
[[database]]
options={"threaded":true}
- Configure Database connections:
- [migration only] Synchronize New Database
- Select
- Click Synchronize Database.
- [migration only] Load Data from Old Database
sqlplus hue/<your hue password> < delete_from_tables.ddl
- Re/Start Hue service
- Navigate to .
- Select , and click Start.
- Click Hue Web UI to log on to Hue with a custom Oracle database.
Configuring the Hue Server to Store Data in Oracle (Client Package)
To install and configure the Oracle server and client repository for Hue, see Connect Hue to Oracle with Client Package
Connect Hue Service to Oracle
You can connect Hue to your Oracle database while installing CDH (and Hue) or with an existing installation. With existing CDH installations, you can connect and restart Hue, without saving the data in your current database, or you can migrate the old data into Oracle.
Continue reading:
New CDH Installation
See Cloudera Installation Guide to install Cloudera Manager (and its Installation Wizard), which you will use here to install CDH and the Oracle client.
- Open the Cloudera Manager Admin Console and run the Cloudera Manager Installation Wizard to install CDH (and Hue). The URL for Cloudera Manager is: http://<cm server hostname>:7180
- Stop at the end of Cluster Installation to copy the latest cx_Oracle package into Hue's Python environment.

- Stop at Database Setup to set connection properties (Cluster Setup, step 3).
- Select Use Custom Database.
- Under Hue, set the connection properties to the Oracle database.
Database Hostname (and port): <fqdn of host with Oracle server>:1521
Database Type (or engine): Oracle
Database SID (or name): orcl
Database Username: hue
Database Password: <hue database password>
- Click Test Connection and click Continue when successful.
- Continue with the installation and click Finish to complete.
- Add support for a multi-threaded environment:
- Go to .
- Filter by Category, Hue-service and Scope, Advanced.
- Add support for a multi-threaded environment by setting Hue Service Advanced Configuration Snippet (Safety Valve) for hue_safety_valve.ini:
[desktop] [[database]] options={"threaded":true} - Click Save Changes.
- Restart the Hue service: select and click Restart.
- Log on to Hue by clicking Hue Web UI.
Existing CDH Installation
If you are not migrating the current (or old) database, simply connect to your new Oracle database and restart Hue. See Connect Hue to an External Database.
- [migration only] Stop Hue Service
- In Cloudera Manager, navigate to .
- Select .
- [migration only] Dump Current Database
- Select .
- Click Dump Database. The file is written to /tmp/hue_database_dump.json on the host of the Hue server.
- Log on to the host of the Hue server in a command-line terminal.
- Edit /tmp/hue_database_dump.json by removing all objects with useradmin.userprofile in the model field. For example:
# Count number of objects
grep -c useradmin.userprofile /tmp/hue_database_dump.json
vi /tmp/hue_database_dump.json
{
  "pk": 1,
  "model": "useradmin.userprofile",
  "fields": {
    "last_activity": "2016-10-03T10:06:13",
    "creation_method": "HUE",
    "first_login": false,
    "user": 1,
    "home_directory": "/user/admin"
  }
},
{
  "pk": 2,
  "model": "useradmin.userprofile",
  "fields": {
    "last_activity": "2016-10-03T10:27:10",
    "creation_method": "HUE",
    "first_login": false,
    "user": 2,
    "home_directory": "/user/alice"
  }
},
- Connect to New Database
- Configure Database connections: Go to , filter by
Database, set properties, and click Save Changes:
Hue Database Type (or engine): Oracle
Hue Database Hostname: <fqdn of host with Oracle server>
Hue Database Port: 1521
Hue Database Username: hue
Hue Database Password: <hue database password>
Hue Database Name (or SID): orcl
- Add support for a multi-threaded environment: Filter by Hue-service, set Hue Service Advanced Configuration Snippet (Safety
Valve) for hue_safety_valve.ini, and click Save Changes:
[desktop]
[[database]]
options={"threaded":true}
- Configure Database connections: Go to , filter by
Database, set properties, and click Save Changes:
- [migration only] Synchronize New Database
- Select
- Click Synchronize Database.
- [migration only] Load Data from Old Database
sqlplus hue/<hue_password> < delete_from_tables.ddl - Re/Start Hue service
- Navigate to .
- Select , and click Start.
- Click Hue Web UI to log on to Hue with a custom Oracle database.
Configuring an Oracle Database for Cloudera Manager
After completing the above instructions to install and configure Oracle databases for Cloudera software, continue to Step 5: Set up the Cloudera Manager Database to configure a database for Cloudera Manager.
