Modifying Configuration Properties Using Cloudera Manager
Minimum Required Role: Configurator (also provided by Cluster Administrator, Full Administrator)
When a service is added to Cloudera Manager, either through the installation or upgrade wizard or with the Add Services workflow, Cloudera Manager automatically sets the configuration properties, based on the needs of the service and characteristics of the cluster in which it will run. These configuration properties include both service-wide configuration properties, as well as specific properties for each role type associated with the service, managed through role groups. A role group is a set of configuration properties for a role type, as well as a list of role instances associated with that group. Cloudera Manager automatically creates a default role group named Role Type Default Group for each role type. See Role Groups.
Changing the Configuration of a Service or Role Instance
- Go to the service status page. ()
- Click the Configuration tab.
- Locate the property you want to edit. You can type all or part of the property name in the search box, or use the
filters on the left side of the screen:
-
The Status section limits the displayed properties by their status. Possible statuses include:
- Error
- Warning
- Edited
- Non-default
- Has Overrides
-
The Scope section of the left hand panel organizes the configuration properties by role types; first those that are Service-Wide, followed by various role types within the service. When you select one of these roles, a set of properties whose values are managed by the default role group for the role display. Any additional role groups that apply to the property also appear in this panel and you can modify values for each role group just as you can the default role group.
-
The Category section of the left hand panel allows you to limit the displayed properties by category.
-
- Edit the property value.
- To facilitate entering some types of values, you can specify not only the value, but also the units that apply to the value. for example, to enter a setting that specifies bytes per second, you can choose to enter the value in bytes (B), KiBs, MiBs, or GiBs—selected from a drop-down menu that appears when you edit the value.
- If the property allows a list of values, click the
 icon to the right of the edit field to add an
additional field. An example of this is the HDFS DataNode Data Directory property, which can have a comma-delimited list of directories as its value. To remove an item from such a list, click the
icon to the right of the edit field to add an
additional field. An example of this is the HDFS DataNode Data Directory property, which can have a comma-delimited list of directories as its value. To remove an item from such a list, click the
 icon to the right of the field you want to remove.
Many configuration properties have different values that are configured by multiple role groups. (See Role Groups).
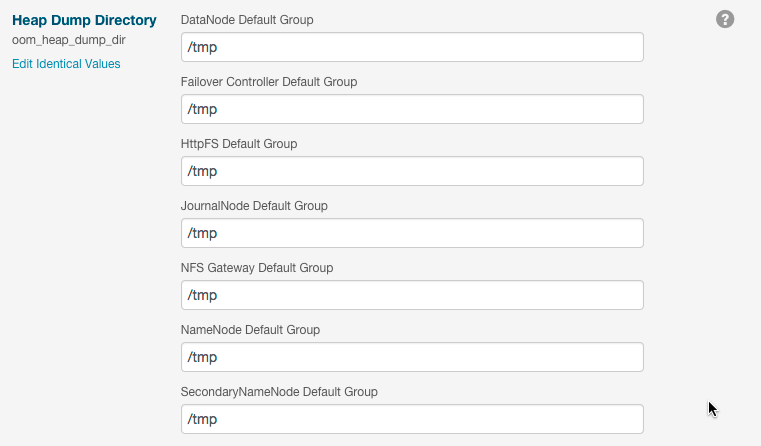
To edit configuration values for multiple role groups:- Go to the property, For example, the configuration panel for the Heap Dump Directory property displays the DataNode Default Group (a role group), and
a link that says ... and 6 others.

- Click the ... and 6 others link to display all of the role groups:

- Click the Show fewer link to collapse the list of role groups.
If you edit the single value for this property, Cloudera Manager applies the value to all role groups. To edit the values for one or more of these role groups individually, click Edit Individual Values. Individual fields display where you can edit the values for each role group. For example:
- Click Save Changes to commit the changes. You can add a note that is included with the change in the Configuration History. This changes the setting for
the role group, and applies to all role instances associated with that role group. Depending on the change you made, you may need to restart the service or roles associated with the configuration you
just changed. Or, you may need to redeploy your client configuration for the service. You should see a message to that effect at the top of the Configuration page, and services will display an
outdated configuration
 (Restart Needed),
 (Refresh Needed), or outdated client configuration
  indicator. Click the indicator to display the Stale Configurations page.
Searching for Properties
Validation of Configuration Properties
Cloudera Manager validates the values you specify for configuration properties. If you specify a value that is outside the recommended range of values or is invalid, Cloudera Manager displays a warning at the top of the Configuration tab and in the text box after you click Save Changes. The warning is yellow if the value is outside the recommended range of values and red if the value is invalid.
Overriding Configuration Properties
- Go to the Status page for the service whose role you want to change.
- Click the Instances tab.
- Click the role instance you want to change.
- Click the Configuration tab.
- Change the configuration values as appropriate.
- Save your changes.
You will most likely need to restart your service or role to have your configuration changes take effect. See Stale Configuration Actions.
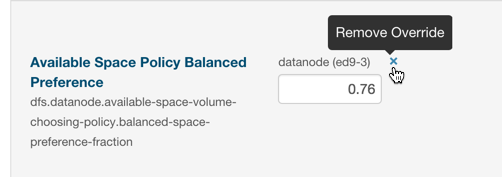
Viewing and Editing Overridden Configuration Properties
To see a list of all role instances that have an override value for a particular configuration setting, go to the Status page for the service and select . A list of configuration properties where values have been overridden displays.
The panel for each configuration property displays the values for each role group or instance. You can edit the value of this property for this instance, or, you can click the  icon next to an instance name to remove the overridden value.
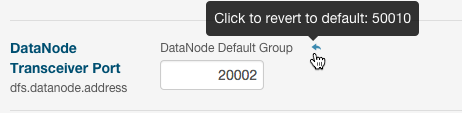
Resetting Configuration Properties to the Default Value
To reset a property back to its default value, click the  icon. The default value is
inserted and the icon turns into an Undo icon (
icon. The default value is
inserted and the icon turns into an Undo icon ( ). Explicitly setting a configuration to the same value as
its default (inherited value) has the same effect as using the icon.
). Explicitly setting a configuration to the same value as
its default (inherited value) has the same effect as using the icon.
There is no mechanism for resetting to an autoconfigured value. However, you can use the configuration history and rollback feature to revert any configuration changes.
Viewing and Editing Host Overrides
You can override the properties of individual hosts in your cluster.
- Click the Hosts tab.
- Click the Configuration tab.
- Use the Filters or Search box to locate the property that you want to override.
- Click the Manage Host Overrides link.
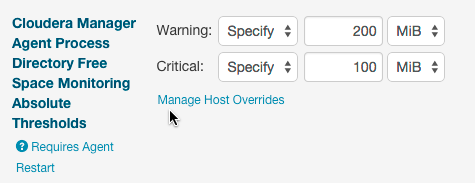
The Manage Overrides dialog box displays.
- Select one or more hosts to override this property.
- Click Update.
A new entry area displays where you can enter the override values. In the example below, servers ed9-e.ent.cloudera.com and ed9-r.cloudera.com were selected for overrides. Note that the first set of fields displays the value set for all hosts and the two sets of fields that follow allow you to edit the override values for each specified host.
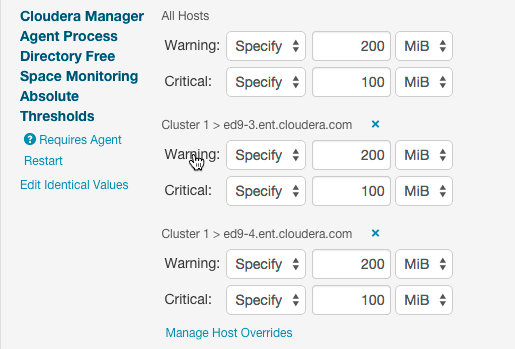
To remove the override, click the
icon next to the hostname.To apply the same value to all hosts, click Edit Identical Values. Click Edit Individual Values to apply different values to selected hosts.
- If the property indicates Requires Agent Restart, restart the agent on the affected hosts.
Restarting Services and Instances after Configuration Changes
- Follow the instructions in Restarting a Service or Starting, Stopping, and Restarting Role Instances.
- If you see a Finished status, the service or role instances have restarted.
- Go to the tab. The service should show a Status of Started for all instances and a health status of Good.
Suppressing Configuration and Parameter Validation Warnings
You can suppress the warnings that Cloudera Manager issues when a configuration value is outside the recommended range or is invalid. If a warning does not apply to your deployment, you might want to suppress it. Suppressed validation warnings are still retained by Cloudera Manager, and you can unsuppress the warnings at any time. You can suppress each warning when you view it, or you can configure suppression for a specific validation before warnings occur.
Suppressing a Configuration Validation in Cloudera Manager
- Click the Suppress... link to suppress the warning.
A dialog box opens where you can enter a comment about the suppression.
- Click Confirm.
You can also suppress warnings from the All Configuration Issues screen:
- Browse to the Home screen.
- Click .
- Locate the validation message in the list and click the Suppress... link.
A dialog box opens where you can enter a comment about the suppression.
- Click Confirm.
The suppressed validation warning is now hidden.
Managing Suppressed Validations
- Click the Show # Suppressed Warning(s) link to show the warnings.
Each suppressed warning displays an icon:
 .
. - Click the Unsuppress... link to unsuppress the configuration validation.
- Click the Hide Suppressed Warnings link to re-hide the suppressed warnings.
Suppressing Configuration Validations Before They Trigger Warnings
- Go to the service or host with the configuration validation warnings you want to suppress.
- Click .
- In the filters on the left, select .
A list of suppression properties displays. The names of the properties begin with Suppress Parameter Validation or Suppress Configuration Validator. You can also use the Search function to limit the number of properties that display.
- Select a suppression property to suppress the validation warning.
- Enter a Reason for change, and then click Save Changes to commit the changes.
