Launching Cloudbreak on AWS
Before launching Cloudbreak on AWS, review and meet the prerequisites. Next, launch a VM using a Cloudbreak Amazon Machine Image, access the VM, and then start Cloudbreak. Once Cloudbreak is running, log in to the Cloudbreak UI and create a Cloudbreak credential.
Meet the Prerequisites
Before launching Cloudbreak on AWS, you must meet the following prerequisites.
AWS Account
In order to launch Cloudbreak on AWS, you must log in to your AWS account. If you don't have an account, you can create one at https://aws.amazon.com/.
AWS Region
Decide in which AWS region you would like to launch Cloudbreak. The following AWS regions are supported:
| Region Name | Region |
|---|---|
| EU (Ireland) | eu-west-1 |
| EU (Frankfurt) | eu-central-1 |
| US East (N. Virginia) | us-east-1 |
| US West (N. California) | us-west-1 |
| US West (Oregon) | us-west-2 |
| South America (São Paulo) | sa-east-1 |
| Asia Pacific (Tokyo) | ap-northeast-1 |
| Asia Pacific (Singapore) | ap-southeast-1 |
| Asia Pacific (Sydney) | ap-southeast-2 |
Clusters created via Cloudbreak can be in the same or different region as Cloudbreak; when you launch a cluster, you select the region in which to launch it.
Related Links
AWS Regions and Endpoints (External)
SSH Key Pair
Import an existing key pair or generate a new key pair in the AWS region which you are planning to use for launching Cloudbreak and clusters. You can do this using the following steps.
Steps
- Navigate to the Amazon EC2 console at https://console.aws.amazon.com/ec2/.
- Check the region listed in the top right corner to make sure that you are in the correct region.
- In the left pane, find NETWORK AND SECURITY and click Key Pairs.
- Do one of the following:
- Click Create Key Pair to create a new key pair. Your private key file will be automatically downloaded onto your computer. Make sure to save it in a secure location. You will need it to SSH to the cluster nodes. You may want to change access settings for the file using
chmod 400 my-key-pair.pem. - Click Import Key Pair to upload an existing public key and then select it and click Import. Make sure that you have access to its corresponding private key.
- Click Create Key Pair to create a new key pair. Your private key file will be automatically downloaded onto your computer. Make sure to save it in a secure location. You will need it to SSH to the cluster nodes. You may want to change access settings for the file using
You need this SSH key pair to SSH to the Cloudbreak instance and start Cloudbreak.
Related Links
Creating a Key Pair Using Amazon EC2 (External)
Authentication
Before you can start using Cloudbreak for provisioning clusters, you must select a way for Cloudbreak to authenticate with your AWS account and create resources on your behalf. There are two ways to do this:
-
Key-based: This is a simpler option which does not require additional configuration at this point. It requires that you provide your AWS access key and secret key pair in the Cloudbreak web UI later. All you need to do now is check your AWS account and ensure that you can access this key pair.
-
Role-based: This requires that you or your AWS admin create an IAM role to allow Cloudbreak to assume AWS roles (the "AssumeRole" policy).
(Option 1) Configure Key-based Authentication
If you are using key-based authentication for Cloudbreak on AWS, you must be able to provide your AWS access key and secret key pair. Cloudbreak will use these keys to launch the resources. You must provide the access and secret keys later in the Cloudbreak web UI later when creating a credential.
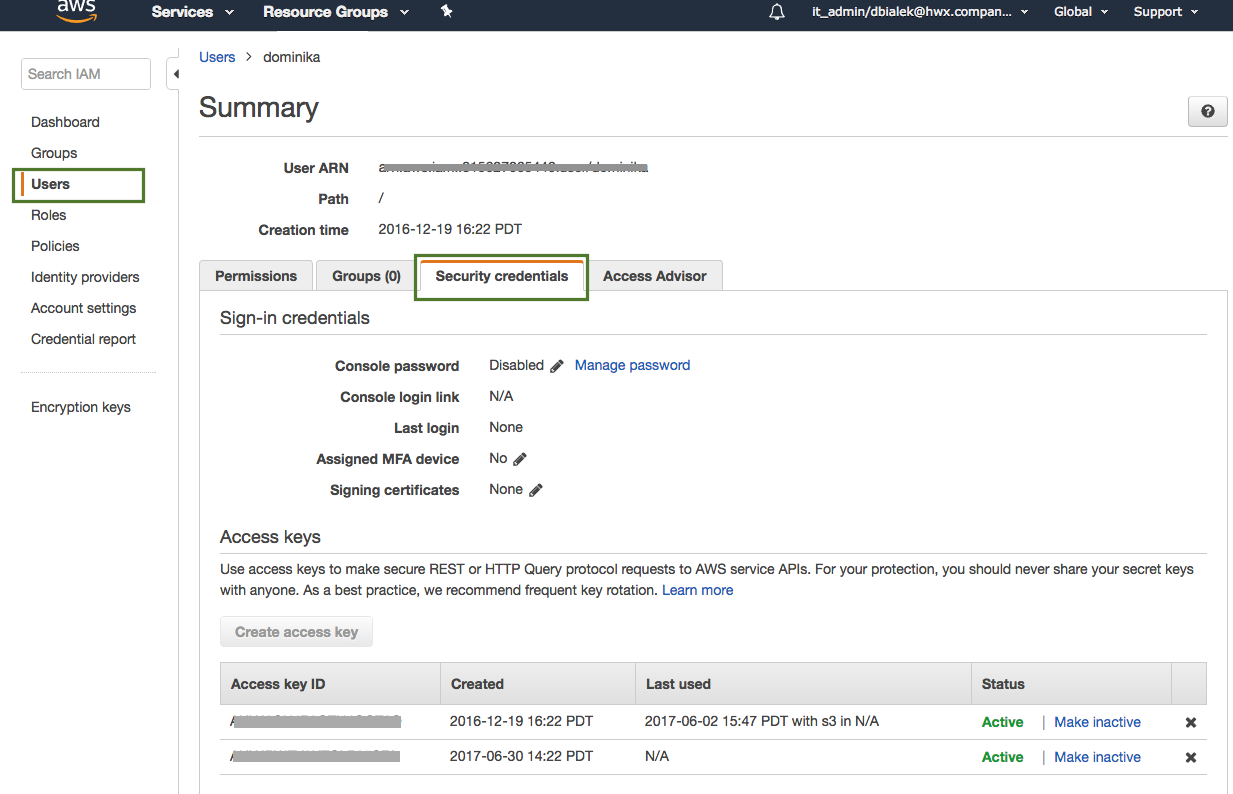
If you choose this option, all you need to do at this point is check your AWS account and make sure that you can access this key pair. You can generate new access and secret keys from the IAM Console > Users. Next, select a user and click on the Security credentials tab:
If you choose this option, you can proceed to Launch the VM.
(Option 2) Configure Role-based Authentication
If you are using role-based authentication for Cloudbreak on AWS, you must create two IAM roles: one to grant Cloudbreak access to allow Cloudbreak to assume AWS roles (using the "AssumeRole" policy) and the second one to provide Cloudbreak with the capabilities required for cluster creation (using the "cb-policy" policy).
The following table provides contextual information about the two roles required:
| Role | Purpose | Overview of Steps | Configuration |
|---|---|---|---|
| CloudbreakRole | Allows Cloudbreak to assume other IAM roles - specifically the CredentialRole. | Create a role called "CloudbreakRole" and attach the "AssumeRole" policy. The "AssumeRole" policy definition and steps for creating the CloudbreakRole are provided below. | When launching your Cloudbreak VM, during Step 3: Configure Instance Details > IAM, you will attach the "CloudbreakRole" IAM role to the VM. |
| CredentialRole | Allows Cloudbreak to create AWS resources required for clusters. | Create a new IAM role called "CredentialRole" and attach the "cb-policy" policy to it. The "cb-policy" policy definition and steps for creating the CredentialRole are provided below. When creating this role using the AWS Console, make sure that that it is a role for cross-account access and that the trust-relation is set up as follows: 'Account ID' is your own 12-digit AWS account ID and 'External ID' is “provision-ambari”. See steps below. |
Once you log in to the Cloudbreak UI and are ready to create clusters, you will use this role to create the Cloudbreak credential. |
Alternatively, instead of attaching the "CloudbreakRole" role during the VM launch, you can assign the "CloudbreakRole" to an IAM user and then add the access and secret key of that user to your 'Profile'.
Alternatively you can generate the "CredentialRole" role later once your Cloudbreak VM is running by SSHing to the Cloudbreak VM and running the
cbd aws generate-rolecommand. This command creates a role with the name "cbreak-deployer" (equivalent to the "CredentialRole"). To customize the name of the role, addexport AWS_ROLE_NAME=my-cloudbreak-role-name(where "my-cloudbreak-role-name" is your custom role name) as a new line to your Profile. If you choose this option, you must make sure that the "CloudbreakRole" or the IAM user have a permission not only to assume a role but also to create a role.
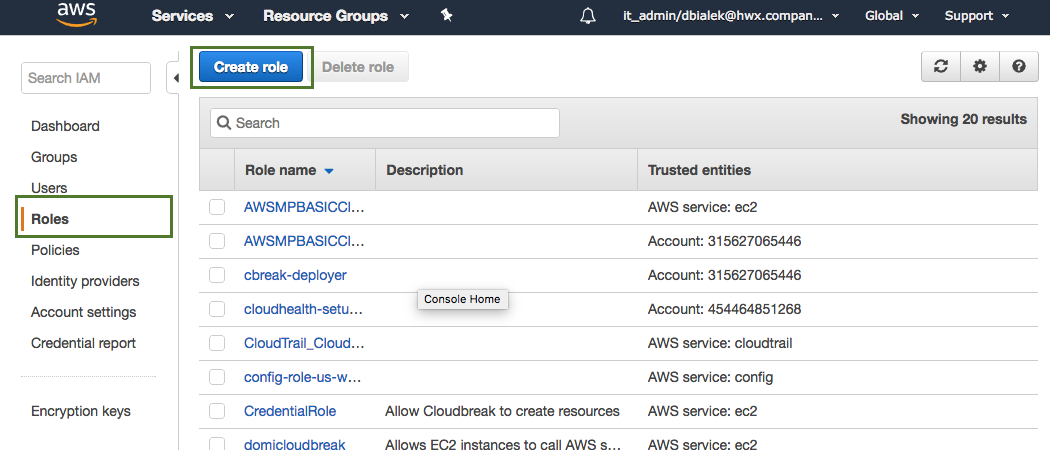
You can create these roles in the IAM console, on the Roles page via the Create Role option. Detailed steps are provided below.
Create CloudbreakRole
Use these steps to create CloudbreakRole.
Use the following "AssumeRole" policy definition:
{
  "Version": "2012-10-17",
  "Statement": {
    "Sid": "Stmt1400068149000",
    "Effect": "Allow",
    "Action": ["sts:AssumeRole"],
    "Resource": "*"
  }
}
Steps
-
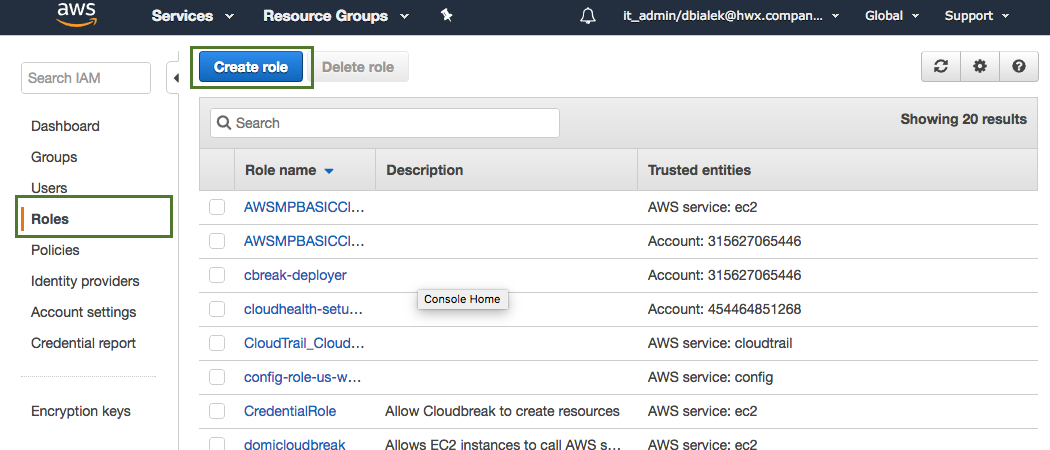
Navigate to the IAM console > Roles and click Create Role.
-
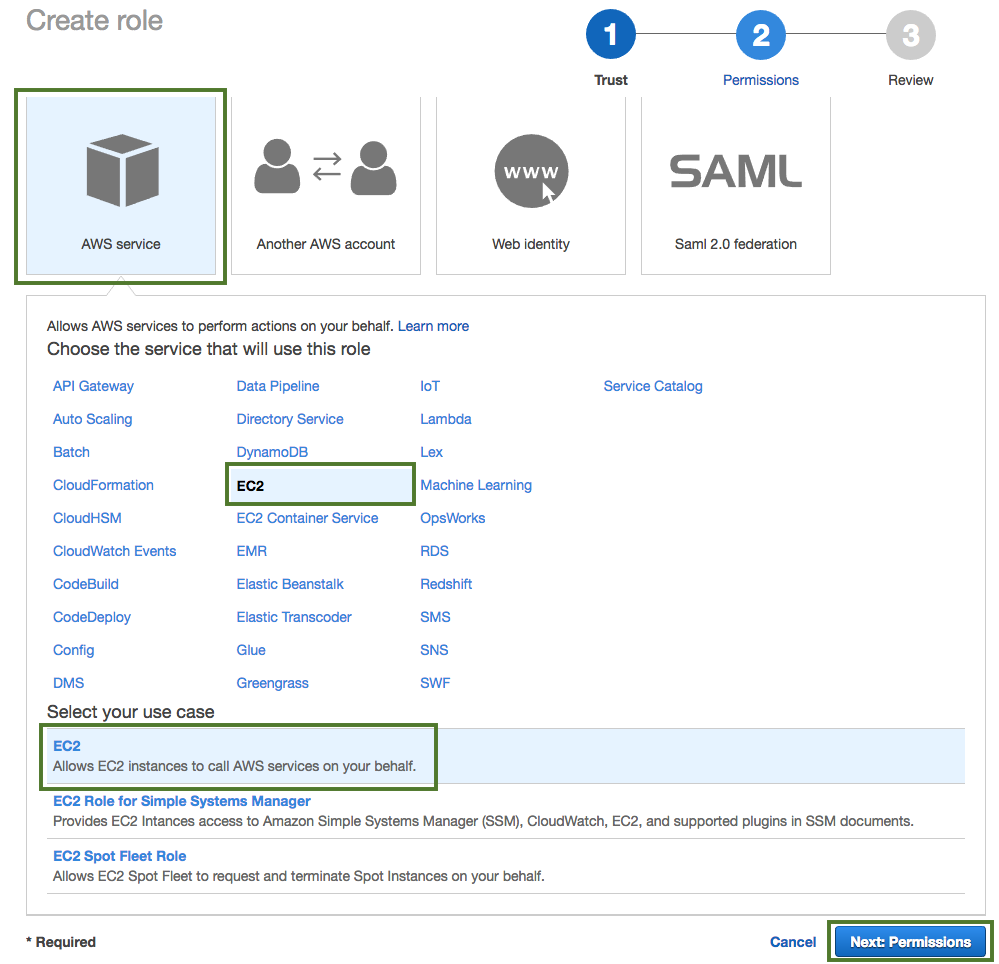
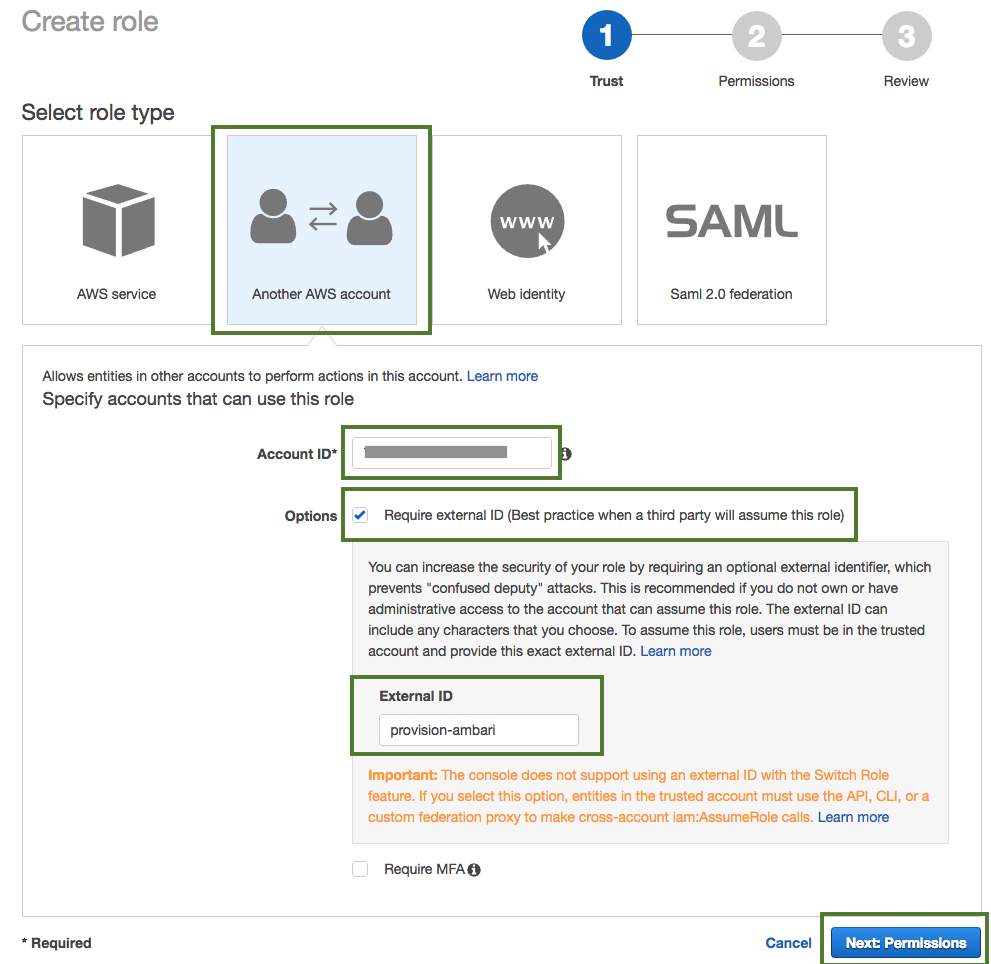
In the "Create Role" wizard, select AWS service role type and then select any service.
-
When done, click Next: Permissions to navigate to the next page in the wizard.
-
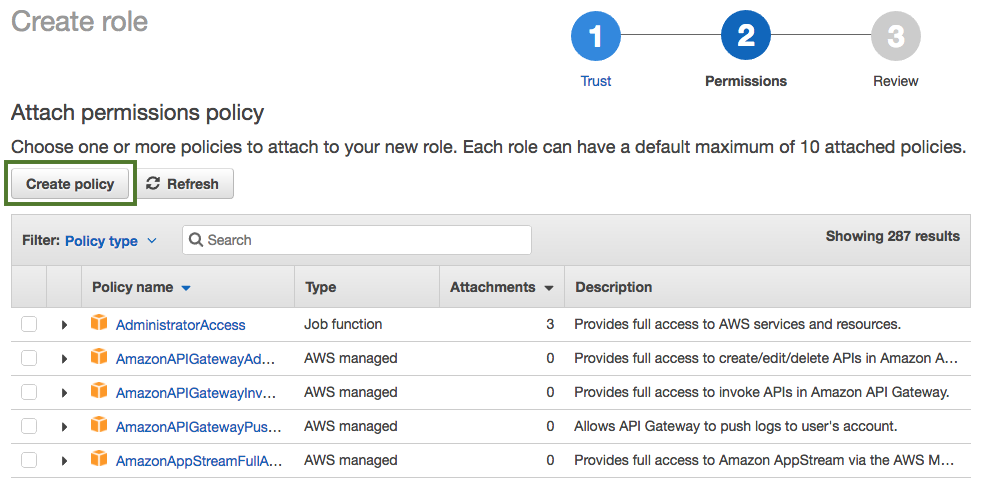
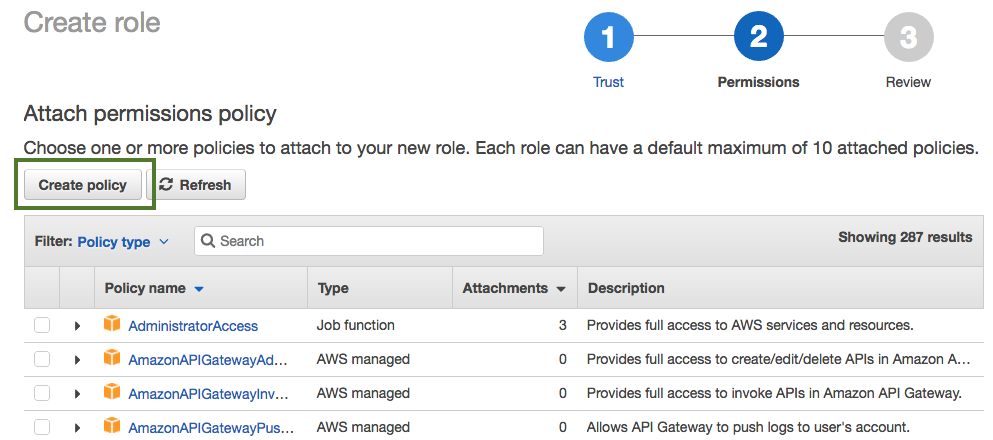
Click Create policy.
-
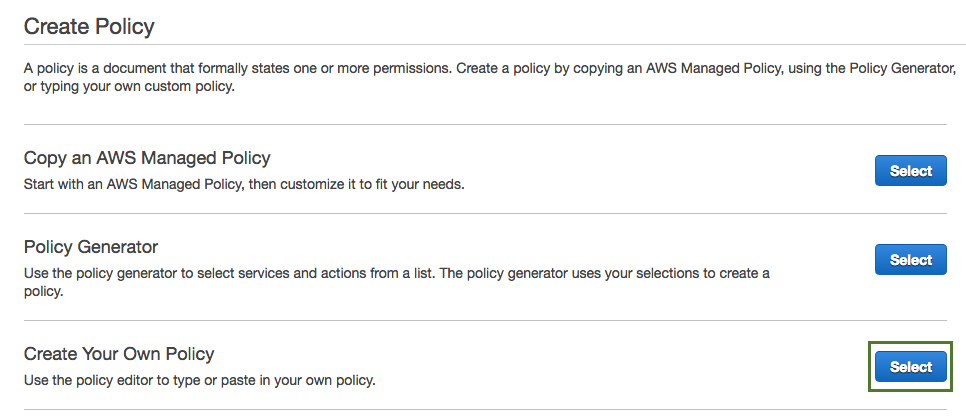
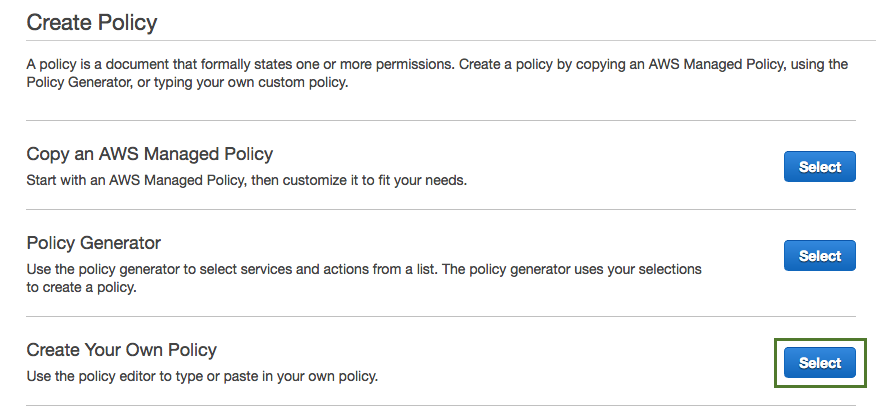
Click Select next to "Create Your Own Policy".
-
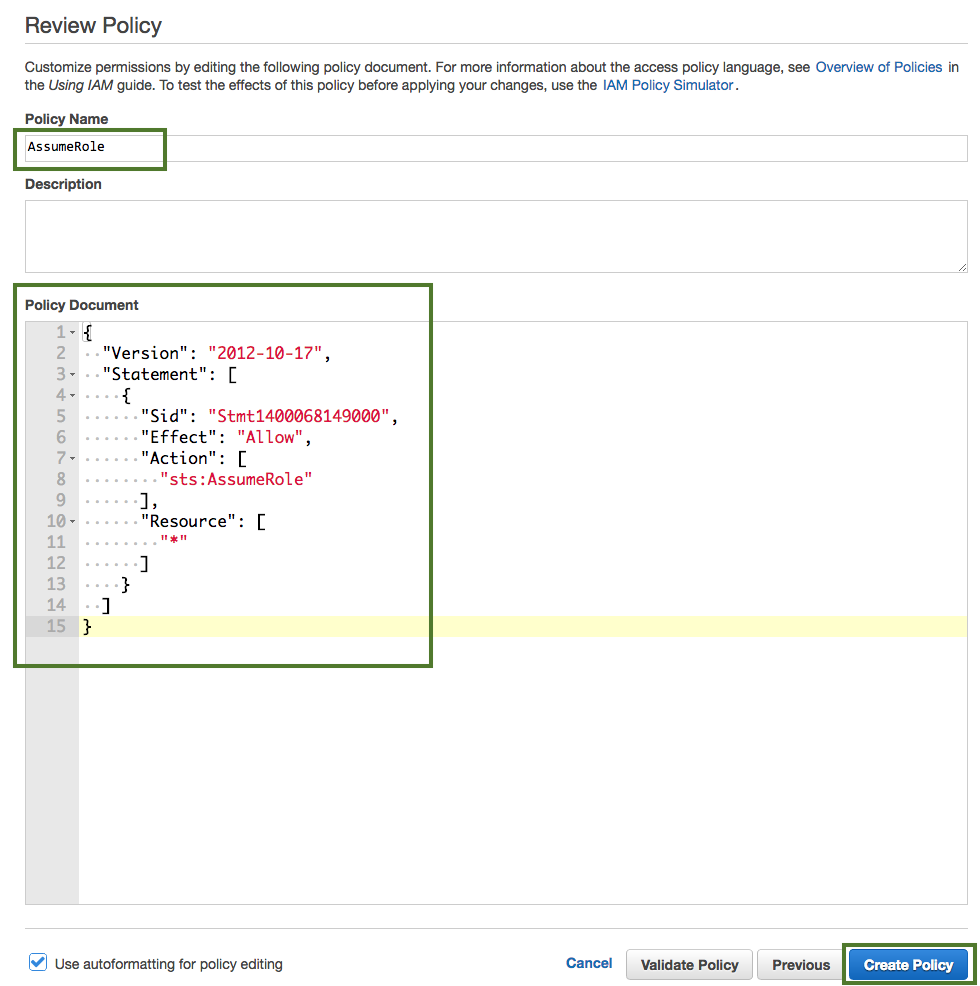
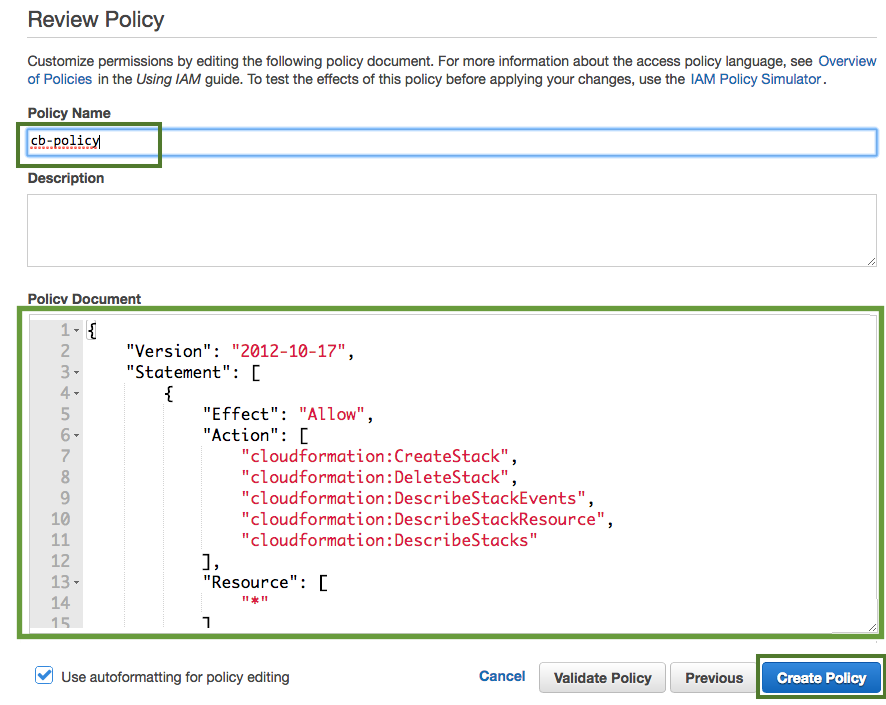
In the Policy Name field, enter "AssumeRole" and in the Policy Document paste the policy definition. You can either copy it from the section preceding these steps or download and copy it from here.
-
When done, click Create Policy.
-
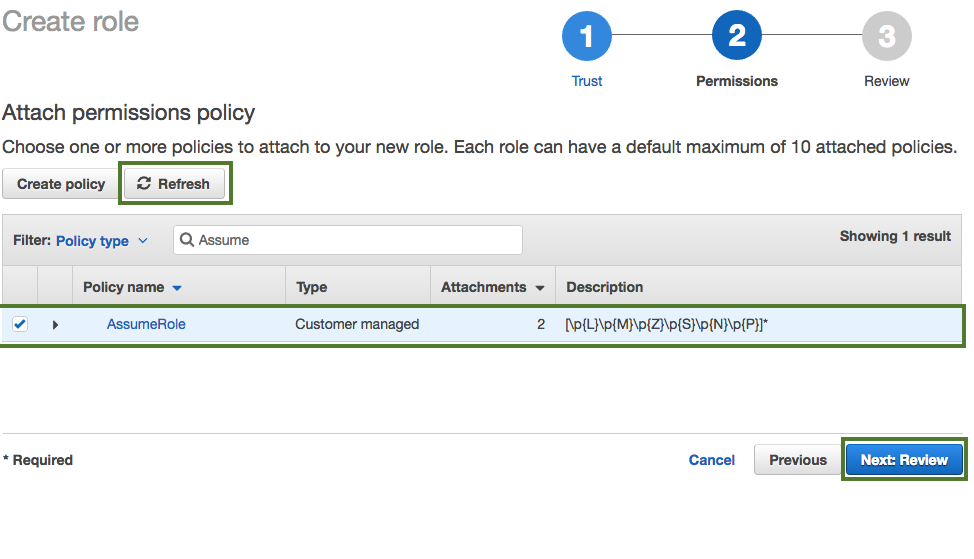
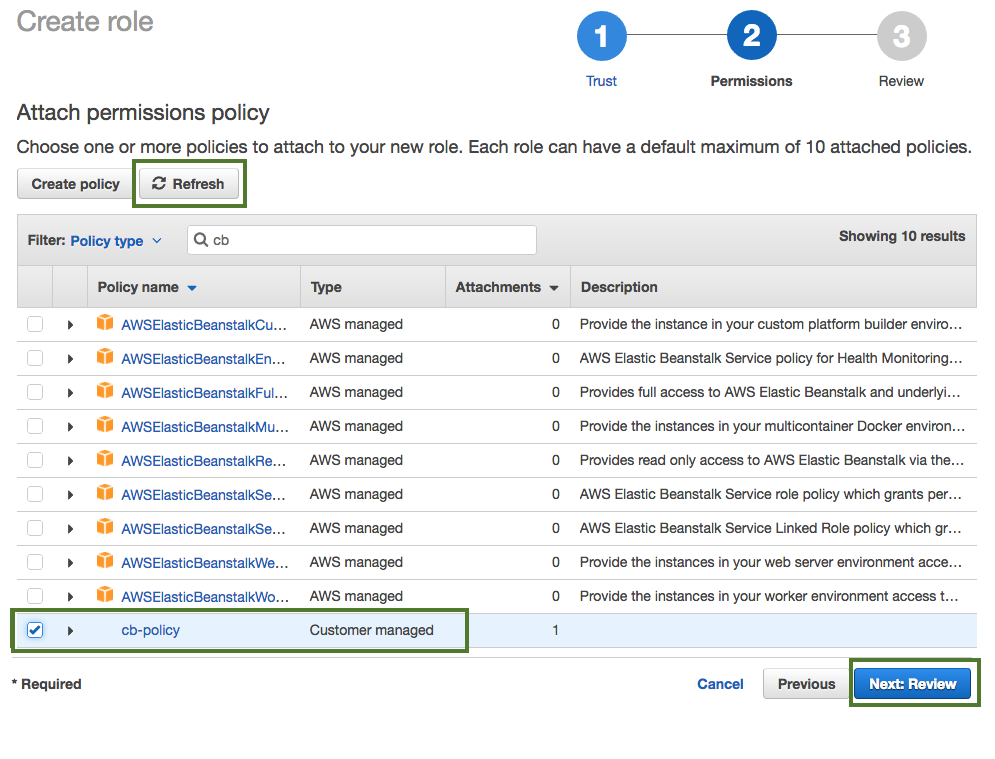
Click Refresh. Next, find the "AssumeRole" policy that you just created and select it by checking the box.
-
When done, click Next: Review.
-
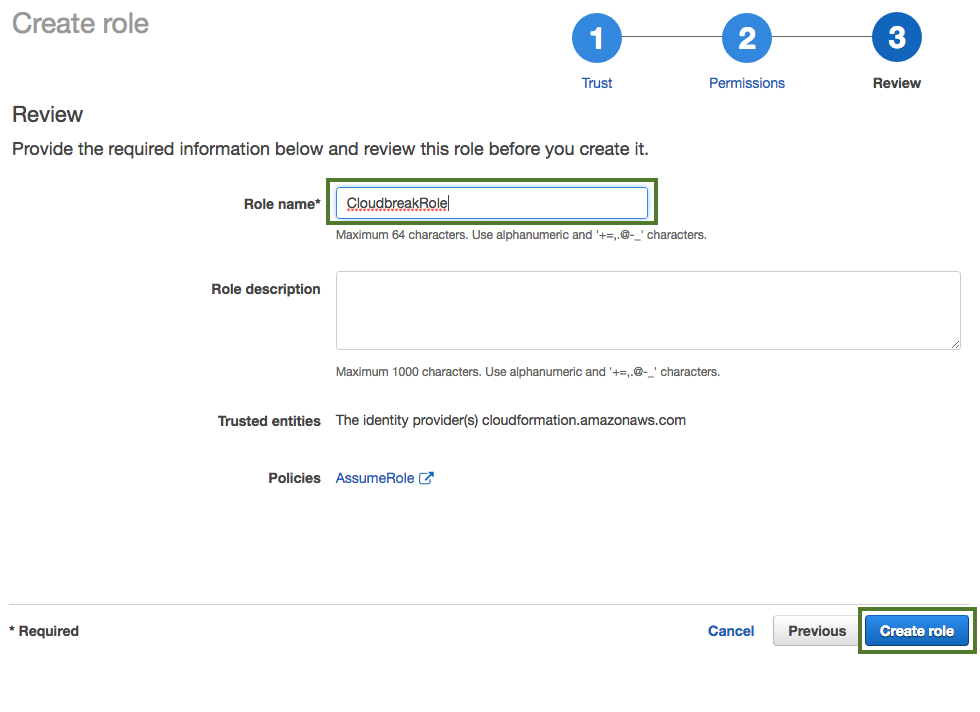
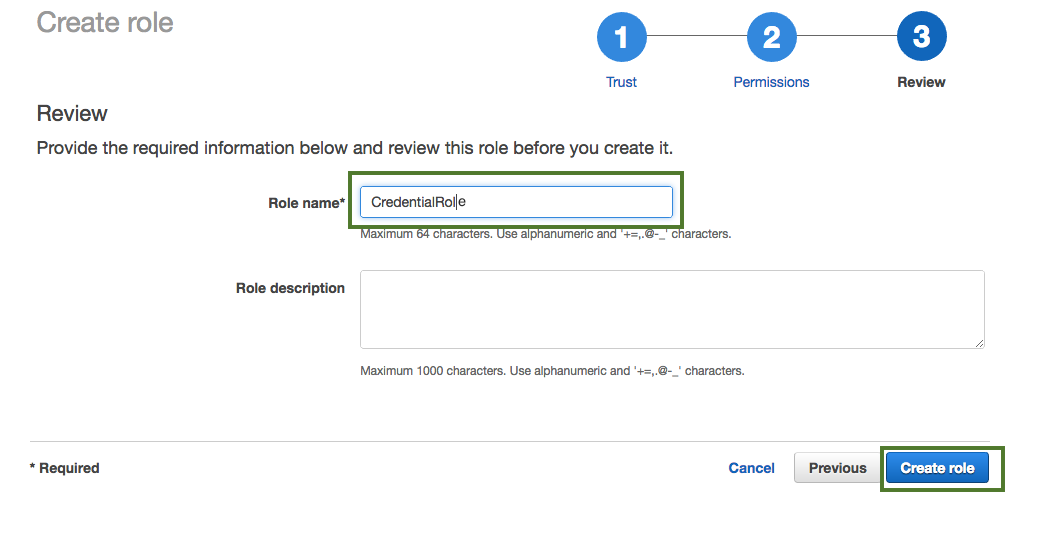
In the Roles name field, enter role name, for example "CloudbreakRole".
-
When done, click Create role to finish the role creation process.
Create CredentialRole
Use these steps to create CredentialRole.
Use the following "cb-policy" policy definition:
{
  "Version": "2012-10-17",
  "Statement": [
    {
      "Effect": "Allow",
      "Action": [
        "cloudformation:CreateStack",
        "cloudformation:DeleteStack",
        "cloudformation:DescribeStackEvents",
        "cloudformation:DescribeStackResource",
        "cloudformation:DescribeStacks"
      ],
      "Resource": [
        "*"
      ]
    },
    {
      "Effect": "Allow",
      "Action": [
        "ec2:AllocateAddress",
        "ec2:AssociateAddress",
        "ec2:AssociateRouteTable",
        "ec2:AuthorizeSecurityGroupIngress",
        "ec2:DescribeRegions",
        "ec2:DescribeAvailabilityZones",
        "ec2:CreateRoute",
        "ec2:CreateRouteTable",
        "ec2:CreateSecurityGroup",
        "ec2:CreateSubnet",
        "ec2:CreateTags",
        "ec2:CreateVpc",
        "ec2:ModifyVpcAttribute",
        "ec2:DeleteSubnet",
        "ec2:CreateInternetGateway",
        "ec2:CreateKeyPair",
        "ec2:DeleteKeyPair",
        "ec2:DisassociateAddress",
        "ec2:DisassociateRouteTable",
        "ec2:ModifySubnetAttribute",
        "ec2:ReleaseAddress",
        "ec2:DescribeAddresses",
        "ec2:DescribeImages",
        "ec2:DescribeInstanceStatus",
        "ec2:DescribeInstances",
        "ec2:DescribeInternetGateways",
        "ec2:DescribeKeyPairs",
        "ec2:DescribeRouteTables",
        "ec2:DescribeSecurityGroups",
        "ec2:DescribeSubnets",
        "ec2:DescribeVpcs",
        "ec2:DescribeSpotInstanceRequests",
        "ec2:DescribeVpcAttribute",
        "ec2:ImportKeyPair",
        "ec2:AttachInternetGateway",
        "ec2:DeleteVpc",
        "ec2:DeleteSecurityGroup",
        "ec2:DeleteRouteTable",
        "ec2:DeleteInternetGateway",
        "ec2:DeleteRouteTable",
        "ec2:DeleteRoute",
        "ec2:DetachInternetGateway",
        "ec2:RunInstances",
        "ec2:StartInstances",
        "ec2:StopInstances",
        "ec2:TerminateInstances"
      ],
      "Resource": [
        "*"
      ]
    },
    {
      "Effect": "Allow",
      "Action": [
        "iam:ListRolePolicies",
        "iam:GetRolePolicy",
        "iam:ListAttachedRolePolicies",
        "iam:ListInstanceProfiles",
        "iam:PutRolePolicy",
        "iam:PassRole",
        "iam:GetRole"
      ],
      "Resource": [
        "*"
      ]
    },
    {
      "Effect": "Allow",
      "Action": [
        "autoscaling:CreateAutoScalingGroup",
        "autoscaling:CreateLaunchConfiguration",
        "autoscaling:DeleteAutoScalingGroup",
        "autoscaling:DeleteLaunchConfiguration",
        "autoscaling:DescribeAutoScalingGroups",
        "autoscaling:DescribeLaunchConfigurations",
        "autoscaling:DescribeScalingActivities",
        "autoscaling:DetachInstances",
        "autoscaling:ResumeProcesses",
        "autoscaling:SuspendProcesses",
        "autoscaling:UpdateAutoScalingGroup"
      ],
      "Resource": [
        "*"
      ]
    }
  ]
}
Steps
-
Navigate to the IAM console > Roles and click Create Role.
-
In the "Create Role" wizard, select Another AWS account role type. Next, provide the following:
- In the Account ID field, enter your AWS account ID.
- Under Options, check Require external ID.
- In the External ID, enter "provision-ambari".
-
When done, click Next: Permissions to navigate to the next page in the wizard.
-
Click Create policy.
-
Click Select next to "Create Your Own Policy".
-
In the Policy Name field, enter "cb-policy" and in the Policy Document paste the policy definition. You can either copy it from the section preceding these steps or download and copy it from here.
-
When done, click Create Policy.
-
Click Refresh. Next, find the "cb-policy" that you just created and select it by checking the box.
-
When done, click Next: Review.
-
In the Roles name field, enter role name, for example "CredentialRole".
-
When done, click Create role to finish the role creation process.
Once you are done, you can proceed to Launch the VM.
Related Links
Using Instance Profiles (External)
Using an IAM Role to Grant Permissions to Applications (External)
Launch the VM
Now that you've met the prerequisites, you can launch the Cloudbreak deployer VM available as a Community AMI.
Steps
-
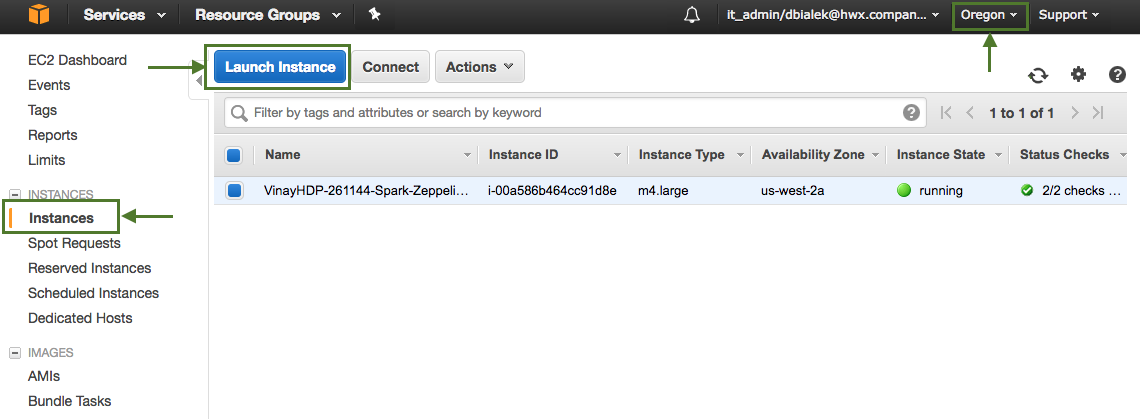
On AWS, navigate to the EC2 Console.
-
In the top right corner, select the region in which you want to launch Cloudbreak.
-
From the left pane, select INSTANCES > Instances.
-
Click on Launch Instance.
-
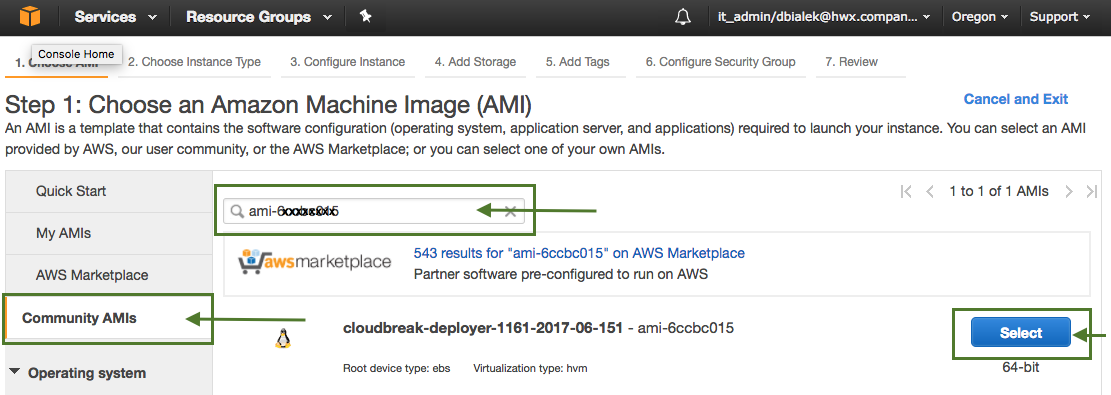
In Step 1: Choose an Amazon Machine Image (AMI), select Community AMIs from the left pane.
-
In the search box, enter the image name. The following Cloudbreak deployer images are available:
Region Name Region Community AMI EU (Ireland) eu-west-1 ami-0b70cb1044802db4a EU (Frankfurt) eu-central-1 ami-2d7827c6 US East (N. Virginia) us-east-1 ami-8d8220f0 US West (N. California) us-west-1 ami-de5949be US West (Oregon) us-west-2 ami-59432721 South America (São Paulo) sa-east-1 ami-955402f9 Asia Pacific (Tokyo) ap-northeast-1 ami-e9564195 Asia Pacific (Singapore) ap-southeast-1 ami-8e98c2f2 Asia Pacific (Sydney) ap-southeast-2 ami-31985653 -
Click Select.
The steps listed below only mention required parameters. You may optionally review and adjust additional parameters.
-
In Step2: Choose Instance Type, choose an instance type. The minimum instance type which is suitable for Cloudbreak is m4.xlarge. Minimum requirements are 16GB RAM, 40GB disk, 4 cores. When done, click Next.
-
(Perform this step only if you are using role-based authorization) In Step 3: Configure Instance Details > IAM, select the "CloudbreakRole" IAM role which you created earlier.
-
In Step4: Add Storage, attach as much storage as you need.
-
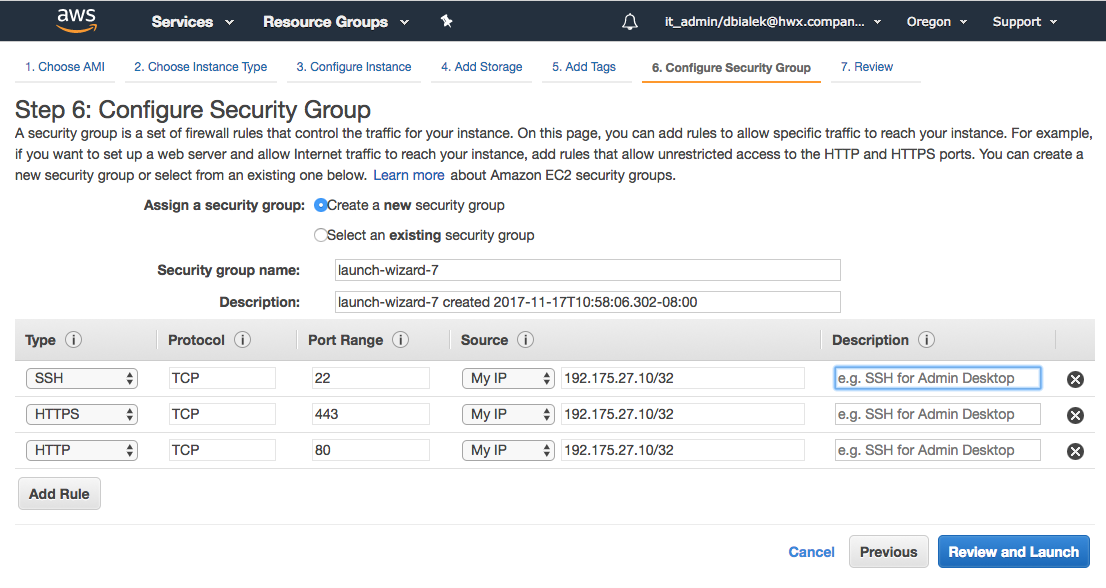
In Step 6: Configure Security Group, open the following ports:
- 22 (for access via SSH)
- 80 (for access via HTTP)
- 443 (for access via HTTPS).
When done, click Review and Launch.
-
In Step 7: Review Instance Launch, review the information carefully and then click Launch.
-
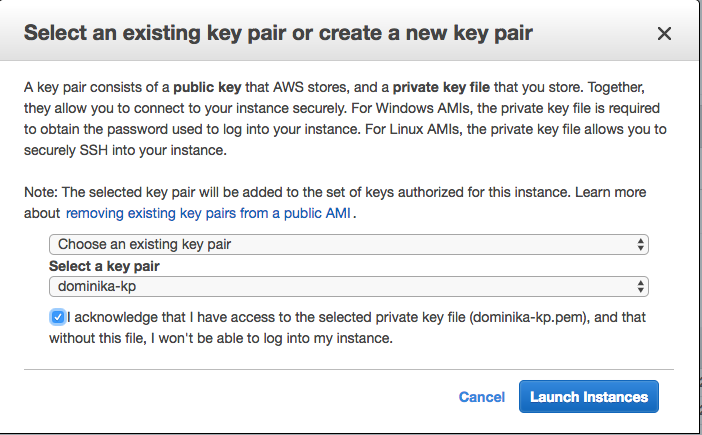
When prompted select an existing key pair or create a new one. Next, acknowledge that you have access to the private key file and click Launch Instance.
-
Click on the instance ID to navigate to the Instances view in your EC2 console.
SSH to the VM
Now that your VM is ready, access it via SSH:
- Use the private key from the key pair that you selected when launching the instance.
- The SSH user is called "cloudbreak".
- You can obtain the host IP from the EC2 console > Instances view by selecting the instance, selecting the Description tab, and copying the value of the Public DNS (IPv4) or IPv4 Public IP parameter.
On Mac OS X, you can SSH to the VM by running the following from the Terminal app: ssh -i "your-private-key.pem" cloudbreak@instance_IP where "your-private-key.pem" points to the location of your private key and "instance_IP" is the public IP address of the VM.
On Windows, you can use PuTTy.
Launch Cloudbreak Deployer
After accessing the VM via SSH, launch Cloudbreak deployer using the following steps.
Steps
-
Navigate to the cloudbreak-deployment directory:
cd /var/lib/cloudbreak-deployment/
This directory contains configuration files and the supporting binaries for Cloudbreak deployer.
-
Initialize your profile by creating a new file called
Profileand adding the following content:export UAA_DEFAULT_SECRET=MY-SECRET export UAA_DEFAULT_USER_PW=MY-PASSWORD export UAA_DEFAULT_USER_EMAIL=MY-EMAIL
For example:
export UAA_DEFAULT_SECRET=MySecret123
export UAA_DEFAULT_USER_PW=MySecurePassword123
export UAA_DEFAULT_USER_EMAIL=dbialek@hortonworks.com
You will need to provide the email and password when logging in to the Cloudbreak web UI and when using the Cloudbreak CLI. The secret will be used by Cloudbreak for authentication.
-
Start the Cloudbreak application by using the following command:
cbd start
This will start the Docker containers and initialize the application. The first time you start the Cloudbreak app, this also downloads of all the necessary docker images.
-
Once the
cbd starthas finished, it returns the "Uluwatu (Cloudbreak UI) url" which you can later paste in your browser and log in to Cloudbreak web UI.If you would like to check Cloudbreak deployer version and health, use:
cbd doctor
If you need to check Cloudbreak application logs, use:
cbd logs cloudbreak
You should see a message like this in the log:
Started CloudbreakApplication in 36.823 seconds.Cloudbreak takes less than a minute to start. If you try to access the Cloudbreak UI before Cloudbreak started, you will get a "Bad Gateway" error or "Cannot connect to Cloudbreak" error.
Access Cloudbreak UI
Log in to the Cloudbreak UI using the following steps.
Steps
-
You can log into the Cloudbreak application at
https://IPv4_Public_IP>/orhttps://Public_DNS. For examplehttps://34.212.141.253orhttps://ec2-34-212-141-253.us-west-2.compute.amazonaws.com. -
Confirm the security exception to proceed to the Cloudbreak web UI.
The first time you access Cloudbreak UI, Cloudbreak will automatically generate a self-signed certificate, due to which your browser will warn you about an untrusted connection and will ask you to confirm a security exception.
-
The login page is displayed:
-
Log in to the Cloudbreak web UI using the credential that you configured in your
Profilefile when launching Cloudbreak deployer:- The username is the
UAA_DEFAULT_USER_EMAIL - The password is the
UAA_DEFAULT_USER_PW
- The username is the
-
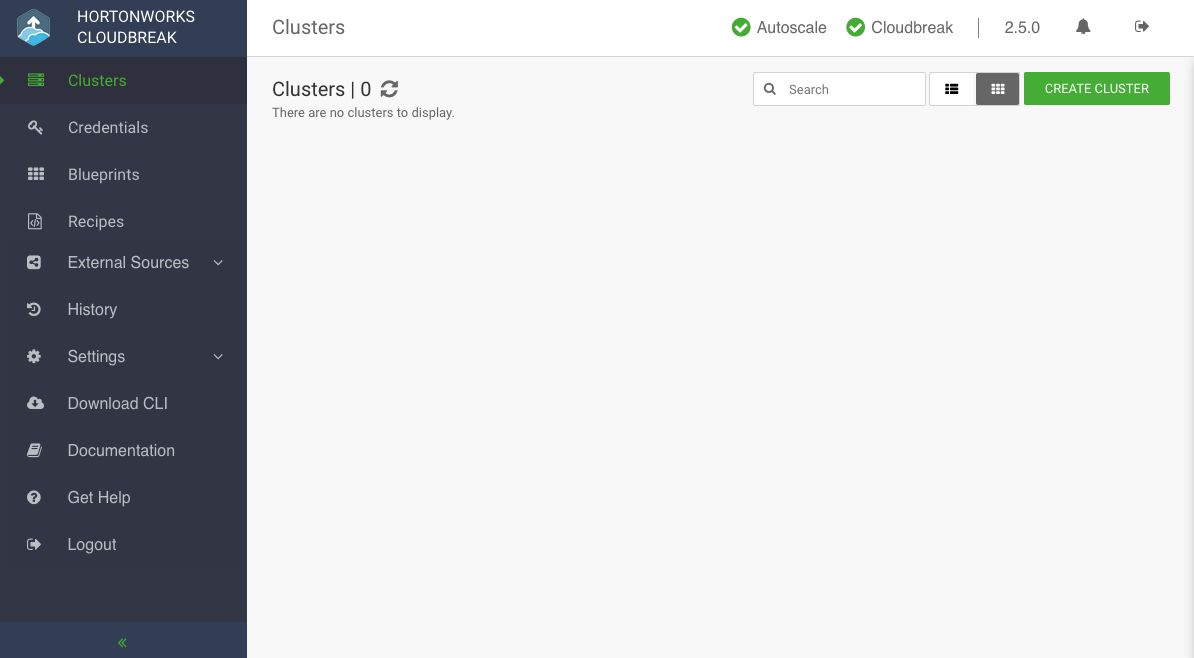
Upon a successful login, you are redirected to the dashboard:
Create Cloudbreak Credential
Before you can start creating clusters, you must first create a Cloudbreak credential. Without this credential, you will not be able to create clusters via Cloudbreak.
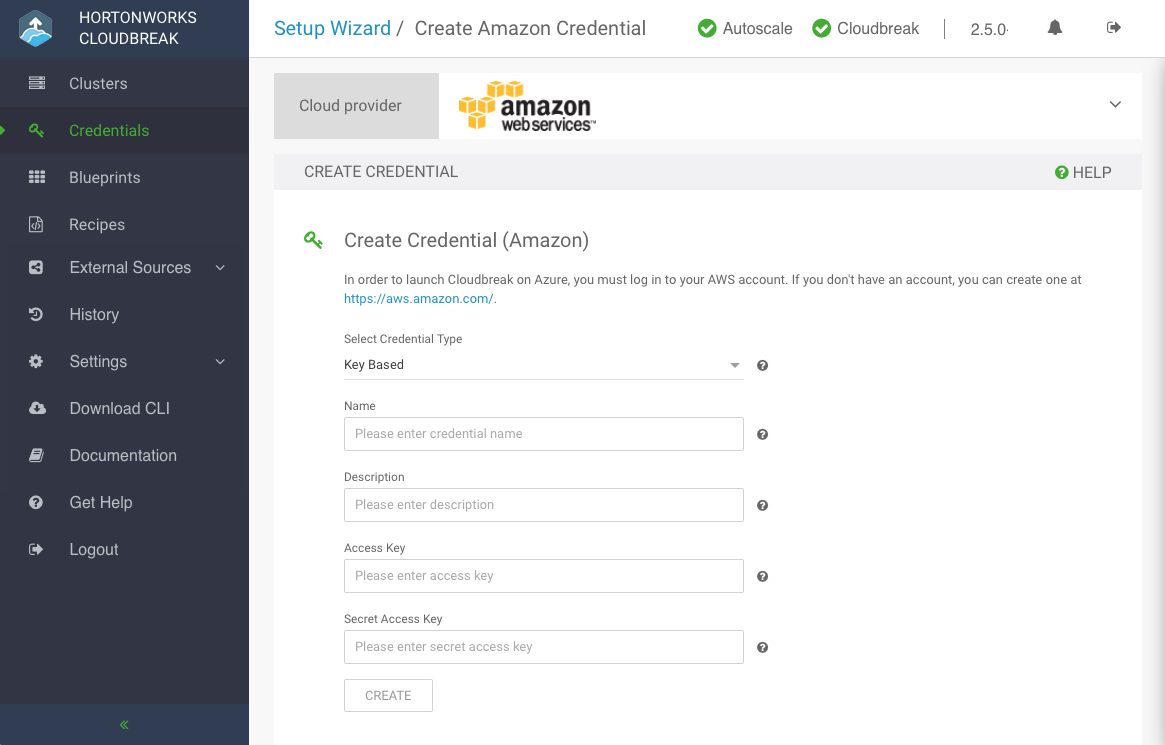
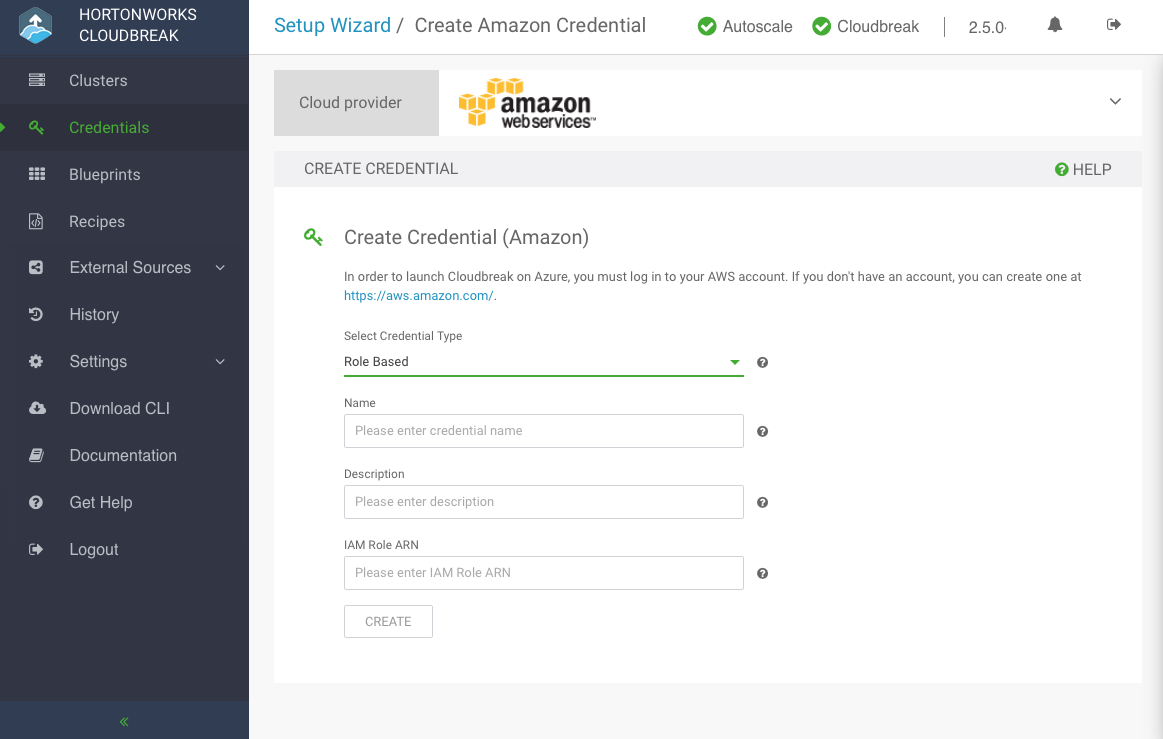
As part of the prerequisites, you had two options to allow Cloudbreak to authenticate with AWS and create resources on your behalf: key-based or role-based authentication. Depending on your choice, you must configure a key-based or role-based credential:
Create Key-Based Credential
To perform these steps, you must know your access and secret key. If needed, you or your AWS administrator can generate new access and secret keys from the IAM Console > Users > select a user > Security credentials.
Steps
-
In the Cloudbreak web UI, select Credentials from the navigation pane.
-
Click Create Credential.
-
Under Cloud provider, select "Amazon Web Services":
-
Provide the following information:
Parameter Description Select Credential Type Select Key Based. Name Enter a name for your credential. Description (Optional) Enter a description. Access Key Paste your access key. Secret Access Key Paste your secret key. -
Click Create.
-
Your credential should now be displayed in the Credentials pane.
Congratulations! You've successfully launched Cloudbreak and create a Cloudbreak credential. Now it's time to create a cluster.
Create Role-Based Credential
To perform these steps, you must know the IAM Role ARN corresponding to the "CredentialRole" (configured as a prerequisite).
Steps
-
In the Cloudbreak web UI, select Credentials from the navigation pane.
-
Click Create Credential.
-
Under Cloud provider, select "Amazon Web Services":
-
Provide the following information:
Parameter Description Select Credential Type Select Role Based (default value). Name Enter a name for your credential. Description (Optional) Enter a description. IAM Role ARN Paste the IAM Role ARN corresponding to the "CredentialRole" that you created earlier. For example arn:aws:iam::315627065446:role/CredentialRoleis a valid IAM Role ARN. -
Click Create.
-
Your credential should now be displayed in the Credentials pane.
Congratulations! You have successfully launched Cloudbreak and created a Cloudbreak credential. Now you can use Cloubdreak to create clusters.
