Launching Cloudbreak on Azure
Before launching Cloudbreak on Azure, review and meet the prerequisites. Next, launch Cloudbreak using one of the two available methods. Once Cloudbreak is running, log in to the Cloudbreak UI and create a Cloudbreak credential.
Meet the Prerequisites
Before launching Cloudbreak on Azure, you must meet the following prerequisites.
Azure Account
In order to launch Cloudbreak on the Azure, log in to your existing Microsoft Azure account. If you don't have an account, you can set it up at https://azure.microsoft.com.
Azure Region
Decide in which Azure region you would like to launch Cloudbreak. You can launch Cloudbreak and provision your clusters in all regions supported by Microsoft Azure.
Clusters created via Cloudbreak can be in the same or different region as Cloudbreak; when you launch a cluster, you select the region in which to launch it.
Related Links
Azure Regions (External)
Azure Roles
In order to provision clusters on Azure, Cloudbreak must be able to assume a sufficient Azure role ("Owner" or "Contributor") via Cloudbreak credential:
-
Your account must have the "Owner" role (or a role with equivalent permissions) in the subscription in order to create a Cloudbreak credential using the interactive credential method.
-
Your account must have the "Contributor" role (or a role with equivalent permissions) in the subscription in order to create a Cloudbreak credential using the app-based credential method. The role must be assigned to the app that you register in Cloudbreak.
To check the roles in your subscription, log in to your Azure account and navigate to Subscriptions.
Related Links
Built-in Roles: Owner (External)
Built-in Roles: Contributor (External)
SSH Key Pair
When launching Cloudbreak, you will be required to provide your public SSH key. If needed, you can generate a new SSH key pair:
- On MacOS X and Linux using
ssh-keygen -t rsa -b 4096 -C "your_email@example.com" - On Windows using PuTTygen
Launch Cloudbreak
Launch Cloudbreak deployer using the following steps.
Steps
-
Log in to your Azure Portal.
-
Click here to get started with Cloudbreak installation using the Azure Resource Manager template:
-
The template for installing Cloudbreak will appear. On the Basics page, provide the following basic parameters:
All parameters except "SmartSense Id" are required.
BASICS
Parameter Description Subscription Select which existing subscription you want to use. Resource group Select an existing resource group or create a new one by selecting Create new and entering a name for your new resource group. Cloudbreak resources will later be accessible in that chosen resource group. Location Select an Azure region in which you want to deploy Cloudbreak. SETTINGS
Parameter Description Base Url This is the URL to the page where the template is stored. Location This is an internal parameter. Do not change it. Vm Size Select virtual machine instance type to use for the Cloudbreak controller. The minimum instance type suitable for Cloudbreak is Standard_DS3. The minimum requirements are 16GB RAM, 40GB disk, 4 cores. Admin Username Create an admin login that you will use to log in to the Cloudbreak UI. Must be a valid email address. By default, admin@example.com is used but you should change it to your email address. Admin User Password Password for the admin login. Must be at least 8 characters containing letters, numbers, and symbols. Username Enter an admin username for the virtual machine. You will use it to SSH to the VM. By default, "cloudbreak" is used. SmartSense Select whether you want to use SmartSense telemetry. Default is "false" (not using SmartSense telemetry). SmartSense Id (Optional) Your SmartSense ID. Remote Location Enter a valid CIDR IP or use one of the default tags. Default value is
Internetwhich allows access from all IP addresses. Examples:- 10.0.0.0/24 will allow access from 10.0.0.0 through 10.0.0.255
- 'Internet' will allow access from all. This is not a secure option but you can use it it you are just getting started and are not planning to have the instance on for a longer period.
- (Advanced) 'VirtualNetwork' will allow access from the address space of the Virtual Network.
- (Advanced) 'AzureLoadBalancer' will allow access from the address space of the load balancer.
For more information, refer to the Azure documentation.
Ssh Key Paste your SSH public key.
You can use
pbcopyto quickly copy it. For example:pbcopy < /Users/homedir/.ssh/id_rsa.pubVnet New Or Existing By default, Cloudbreak is launched in a new VNet called cbdeployerVnetand a new subnet calledcbdeployerSubnet; if needed, you can customize the settings for the new VNet using available VNet and Subnet parameters.Vnet Name Provide the name for a new Vnet. Default is `cbdeployerVnet.Vnet Subnet Name Provide a name for a new subnet. Default is cbdeployerSubnet.Vnet Address Prefix Provide a CIDR for the virtual network. Default is 10.0.0.0/16.Vnet Subnet Address Prefix Provide a CIDR for the subnet. Default is 10.0.0.0/24.Vnet RG Name The name of the resource group in which the Vnet is located. If creating a new Vnet, enter the same resource group name as provided in the Resource groupfield in the BASICS section. -
Review terms of use and check "I agree to the terms and conditions stated above".
-
Click Purchase.
-
Your deployment should be initiated.
If you encounter errors, refer to Troubleshooting Azure.
-
Proceed to the next step: Explore Newly Created Resources.
Related Links
CIDR IP (External)
Filter Network Traffic with Network Security Groups (External)
Explore Newly Created Resources
This step is optional.
While the deployment is in progress, you can optionally navigate to the newly created resource group and see what Azure resources are being provisioned.
Steps
-
From the left pane, select Resource groups.
-
Find the the resource group that you just created and select it to view details.
-
The following resources should have been created in your resource group:
If you chose to use an existing virtual network, the virtual network will not be added to the resource group.
- Virtual network (VNet) securely connects Azure resources to each other.
- Network security group (NSG) defines inbound and outbound security rules, which control network traffic flow.
- Virtual machine runs Cloudbreak.
- Public IP address is assigned to your VM so that it can communicate with other Azure resources.
- Network interface (NIC) attached to the VM provides the interconnection between the VM and the underlying software network.
- Blob storage container is created to store Cloudbreak Deployer OS disk's data.
-
You can click on each entry to view details of the resource. For example, click on cbdeployerVM to view details, including Cloudbreak IP address.
-
Once your deployment is ready, the status will change from "Deploying" to "Success".
Access Cloudbreak UI
Log in to the Cloudbreak UI using the following steps.
Steps
-
When your deployment succeeds, you will receive a notification in the top-right corner. You can click on the link provided to navigate to the resource group created earlier.
This only works right after deployment. At other times, you can find your resource group by selecting Resource Groups from the service menu and then finding your resource group by name.
-
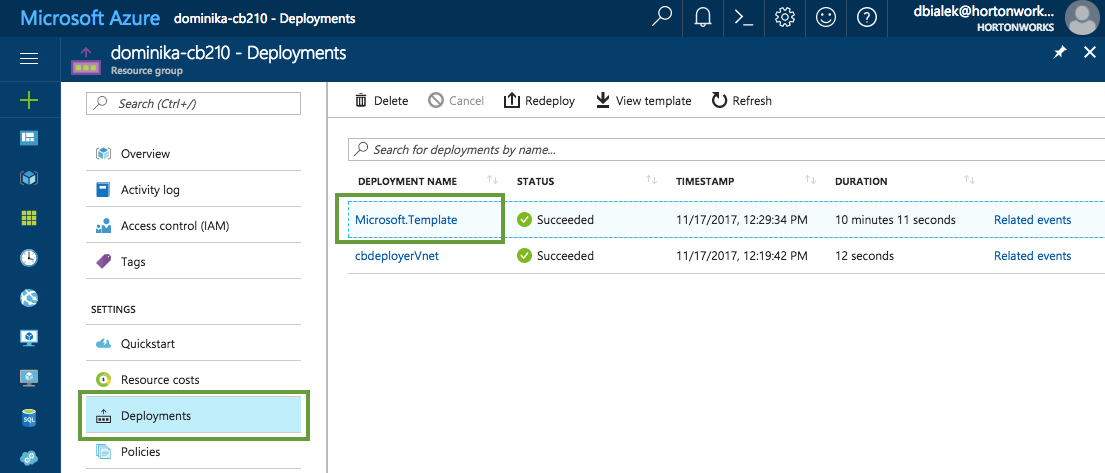
Once you've navigated to your resource group, click on Deployments and then click on Microsoft.Template:
-
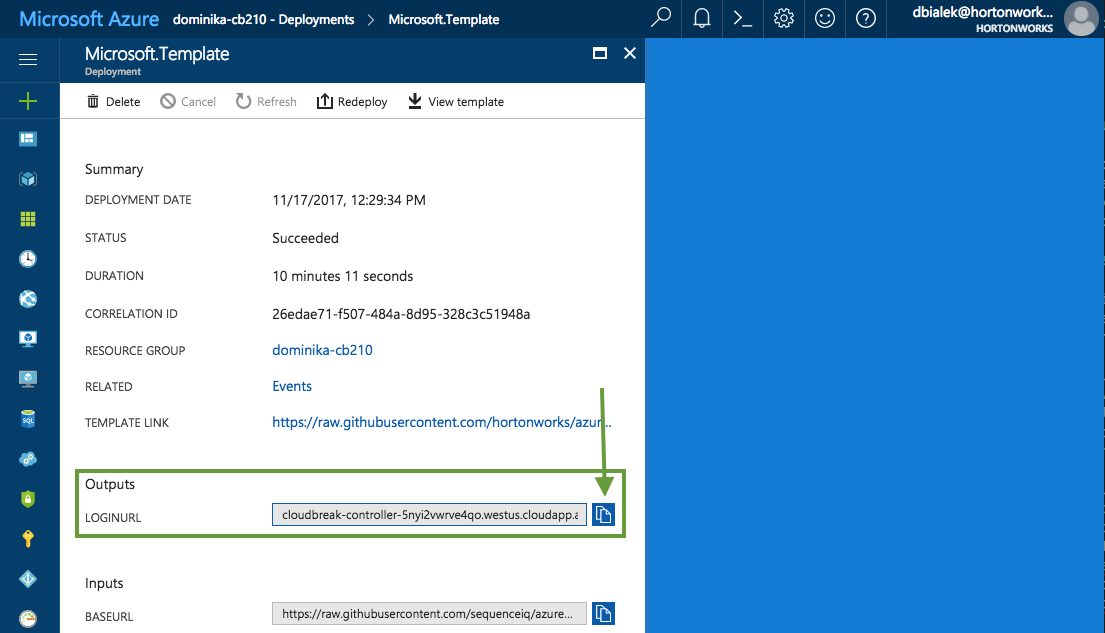
From Outputs, you can copy the link by clicking on the copy icon:
-
Paste the link in your browser's address bar.
The first time you access Cloudbreak UI, Cloudbreak will automatically generate a self-signed certificate, due to which your browser will warn you about an untrusted connection and will ask you to confirm a security exception. You can safely proceed to the website.
Browser Steps Firefox Click Advanced > Click Add Exception... > Click Confirm Security Exception Safari Click Continue Chrome Click Advanced > Click Proceed... -
Now you should be able to access Cloudbreak UI and log in with the Admin email address and Admin password that you created when launching Cloudbreak:
-
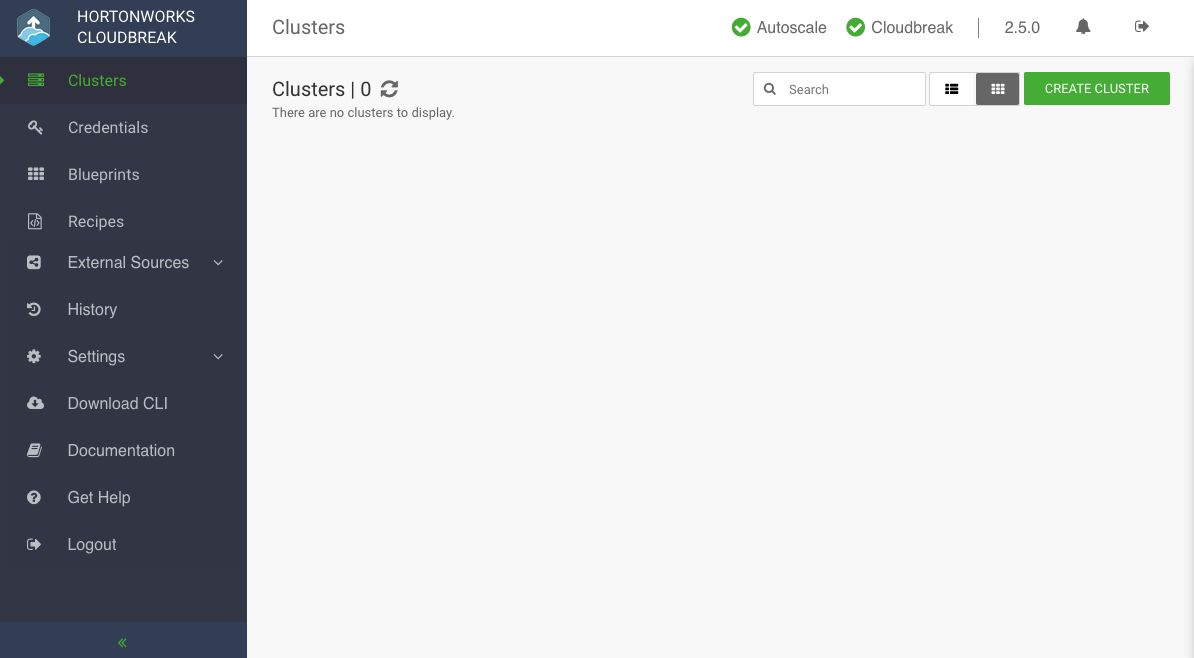
Upon a successful login, you are redirected to the dashboard:
The last task that you need to perform before you can use Cloudbreak is to create a cloudbreak credential.
Create Cloudbreak Credential
Before you can start creating clusters, you must first create a Cloudbreak credential. Without this credential, you will not be able to create clusters via Cloudbreak. Cloudbreak works by connecting your Azure account through this credential, and then uses it to create resources on your behalf.
There are two methods for creating a Cloudbreak credential:
| Method | Description | Prerequisite | Steps |
|---|---|---|---|
| Interactive | The advantage of using this method is that the app and service principal creation and role assignment are fully automated, so the only input that you need to provide is the Subscription ID and Directory ID. During the interactive credential creation, you are required to log in to your Azure account. | (1) Your account must have the "Owner" role (or its equivalent) in the subscription. (2) You must be able log in to your Azure account. | To configure an interactive credential, refer to Create an Interactive Credential. |
| App-based | The advantage of the app-based credential creation is that it allows you to create a credential without logging in to the Azure account, as long as you have been given all the information. In addition to providing your Subscription ID and Directory ID, you must provide information for your previously created Azure AD application (its ID and key which allows access to it). | (1) Your account must have the "Contributor" role (or equivalent) in the subscription. (2) You or your Azure administrator must perform prerequisite steps of registering an Azure application and assigning the "Contributor" role to it. This step typically requires admin permissions so you may have to contact your Azure administrator. | To configure an app based credential, refer to Create an App Based Credential. |
Create an Interactive Credential
Follow these steps to create an interactive Cloudbreak credential.
Steps
-
In the Cloudbreak web UI, select Credentials from the navigation pane.
-
Click Create Credential.
-
Under Cloud provider, select "Microsoft Azure".
-
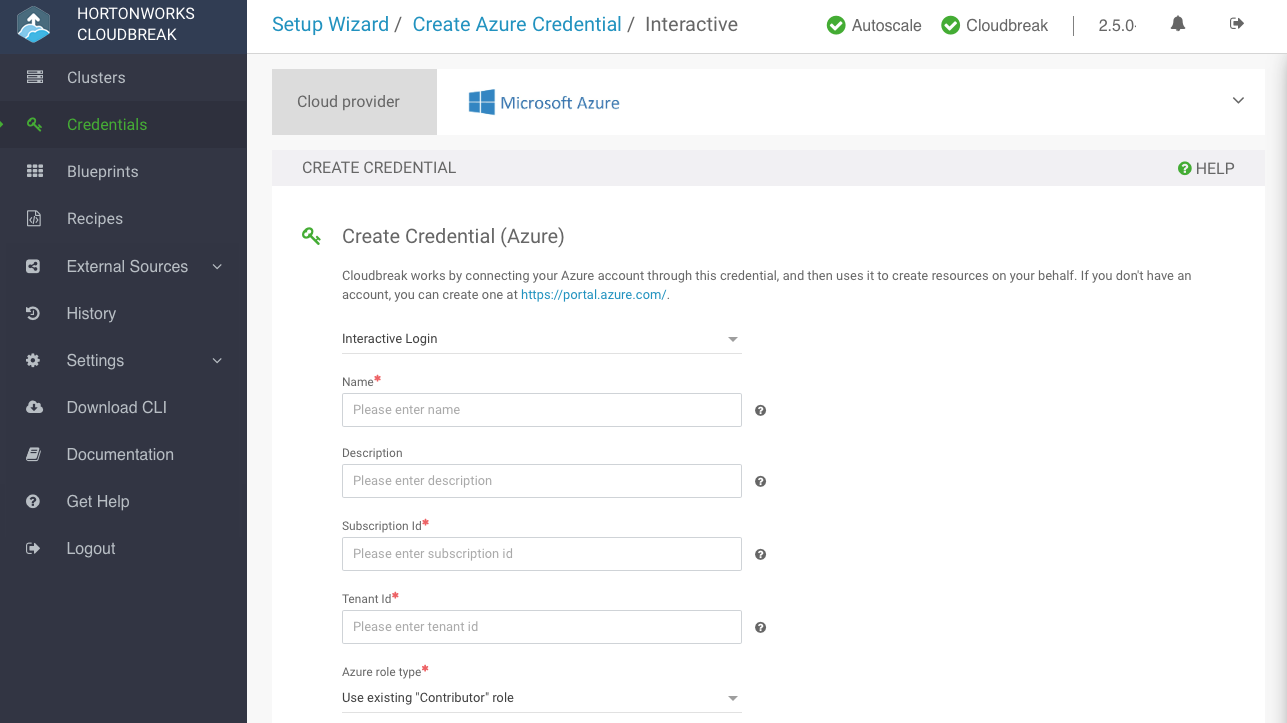
Select Interactive Login:
-
Provide the following information:
Parameter Description Name Enter a name for your credential. Description (Optional) Enter a description. Subscription Id Copy and paste the Subscription ID from your Subscriptions. Tenant Id Copy and paste your Directory ID from your Active Directory > Properties. Azure role type You have the following options:
- "Use existing Contributor role" (default): If you select this option, Cloudbreak will use the "Contributor" role to create resources. This requires no further input.
- "Reuse existing custom role": If you select this option and enter the name of an existing role, Cloudbreak will use this role to create resources.
- "Let Cloudbreak create a custom role": If you select this option and enter a name for the new role, the role will be created. When choosing role name, make sure that there is no existing role with the name chosen. For information on creating custom roles, refer to Azure documentation.
If using a custom role, make sure that it includes the necessary Action set for Cloudbreak to be able to manage clusters:
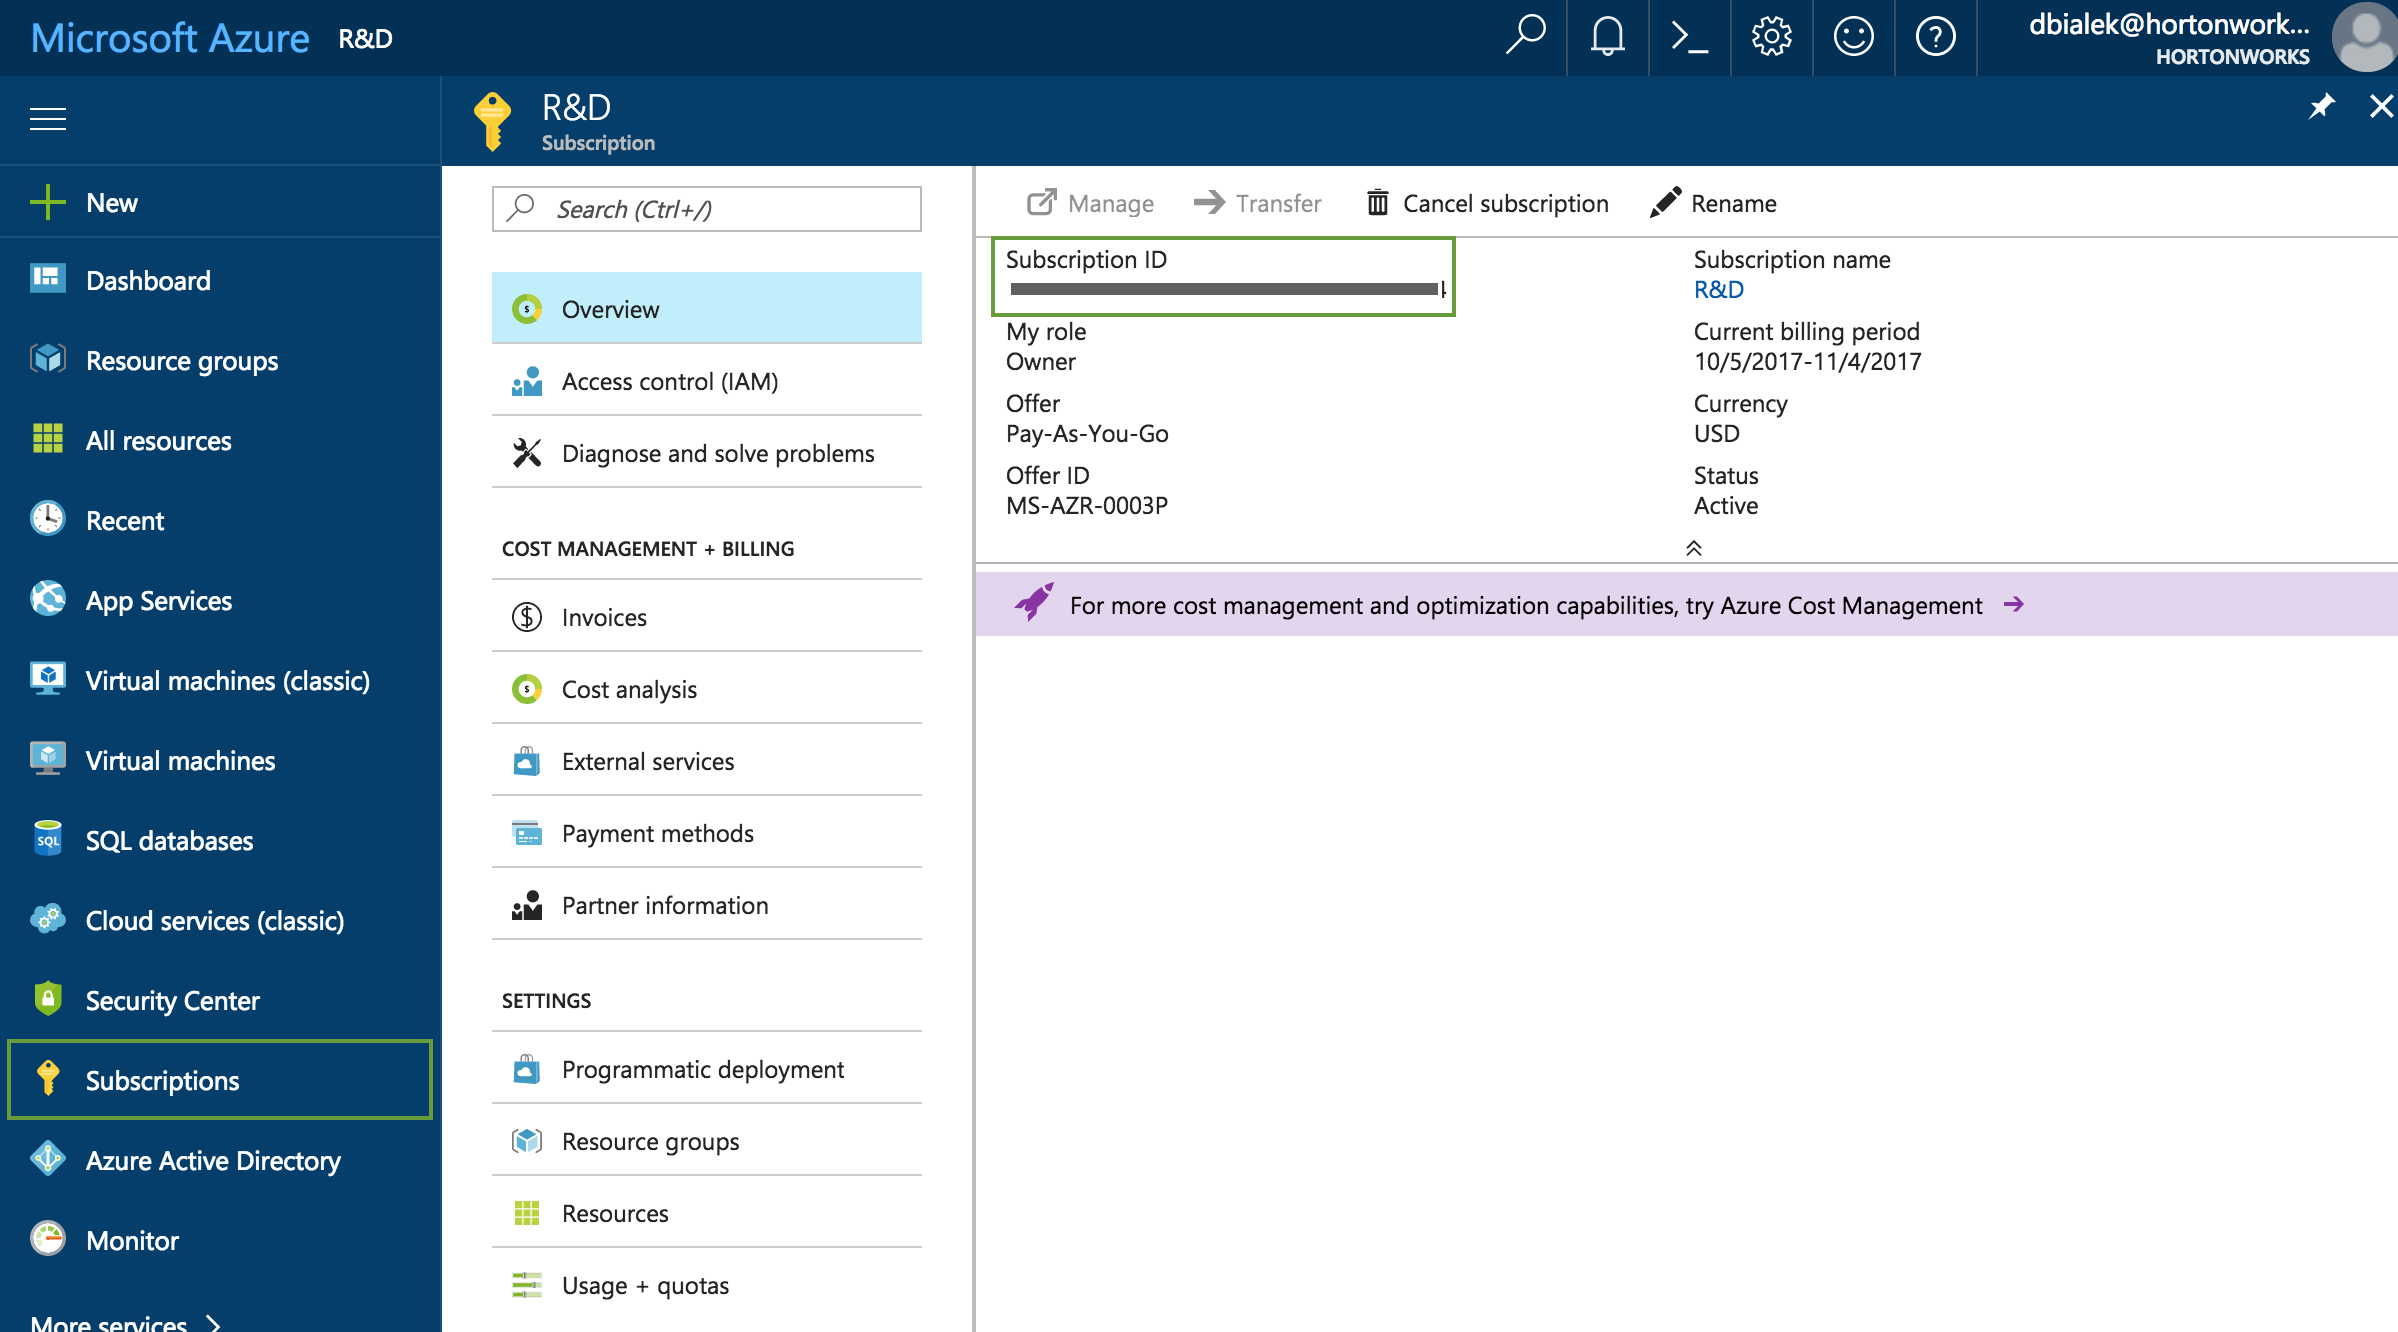
Microsoft.Compute/*,Microsoft.Network/*,Microsoft.Storage/*,Microsoft.Resources/*.To obtain the Subscription Id:
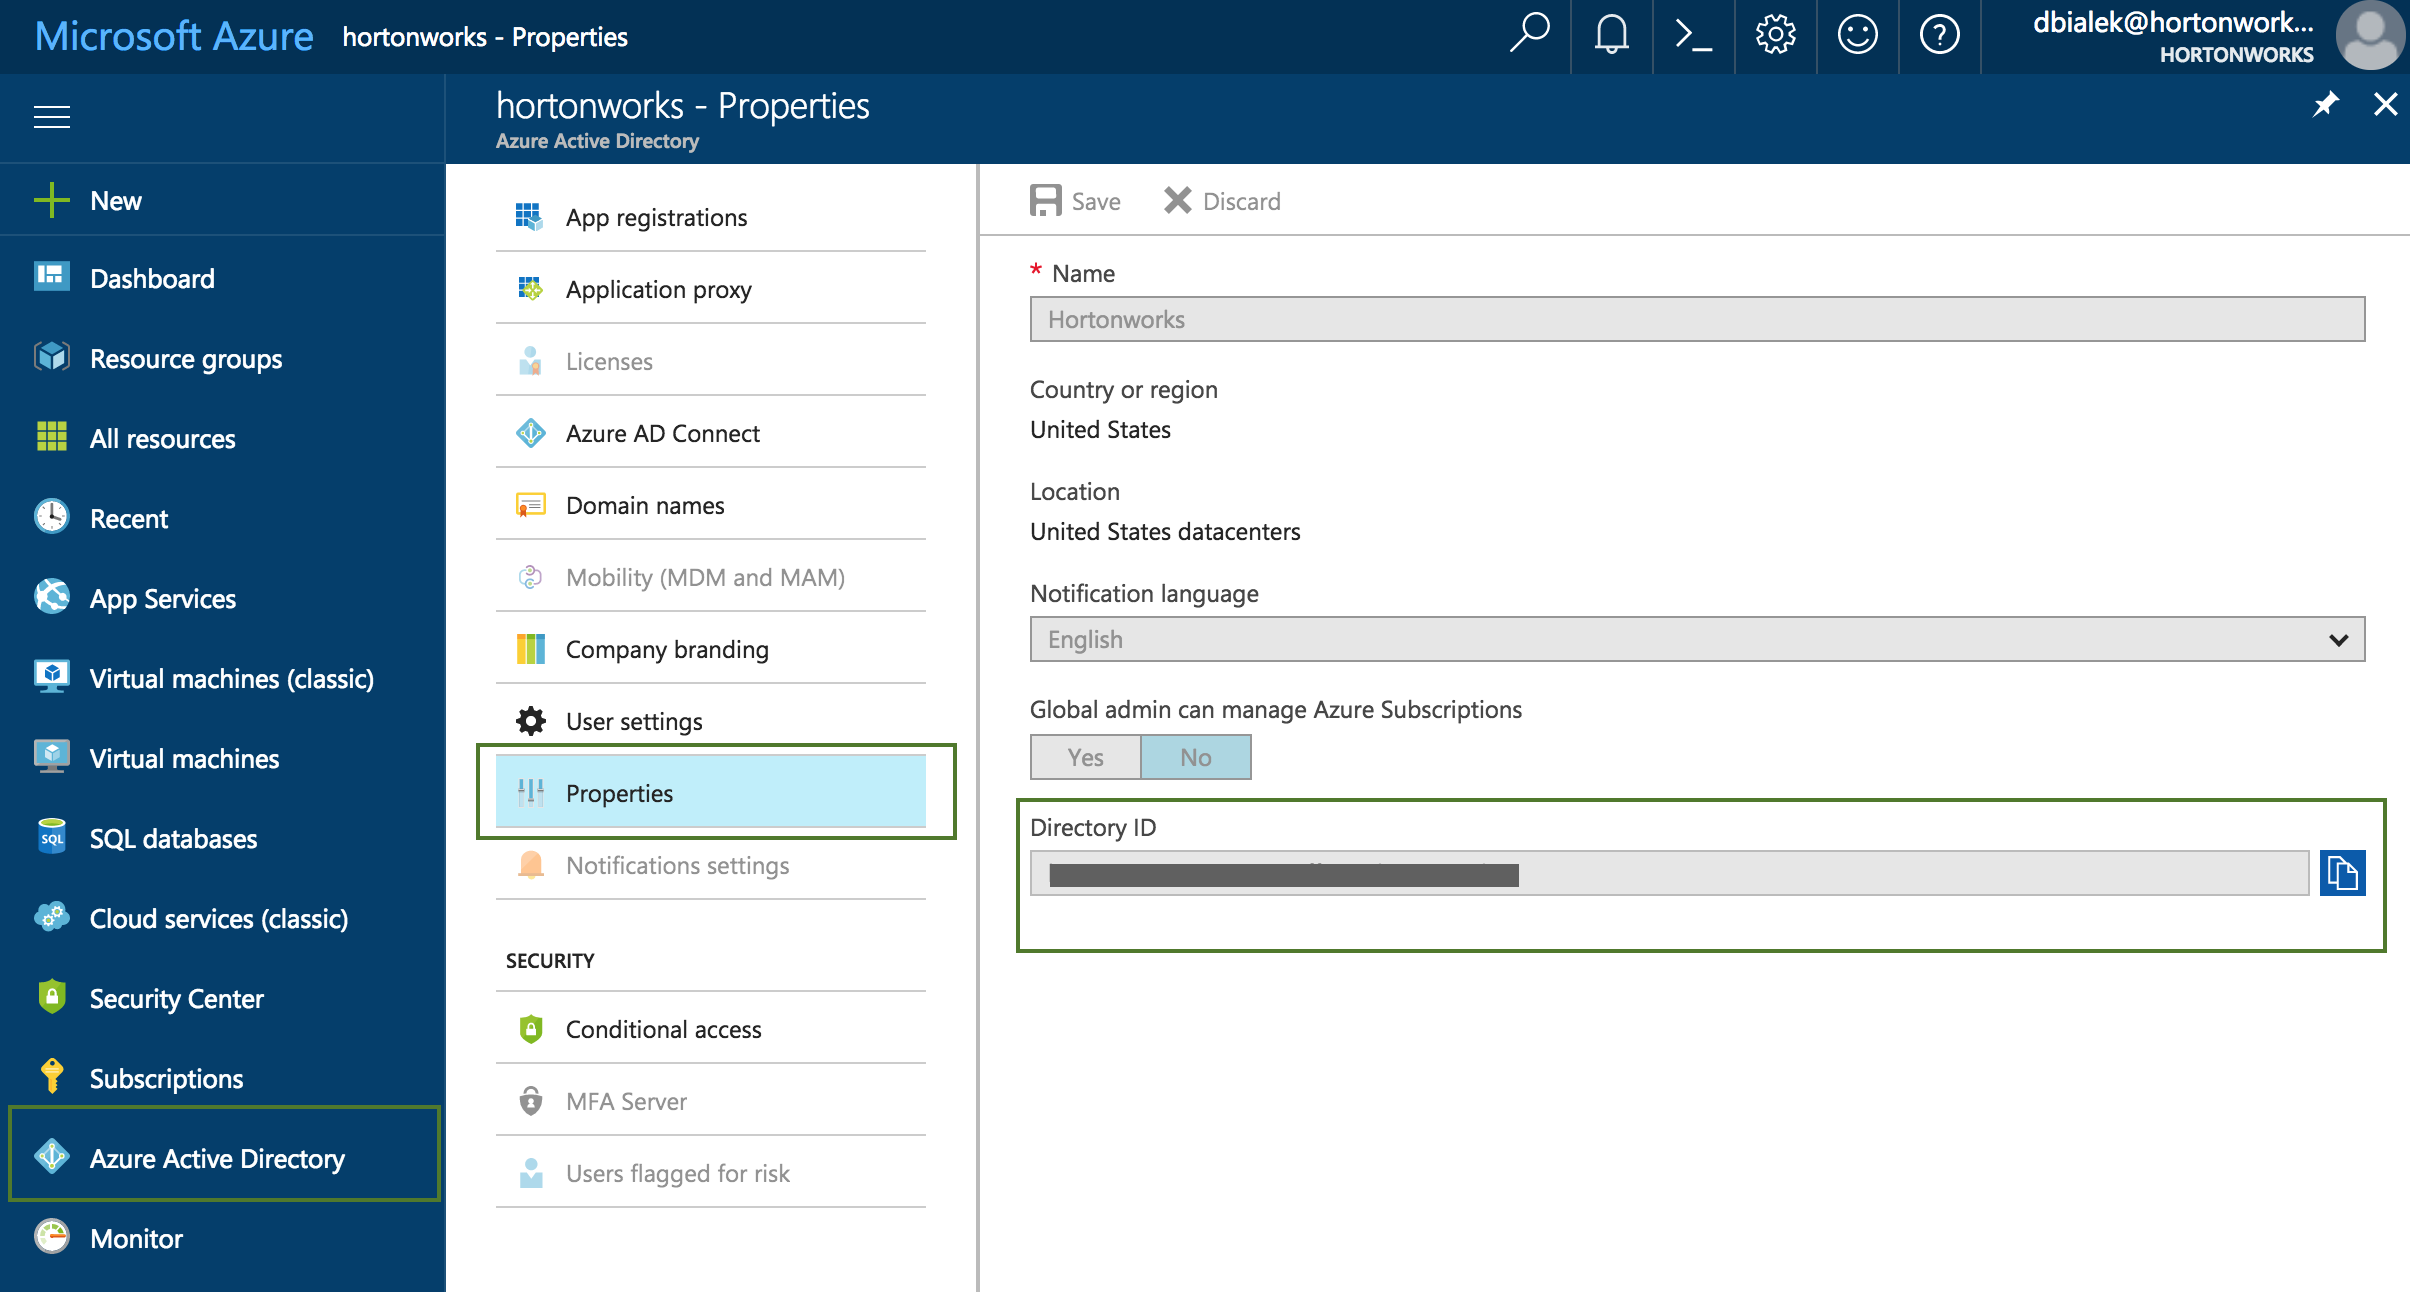
To obtain the Tenant ID (actually Directory Id):
-
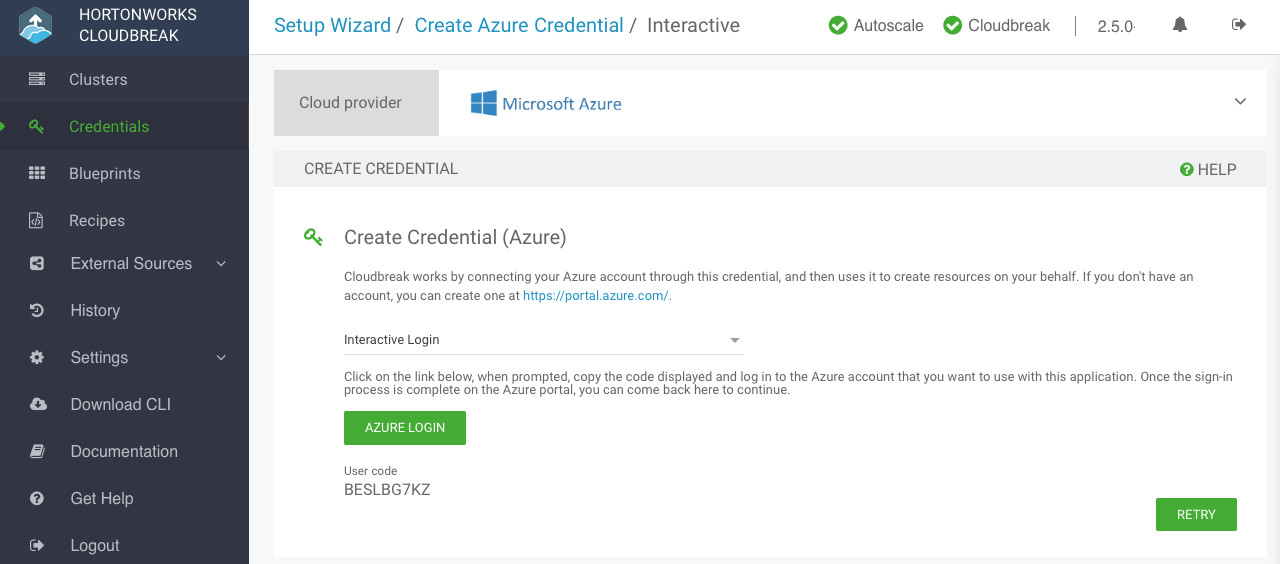
After providing the parameters, click Interactive Login.
-
Copy the code provided in the UI:
-
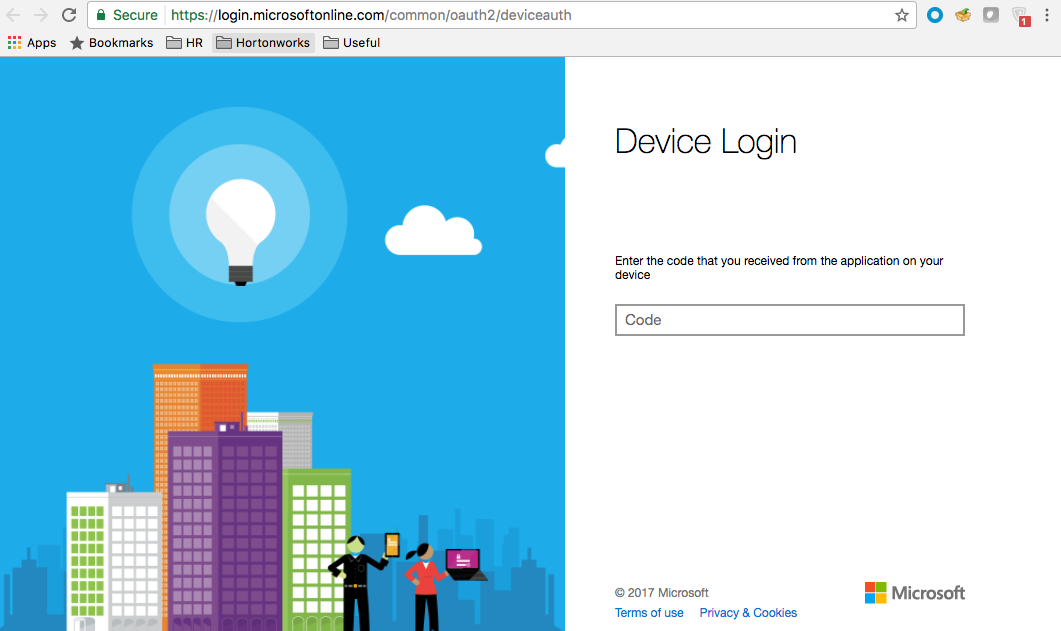
Click Azure login and a new Device login page will open in a new browser tab:
-
Next, paste the code in field on the Device login page and click Continue.
-
Confirm your account by selecting it:
-
A confirmation page will appear, confirming that you have signed in to the Microsoft Azure Cross-platform Command Line Interface application on your device. You may now close this window.
If you encounter errors, refer to Troubleshooting Azure.
Congratulations! You've successfully launched and configured Cloudbreak. Now you can use Cloudbreak to create clusters.
Create an App Based Credential
Follow these steps to create an app based Cloudbreak credential.
Prerequisites
-
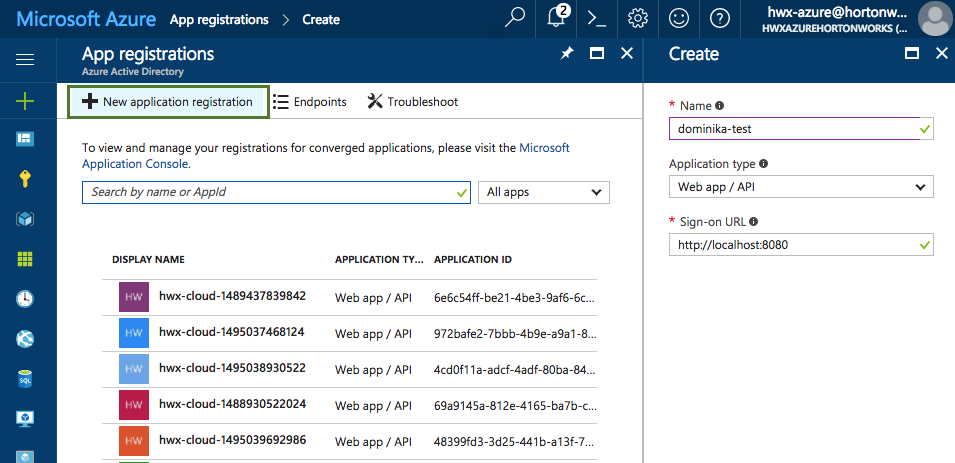
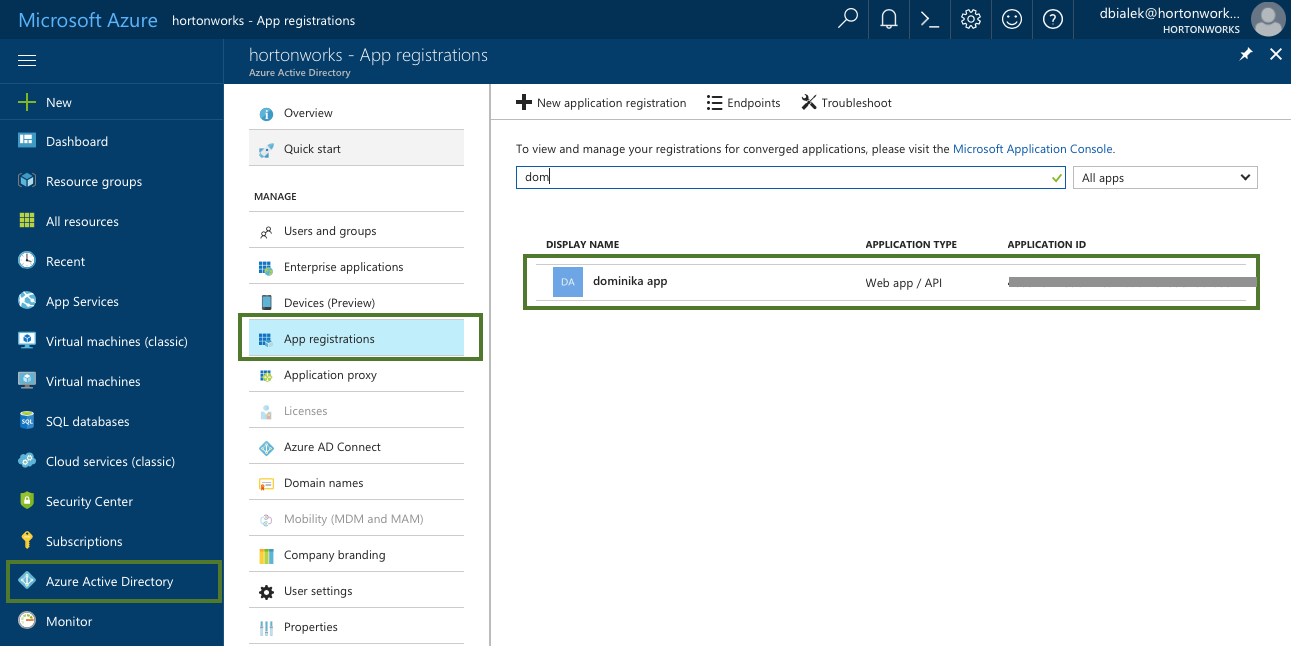
On Azure Portal, navigate to the Active Directory > App Registrations and register a new application. For more information, refer to Create an Azure AD Application.
Aa an alternative to the steps listed below for creating an application registration, you use a utility called
azure-cli-tools. The utility supports app creation and role assignment. It is available at https://github.com/sequenceiq/azure-cli-tools/blob/master/cli_tools. -
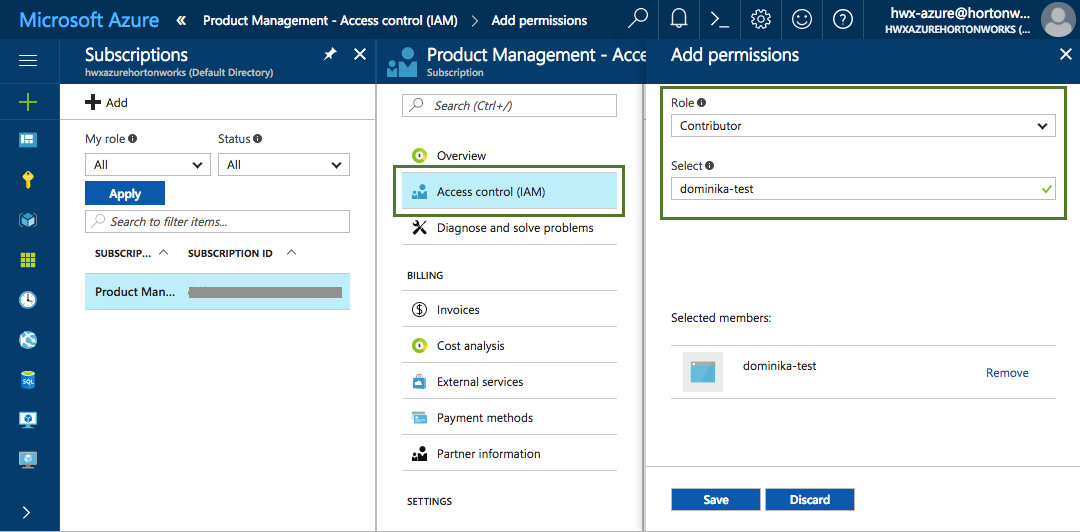
Navigate to the Subscriptions, choose Access control (IAM). Click Add and then assign the "Contributor" role to your newly created application by selecting "Contributor" under Role and your app name under Select:
This step typically requires admin permissions so you may have to contact your Azure administrator.
Steps
-
In the Cloudbreak web UI, select Credentials from the navigation pane.
-
Click Create Credential.
-
Under Cloud provider, select "Microsoft Azure".
-
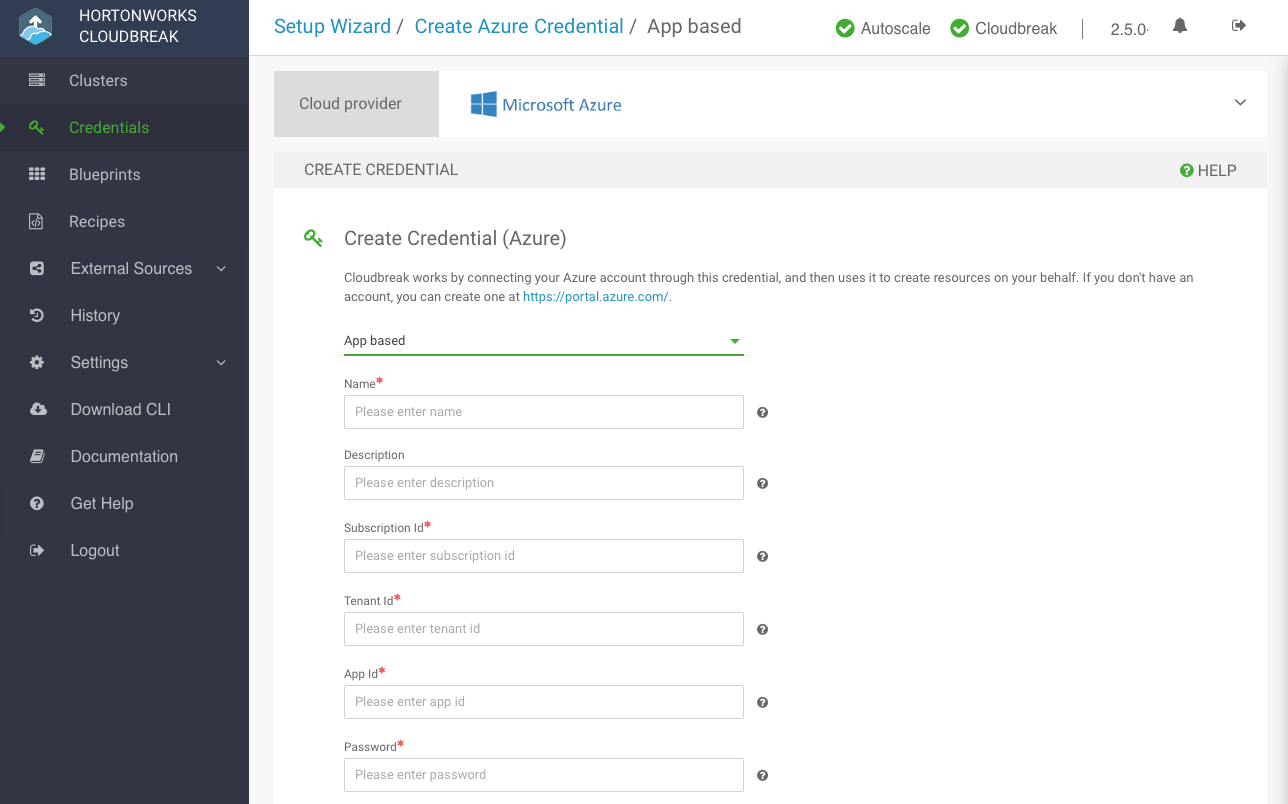
Select App based Login:
-
On the Configure credential page, provide the following parameters:
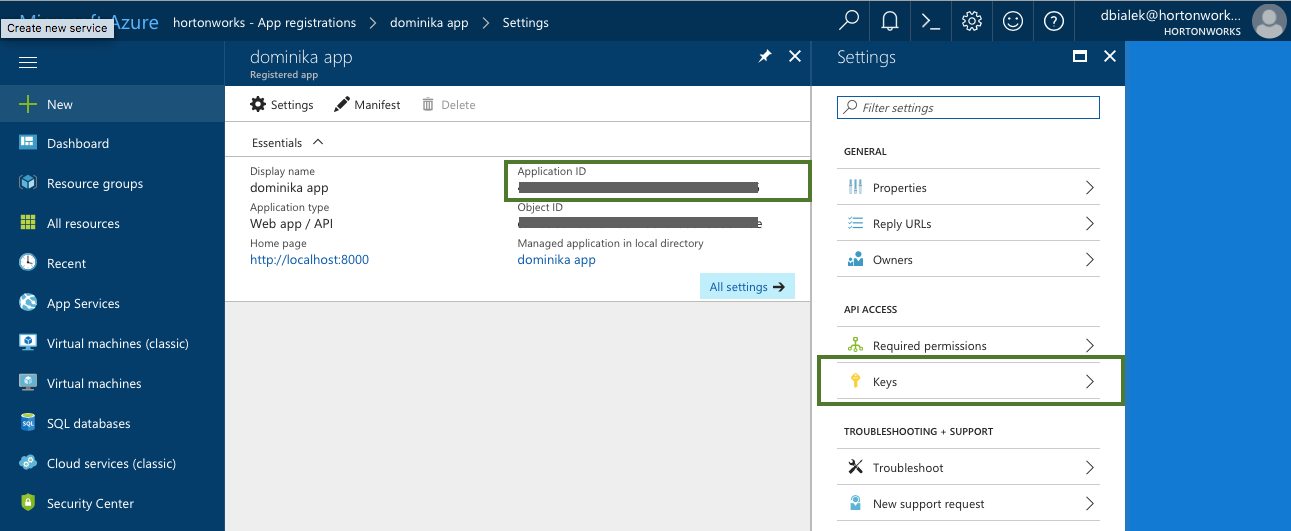
Parameter Description Select Credential Type Select App based. Name Enter a name for your credential. Description (Optional) Enter a description. Subscription Id Copy and paste the Subscription ID from your Subscriptions. Tenant Id Copy and paste your Directory ID from your Active Directory > Properties. App Id Copy and paste the Application ID from your Azure Active Directory > App Registrations > your app registration's Settings > Properties. Password This is your application key. You can generate it from your Azure Active Directory app registration's Settings > Keys. To obtain the Subscription Id from Subscriptions:
To obtain the App ID (actually Application ID) and an application key from Azure Active Directory:
To obtain the Tenant ID (actually Directory Id) from Azure Active Directory:
-
Click Create.
If you encounter errors, refer to Troubleshooting Azure.
Congratulations! You have successfully launched Cloudbreak and created a Cloudbreak credential. Now you can use Cloudbreak to create clusters.
Related Links
CLI Tools (Hortonworks)
Use Portal to Create an Azure Active Directory Application (External)


