Important Notes About Cloudera Director and Azure
Azure Limits, Quotas, and Constraints
Azure limits the number of CPU cores that can be allocated in each region. For details, see Azure subscription and service limits, quotas, and constraints in the Azure documentation. If you need to increase the limit, contact Microsoft Azure support before deploying the cluster with Cloudera Director.
Not all Azure Virtual Machine (VM) types are available in all Azure regions. See Products available by region on the Microsoft Azure web site to confirm that a VM type is available in a particular region. See Cloudera Reference Architecture for Microsoft Azure Deployments for the latest supported VM types.
Azure Resources Managed by Cloudera Director
- Managed disks and storage accounts:
- For VMs using unmanaged disks in storage accounts: one storage account for each VM.
- For VMs using managed disks: one managed disk for each data disk, and one managed disk for the OS disk.
- A NIC for each VM.
- A public IP address for each VM, if public IP addresses are enabled.
Changing the Instance Type is Not Supported in Azure
- Changing the instance type of an already-deployed VM is not supported in Azure.
- Changing the instance type of a VM through a tool external to Cloudera Director is not supported in Azure. You cannot, for example, use the Azure Portal to change the instance type. Cloudera Director is not updated when instance type changes are made with external tools, and your cluster will show errors in Cloudera Director.
Deploying Production Clusters
Although the Cloudera Director web UI can be used for proof-of-concept deployments on Azure, you must use the published sample configuration files for production deployments (see Useful Links below). You can modify the sample configuration file to fit your specific deployment environment, remove services you do not need, and customize the sample bootstrap script. Configurations related to logging and data storage for individual services must not be changed. Deploying a cluster using the Cloudera Director command-line interface and configuration file based on the examples ensures a repeatable deployment with the proper settings for Azure.
See the Cloudera Reference Architecture for Microsoft Azure Deployments document for more details.
Updating the Azure Plug-in Timeout Value
- Download the latest supported azure-plugin.conf file from the Cloudera Director scripts repository.
- Find the parameter azure-backend-operation-polling-timeout-second in the provider section.
- Change the value to the required duration in seconds.
- On the Cloudera Director server, copy the modified azure-plugin.conf to /var/lib/cloudera-director-plugins/azure-provider-x.x.x/etc/azure-plugin.conf (replacing x.x.x with the latest version), and then restart Cloudera Director with sudo service cloudera-director-server restart
- lp.cloud.databaseServers.allocate.timeoutInMinutes
- lp.cloud.instances.terminate.timeoutInMinutes
Deletion Behavior
- The storage used for the VM OS disk and cluster data disks.
- The NIC created by the plug-in is attached to the VM. Only one NIC is used per VM. Do not manually attach NICs to the VM created by the plug-in.
- If the VM was set up to have a public IP, Cloudera Director will delete it. If a public IP was attached manually after the VM was created, Cloudera Director will not delete it.
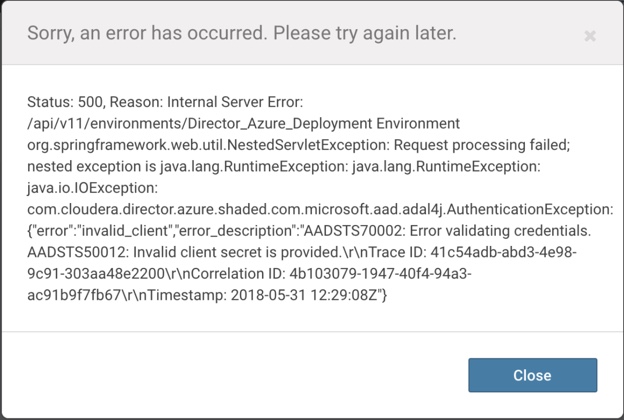
Updating an Expired Azure Client Secret
If your client secret expires, you will get an error in the Cloudera Director UI similar to the following:
An expired client secret also results in an entry similar to the following in the Cloudera Director log file:
Failed to authenticate with Azure: java.io.IOException:
com.cloudera.director.azure.shaded.com.microsoft.aad.adal4j.AuthenticationException:
{"error":"invalid_client","error_description":"AADSTS70002: Error validating
credentials. AADSTS50012: Invalid client secret is provided.\r\nTrace ID:
fc5529da-2536-44f6-bad4-d07f6a9bbd00\r\nCorrelation ID:
1e7f12f3-32e7-4635-8b27-197e53fd0ab8\r\nTimestamp: 2018-05-31
11:13:11Z"}
Steps to Update an Expired Client Secret
- Turn off credential validation.
- ssh to the Cloudera Director server host.
- Locate the Azure plugin configuration file if you have one, or create a new plugin configuration file.
- If you already have a configuration file, it will be located at /var/lib/cloudera-director-plugins/azure-provider-version/etc/azure-plugin.conf.
- If there is no azure-plugin.conf file at that location, create one by running the following command:
wget -O /var/lib/cloudera-director-plugins/azure-provider-version/etc/azure-plugin.conf
https://raw.githubusercontent.com/cloudera/director-scripts/master/azure-plugin-config/azure-plugin.conf
- Edit the azure-plugin.conf file. Towards the end of the file there’s an azure-validate-credentials field. Change the value
to false:
azure-validate-credentials: false
- Restart Cloudera Director:
sudo service cloudera-director-server restart
- Update the credentials in either of the following ways:
- Using the Cloudera Director UI:
- Log into Cloudera Director and go to the environment whose client secret has expired.
- From the Add Cloudera Manager dropdown menu, select Update Environment Credentials.
- Put in the new client secret along with your existing settings for this environment. Existing environment settings can be found under the Details tab.
- Using the Cloudera Director API:
- Log into Cloudera Director. (You must be authenticated to use the Cloudera Director API.)
- Go the the environments section of the API console of your Cloudera Director server (replace director-server-hostname with
your own):
http://director-server-hostname:7189/api-console/index.html#
- Click on the GET /api/v11/environments section, and click Try it out! to list the environments. If you are using a version of the API other than v11, this procedure will still work, but your URL will contain the version you are using in place of v11.
- Copy the name of the environment whose client secret has expired. Open the GET /api/v11/environments/{name} section and paste the environment name into the name parameter box, and click Try it out! to display the environment details.
- Copy the config portion of the JSON block including the curly braces but excluding the "config" string. It should similar
to the example below. You might have different fields and values, but clientSecret should be there. If the clientSecret field is not there,
check to be sure you are using the correct API.
{ "tenantId": "[...]", "region": "eastus2", "azureCloudEnvironment": "azure", "clientSecret": "REDACTED", "subscriptionId": "[...]", "clientId": "[...]" } - Open the PUT /api/v11/environments/{name}/provider/credentials section. Note that there is /provider/credentials in the path - it is NOT the PUT /api/v11/environments/{name} section.
- Paste in the whole JSON block, including all fields and the surrounding curly braces, and then edit the JSON block:
-
Remove the "region" line.
-
Replace the "REDACTED" portion of "clientSecret": "REDACTED" with your new client secret.
-
- Click Try it out! again to update the credentials. On success, you should get a 202 response code. If you get a
400 Bad Request, check the Cloudera Director logs for full details. Also, check that you have not made any of the following common mistakes:
-
a. Using PUT /api/v11/environments/{name} instead of PUT /api/v11/environments/{name}/provider/credentials (note the /provider/credentials in the path).
This causes the following response:"status": 400, "error": "Bad Request", "exception": "org.springframework.http.converter.HttpMessageNotReadableException", "message": "Bad Request"
-
b. Improperly formatted JSON. This causes the following response:
   "status": 400,
   "error": "Bad Request",
   "exception":
"org.springframework.http.converter.HttpMessageNotReadableException",
   "message": "Bad Request"
-
c. Forgetting to remove the "region" line. This causes the following response:
   "status": 400,
   "error": "Bad Request",
   "exception":
"com.cloudera.launchpad.api.common.EnvironmentsResource$UnsupportedEnvironmentUpdateException",
   "message": "Unsupported environment update request"
-
- Using the Cloudera Director UI:
- Turn on credential validation. In this step, you undo what you did in the beginning:
- If you did not have an azure-plugin.conf file initially, delete the file now.
- If there was a file initially, then change azure-validate-credentials in your azure-plugin.conf back to true:
azure-validate-credentials: true
- Restart Cloudera Director:
sudo service cloudera-director-server restart
- Verify the fix.
- Tail the logs on the Cloudera Director host:
tail -f /var/log/cloudera-director-server/application.log
- Log into the Cloudera Director UI and go to the environment whose client secret was previously expired.
- If there are no errors with credential validation in the Cloudera Director UI or in the logs, then the new client secret has been applied.
- Tail the logs on the Cloudera Director host:
Skipping Azure credential validation with Azure backend.Verify that everything was changed back correctly, and that Cloudera Director was restarted.
Useful Links
- Cloudera Enterprise Reference Architecture for Azure Deployments.
- Configuration files for running Cloudera Director on Microsoft Azure:
- azure.simple.conf: A simple Cloudera Director configuration that creates a Cloudera Manager node and a four-node cluster (one master and three workers).
- azure.reference.conf: A reference Cloudera Director configuration that creates an eight-node cluster (three masters and five workers) with high availability (HA) enabled.
- azure.kerberos.conf: The same Cloudera Director configuration as azure.reference.conf, but with Kerberos enabled.