Importing Data Into HBase
- The location, size, and format of your existing data
- Whether you need to import data once or periodically over time
- Whether you want to import the data in bulk or stream it into HBase regularly
- How fresh the HBase data needs to be
Always run HBase administrative commands as the HBase user (typically hbase).
Continue reading:
- Choosing the Right Import Method
- Using CopyTable
- Importing HBase Data From CDH 4 to CDH 5
- Using Snapshots
- Using BulkLoad
- Using Cluster Replication
- Using Pig and HCatalog
- Using the Java API
- Using the Apache Thrift Proxy API
- Using the REST Proxy API
- Using Flume
- Using Spark
- Using Spark and Kafka
- Using a Custom MapReduce Job
Choosing the Right Import Method
If the data is already in an HBase table:
-
To move the data from one HBase cluster to another, use snapshot and either the clone_snapshot or ExportSnapshot utility; or, use the CopyTable utility.
-
To move the data from one HBase cluster to another without downtime on either cluster, use replication.
- To migrate data between HBase version that are not wire compatible, such as from CDH 4 to CDH 5, see Importing HBase Data From CDH 4 to CDH 5.
If the data currently exists outside HBase:
-
If possible, write the data to HFile format, and use a BulkLoad to import it into HBase. The data is immediately available to HBase and you can bypass the normal write path, increasing efficiency.
-
If you prefer not to use bulk loads, and you are using a tool such as Pig, you can use it to import your data.
If you need to stream live data to HBase instead of import in bulk:
-
Write a Java client using the Java API, or use the Apache Thrift Proxy API to write a client in a language supported by Thrift.
-
Stream data directly into HBase using the REST Proxy API in conjunction with an HTTP client such as wget or curl.
-
Use Flume or Spark.
Most likely, at least one of these methods works in your situation. If not, you can use MapReduce directly. Test the most feasible methods with a subset of your data to determine which one is optimal.
Using CopyTable
CopyTable uses HBase read and write paths to copy part or all of a table to a new table in either the same cluster or a different cluster. CopyTable causes read load when reading from the source, and write load when writing to the destination. Region splits occur on the destination table in real time as needed. To avoid these issues, use snapshot and export commands instead of CopyTable. Alternatively, you can pre-split the destination table to avoid excessive splits. The destination table can be partitioned differently from the source table. See this section of the Apache HBase documentation for more information.
$ ./bin/hbase org.apache.hadoop.hbase.mapreduce.CopyTable --help
Usage: CopyTable [general options] [--starttime=X] [--endtime=Y] [--new.name=NEW] [--peer.adr=ADR] <tablename>
The starttime/endtime and startrow/endrow pairs function in a similar way: if you leave out the first of the pair, the first timestamp or row in the table is the starting point. Similarly, if you leave out the second of the pair, the operation continues until the end of the table. To copy the table to a new table in the same cluster, you must specify --new.name, unless you want to write the copy back to the same table, which would add a new version of each cell (with the same data), or just overwrite the cell with the same value if the maximum number of versions is set to 1 (the default in CDH 5). To copy the table to a new table in a different cluster, specify --peer.adr and optionally, specify a new table name.
$ echo create 'NewTestTable', 'cf1', 'cf2', 'cf3' | bin/hbase shell --non-interactive
$ bin/hbase org.apache.hadoop.hbase.mapreduce.CopyTable --starttime=1265875194289  --families=cf1,cf2,cf3 --new.name=NewTestTable TestTable
In CDH 5, snapshots are recommended instead of CopyTable for most situations.
Importing HBase Data From CDH 4 to CDH 5
CDH 4 and CDH 5 are not wire-compatible, so import methods such as CopyTable will not work. Instead, you can use separate export and import operations using distcp, or you can copy the table's HFiles using HDFS utilities and upgrade the HFiles in place. The first option is preferred unless the size of the table is too large to be practical and the export or import will take too long. The import/export mechanism gives you flexibility and allows you to run exports as often as you need, for an ongoing period of time. This would allow you to test CDH 5 with your production data before finalizing your upgrade, for instance.
Import and Export Data Using DistCP
- Both Import and Export applications have several command-line options which you can use to control their behavior, such as limiting the import or export to certain column families or
modifying the output directory. Run the commands without arguments to view the usage instructions. The output below is an example, and may be different for different HBase versions.
$ bin/hbase org.apache.hadoop.hbase.mapreduce.Import

Usage: Import [options] <tablename> <inputdir>
By default Import will load data directly into HBase. To instead generate
HFiles of data to prepare for a bulk data load, pass the option:
  -Dimport.bulk.output=/path/for/output
 To apply a generic org.apache.hadoop.hbase.filter.Filter to the input, use
  -Dimport.filter.class=<name of filter class>
  -Dimport.filter.args=<comma separated list of args for filter
 NOTE: The filter will be applied BEFORE doing key renames using the HBASE_IMPORTER_RENAME_CFS property. Futher, filters will only use the
       Filter#filterRowKey(byte[] buffer, int offset, int length) method to identify  whether the current row needs to be ignored completely
       for processing and  Filter#filterKeyValue(KeyValue) method to determine if the KeyValue should be added; Filter.ReturnCode#INCLUDE
       and #INCLUDE_AND_NEXT_COL will be considered as including the KeyValue.
To import data exported from HBase 0.94, use
  -Dhbase.import.version=0.94
For performance consider the following options:
  -Dmapreduce.map.speculative=false
  -Dmapreduce.reduce.speculative=false
  -Dimport.wal.durability=<Used while writing data to hbase. Allowed values
  are the supported durability values like SKIP_WAL/ASYNC_WAL/SYNC_WAL/...>
$ /usr/bin/hbase org.apache.hadoop.hbase.mapreduce.Export ERROR: Wrong number of arguments: 0 Usage: Export [-D <property=value>]* <tablename> <outputdir> [<versions> [<starttime> [<endtime>]] [^[regex pattern] or [Prefix] to filter]] Note: -D properties will be applied to the conf used. For example: -D mapreduce.output.fileoutputformat.compress=true -D mapreduce.output.fileoutputformat.compress.codec=org.apache.hadoop.io.compress.GzipCodec -D mapreduce.output.fileoutputformat.compress.type=BLOCK Additionally, the following SCAN properties can be specified to control/limit what is exported.. -D hbase.mapreduce.scan.column.family=<familyName> -D hbase.mapreduce.include.deleted.rows=true -D hbase.mapreduce.scan.row.start=<ROWSTART> -D hbase.mapreduce.scan.row.stop=<ROWSTOP> For performance consider the following properties: -Dhbase.client.scanner.caching=100 -Dmapreduce.map.speculative=false -Dmapreduce.reduce.speculative=false For tables with very wide rows consider setting the batch size as below: -Dhbase.export.scanner.batch=10
-
On the CDH 4 cluster, export the contents of the table to sequence files in a given directory using a command like the following.
$ sudo -u hdfs hbase org.apache.hadoop.hbase.mapreduce.Export <tablename> /export_directory
The sequence files are located in the /export_directory directory.
- Copy the contents of /export_directory to the CDH 5 cluster using distcp or through a filesystem accessible from hosts on
both clusters. If you use distcp, the following is an example command.
$ sudo -u hdfs hadoop distcp -p -update -skipcrccheck hftp://cdh4-namenode:port/export_directory hdfs://cdh5-namenode/import_directory
- Create the table on the CDH 5 cluster using HBase Shell. Column families must be identical to the table on the CDH 4 cluster.
- Import the sequence file into the newly-created table.
$ sudo -u hdfs hbase -Dhbase.import.version=0.94 org.apache.hadoop.hbase.mapreduce.Import t1 /import_directory
Copy and Upgrade the HFiles
- Use the distcp command on the CDH 5 cluster to copy the HFiles from the CDH 4 cluster.
$ sudo -u hdfs hadoop distcp -p -update -skipcrccheck webhdfs://cdh4-namenode:http-port/hbase hdfs://cdh5-namenode:rpc-port/hbase
- Start HBase on the CDH 5 cluster. HBase detects and upgrades the HFiles and makes the table available. Verify the data and confirm that no errors are logged.
Using Snapshots
As of CDH 4.7, Cloudera recommends snapshots instead of CopyTable where possible. A snapshot captures the state of a table at the time the snapshot was taken. Because no data is copied when a snapshot is taken, the process is very quick. As long as the snapshot exists, cells in the snapshot are never deleted from HBase, even if they are explicitly deleted by the API. Instead, they are archived so that the snapshot can restore the table to its state at the time of the snapshot.
After taking a snapshot, use the clone_snapshot command to copy the data to a new (immediately enabled) table in the same cluster, or the Export utility to create a new table based on the snapshot, in the same cluster or a new cluster. This is a copy-on-write operation. The new table shares HFiles with the original table until writes occur in the new table but not the old table, or until a compaction or split occurs in either of the tables. This can improve performance in the short term compared to CopyTable.
To export the snapshot to a new cluster, use the ExportSnapshot utility, which uses MapReduce to copy the snapshot to the new cluster. Run the ExportSnapshot utility on the source cluster, as a user with HBase and HDFS write permission on the destination cluster, and HDFS read permission on the source cluster. This creates the expected amount of IO load on the destination cluster. Optionally, you can limit bandwidth consumption, which affects IO on the destination cluster. After the ExportSnapshot operation completes, you can see the snapshot in the new cluster using the list_snapshot command, and you can use the clone_snapshot command to create the table in the new cluster from the snapshot.
For full instructions for the snapshot and clone_snapshot HBase Shell commands, run the HBase Shell and type help snapshot. The following example takes a snapshot of a table, uses it to clone the table to a new table in the same cluster, and then uses the ExportSnapshot utility to copy the table to a different cluster, with 16 mappers and limited to 200 Mb/sec bandwidth.
$ bin/hbase shell
hbase(main):005:0> snapshot 'TestTable', 'TestTableSnapshot'
0 row(s) in 2.3290 seconds

hbase(main):006:0> clone_snapshot 'TestTableSnapshot', 'NewTestTable'
0 row(s) in 1.3270 seconds

hbase(main):007:0> describe 'NewTestTable'
DESCRIPTION                                          ENABLED
 'NewTestTable', {NAME => 'cf1', DATA_BLOCK_ENCODING true
  => 'NONE', BLOOMFILTER => 'ROW', REPLICATION_SCOPE
  => '0', VERSIONS => '1', COMPRESSION => 'NONE', MI
 N_VERSIONS => '0', TTL => 'FOREVER', KEEP_DELETED_C
 ELLS => 'false', BLOCKSIZE => '65536', IN_MEMORY =>
  'false', BLOCKCACHE => 'true'}, {NAME => 'cf2', DA
 TA_BLOCK_ENCODING => 'NONE', BLOOMFILTER => 'ROW',
 REPLICATION_SCOPE => '0', VERSIONS => '1', COMPRESS
 ION => 'NONE', MIN_VERSIONS => '0', TTL => 'FOREVER
 ', KEEP_DELETED_CELLS => 'false', BLOCKSIZE => '655
 36', IN_MEMORY => 'false', BLOCKCACHE => 'true'}
1 row(s) in 0.1280 seconds
hbase(main):008:0> quit

$ hbase org.apache.hadoop.hbase.snapshot.ExportSnapshot -snapshot TestTableSnapshot -copy-to file:///tmp/hbase -mappers 16 -bandwidth 200
14/10/28 21:48:16 INFO snapshot.ExportSnapshot: Copy Snapshot Manifest
14/10/28 21:48:17 INFO client.RMProxy: Connecting to ResourceManager at hbase-21.example.com/10.20.188.121:8032
14/10/28 21:48:19 INFO snapshot.ExportSnapshot: Loading Snapshot 'TestTableSnapshot' hfile list
14/10/28 21:48:19 INFO Configuration.deprecation: hadoop.native.lib is deprecated. Instead, use io.native.lib.available
14/10/28 21:48:19 INFO util.FSVisitor: No logs under directory:hdfs://hbase-21.example.com:8020/hbase/.hbase-snapshot/TestTableSnapshot/WALs
14/10/28 21:48:20 INFO mapreduce.JobSubmitter: number of splits:0
14/10/28 21:48:20 INFO mapreduce.JobSubmitter: Submitting tokens for job: job_1414556809048_0001
14/10/28 21:48:20 INFO impl.YarnClientImpl: Submitted application application_1414556809048_0001
14/10/28 21:48:20 INFO mapreduce.Job: The url to track the job: http://hbase-21.example.com:8088/proxy/application_1414556809048_0001/
14/10/28 21:48:20 INFO mapreduce.Job: Running job: job_1414556809048_0001
14/10/28 21:48:36 INFO mapreduce.Job: Job job_1414556809048_0001 running in uber mode : false
14/10/28 21:48:36 INFO mapreduce.Job:  map 0% reduce 0%
14/10/28 21:48:37 INFO mapreduce.Job: Job job_1414556809048_0001 completed successfully
14/10/28 21:48:37 INFO mapreduce.Job: Counters: 2

Job Counters


Total time spent by all maps in occupied slots (ms)=0


Total time spent by all reduces in occupied slots (ms)=0
14/10/28 21:48:37 INFO snapshot.ExportSnapshot: Finalize the Snapshot Export
14/10/28 21:48:37 INFO snapshot.ExportSnapshot: Verify snapshot integrity
14/10/28 21:48:37 INFO Configuration.deprecation: fs.default.name is deprecated. Instead, use fs.defaultFS
14/10/28 21:48:37 INFO snapshot.ExportSnapshot: Export Completed: TestTableSnapshot
The bold italic line contains the URL from which you can track the ExportSnapshot job. When it finishes, a new set of HFiles, comprising all of the HFiles that were part of the table when the snapshot was taken, is created at the HDFS location you specified.
You can use the SnapshotInfo command-line utility included with HBase to verify or debug snapshots.
Using BulkLoad
- The data is available to HBase immediately but does cause additional load or latency on the cluster when it appears.
- BulkLoad operations do not use the write-ahead log (WAL) and do not cause flushes or split storms.
- BulkLoad operations do not cause excessive garbage collection.
- Extract your data from its existing source. For instance, if your data is in a MySQL database, you might run the mysqldump command. The process you use depends on your data. If your data is already in TSV or CSV format, skip this step and use the included ImportTsv utility to process your data into HFiles. See the ImportTsv documentation for details.
- Process your data into HFile format. See http://hbase.apache.org/book.html#_hfile_format_2 for details about HFile format. Usually you use a MapReduce job for the conversion, and you often need to write the Mapper yourself
because your data is unique. The job must to emit the row key as the Key, and either a KeyValue, a Put, or
a Delete as the Value. The Reducer is handled by HBase; configure it using HFileOutputFormat.configureIncrementalLoad() and it does the following:
- Inspects the table to configure a total order partitioner
- Uploads the partitions file to the cluster and adds it to the DistributedCache
- Sets the number of reduce tasks to match the current number of regions
- Sets the output key/value class to match HFileOutputFormat requirements
- Sets the Reducer to perform the appropriate sorting (either KeyValueSortReducer or PutSortReducer)
- One HFile is created per region in the output folder. Input data is almost completely re-written, so you need available disk space at least twice the size of the original data set. For example, for a 100 GB output from mysqldump, you should have at least 200 GB of available disk space in HDFS. You can delete the original input file at the end of the process.
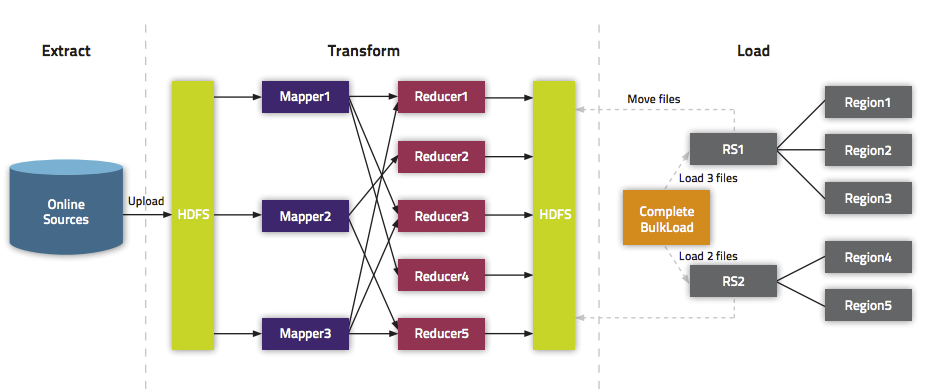
- Load the files into HBase. Use the LoadIncrementalHFiles command (more commonly known as the completebulkload tool), passing it a URL that locates the files in HDFS. Each file is loaded into the relevant region on the
RegionServer for the region. You can limit the number of versions that are loaded by passing the --versions= N option, where N is the maximum number of versions to include, from newest to oldest (largest timestamp to smallest timestamp).
If a region was split after the files were created, the tool automatically splits the HFile according to the new boundaries. This process is inefficient, so if your table is being written to by other processes, you should load as soon as the transform step is done.
The following illustration shows the full BulkLoad process.
Extra Steps for BulkLoad With Encryption Zones
- Both the staging directory and the directory into which you place your generated HFiles need to be within HBase's encryption zone (generally under the /hbase directory). Before you can do this, you need to change the permissions of /hbase to be world-executable but not world-readable (rwx--x--x, or numeric mode 711).
- You also need to configure the HMaster to set the permissions of the HBase root directory correctly. If you use Cloudera Manager, edit the Master Advanced
Configuration Snippet (Safety Valve) for hbase-site.xml. Otherwise, edit hbase-site.xml on the HMaster. Add the following:
<property>
  <name>hbase.rootdir.perms</name>
  <value>711</value>
</property>
If you skip this step, a previously-working BulkLoad setup will start to fail with permission errors when you restart the HMaster.
Use Cases for BulkLoad
- Loading your original dataset into HBase for the first time - Your initial dataset might be quite large, and bypassing the HBase write path can speed up the process considerably.
- Incremental Load - To load new data periodically, use BulkLoad to import it in batches at your preferred intervals. This alleviates latency problems and helps you to achieve service-level agreements (SLAs). However, one trigger for compaction is the number of HFiles on a RegionServer. Therefore, importing a large number of HFiles at frequent intervals can cause major compactions to happen more often than they otherwise would, negatively impacting performance. You can mitigate this by tuning the compaction settings such that the maximum number of HFiles that can be present without triggering a compaction is very high, and relying on other factors, such as the size of the Memstore, to trigger compactions.
- Data needs to originate elsewhere - If an existing system is capturing the data you want to have in HBase and needs to remain active for business reasons, you can periodically BulkLoad data from the system into HBase so that you can perform operations on it without impacting the system.
Using BulkLoad On A Secure Cluster
If you use security, HBase allows you to securely BulkLoad data into HBase. For a full explanation of how secure BulkLoad works, see HBase Transparent Encryption at Rest.
First, configure a hbase.bulkload.staging.dir which will be managed by HBase and whose subdirectories will be writable (but not readable) by HBase users. Next, add the org.apache.hadoop.hbase.security.access.SecureBulkLoadEndpoint coprocessor to your configuration, so that users besides the hbase user can BulkLoad files into HBase. This functionality is available in CDH 5.5 and higher.
<property>
  <name>hbase.bulkload.staging.dir</name>
  <value>/tmp/hbase-staging</value>
</property>
<property>
  <name>hbase.coprocessor.region.classes</name>
  <value>org.apache.hadoop.hbase.security.access.SecureBulkLoadEndpoint</value>
</property>
More Information about BulkLoad
For more information and examples, as well as an explanation of the ImportTsv utility, which can be used to import data in text-delimited formats such as CSV, see this post on the Cloudera Blog.
Using Cluster Replication
If your data is already in an HBase cluster, replication is useful for getting the data into additional HBase clusters. In HBase, cluster replication refers to keeping one cluster state synchronized with that of another cluster, using the write-ahead log (WAL) of the source cluster to propagate the changes. Replication is enabled at column family granularity. Before enabling replication for a column family, create the table and all column families to be replicated, on the destination cluster.
Cluster replication uses an active-push methodology. An HBase cluster can be a source (also called active, meaning that it writes new data), a destination (also called passive, meaning that it receives data using replication), or can fulfill both roles at once. Replication is asynchronous, and the goal of replication is consistency.
When data is replicated from one cluster to another, the original source of the data is tracked with a cluster ID, which is part of the metadata. In CDH 5, all clusters that have already consumed the data are also tracked. This prevents replication loops.
Common Replication Topologies
- A central source cluster might propagate changes to multiple destination clusters, for failover or due to geographic distribution.
- A source cluster might push changes to a destination cluster, which might also push its own changes back to the original cluster.
- Many different low-latency clusters might push changes to one centralized cluster for backup or resource-intensive data-analytics jobs. The processed data might then be replicated back to the low-latency clusters.
- Multiple levels of replication can be chained together to suit your needs. The following diagram shows a hypothetical scenario. Use the arrows to follow the data paths.
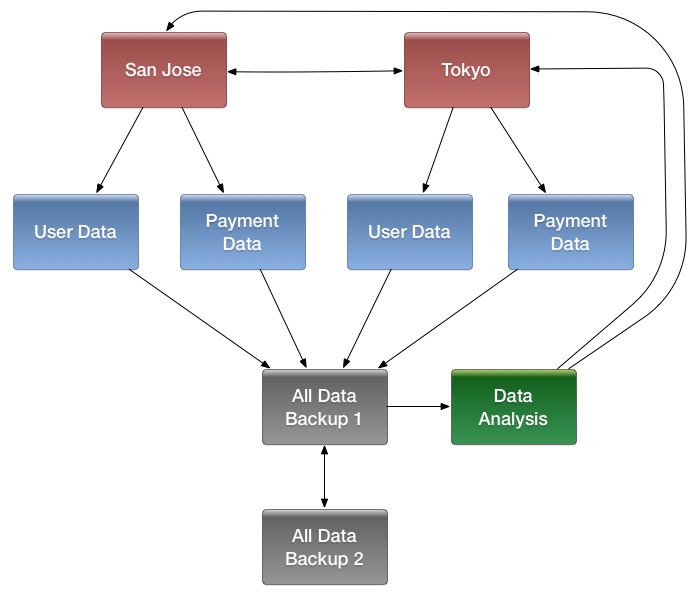
At the top of the diagram, the San Jose and Tokyo clusters, shown in red, replicate changes to each other, and each also replicates changes to a User Data and a Payment Data cluster.
Each cluster in the second row, shown in blue, replicates its changes to the All Data Backup 1 cluster, shown in grey. The All Data Backup 1 cluster replicates changes to the All Data Backup 2 cluster (also shown in grey), as well as the Data Analysis cluster (shown in green). All Data Backup 2 also propagates any of its own changes back to All Data Backup 1.
The Data Analysis cluster runs MapReduce jobs on its data, and then pushes the processed data back to the San Jose and Tokyo clusters.
Configuring Clusters for Replication
- Configure and start the source and destination clusters.
- Create tables with the same names and column families on both the source and destination clusters, so that the destination cluster knows where to store data it receives. All hosts in the source and destination clusters should be reachable to each other. See Creating the Empty Table On the Destination Cluster.
- On the source cluster, enable replication in Cloudera Manager, or by setting hbase.replication to true in hbase-site.xml.
- Obtain Kerberos credentials as the HBase principal. Substitute your fully.qualified.domain.name and realm in the following command:
$ kinit -k -t /etc/hbase/conf/hbase.keytab hbase/fully.qualified.domain.name@YOUR-REALM.COM
- On the source cluster, in HBase Shell, add the destination cluster as a peer, using the add_peer command. The syntax is as follows:
add_peer 'ID', 'CLUSTER_KEY'
The ID must be a short integer. To compose the CLUSTER_KEY, use the following template:hbase.zookeeper.quorum:hbase.zookeeper.property.clientPort:zookeeper.znode.parent
If both clusters use the same ZooKeeper cluster, you must use a different zookeeper.znode.parent, because they cannot write in the same folder.
- On the source cluster, configure each column family to be replicated by setting its REPLICATION_SCOPE to 1, using commands such as the following in HBase
Shell.
hbase> disable 'example_table' hbase> alter 'example_table', {NAME => 'example_family', REPLICATION_SCOPE => '1'} hbase> enable 'example_table' - Verify that replication is occurring by examining the logs on the source cluster for messages such as the following.
Considering 1 rs, with ratio 0.1
Getting 1 rs from peer cluster # 0
Choosing peer 10.10.1.49:62020
- To verify the validity of replicated data, use the included VerifyReplication MapReduce job on the source cluster,
providing it with the ID of the replication peer and table name to verify. Other options are available, such as a time range or specific families to verify.
The command has the following form:
hbase org.apache.hadoop.hbase.mapreduce.replication.VerifyReplication [--starttime=timestamp1] [--stoptime=timestamp] [--families=comma separated list of families] <peerId> <tablename>
The VerifyReplication command prints GOODROWS and BADROWS counters to indicate rows that did and did not replicate correctly.
Using Pig and HCatalog
- Format the data as a TSV file. You can work with other file formats; see the Pig and HCatalog project documentation for more details.
The following example shows a subset of data from Google's NGram Dataset, which shows the frequency of specific phrases or letter-groupings found in publications indexed by Google. Here, the first column has been added to this dataset as the row ID. The first column is formulated by combining the n-gram itself (in this case, Zones) with the line number of the file in which it occurs (z_LINE_NUM). This creates a format such as "Zones_z_6230867." The second column is the n-gram itself, the third column is the year of occurrence, the fourth column is the frequency of occurrence of that Ngram in that year, and the fifth column is the number of distinct publications. This extract is from the z file of the 1-gram dataset from version 20120701. The data is truncated at the ... mark, for the sake of readability of this document. In most real-world scenarios, you will not work with tables that have five columns. Most HBase tables have one or two columns.
Zones_z_6230867 Zones 1507 1 1
Zones_z_6230868 Zones 1638 1 1
Zones_z_6230869 Zones 1656 2 1
Zones_z_6230870 Zones 1681 8 2
...
Zones_z_6231150 Zones 1996 17868 4356
Zones_z_6231151 Zones 1997 21296 4675
Zones_z_6231152 Zones 1998 20365 4972
Zones_z_6231153 Zones 1999 20288 5021
Zones_z_6231154 Zones 2000 22996 5714
Zones_z_6231155 Zones 2001 20469 5470
Zones_z_6231156 Zones 2002 21338 5946
Zones_z_6231157 Zones 2003 29724 6446
Zones_z_6231158 Zones 2004 23334 6524
Zones_z_6231159 Zones 2005 24300 6580
Zones_z_6231160 Zones 2006 22362 6707
Zones_z_6231161 Zones 2007 22101 6798
Zones_z_6231162 Zones 2008 21037 6328
- Using the hadoop fs command, put the data into HDFS. This example places the file into an /imported_data/ directory.
$ hadoop fs -put zones_frequency.tsv /imported_data/
- Create and register a new HBase table in HCatalog, using the hcat command, passing it a DDL file to represent your table. You could also register an
existing HBase table, using the same command. The DDL file format is specified as part of the Hive REST
API. The following example illustrates the basic mechanism.
CREATE TABLE
zones_frequency_table (id STRING, ngram STRING, year STRING, freq STRING, sources STRING)
STORED BY 'org.apache.hcatalog.hbase.HBaseHCatStorageHandler'
TBLPROPERTIES (
  'hbase.table.name' = 'zones_frequency_table',
  'hbase.columns.mapping' = 'd:ngram,d:year,d:freq,d:sources',
  'hcat.hbase.output.bulkMode' = 'true'
);
$ hcat -f zones_frequency_table.ddl
- Create a Pig file to process the TSV file created in step 1, using the DDL file created in step 3. Modify the file names and other parameters in this command to match your values if
you use data different from this working example. USING PigStorage('\t') indicates that the input file is tab-delimited. For more details about Pig syntax, see the
Pig Latin reference documentation.
A = LOAD 'hdfs:///imported_data/zones_frequency.tsv' USING PigStorage('\t') AS (id:chararray, ngram:chararray, year:chararray, freq:chararray, sources:chararray);
-- DUMP A;
STORE A INTO 'zones_frequency_table' USING org.apache.hcatalog.pig.HCatStorer();
Save the file as zones.bulkload.pig.
- Use the pig command to bulk-load the data into HBase.
$ pig -useHCatalog zones.bulkload.pig
The data is now in HBase and is available to use.
Using the Java API
...
  HTable table = null;
  try {
    table = myCode.createTable(tableName, fam);
    int i = 1;
    List<Put> puts = new ArrayList<Put>();
    for (String labelExp : labelExps) {
      Put put = new Put(Bytes.toBytes("row" + i));
      put.add(fam, qual, HConstants.LATEST_TIMESTAMP, value);
      puts.add(put);
      i++;
    }
    table.put(puts);
  } finally {
    if (table != null) {
      table.flushCommits();
    }
  }
...
Using the Apache Thrift Proxy API
The Apache Thrift library provides cross-language client-server remote procedure calls (RPCs), using Thrift bindings. A Thrift binding is client code generated by the Apache Thrift Compiler for a target language (such as Python) that allows communication between the Thrift server and clients using that client code. HBase includes an Apache Thrift Proxy API, which allows you to write HBase applications in Python, C, C++, or another language that Thrift supports. The Thrift Proxy API is slower than the Java API and may have fewer features. T use the Thrift Proxy API, you need to configure and run the HBase Thrift server on your cluster. See Installing and Starting the HBase Thrift Server. You also need to install the Apache Thrift compiler on your development system.
$ mkdir HBaseThrift
$ cd HBaseThrift/
$ thrift -gen py /path/to/Hbase.thrift
$ mv gen-py/* .
$ rm -rf gen-py/
$ mkdir thrift
$ cp -rp ~/Downloads/thrift-0.9.0/lib/py/src/* ./thrift/
from thrift.transport import TSocket
from thrift.protocol import TBinaryProtocol
from thrift.transport import TTransport
from hbase import Hbase

# Connect to HBase Thrift server
transport = TTransport.TBufferedTransport(TSocket.TSocket(host, port))
protocol = TBinaryProtocol.TBinaryProtocolAccelerated(transport)

# Create and open the client connection
client = Hbase.Client(protocol)
transport.open()

# Modify a single row
mutations = [Hbase.Mutation(
  column='columnfamily:columndescriptor', value='columnvalue')]
client.mutateRow('tablename', 'rowkey', mutations)

# Modify a batch of rows
# Create a list of mutations per work of Shakespeare
mutationsbatch = []

for line in myDataFile:
    rowkey = username + "-" + filename + "-" + str(linenumber).zfill(6)

    mutations = [
            Hbase.Mutation(column=messagecolumncf, value=line.strip()),
            Hbase.Mutation(column=linenumbercolumncf, value=encode(linenumber)),
            Hbase.Mutation(column=usernamecolumncf, value=username)
        ]

       mutationsbatch.append(Hbase.BatchMutation(row=rowkey,mutations=mutations))

# Run the mutations for all the lines in myDataFile
client.mutateRows(tablename, mutationsbatch)

transport.close()
The Thrift Proxy API does not support writing to HBase clusters that are secured using Kerberos.
This example was modified from the following two blog posts on http://www.cloudera.com. See them for more details.
Using the REST Proxy API
After configuring and starting the HBase REST Server on your cluster, you can use the HBase REST Proxy API to stream data into HBase, from within another application or shell script, or by using an HTTP client such as wget or curl. The REST Proxy API is slower than the Java API and may have fewer features. This approach is simple and does not require advanced development experience to implement. However, like the Java and Thrift Proxy APIs, it uses the full write path and can cause compactions and region splits.
Specified addresses without existing data create new values. Specified addresses with existing data create new versions, overwriting an existing version if the row, column:qualifier, and timestamp all match that of the existing value.
$ curl -H "Content-Type: text/xml" http://localhost:8000/test/testrow/test:testcolumn
The REST Proxy API does not support writing to HBase clusters that are secured using Kerberos.
For full documentation and more examples, see the REST Proxy API documentation.
Using Flume
Apache Flume is a fault-tolerant system designed for ingesting data into HDFS, for use with Hadoop. You can configure Flume to write data directly into HBase. Flume includes two different sinks designed to work with HBase: HBaseSink (org.apache.flume.sink.hbase.HBaseSink) and AsyncHBaseSink (org.apache.flume.sink.hbase.AsyncHBaseSink). HBaseSink supports HBase IPC calls introduced in HBase 0.96, and allows you to write data to an HBase cluster that is secured by Kerberos, whereas AsyncHBaseSink does not. However, AsyncHBaseSink uses an asynchronous model and guarantees atomicity at the row level.
You configure HBaseSink and AsyncHBaseSink nearly identically. Following is an example configuration for each. Bold lines highlight differences in the configurations. For full documentation about configuring HBaseSink and AsyncHBaseSink, see the Flume documentation. The table, columnFamily, and column parameters correlate to the HBase table, column family, and column where the data is to be imported. The serializer is the class that converts the data at the source into something HBase can use. Configure your sinks in the Flume configuration file.
In practice, you usually need to write your own serializer, which implements either AsyncHBaseEventSerializer or HBaseEventSerializer. The HBaseEventSerializer converts Flume Events into one or more HBase Puts, sends them to the HBase cluster, and is closed when the HBaseSink stops. AsyncHBaseEventSerializer starts and listens for Events. When it receives an Event, it calls the setEvent method and then calls the getActions and getIncrements methods. When the AsyncHBaseSink is stopped, the serializer cleanUp method is called. These methods return PutRequest and AtomicIncrementRequest, which are part of the asynchbase API.
AsyncHBaseSink:
#Use the AsyncHBaseSink
host1.sinks.sink1.type = org.apache.flume.sink.hbase.AsyncHBaseSink
host1.sinks.sink1.channel = ch1
host1.sinks.sink1.table = transactions
host1.sinks.sink1.columnFamily = clients
host1.sinks.sink1.column = charges
host1.sinks.sink1.batchSize = 5000
#Use the SimpleAsyncHbaseEventSerializer that comes with Flume
host1.sinks.sink1.serializer = org.apache.flume.sink.hbase.SimpleAsyncHbaseEventSerializer
host1.sinks.sink1.serializer.incrementColumn = icol
host1.channels.ch1.type=memory
#Use the HBaseSink
host1.sinks.sink1.type = org.apache.flume.sink.hbase.HBaseSink
host1.sinks.sink1.channel = ch1
host1.sinks.sink1.table = transactions
host1.sinks.sink1.columnFamily = clients
host1.sinks.sink1.column = charges
host1.sinks.sink1.batchSize = 5000
#Use the SimpleHbaseEventSerializer that comes with Flume
host1.sinks.sink1.serializer = org.apache.flume.sink.hbase.SimpleHbaseEventSerializer
host1.sinks.sink1.serializer.incrementColumn = icol
host1.channels.ch1.type=memory
   /**
  * A serializer for the AsyncHBaseSink, which splits the event body into
  * multiple columns and inserts them into a row whose key is available in
  * the headers
  */
 public class SplittingSerializer implements AsyncHbaseEventSerializer {
   private byte[] table;
   private byte[] colFam;
   private Event currentEvent;
   private byte[][] columnNames;
   private final List<PutRequest> puts = new ArrayList<PutRequest>();
   private final List<AtomicIncrementRequest> incs = new ArrayList<AtomicIncrementRequest>();
   private byte[] currentRowKey;
   private final byte[] eventCountCol = "eventCount".getBytes();

   @Override
   public void initialize(byte[] table, byte[] cf) {
     this.table = table;
     this.colFam = cf;
   }

   @Override
   public void setEvent(Event event) {
     // Set the event and verify that the rowKey is not present
     this.currentEvent = event;
     String rowKeyStr = currentEvent.getHeaders().get("rowKey");
     if (rowKeyStr == null) {
       throw new FlumeException("No row key found in headers!");
     }
     currentRowKey = rowKeyStr.getBytes();
   }

   @Override
   public List<PutRequest> getActions() {
     // Split the event body and get the values for the columns
     String eventStr = new String(currentEvent.getBody());
     String[] cols = eventStr.split(",");
     puts.clear();
     for (int i = 0; i < cols.length; i++) {
       //Generate a PutRequest for each column.
       PutRequest req = new PutRequest(table, currentRowKey, colFam,
               columnNames[i], cols[i].getBytes());
       puts.add(req);
     }
     return puts;
   }

   @Override
   public List<AtomicIncrementRequest> getIncrements() {
     incs.clear();
     //Increment the number of events received
     incs.add(new AtomicIncrementRequest(table, "totalEvents".getBytes(), colFam, eventCountCol));
     return incs;
   }

   @Override
   public void cleanUp() {
     table = null;
     colFam = null;
     currentEvent = null;
     columnNames = null;
     currentRowKey = null;
   }

   @Override
   public void configure(Context context) {
     //Get the column names from the configuration
     String cols = new String(context.getString("columns"));
     String[] names = cols.split(",");
     byte[][] columnNames = new byte[names.length][];
     int i = 0;
     for(String name : names) {
       columnNames[i++] = name.getBytes();
     }
     this.columnNames = columnNames;
   }

   @Override
   public void configure(ComponentConfiguration conf) {
   }
}
Using Spark
// Note: mapred package is used, instead of the
// mapreduce package which contains new hadoop APIs.

import org.apache.hadoop.hbase.mapred.TableOutputFormat
import org.apache.hadoop.hbase.client
// ... some other settings

val conf = HBaseConfiguration.create()

// general hbase settings
conf.set("hbase.rootdir",
         "hdfs://" + nameNodeURL + ":" + hdfsPort + "/hbase")
conf.setBoolean("hbase.cluster.distributed", true)
conf.set("hbase.zookeeper.quorum", hostname)
conf.setInt("hbase.client.scanner.caching", 10000)
// ... some other settings

val jobConfig: JobConf = new JobConf(conf, this.getClass)

// Note:  TableOutputFormat is used as deprecated code
// because JobConf is an old hadoop API
jobConfig.setOutputFormat(classOf[TableOutputFormat])
jobConfig.set(TableOutputFormat.OUTPUT_TABLE, outputTable)def convert(triple: (Int, Int, Int)) = {
val p = new Put(Bytes.toBytes(triple._1))
p.add(Bytes.toBytes("cf"),
Bytes.toBytes("col_1"),
Bytes.toBytes(triple._2))
p.add(Bytes.toBytes("cf"),
Bytes.toBytes("col_2"),
Bytes.toBytes(triple._3))
(new ImmutableBytesWritable, p)
}new PairRDDFunctions(localData.map(convert)).saveAsHadoopDataset(jobConfig)
Using Spark and Kafka
package org.apache.spark.streaming.examples

import java.util.Properties

import kafka.producer._

import org.apache.hadoop.hbase.{ HBaseConfiguration, HColumnDescriptor, HTableDescriptor }
import org.apache.hadoop.hbase.client.{ HBaseAdmin, Put }
import org.apache.hadoop.hbase.io.ImmutableBytesWritable
import org.apache.hadoop.hbase.mapred.TableOutputFormat
import org.apache.hadoop.hbase.mapreduce.TableInputFormat
import org.apache.hadoop.hbase.util.Bytes
import org.apache.hadoop.mapred.JobConf
import org.apache.spark.SparkContext
import org.apache.spark.rdd.{ PairRDDFunctions, RDD }
import org.apache.spark.streaming._
import org.apache.spark.streaming.StreamingContext._
import org.apache.spark.streaming.kafka._

object MetricAggregatorHBase {
  def main(args : Array[String]) {
    if (args.length < 6) {
      System.err.println("Usage: MetricAggregatorTest <master> <zkQuorum> <group> <topics> <destHBaseTableName> <numThreads>")
      System.exit(1)
    }

    val Array(master, zkQuorum, group, topics, hbaseTableName, numThreads) = args

    val conf = HBaseConfiguration.create()
    conf.set("hbase.zookeeper.quorum", zkQuorum)

    // Initialize hBase table if necessary
    val admin = new HBaseAdmin(conf)
    if (!admin.isTableAvailable(hbaseTableName)) {
      val tableDesc = new HTableDescriptor(hbaseTableName)
      tableDesc.addFamily(new HColumnDescriptor("metric"))
      admin.createTable(tableDesc)
    }

    // setup streaming context
    val ssc = new StreamingContext(master, "MetricAggregatorTest", Seconds(2),
      System.getenv("SPARK_HOME"), StreamingContext.jarOfClass(this.getClass))
    ssc.checkpoint("checkpoint")

    val topicpMap = topics.split(",").map((_, numThreads.toInt)).toMap
    val lines = KafkaUtils.createStream(ssc, zkQuorum, group, topicpMap)
      .map { case (key, value) => ((key, Math.floor(System.currentTimeMillis() / 60000).toLong * 60), value.toInt) }

    val aggr = lines.reduceByKeyAndWindow(add _, Minutes(1), Minutes(1), 2)

    aggr.foreach(line => saveToHBase(line, zkQuorum, hbaseTableName))

    ssc.start

    ssc.awaitTermination
  }

  def add(a : Int, b : Int) = { (a + b) }

  def saveToHBase(rdd : RDD[((String, Long), Int)], zkQuorum : String, tableName : String) = {
    val conf = HBaseConfiguration.create()
    conf.set("hbase.zookeeper.quorum", zkQuorum)

    val jobConfig = new JobConf(conf)
    jobConfig.set(TableOutputFormat.OUTPUT_TABLE, tableName)
    jobConfig.setOutputFormat(classOf[TableOutputFormat])

    new PairRDDFunctions(rdd.map { case ((metricId, timestamp), value) => createHBaseRow(metricId, timestamp, value) }).saveAsHadoopDataset(jobConfig)
  }

  def createHBaseRow(metricId : String, timestamp : Long, value : Int) = {
    val record = new Put(Bytes.toBytes(metricId + "~" + timestamp))

    record.add(Bytes.toBytes("metric"), Bytes.toBytes("col"), Bytes.toBytes(value.toString))

    (new ImmutableBytesWritable, record)
  }

}

// Produces some random words between 1 and 100.
object MetricDataProducer {

  def main(args : Array[String]) {
    if (args.length < 2) {
      System.err.println("Usage: MetricDataProducer <metadataBrokerList> <topic> <messagesPerSec>")
      System.exit(1)
    }

    val Array(brokers, topic, messagesPerSec) = args

    // ZooKeeper connection properties
    val props = new Properties()
    props.put("metadata.broker.list", brokers)
    props.put("serializer.class", "kafka.serializer.StringEncoder")

    val config = new ProducerConfig(props)
    val producer = new Producer[String, String](config)

    // Send some messages
    while (true) {
      val messages = (1 to messagesPerSec.toInt).map { messageNum =>
        {
          val metricId = scala.util.Random.nextInt(10)
          val value = scala.util.Random.nextInt(1000)
          new KeyedMessage[String, String](topic, metricId.toString, value.toString)
        }
      }.toArray

      producer.send(messages : _*)
      Thread.sleep(100)
    }
  }
}
Using a Custom MapReduce Job
Many of the methods to import data into HBase use MapReduce implicitly. If none of those approaches fit your needs, you can use MapReduce directly to convert data to a series of HFiles or API calls for import into HBase. In this way, you can import data from Avro, Parquet, or another format into HBase, or export data from HBase into another format, using API calls such as TableOutputFormat, HFileOutputFormat, and TableInputFormat.
