Managing HDFS Snapshots
This topic demonstrates how to manage HDFS snapshots using either Cloudera Manager or the command line.
Managing HDFS Snapshots Using Cloudera Manager
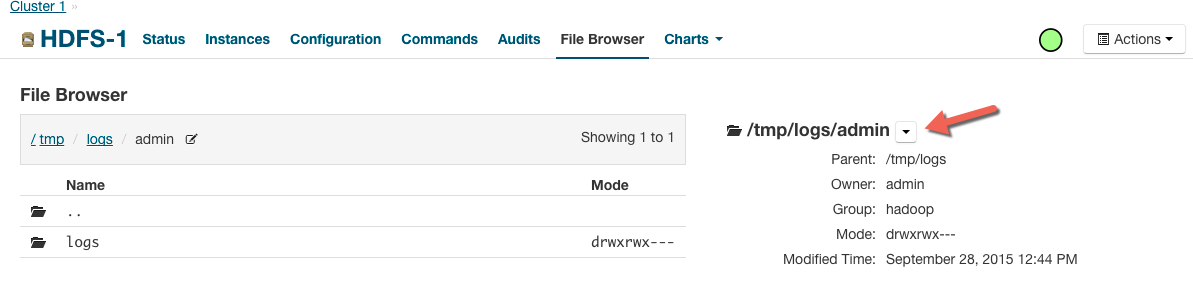
For HDFS (CDH 5 only) services, use the File Browser tab to view the HDFS directories associated with a service on your cluster. You can view the currently saved snapshots for your files, and delete or restore them. From the HDFS File Browser tab, you can:
- Designate HDFS directories to be "snapshottable" so snapshots can be created for those directories.
- Initiate immediate (unscheduled) snapshots of a table.
- View the list of saved snapshots currently being maintained. These can include one-off immediate snapshots, as well as scheduled policy-based snapshots.
- Delete a saved snapshot.
- Restore an HDFS directory or file from a saved snapshot.
- Restore an HDFS directory or file from a saved snapshot to a new directory or file (Restore As).
Browsing HDFS Directories
To browse the HDFS directories to view snapshot activity:
- From the Clusters tab, select your CDH 5 HDFS service.
- Go to the File Browser tab.
As you browse the directory structure of your HDFS, basic information about the directory you have selected is shown at the right (owner, group, and so on).
Enabling and Disabling HDFS Snapshots
Minimum Required Role: Cluster Administrator (also provided by Full Administrator)
For snapshots to be created, HDFS directories must be enabled for snapshots. You cannot specify a directory as part of a snapshot policy unless it has been enabled for snapshots.
Taking and Deleting HDFS Snapshots
Minimum Required Role: BDR Administrator (also provided by Full Administrator)
To manage HDFS snapshots, first enable an HDFS directory for snapshots.
Taking Snapshots
- From the Clusters tab, select your CDH 5 HDFS service.
- Go to the File Browser tab.
- Go to the directory with the snapshot you want to restore.
- Click the drop-down menu next to the full path name and select Take Snapshot.
The Take Snapshot screen displays.
- Enter a name for the snapshot.
- Click OK.
The Take Snapshot button is present, enabling an immediate snapshot of the directory.
- To take a snapshot, click Take Snapshot, specify the name of the snapshot, and click Take Snapshot. The snapshot is added to
the snapshot list.
Any snapshots that have been taken are listed by the time at which they were taken, along with their names and a menu button.
Restoring Snapshots
- From the Clusters tab, select your CDH 5 HDFS service.
- Go to the File Browser tab.
- Go to the directory you want to restore.
- In the File Browser, click the drop-down menu next to the full file path (to the right of the file browser listings) and select one of the following:
- Restore Directory From Snapshot
- Restore Directory From Snapshot As...
The Restore Snapshot screen displays.
- If you selected Restore Directory From Snapshot As..., enter the username to apply when restoring the snapshot.
- Select one of the following:
- Use HDFS 'copy' command - This option executes more slowly and does not require credentials in a secure cluster. It copies the contents of the snapshot as a subdirectory or as files within the target directory.
- Use DistCp / MapReduce - This options executes more quickly and requires credentials (Run As) in secure clusters. It merges the target directory with
the contents of the source snapshot. When you select this option, the following additional fields, which are similar to those available when configuring a replication, display under More Options:
- MapReduce Service - The MapReduce or YARN service to use.
- Scheduler Pool - The name of a resource pool. The value you enter is used by the MapReduce Service you specified
when Cloudera Manager executes the MapReduce job for the replication. The job specifies the value using one of these properties:
- MapReduce - Fair scheduler: mapred.fairscheduler.pool
- MapReduce - Capacity scheduler: queue.name
- YARN - mapreduce.job.queuename
- Run As Username - The user to run the job. By default this is hdfs. If you want to run the job as a different user,
enter the user name here. If you are using Kerberos, you must provide a user name here, and it must be one with an ID greater than 1000. (You can also configure the minimum user
ID number with the min.user.id property in the YARN or MapReduce service.) Verify that the user running the job has a home directory, /user/username, owned by username:supergroup in
HDFS. This user must have permissions to read from the source directory and write to the destination directory.
Note the following:
- The User must not be present in the list of banned users specified with the Banned System Users property in the YARN configuration (Go to the YARN service, select Configuration tab and search for the property). For security purposes, the hdfs user is banned by default from running YARN containers.
- The requirement for a user ID that is greater than 1000 can be overridden by adding the user to the "white list" of users that is specified with the Allowed System Users property. (Go to the YARN service, select Configuration tab and search for the property.)
- Log path - An alternate path for the logs.
- Maximum Map Slots and Maximum Bandwidth - Limits for the number of map slots and for bandwidth per mapper. The default for Maximum Bandwidth is 100 MB.
- Abort on Error - Whether to abort the job on an error. If selected, files copied up to that point remain on the destination, but no additional files are copied. Abort on Error is off by default.
- Skip Checksum Checks - Whether to skip checksum checks (the default is to perform them). If checked, checksum
validation will not be performed.
You must select the this property to prevent failure when restoring snapshots in the following cases:
- Restoring a snapshot within a single encryption zone.
- Restoring a snapshot from one encryption zone to a different encryption zone.
- Restoring a snapshot from an unencrypted zone to an encrypted zone.
- Delete Policy - Whether files that were deleted on the source should also be deleted from the destination directory. This policy also determines the
handling of files in the destination location that are unrelated to the source. Options include:
- Keep Deleted Files - Retains the destination files even when they no longer exist at the source. (This is the default.).
- Delete to Trash - If the HDFS trash is enabled, files are moved to the trash folder.
- Delete Permanently - Uses the least amount of space; use with caution.
- Preserve - Whether to preserve the block size, replication count, permissions (including ACLs), and extended attributes (XAttrs) as they exist on the source file system, or to use the settings as configured on the destination file system. By default source system settings are preserved. When Permission is checked, and both the source and destination clusters support ACLs, replication preserves ACLs. Otherwise, ACLs are not replicated. When Extended attributes is checked, and both the source and destination clusters support extended attributes, replication preserves them.
Managing HDFS Snapshots Using the Command Line
For information about managing snapshots using the command line, see HDFS Snapshots.
