DSSD D5 Installation Path A - Automated Installation by Cloudera Manager Installer (Non-Production)
This section describes how to install Cloudera Manager and CDH on a cluster that uses the EMC® DSSD™ D5™ storage appliance as the storage for Hadoop DataNodes. For installation of clusters that do not use the DSSD D5, see Installing Cloudera Manager and CDH.
- Provide the ability to log in to the Cloudera Manager Server host using a root account or an account that has password-less sudo permission.
- Allow the Cloudera Manager Server host to have uniform SSH access on the same port to all hosts. See Networking and Security Requirements for further information.
- All hosts must have access to standard package repositories and either archive.cloudera.com or a local repository with the required installation files.
The general steps in the procedure for Installation Path A follow.
- DSSD D5 Pre-Installation Tasks
- Before You Begin
- Download and Run the Cloudera Manager Server Installer
- Start and Log into the Cloudera Manager Admin Console
- Enable DSSD Mode and Configure Cloudera Manager for the DSSD D5
- Use the Cloudera Manager Wizard for Software Installation and Configuration
- Configure Database Settings
- Review and Finish the DSSD D5 Configuration
- (Optional) Disable Short Circuit Reads for HBase and Impala
- Change the Default Administrator Password
- Configure Oozie Data Purge Settings
- (Optional) Install Multiple DSSD D5 Appliances in a Cluster
- Test the Installation
DSSD D5 Pre-Installation Tasks
- Installing and racking the DSSD D5 Storage Appliance.
- Installing the DSSD D5 PCI cards in the DataNode hosts.
- Connecting the DataNode hosts to the DSSD D5.
- Installing and configuring the DSSD D5 drivers.
- Installing and configuring the DSSD D5 client software.
- Creating a volume on the DSSD D5 for the DataNodes.
- Identifying CPUs and NUMA nodes. See the EMC document DSSD Hadoop Plugin Installation Guide for more information. You use the information from this task in a later step to configure the Libflood CPU ID parameter during the initial configuration of Cloudera Manager.
See the EMC DSSD D5 document DSSD D5 Installation and Service Guide for more information about these tasks.
- Host names of all the hosts in your cluster.
- The DSSD D5 volume name for the DataNodes.
- If you are not using the entire capacity of the DSSD D5 for this cluster, the DSSD Amount of Usable Capacity as assigned in the DSSD D5. For most deployments, the default value (100 TB) is correct. See the DSSD Hadoop Plugin Installation Guide for more information on setting this property.
- The value for the Libflood CPU ID. See “Identify CPUs and NUMA Nodes” in the DSSD Hadoop Plugin Installation Guide for more information.
Before You Begin
In certain circumstances you may need to perform the following optional installation and configuration steps.
Install and Configure External Databases
Read Cloudera Manager and Managed Service Datastores. If you are using an external database for services or Cloudera Management Service roles, install and configure it following the instructions in External Databases for Oozie Server, Sqoop Server, Activity Monitor, Reports Manager, Hive Metastore Server, Sentry Server, Cloudera Navigator Audit Server, and Cloudera Navigator Metadata Server.
Perform Configuration Required by Single User Mode
If you are creating a Cloudera Manager deployment that employs single user mode, perform the configuration steps described in Single User Mode Requirements.(CDH 5 only) On RHEL 5 and CentOS 5, Install Python 2.6 or 2.7
CDH 5 Hue will only work with the default system Python version of the operating system it is being installed on. For example, on RHEL/CentOS 6 you will need Python 2.6 to start Hue.$ su -c 'rpm -Uvh http://download.fedoraproject.org/pub/epel/5/i386/epel-release-5-4.noarch.rpm' ... $ yum install python26
Configure an HTTP Proxy
The Cloudera Manager installer accesses archive.cloudera.com by using yum on RHEL systems. If your hosts access the Internet through an HTTP proxy, you can configure yum, system-wide, to access archive.cloudera.com through a proxy. To do so, modify the system configuration on the Cloudera Manager Server host and on every cluster host as follows:
File: /etc/yum.conf
Property: proxy=http://server:port/
| OS | File | Property |
|---|---|---|
| RHEL-compatible | /etc/yum.conf | proxy=http://server:port/ |
| SLES | /root/.curlrc | --proxy=http://server:port/ |
| Ubuntu or Debian | /etc/apt/apt.conf | Acquire::http::Proxy "http://server:port"; |
Install the Oracle JDK
If you choose not to have the Oracle JDK installed by Cloudera Manager, install the JDK on all hosts in the cluster. See Java Development Kit Installation.Download and Run the Cloudera Manager Server Installer
- Open Cloudera Manager Downloads in a web browser.
- In the Cloudera Manager box, click Download Now.
- Click Download Cloudera Manager to download the most recent version of the installer or click Select a Different
Version to download an earlier version.
The product interest dialog box displays.
- Click Sign in and enter your email address and password or complete the product interest form and click Continue.
The Cloudera Standard License page displays.
- Accept the license agreement and click Submit.
The Automated Installation instructions display. You can also view system requirements, release notes, and you can go to the documentation.
- Download the installer:
$ wget https://archive.cloudera.com/cm5/installer/latest/cloudera-manager-installer.bin
- Change cloudera-manager-installer.bin to have executable permission:
$ chmod u+x cloudera-manager-installer.bin
- Run the Cloudera Manager Server installer by doing one of the following:
- Install Cloudera Manager packages from the Internet:
$ sudo ./cloudera-manager-installer.bin
- Install Cloudera Manager packages from a local repository:
$ sudo ./cloudera-manager-installer.bin --skip_repo_package=1
- Install Cloudera Manager packages from the Internet:
- Read the Cloudera Manager README and then press Return or Enter to choose Next.
- Read the Cloudera Express License and then press Return or Enter to choose Next. Use the arrow keys and press Return or Enter to choose Yes to confirm you accept the license.
- Read the Oracle Binary Code License Agreement and then press Return or Enter to choose Next.
- Use the arrow keys and press Return or Enter to choose Yes to confirm you accept the Oracle
Binary Code License Agreement. The following occurs:
- The installer installs the Oracle JDK and the Cloudera Manager repository files.
- The installer installs the Cloudera Manager Server and embedded PostgreSQL packages.
- The installer starts the Cloudera Manager Server and embedded PostgreSQL database.
- When the installation completes, the complete URL for the Cloudera Manager Admin Console displays, including the port number, which is 7180 by default. Press Return or Enter to choose OK to continue.
- Press Return or Enter to choose OK to exit the installer.
Start and Log into the Cloudera Manager Admin Console
- Wait several minutes for the Cloudera Manager Server to start. To observe the startup process, run tail -f /var/log/cloudera-scm-server/cloudera-scm-server.log on the Cloudera Manager Server host. If the Cloudera Manager Server does not start, see Troubleshooting Installation and Upgrade Problems.
- In a web browser, enter http://Server host:7180, where Server host is the fully qualified domain name or IP address of the host where the Cloudera Manager Server is running.
The login screen for Cloudera Manager Admin Console displays.
- Log into Cloudera Manager Admin Console. The default credentials are: Username: admin Password: admin. Cloudera Manager does not support changing the admin username for the installed account. You can change the password using Cloudera Manager after you run the installation wizard. Although you cannot change the admin username, you can add a new user, assign administrative privileges to the new user, and then delete the default admin account.
- After logging in, the Cloudera Manager End User License Terms and Conditions page displays. Read the terms and conditions and then select Yes to accept them.
- Click Continue.
The Welcome to Cloudera Manager page displays.
Enable DSSD Mode and Configure Cloudera Manager for the DSSD D5
- Click the Cloudera Manager logo to open the Home page.
- Click .
- Type DSSD in the Search box.
- Select the DSSD Mode property.
- Click Save Changes to commit the changes.
Cloudera Manager reconfigures the system for DSSD mode, which may take several minutes.
- Click the Cloudera Manager logo to open the Home page.
- Click Add Cluster to continue with the installation.
- The Cloudera Manager End User License Terms and Conditions page displays. Read the terms and conditions and then select Yes to accept them.
- Click Continue.
- The EMC Software License Agreement page displays. Read the terms and conditions and then select Yes to accept them.
- Click Continue.
The Welcome to Cloudera Manager page displays.
Use the Cloudera Manager Wizard for Software Installation and Configuration
The following instructions describe how to use the Cloudera Manager installation wizard to do an initial installation and configuration. The wizard lets you:
- Select the edition of Cloudera Manager to install
- Find the cluster hosts you specify using hostname and IP address ranges
- Connect to each host with SSH to install the Cloudera Manager Agent and other components
- Optionally install the Oracle JDK on the cluster hosts.
- Install CDH and managed service packages or parcels
- Configure CDH and managed services automatically and start the services
Choose Cloudera Manager Edition
From the Welcome to Cloudera Manager page, you can select the edition of Cloudera Manager to install and, optionally, install a license:
- Choose which edition to install:
- Cloudera Express, which does not require a license, but provides a limited set of features.
- Cloudera Enterprise Enterprise Data Hub Edition Trial, which does not require a license, but expires after 60 days and cannot be renewed.
- Cloudera Enterprise with one of the following license types:
- Basic Edition
- Flex Edition
- Enterprise Data Hub Edition
- If you elect Cloudera Enterprise, install a license:
- Click Upload License.
- Click the document icon to the left of the Select a License File text field.
- Go to the location of your license file, click the file, and click Open.
- Click Upload.
- Information is displayed indicating what the CDH installation includes. At this point, you can click the Support drop-down menu to access online Help or the Support Portal.
- Click Continue to proceed with the installation.
Choose Cloudera Manager Hosts
Choose which hosts will run CDH and managed services:
- To enable Cloudera Manager to automatically discover hosts on which to install CDH and managed services, enter the cluster hostnames or IP addresses.
You can also specify hostname and IP address ranges. For example:
Range Definition Matching Hosts 10.1.1.[1-4] 10.1.1.1, 10.1.1.2, 10.1.1.3, 10.1.1.4 host[1-3].company.com host1.company.com, host2.company.com, host3.company.com host[07-10].company.com host07.company.com, host08.company.com, host09.company.com, host10.company.com You can specify multiple addresses and address ranges by separating them with commas, semicolons, tabs, or blank spaces, or by placing them on separate lines. Use this technique to make more specific searches instead of searching overly wide ranges. The scan results will include all addresses scanned, but only scans that reach hosts running SSH will be selected for inclusion in your cluster by default. If you do not know the IP addresses of all of the hosts, you can enter an address range that spans over unused addresses and then clear the hosts that do not exist (and are not discovered) later in this procedure. However, keep in mind that wider ranges will require more time to scan.
- Click Search. Cloudera Manager identifies the hosts on your cluster to allow you to configure them for services. If there are a large number of hosts on your cluster, wait a few moments to allow them to be discovered and shown in the wizard. If the search is taking too long, you can stop the scan by clicking Abort Scan. To find additional hosts, click New Search, add the host names or IP addresses and click Search again. Cloudera Manager scans hosts by checking for network connectivity. If there are some hosts where you want to install services that are not shown in the list, make sure you have network connectivity between the Cloudera Manager Server host and those hosts. Common causes of loss of connectivity are firewalls and interference from SELinux.
- Verify that the number of hosts shown matches the number of hosts where you want to install services. Clear host entries that do not exist and clear the hosts where you do not want to install services.
Install CDH Software
- Add the DSSD remote repository URL:
- Click the More Options button.
- In the Remote Parcel Repository URLs section, click the
 button.
 - Enter the following URL in the blank field: http://cloudera-dssd.s3-website-us-west-1.amazonaws.com/dhp1/parcels/1.2
- Choose the CDH and managed service version:
- Choose the parcels to install. The choices depend on the repositories you have chosen; a repository can contain multiple parcels. Only the parcels for
the latest supported service versions are configured by default. Select the following parcels:
- CDH 5
- DSSD version 1.2
- DSSD_SCR version 1.2 - This parcel enables short-circuit reads for HBase and Impala. Select this parcel even if you intend to disable short-circuit reads. (See DSSD D5 and Short-Circuit Reads.)
- Any additional parcels required for your deployment (for example: Accumulo, Spark, or Keytrustee) .
You can add additional parcels for previous versions by specifying custom repositories. For example, you can find the locations of the previous CDH 5 parcels at https://archive.cloudera.com/cdh5/parcels/.- To specify the parcel directory, specify the local parcel repository, add a parcel repository, or specify the properties of a proxy server through which
parcels are downloaded, click the More Options button and do one or more of the following:
- Parcel Directory and Local Parcel Repository Path - Specify the location of parcels on
cluster hosts and the Cloudera Manager Server host. If you change the default value for Parcel Directory and have already installed and started Cloudera Manager Agents,
restart the Agents:
sudo service cloudera-scm-agent restart
- Parcel Repository - In the Remote Parcel Repository URLs field, click the button and enter the URL of the repository. The URL you specify is added to the list of repositories listed in the Configuring Cloudera Manager Server Parcel Settings page and a parcel is added to the list of parcels on the Select Repository page. If
you have multiple repositories configured, you see all the unique parcels contained in all your repositories.
- Proxy Server - Specify the properties of a proxy server.
- Parcel Directory and Local Parcel Repository Path - Specify the location of parcels on
cluster hosts and the Cloudera Manager Server host. If you change the default value for Parcel Directory and have already installed and started Cloudera Manager Agents,
restart the Agents:
- Click OK.
- If you are using Cloudera Manager to install software, select the release of Cloudera Manager Agent. You can choose either the version that matches the Cloudera Manager Server you are currently using or specify a version in a custom repository. If you opted to use custom repositories for installation files, you can provide a GPG key URL that applies for all repositories.
- Choose the parcels to install. The choices depend on the repositories you have chosen; a repository can contain multiple parcels. Only the parcels for
the latest supported service versions are configured by default. Select the following parcels:
- If you installed the Agent and JDK manually on all cluster hosts:
- Click Continue.
The Host Inspector runs to validate the installation and provides a summary of what it finds, including all the versions of the installed components. If the validation is successful, click Finish.
- Skip the remaining steps in this section and continue with Add Services
- Click Continue.
- Click Continue.
The Cluster Installation JDK Installation Options screen displays.
- Select Install Oracle Java SE Development Kit (JDK) to allow Cloudera Manager to install the JDK on each cluster host. If you have already installed the JDK, do not select this option. If your local laws permit you to deploy unlimited strength encryption, and you are running a secure cluster, select the Install Java Unlimited Strength Encryption Policy Files checkbox.
- Click Continue.
- (Optional) Select Single User Mode to configure the Cloudera Manager Agent and all service processes to run as the same user. This mode requires extra configuration steps that must be done manually on all hosts in the cluster. If you have not performed the steps, directory creation will fail in the installation wizard. In most cases, you can create the directories but the steps performed by the installation wizard may have to be continued manually. Click Continue.
- Specify host installation properties:
- Select root or enter the username for an account that has password-less sudo permission.
- Select an authentication method:
- If you choose password authentication, enter and confirm the password.
- If you choose public-key authentication, provide a passphrase and path to the required key files.
- You can specify an alternate SSH port. The default value is 22.
- You can specify the maximum number of host installations to run at once. The default value is 10.
- Click Continue.
If you chose to have Cloudera Manager install software, Cloudera Manager installs the Oracle JDK, Cloudera Manager Agent, packages and CDH and managed service parcels or packages. During parcel installation, progress is indicated for the phases of the parcel installation process in separate progress bars. If you are installing multiple parcels, you see progress bars for each parcel. When the Continue button at the bottom of the screen turns blue, the installation process is completed.
- Click Continue.
The Cluster Installation page displays and shows the progress of the installation. When the Continue button turns blue, the cluster installation is complete.
- Click Continue.
The Host Inspector runs to validate the installation and provides a summary of what it finds, including all the versions of the installed components. If the validation is successful, click Finish.
Add Services
- In the first page of the Add Services wizard, choose the combination of services to install and whether to install Cloudera Navigator:
- Select the combination of services to install:
- Core Hadoop - HDFS, YARN (includes MapReduce 2), ZooKeeper, Oozie, Hive, and Hue
- Core with HBase
- Core with Impala
- Core with Search
- Core with Spark
- All Services - HDFS, YARN (includes MapReduce 2), ZooKeeper, Oozie, Hive, Hue, HBase, Impala, Solr, Spark, and Key-Value Store Indexer
- Custom Services - Any combination of services.
- Some services depend on other services; for example, HBase requires HDFS and ZooKeeper. Cloudera Manager tracks dependencies and installs the correct combination of services.
- In a Cloudera Manager deployment of a CDH 4 cluster, the MapReduce service is the default MapReduce computation framework. Choose Custom Services to install YARN, or use the Add Service functionality to add YARN after installation completes.
- In a Cloudera Manager deployment of a CDH 5 cluster, the YARN service is the default MapReduce computation framework. Choose Custom Services to install MapReduce, or use the Add Service functionality to add MapReduce after installation completes.
- The Flume service can be added only after your cluster has been set up.
- If you have chosen Enterprise Data Hub Edition Trial or Cloudera Enterprise, optionally select the Include Cloudera Navigator checkbox to enable Cloudera Navigator. See Cloudera Navigator 2 Overview.
- Select the combination of services to install:
- Click Continue.
- Customize the assignment of role instances to hosts. The wizard evaluates the hardware configurations of the hosts to determine the best hosts for each
role. The DataNode role is only assigned to hosts that are connected to the DSSD D5. The wizard assigns all worker roles to the same set of hosts to which the HDFS DataNode role is assigned. You can
reassign role instances if necessary.
Click a field below a role to display a dialog box containing a list of hosts. If you click a field containing multiple hosts, you can also select All Hosts to assign the role to all hosts, or Custom to display the pageable hosts dialog box.
The following shortcuts for specifying hostname patterns are supported:- Range of hostnames (without the domain portion)
Range Definition Matching Hosts 10.1.1.[1-4] 10.1.1.1, 10.1.1.2, 10.1.1.3, 10.1.1.4 host[1-3].company.com host1.company.com, host2.company.com, host3.company.com host[07-10].company.com host07.company.com, host08.company.com, host09.company.com, host10.company.com - IP addresses
- Rack name
Click the View By Host button for an overview of the role assignment by hostname ranges.
- Range of hostnames (without the domain portion)
- When you are satisfied with the assignments, click Continue.
Configure Database Settings
- Choose the database type:
- Keep the default setting of Use Embedded Database to have Cloudera Manager create and configure required databases. Record the auto-generated
passwords.
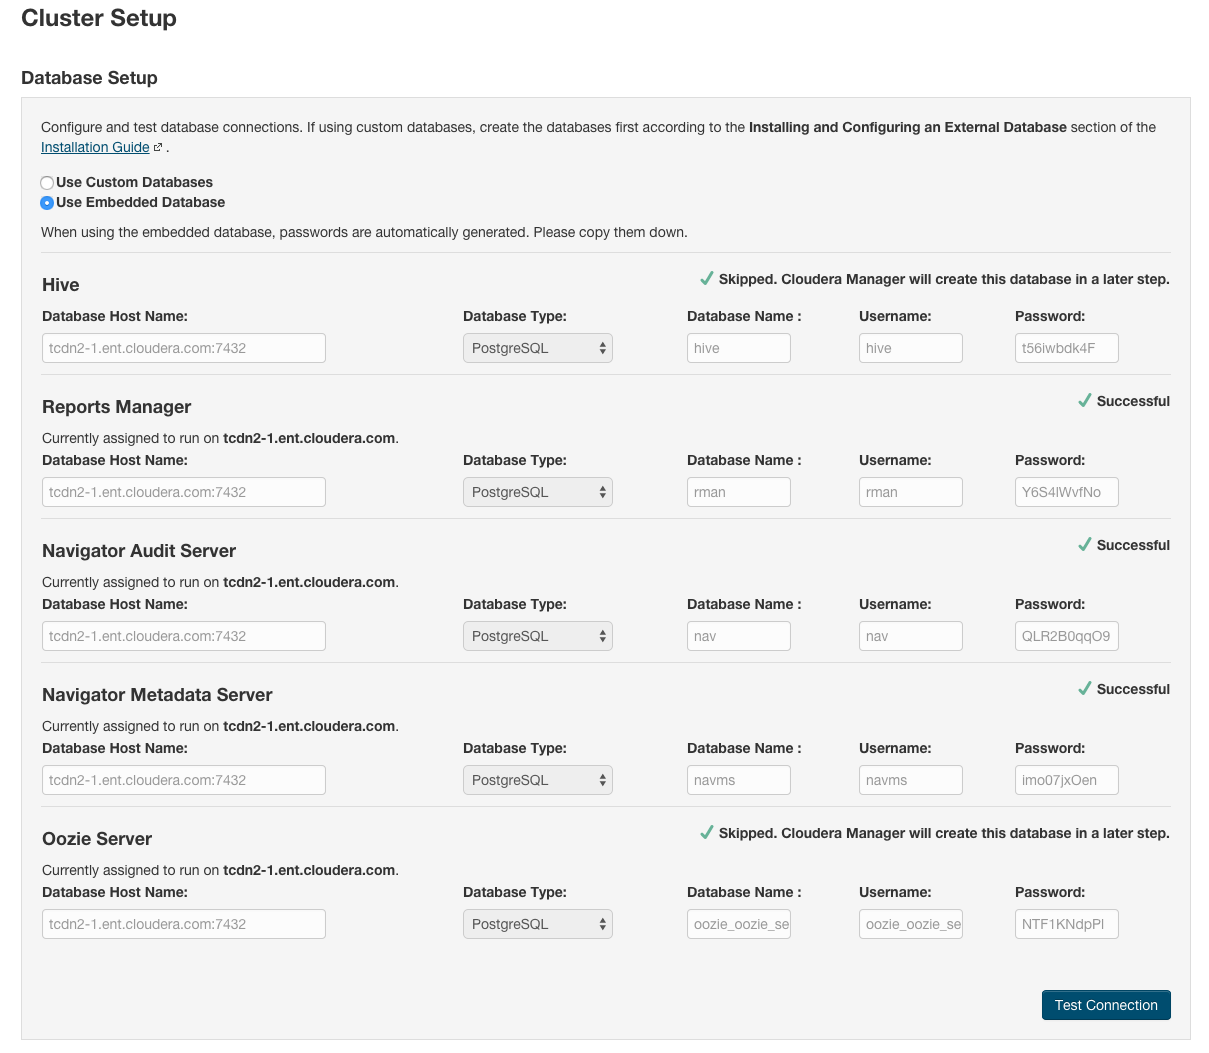
- Select Use Custom Databases to specify external database host, enter the database type, database name, username, and password for the database that you created when you set up the database.
- If you are adding the Oozie service, you can change your Oozie configuration to control when data is purged to improve performance, cut down on database disk usage, improve upgrade performance, or to keep the history for a longer period of time. See Configuring Oozie Data Purge Settings Using Cloudera Manager.
- Keep the default setting of Use Embedded Database to have Cloudera Manager create and configure required databases. Record the auto-generated
passwords.
- Click Test Connection to confirm that Cloudera Manager can communicate with the database using the information you have
supplied. If the test succeeds in all cases, click Continue; otherwise, check and correct the information you have provided for the database and then try the test
again. (For some servers, if you are using the embedded database, you will see a message saying the database will be created at a later step in the installation process.)
The Cluster Setup Review Changes screen displays.
Review and Finish the DSSD D5 Configuration
From the Cluster Setup Review Changes page:
- Review the configuration changes to be applied. Confirm the settings entered for file system paths. The file paths required vary based on the services to be
installed. If you chose to add the Sqoop service, indicate whether to use the default Derby database or the embedded PostgreSQL database. If the latter, type the database name, host, and user
credentials that you specified when you created the database.
The configuration properties that display on this page are somewhat different from those that display when configuring non-DSSD D5 DataNodes. Some properties, such as the DataNode directory have been removed because they do not apply to a cluster that uses DSSD D5 DataNodes. Other properties, such as the Flood Volume Name are specific to the DSSD D5 DataNode role.
- (Required) In the Flood Volume Name field, enter the name of the Flood Volume as configured in the DSSD D5 appliance. If you are deploying multiple DSSD D5 appliances, note that you must specify this property for each appliance using a Role Group.
- (Optional) If you are not using the entire capacity of the DSSD D5 for this cluster, set the Usable Capacity property. For most deployments, the default value (100 TB) is correct. See the EMC document DSSD Hadoop Plugin Installation Guide for more information on setting this property.
- (Optional) Set the value of the HDFS Block Size parameter. The default value for this parameter is 512 MB when in DSSD Mode. You may want to change this for some types of work loads. See Tuning the HDFS Block Size for DSSD Mode.
- Click Continue.
The wizard starts the services.
- When all of the services are started, click Continue.
You see a success message indicating that your cluster has been successfully started.
- Click Finish to proceed to the Cloudera Manager Admin Console Home Page.
- If you see a message indicating that you need to restart Cloudera Management Services, restart the Cloudera Management Service:
- Do one of the following:
-
- Select .
- Select .
- On the tab, click
 to the right of Cloudera Management Service and select Restart.
-
- Click Restart to confirm. The Command Details window shows the progress of stopping and then starting the roles.
- When Command completed with n/n successful subcommands appears, the task is complete. Click Close.
- Do one of the following:
- Choose
and then in the filter section, select to view the DSSD D5
DataNode-specific properties.
See the Cloudera Manager 5.8 Configuration Properties configuration reference for descriptions of these properties.
See the EMC document DSSD Hadoop Plugin Installation Guide for information about setting these properties.
- (Recommended for best performance) Set the Libflood CPU ID property.
The value to use for this parameter should have been determined during the set up of the DSSD D5 appliance. See “Identify CPUs and NUMA Nodes” in the EMC document DSSD Hadoop Plugin Installation Guide. The value you set for this parameter can effect the performance of your cluster.
- (Optional) Set the following properties to tune the performance of your cluster:
- Libflood Command Queues
- Libflood Command Queue Depth
- (Optional) Set the Java heap size for the NameNode.
- Choose .
- Type Java heap in the search box.
- Set the Java Heap Size of NameNode in Bytes parameter:
Cloudera Manager automatically sets the value of this parameter to 4 GB (If there are not adequate resources in the cluster, Cloudera Manager may set a smaller value.) Cloudera recommends that you manually set the value of this parameter by calculating the number of HDFS blocks in the cluster and including 1 GB of Java heap for each 1 million HDFS blocks. For more information on HDFS block size and the DSSD D5, see Tuning the HDFS Block Size for DSSD Mode.
- Set the Java Heap Size of Secondary NameNode in Bytes parameter to the same value as the Java Heap Size of NameNode in Bytes parameter.
- Restart the NameNode:
- Choose .
- In the table of roles, select the NameNode (Active) and SecondaryNameNode role types.
- Click .
(Optional) Disable Short Circuit Reads for HBase and Impala
Short-circuit reads are enabled for HBase and Impala by default. To disable short-circuit reads for use with DSSD D5 DataNodes:
- In the Cloudera Manager Admin Console, select .
- Type “short” in the Search box.
A set of short-circuit read parameters for HBase display.
- Clear the Enable DSSD Short-Circuit Read property.
- Click Save Changes to commit the changes.
The Admin console indicates that there is a stale configuration.
- Restart the stale services as indicated. See Stale Configurations.
- In the Cloudera Manager Admin Console, select .
- Type “short” in the Search box.
A set of short-circuit read parameters for Impala display.
- Clear the Enable DSSD Short-Circuit Read property.
- Click Save Changes to commit the changes.
The Admin console now indicates that there is a stale configuration.
- Restart the stale services as indicated. See Stale Configurations.
Change the Default Administrator Password
- Click the logged-in username at the far right of the top navigation bar and select Change Password.
- Enter the current password and a new password twice, and then click OK.
Configure Oozie Data Purge Settings
If you added an Oozie service, you can change your Oozie configuration to control when data is purged to improve performance, cut down on database disk usage, or to keep the history for a longer period of time. Limiting the size of the Oozie database can also improve performance during upgrades. See Configuring Oozie Data Purge Settings Using Cloudera Manager.
(Optional) Install Multiple DSSD D5 Appliances in a Cluster
To increase capacity and performance, you can configure a cluster that uses multiple DSSD D5 storage appliances. You configure the cluster by assigning all hosts connected to a DSSD D5 appliance to a single "rack" and select one of three modes to provide policies used by the NameNode to satisfy the configured replication factor. If you are only configuring a single DSSD D5 appliance, skip this section.
You can also move hosts between appliances. See Moving Existing Hosts to a New DSSD D5
- Stop the HDFS service. Go to the HDFS service and select .
- Assign the hosts attached to each DSSD D5 to a single rack ID. All hosts attached to a D5 should have the same rack assignment and each DSSD D5 should have a unique rack ID. See Specifying Racks for Hosts.
- Go to the HDFS service, select the Configuration tab, and search for the Block Replica Placement Policy property.
- Set the value of the Block Replica Placement Policy property to one of the following values:
- HDFS Default
- Places the first replica on the node where the client process writing the block resides, the second replica on a randomly-chosen remote rack, and a third on a randomly-chosen host in the same remote rack (assuming a replication factor of 3). This ordering is fixed.
- Maximize Capacity
- Places all replicas on the same rack and uses all the capacity of the DSSD D5 for HDFS. If there are fewer DataNode hosts than the configured replication factor, blocks are under-replicated. To avoid under-replication, make sure that there are more DataNodes than the replication factor.
- Maximize Availability
- Places replicas in as many racks as needed to meet the configured replication factor. After replicas have been placed on all available racks, additional replicas are placed randomly across the available racks. If there are fewer DataNode hosts than the configured replication factor, blocks are under-replicated. To avoid under-replication, make sure that there are more DataNodes than the replication factor.
- Perform a Rolling Restart on the cluster. Select .
Test the Installation
You can test the installation following the instructions in Testing the Installation.
