

Install Multiple Ranger KMS
Multiple services can be set up for high availability of Ranger KMS. HDFS interacts with the active process.
Prerequisite: an instance with more than one node.
To install Ranger KMS on multiple nodes:
First install Ranger KMS on a single node (see Installing the Ranger Key Management Service).
Next, add the Ranger KMS service to another node.
In the Ambari Web UI for the additional node, go to Ranger KMS service → Summary → Service Actions → Add Ranger KMS server.
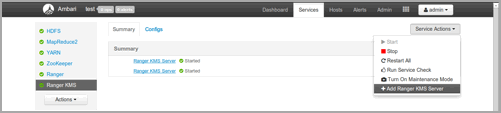
After adding Ranger KMS server, Ambari will show a pop-up message.
Press OK. Ambari will modify two HDFS properties,
hadoop.security.key.provider.pathanddfs.encryption.key.provider.uri.Restart the HDFS service:

For the Ranger KMS service, go to the Advanced kms-site list and change the following property values:
hadoop.kms.cache.enable=falsehadoop.kms.cache.timeout.ms=0hadoop.kms.current.key.cache.timeout.ms=0hadoop.kms.authentication.signer.secret.provider=zookeeperhadoop.kms.authentication.signer.secret.provider.zookeeper.connection.string={internal ip of first node}:2181,{internal ip of second node}:2181, ...hadoop.kms.authentication.signer.secret.provider.zookeeper.auth.type=noneSave your configuration changes and restart the Ranger KMS service.
Next, check connectivity from Ranger admin for the newly-added Ranger KMS server:
Go to the Ranger UI:
http://<gateway>:6080Login with your keyadmin user ID and password (the defaults are
keyadmin,keyadmin; these should be changed as soon as possible after installation). The default repository will be added under Ranger KMS service.Under Config properties of the Ranger KMS URL, add the newly added Ranger KMS server FQDN. For example:
Previous Ranger KMS URL =
kms://http@<internal host
                            name>:9292/kms
New Ranger KMS URL =
kms://http@<internal host name1>;<internal
                            host name2>;...:9292/kms
Run a test connection for the service. You should see a ‘connected successfully’ message.
Choose the Audit > Plugin tab.
Check whether plugins are communicating. The UI should display HTTP Response Code = 200 for the respective plugin.