

Configuring SolrCloud for Kerberos
![[Note]](../common/images/admon/note.png) | Note |
|---|---|
Beginning with Ambari-2.4.0.0 and HDP-2.5.0, Ranger uses the Ambari Infra SolrCloud instance by default. Therefore, this procedure is only necessary for earlier versions, or if you are setting up additional SolrCloud instances. |
| Note |
|---|---|
SolrCloud with Kerberos requires Apache ZooKeeper and MIT Kerberos. You should also review the other SolrCloud Prerequisites. |
Use the following steps to configure SolrCloud for Kerberos.
Configure Kerberos for SolrCloud
Use the following procedure to configure Kerberos for SolrCloud.
Create a principal "solr" in your KDC. You can make it host-specific or headless.
Log in as the root user to the KDC server and create the keytabs for users "solr" and HTTP.
kadmin.local
Authenticating as principal root/admin@EXAMPLE.COM with password.
kadmin.local:  addprinc -randkey solr@EXAMPLE.COM
WARNING: no policy specified for solr@EXAMPLE.COM; defaulting to no policy
Principal "solr@EXAMPLE.COM" created.
kadmin.local:  xst -k solr.service.keytab solr@EXAMPLE.COM
Entry for principal solr@EXAMPLE.COM with kvno 2, encryption type aes256-cts-hmac-sha1-96 added to keytab WRFILE:solr.service.keytab.
Entry for principal solr@EXAMPLE.COM with kvno 2, encryption type aes128-cts-hmac-sha1-96 added to keytab WRFILE:solr.service.keytab.
Entry for principal solr@EXAMPLE.COM with kvno 2, encryption type des3-cbc-sha1 added to keytab WRFILE:solr.service.keytab.
Entry for principal solr@EXAMPLE.COM with kvno 2, encryption type arcfour-hmac added to keytab WRFILE:solr.service.keytab.
Entry for principal solr@EXAMPLE.COM with kvno 2, encryption type des-hmac-sha1 added to keytab WRFILE:solr.service.keytab.
Entry for principal solr@EXAMPLE.COM with kvno 2, encryption type des-cbc-md5 added to keytab WRFILE:solr.service.keytab.
kadmin.local:  quit
The example above creates a headless keytab for the "solr" service user. You should create one keytab per host. You should also create a principal for each host on which Solr is running. Use the procedure shown above, but use the principal name with the host. For example:
kadmin.local: addprinc -randkey solr/<SOLR_HOST_NAME>@EXAMPLE.COM
You will also need another keytab for Spnego. This is used by Solr to authenticate HTTP requests. Follow the process shown above, but replace "solr" with "HTTP". For example:
kadmin.local
kadmin.local:  addprinc -randkey HTTP@EXAMPLE.COM
kadmin.local:  xst -k HTTP.keytab HTTP@EXAMPLE.COM
kadmin.local:  quit
After the keytabs are created, run the following commands to copy them to all of the hosts running Solr,
chownto "solr", andchmodto 400.mkdir -p /opt/solr/conf #scp both the keytab files to the above folder chown solr:solr /opt/solr/conf/solr.service.keytab usermod -a -G hadoop solr chmod 400 /opt/solr/conf/solr.service.keytab chown solr:solr /opt/solr/conf/HTTP.keytab chmod 400 /opt/solr/conf/HTTP.keytab
Note The usermod -a -G hadoop solr command is required if you are using the HTTP (Spnego) keytab that is generated by Ambari.
Configure SolrCloud for Kerberos
Use the following procedure to configure SolrCloud for Kerberos.
Run the following commands:
cd /opt/solr
mkdir /opt/solr/conf
Create a new JAAS file in the
/opt/solr/confdirectory:vi /opt/solr/conf/solr_jaas.conf
Add the following lines to the
solr_jaas.conffile, but replace the REALM name@EXAMPLE.COMwith your REALM.Client { com.sun.security.auth.module.Krb5LoginModule required useKeyTab=true keyTab="/opt/solr/conf/solr.service.keytab" storeKey=true useTicketCache=true debug=true principal="solr@EXAMPLE.COM"; };Copy the
solr_jaas.conffile to all of the hosts on which Solr is running.Edit the
solr.in.shfile in the<SOLR_INSTALL_HOME>/bin/directory:vi $SOLR_INSTALL_HOME/ranger_audit_server/scripts/solr.in.sh
Add the following lines at the end of the
solr.in.shfile:SOLR_JAAS_FILE=/opt/solr/conf/solr_jaas.conf SOLR_HOST=`hostname -f` ZK_HOST="$ZK_HOST1:2181,$ZK_HOST2:2181,$ZK_HOST3:2181/ranger_audits" KERBEROS_REALM="EXAMPLE.COM" SOLR_KEYTAB=/opt/solr/conf/solr.service.keytab SOLR_KERB_PRINCIPAL=HTTP@${KERBEROS_REALM} SOLR_KERB_KEYTAB=/opt/solr/conf/HTTP.keytab SOLR_AUTHENTICATION_CLIENT_CONFIGURER="org.apache.solr.client.solrj.impl.Krb5HttpClientConfigurer" SOLR_AUTHENTICATION_OPTS=" -DauthenticationPlugin=org.apache.solr.security.KerberosPlugin -Djava.security.auth.login.config=$SOLR_JAAS_FILE -Dsolr.kerberos.principal=${SOLR_KERB_PRINCIPAL} -Dsolr.kerberos.keytab=${SOLR_KERB_KEYTAB} -Dsolr.kerberos.cookie.domain=${SOLR_HOST} -Dhost=${SOLR_HOST} -Dsolr.kerberos.name.rules=DEFAULT"Copy the
solr.in.shfile to all of the hosts on which Solr is running.Run the following command to enable Kerberos as the authentication scheme by updating the
security.jsonfile in ZooKeeper.$SOLR_INSTALL_HOME/server/scripts/cloud-scripts/zkcli.sh -zkhost $ZK_HOST:2181 -cmd put /ranger_audits/security.json '{"authentication":{"class": "org.apache.solr.security.KerberosPlugin"}}'Run the following commands to restart Solr on all hosts.
/opt/solr/ranger_audit_server/scripts/stop_solr.sh
/opt/solr/ranger_audit_server/scripts/start_solr.sh
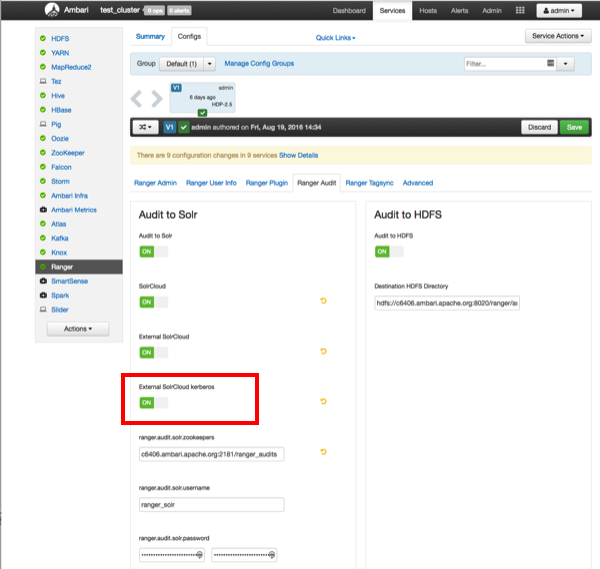
On the Ambari dashboard, select Ranger > Configs > Ranger Audit, then enable External SolrCloud Kerberos by clicking the OFF button. The button label changes to ON when External SolrCloud Kerberos is enabled.
Click Save, then restart Ranger and all required services.
Connecting to Kerberos-enabled SolrCloud
To connect to Kerberos-enabled Solr from your local machine:
On both Linux and Mac, copy the
/etc/krb5.conffile from the Solr host to your local/etc/krb5.conf. If you already have a local/etc/krb5.conffile, merge the two files.Log in to the KDC host as root and run the following commands to create a KDC user:
kadmin.local
kadmin.local: addprinc $USERNAME@EXAMPLE.COM
kadmin.local: quit
Run the following command on your local machine.
kinit $USERNAME@EXAMPLE.COM
You can now use a browser to connect to the Solr URL.