
Scenario: Log Collection Aggregation
You are a supervisor in a car rental company that is engaged in renting cars and trucks. Your company has put numerous cars and trucks on rent and you monitor logs coming out for those vehicles.
Eventually you have more servers doing this same processing and they are provisioned
with a new version of myapp and the log location has changed. Earlier, for example, your logs
resided in /opt/myapp/logs. Now, for example, your logs reside in
/opt/myappv2/logs. Due to policy on making Configuration Management changes
on existing servers, you have the same content and flow but have different needs on
configuration for this source data.
This caters to a log collection aggregation use case. In this scenario, agents may be deployed on a large number of servers that are all performing this log collection process.
CEM has a standard way to filter and transform these logs to filter out only the events of interest.
Earlier, you needed to create one dataflow for each and every vehicle. So, you created numerous dataflows to monitor numerous vehicles. If the log path changed in this situation, then you updated each and every dataflow to update the path.
Solution
- You first update your LogCollection flow for your class to parameterize the GetFile
location to
log.locationand specify the default value of/opt/myapp/logs. - With these items created, you then publish your flow and make the update available to agents. EFM, when agents heartbeat in with a specific context, are given an update to a flow with the new v2 location provided. Those agents that have not had a specific context made will use the default, version 1 location of the logs.
Initial setup
You have a class called LogCollection with numerous MiNiFi agents deployed on all the vehicles
and running. You have built a dataflow inside this class and published this dataflow to all
the MiNiFi agents deployed on the vehicles. The dataflow gathers logs from the desired
location, for example /opt/myapp/logs, on the machines and then performs
the associated logic to only get the content which is WARNING or ERROR. You are managing and
monitoring the warnings and errors that are collected at the EFM server for every heartbeat
from the vehicles.
Actual steps
- Open the flow for the LogCollection agent class.
- Design the flow.
- Find the one or more properties or configurations that may need unique values on a per
agent basis and create parameters. Keep track of
namewhich will be used as an ID in our REST API calls. You will reference this asparameter namemoving forward.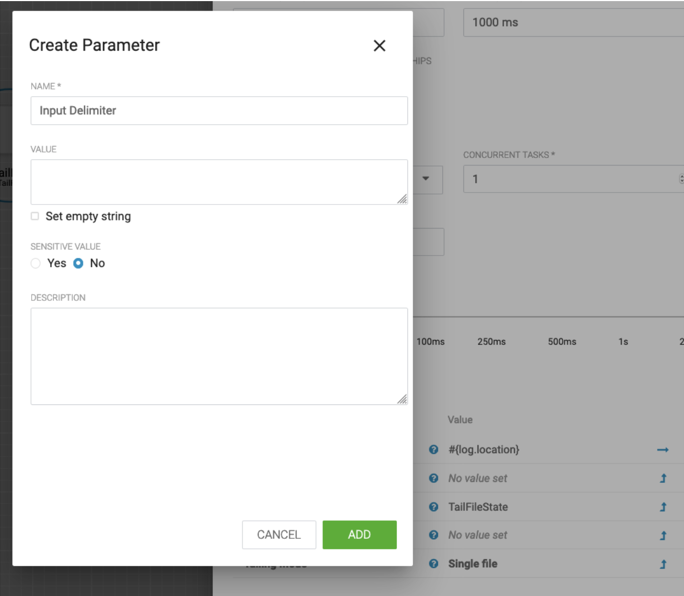
- Switch over to Swagger to perform manual steps for update (this could be automated through Configuration Management tooling like Salt, Puppet, and Ansible).
- Confirm the agent identifier(s) you wish to augment (this is driven by the value provided
by users for
nifi.c2.agent.identifieror automatically generated) by specifying a custom value for the one or moreparameter namevalues created above.Through Swagger, use the following endpoint:http://localhost/efm/swagger/ui.html#/Agents/getAgentscurl -X GET "http://localhost/efm/api/agents" -H "accept: application/json"
Sample response:[ { "identifier": "test_agent_1", "agentClass": "default", "agentManifestId": "39344613-9b36-41e7-9416-e6b755d038c9", "flowId": "7650ef4e-5258-11ea-ba2c-0242ac120002", "deviceId": "15831645727656044827", "status": { "uptime": 1434101, "repositories": { "flowfile": { "size": 0 }, "provenance": { "size": 0 } }, "components": { "FlowController": { "running": true } } }, "state": "MISSING", "firstSeen": 1582035123611, "lastSeen": 1582036507014 }, { "identifier": "test_agent_2", "agentClass": "default", "agentManifestId": "39344613-9b36-41e7-9416-e6b755d038c9", "flowId": "c4a1627c-5259-11ea-be90-0242ac120009", "deviceId": "12645594159739466366", "status": { "uptime": 888065, "repositories": { "flowfile": { "size": 0 }, "provenance": { "size": 0 } }, "components": { "FlowController": { "running": true } } }, "state": "MISSING", "firstSeen": 1582035621624, "lastSeen": 1582036507139 }, { "identifier": "test_agent_3", "agentClass": "default", "agentManifestId": "39344613-9b36-41e7-9416-e6b755d038c9", "flowId": "c4a1922e-5259-11ea-ba73-0242ac120008", "deviceId": "11588253182801567996", "status": { "uptime": 889065, "repositories": { "flowfile": { "size": 0 }, "provenance": { "size": 0 } }, "components": { "FlowController": { "running": true } } }, "state": "MISSING", "firstSeen": 1582035621721, "lastSeen": 1582036508237 } ] - Create agent specific parameter contexts for those properties you wish to
override.Through Swagger, use the following endpoint:
http://localhost/efm/swagger/ui.html#/Agents/createAgentParameterscurl -X POST "http://localhost/efm/api/agents/<AGENT ID>/parameters" -H "accept: application/json" -H "Content-Type: application/json"
The body that gets posted contains one or more key value names for the designated
parameter namevalues.Sample body (one parameter for an agent):[ { "name": "parameter name 1", "sensitive": false, "description": "Agent parameter name override ", "value": "parameter value" } ] Sample body (multiple parameters for an agent): [ { "name": "parameter name 1", "sensitive": false, "description": "Agent parameter name override ", "value": "parameter value 1" }, { "name": "parameter name 2", "sensitive": false, "description": "Agent parameter name override ", "value": "parameter value 2" } ... ] - Optionally, confirm the creation of the agent parameter contexts by using Swagger or
curl.
Through Swagger, use the following endpoint:
http://localhost/efm/swagger/ui.html#/Agents/getAgentParameterscurl -X GET "http://localhost/efm/api/agents/<AGENT ID>/parameters" -H "accept: application/json"
Sample response:
[ { "name": "parameter name 1", "sensitive": false, "description": "Agent parameter name override ", "value": "parameter value" } ] - In the CEM UI, push publish to deploy flow to agents with associated parameter contexts.
