

Installing and Configuring Falcon View
You must manually copy the .jar file for Falcon View, then
configure Ambari to access the view. You can install Falcon View in a secure or an
unsecure cluster. If using a secure cluster, Ambari and Falcon must be properly configured
with Kerberos.
Prerequisites
Apache Falcon must have been installed and configured, and be deployed in Ambari.
For an Ambari-managed installation, Falcon is included as a default service.
The users and groups for Falcon must exist in Ambari prior to installing the Falcon View.
Falcon must have been configured as a proxy super user in the
oozie-siteproperties and in the HDFScore-siteproperties.
Steps
Copy the Falcon View
falcon-ambari-view.jarfile from the Falcon server/webappdirectory to the Ambari server/viewsdirectory.If the Falcon and Ambari servers are on the same host, use the copy command:
cp /usr/hdp/current/falcon-server/server/webapp/falcon-ambari-view.jar /var/lib/ambari-server/resources/views/
If the Falcon server is on a remote host, use the secure copy command for your operating system.
A key pair might be required. See your operating system documentation for more information about remote copies.
Restart the Ambari server.
[root@DataMovementDocs-1 ~]# ambari-server restart
In Ambari Web, browse to
user_name> Manage Ambari.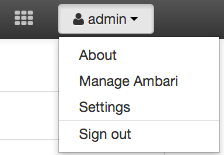
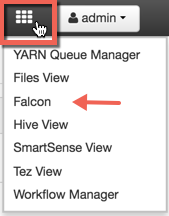
Under Deploy Views, click Views, then click Falcon > Create Instance in the Views list.
Provide the required Details information.
Instance Name: 250 characters, no spaces, no special characters Display Name: 250 characters, including spaces; no special characters; can be the same as the Instance Name Description: 140 characters max, including spaces; special characters allowed ![[Note]](../common/images/admon/note.png)
Note If you enter more than the allowed number of characters, you might see the error message
Cannot create instance: Server Error.Select a cluster configuration.
The Local and Remote fields populate with the names of available clusters. The authentication type for the cluster is automatically recognized.
To use a custom cluster location, enter the Falcon service URI and authentication type of
simpleorkerberos.Click Save.
The Permissions section displays at the bottom of the Views page.
(Optional) Set the permissions for access to the view.
Hover over the Views icon to verify that your Falcon View is available in the menu.
Note Do not click on the Falcon link yet. You must make additional configuration changes before you can access the Falcon View.
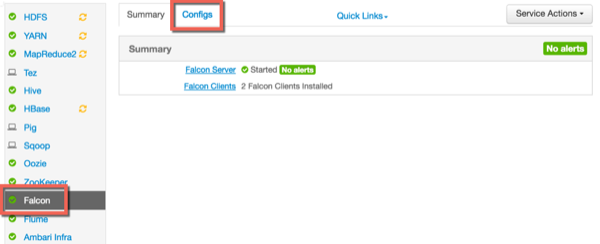
Click the Ambari icon to return to the Dashboard window, then click the Falcon service and the Configs tab.
Scroll to the Falcon startup.properties section, locate the *.application.services field, and enter the following services immediately above the line
org.apache.falcon.metadata.MetadataMappingService:org.apache.falcon.service.GroupsService,\org.apache.falcon.service.ProxyUserService,\Add the proxy user for hosts and groups in the Custom falcon-runtime.properties section.
The proxy user is the user that the Falcon process runs as, typically Falcon.
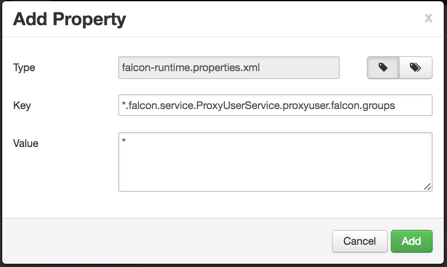
Click Add Property.
Add the following key/value pairs.
Substitute
#USER#with the proxy user configured for the Ambari server.Key=*.falcon.service.ProxyUserService.proxyuser.#USER#.hosts, Value=*
These are the hosts from which
#USER#can impersonate other users.Key=*.falcon.service.ProxyUserService.proxyuser.#USER#.groups, Value=*
These are the groups that the users being impersonated must belong to.
Example 2.1. Substitute
#USER#In the key/value pairs above, if the
#USER#is “falcon”, enter*.falcon.service.ProxyUserService.proxyuser.falcon.hosts.The wildcard value=* (asterisk) is used to allow impersonation from any host or of any user. If you don't use the wildcard character, enter the appropriate host or group values.
Click Save on the information bar at the top of the Configs page.
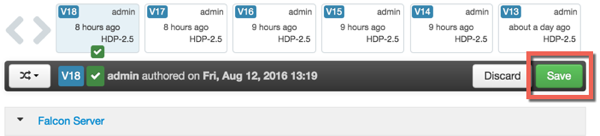
If you try to leave the page without clicking Save, you see a Warning message. Click Save in the Warning dialog box.
A
Restart Requiredmessage displays at the top of the Falcon Configs page.Click Restart > Restart All Affected to restart the Falcon services.
When the restart completes, verify that you can access the Falcon View by clicking Falcon in the Views menu.
More Information