Tutorial: Using Impala, Hive and Hue with Virtual Private Clusters
Set Up an Environment
- Create clusters where the Cloudera Manager and CDH version match, for example both are 6.2.0. The clusters must use Kerberos and TLS.
- If Base cluster has Sentry, then make sure the user executing cross cluster queries is added to the correct role that has all the necessary privileges to create/insert data into tables. (more in workflow #3).
- Configure a Regular cluster called Cluster 1 to be used as a Base cluster. This cluster must have high availability enabled.
- Create two Compute clusters called Compute 1 and Compute 2.
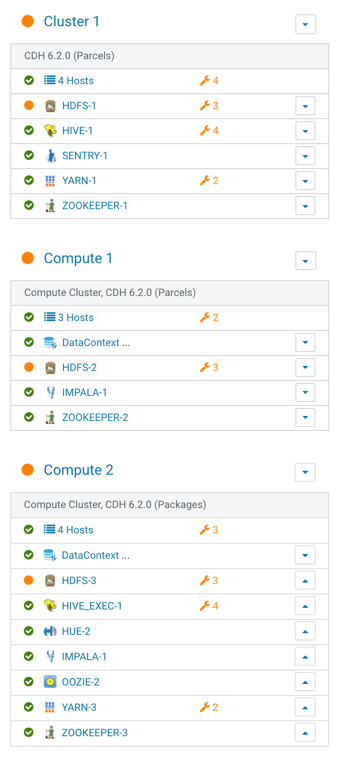
- Configure services for the three clusters as shown below:
Workflow #1: Using impala-shell and Hive
This workflow desribes how to create a table using Impala, how to insert sample data on Compute cluster 1, and how to access and modify the data using beeline from Compute cluster 2.
In a Virtural Private Cluster environment, Hue and the impala-shell can be used to setup databases, tables, insert and retrieve data using queries. This workflow focuses on running a few queries using impala-shell command line tool.
This tutorial uses a kerberized environment with TLS, so you must kinit the user first. If you want to add a new user, see Step 6: Get or Create a Kerberos Principal for Each User Account and Enabling Sentry Authorization for Impala for documentation to create and add the user to the Kerberos principal and the required Linux groups.
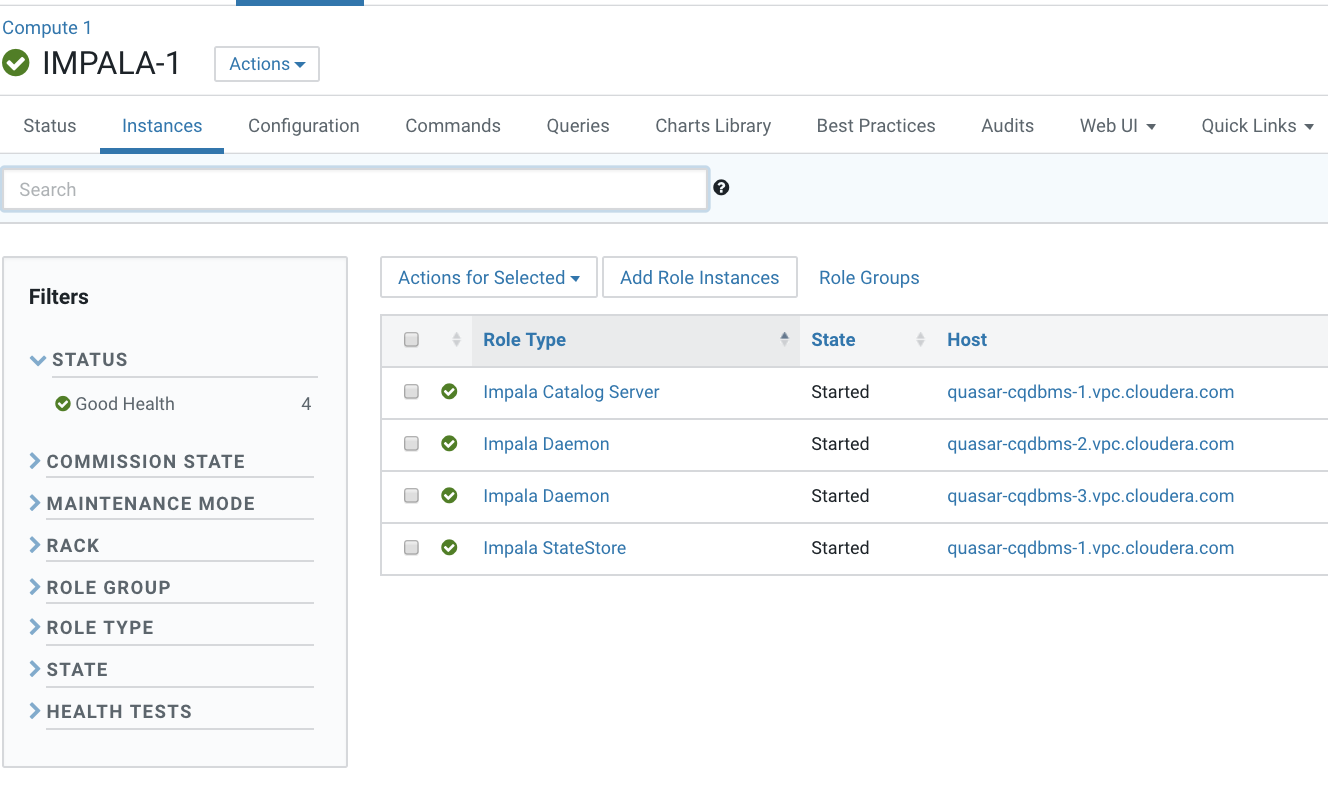
- Identify a host running Impala Daemon to launch impala-shell using this breadcrumb. In the Cloudera Manager Admin Console, go to .
- Note the hostname of a host that is running the Impala Daemon and open an ssh session to that host.
ssh <hostname>
- Kinit the user (because this is a Kerberized environment):
kinit -kt <keytab path of authorized user> <authorized user> - Start the Impala-shell:
In the Cloudera Manager Admin Console, go to the Impala service and click the Status tab.
The Impala Shell command displays in the upper-left. Copy that string and use it as the command to open Impala shell. For example:impala-shell -i vpc_host-cqdbms-2.tut.myco.com:25003 -d default -k --ssl --ca_cert=/etc/cdep-ssl-conf/CA_STANDARD/truststore.pem
The command uses the following form:impala-shell -i <Impala Daemon host URL>:25003 -d default -k --ssl --ca_cert=<path to truststore>/truststore.pem
Query: use `default`
[vpc_host-cqdbms-2.tut.myco.com:25003] default>
- Verify that impala-shell is in the connected status.
- Create a database and a table:
[vpc_host-cqdbms-2.tut.myco.com:25003] default> create database test_data;
Query: create database test_data
+----------------------------+
| summary                    |
+----------------------------+
| Database has been created. |
+----------------------------+
[vpc_host-cqdbms-2.tut.myco.com:25003] default> show databases;
Query: show databases
+------------------+----------------------------------------------+
| name             | comment                                      |
+------------------+----------------------------------------------+
| _impala_builtins | System database for Impala builtin functions |
| default          | Default Hive database                        |
| test_data        |                                              |
+------------------+----------------------------------------------+
[vpc_host-cqdbms-2.tut.myco.com:25003] default> use test_data;
[vpc_host-cqdbms-2.tut.myco.com:25003] test_data> create table test_table (year int, winner string);
+-------------------------+
| summary                 |
+-------------------------+
| Table has been created. |
+-------------------------+
Fetched 1 row(s) in 0.47s
- Verify that the table has been created on the Base cluster HDFS
[vpc_host-cqdbms-2.tut.myco.com:25003] test_data> show create table test_table;
Query: show create table test_table
+-------------------------------------------------------------------+
| result                                                            |
+-------------------------------------------------------------------+
| CREATE TABLE test_data.test_table (                               |
|   year INT,                                                       |
|   winner STRING                                                   |
| )                                                                 |
| STORED AS TEXTFILE                                                |
| LOCATION 'hdfs://ns1/user/hive/warehouse/test_data.db/test_table' |
|                                                                   |
+-------------------------------------------------------------------+
- Insert test data into the table:
[vpc_host-cqdbms-2.tut.myco.com:25003] test_data> insert into table test_table values (2018, 'France'), (2014, 'Germany'), (2010, 'Spain'), (2006, 'Italy');
Query: insert into table test_table values (2018, 'France'), (2014, 'Germany'), (2010, 'Spain'), (2006, 'Italy')
Query progress can be monitored at: https://vpc_host-cqdbms-2.tut.myco.com:25000/query_plan?query_id=334fc3bd7e421cce:540f171500000000
[vpc_host-cqdbms-2.tut.myco.com:25003] test_data> select * from test_table;
Query progress can be monitored at: https://vpc_host-cqdbms-2.tut.myco.com:25000/query_plan?query_id=be4c4c177520a5fd:7efba74700000000
+------+---------+
| year | winner  |
+------+---------+
| 2018 | France  |
| 2014 | Germany |
| 2010 | Spain   |
| 2006 | Italy   |
+------+---------+
- Log in using ssh to the host running HiveServer2 on the Compute cluster. You can find a host in the Cloudera Manager Admin Console by going to .
- Because this is a Kerberized environment, kinit the user:
[root@vpc_host-nnwznq-1 ~]# kinit hive
Password for hive@tut.myco.com:
- Launch beeline:
- TLS is not enabled:
[root@vpc_host-nnwznq-1 ~]# beeline -u 'jdbc:hive2://localhost:10000/default;principal=hive/vpc_host-nnwznq-1.tut.myco.com@tut.myco.com'
- Auto-TLS is enabled:
[root@vpc_host-nnwznq-1 ~]# beeline -u 'jdbc:hive2://localhost:10000/default;ssl=true;sslTrustStore=<CMCA_TRUSTORE_LOC>.jks;trustStorePassword=cloudera;principal=hive/vpc_host-nnwznq-1.tut.myco.com@tut.myco.com'
- Regular TLS is enabled:
[root@vpc_host-nnwznq-1 ~]# beeline -u 'jdbc:hive2://localhost:10000/default;ssl=true;sslTrustStore=/etc/cdep-ssl-conf/CA_STANDARD/truststore.jks;trustStorePassword=cloudera;principal=hive/vpc_host-nnwznq-1.tut.myco.com@tut.myco.com'
/CA_STANDARD/truststore.jks;trustStorePassword=cloudera;principal=hive/<HiveServer2 Host URL>@VPC.CLOUDERA.COM'
- TLS is not enabled:
- Access the tables created through Impala in the previous section:
0: jdbc:hive2://localhost:10000/default> show databases;
INFO  : Compiling command(queryId=hive_20190309192547_09146fd4-58b9-4f60-ad40-c9de3f98d470); Time taken: 0.987 seconds
INFO  : Starting task [Stage-0:DDL] in serial mode
INFO  : Completed executing command(queryId=hive_20190309192547_09146fd4-58b9-4f60-ad40-c9de3f98d470); Time taken: 0.041 seconds
INFO  : OK
+----------------+
| database_name  |
+----------------+
| default        |
| test_data      |
+----------------+
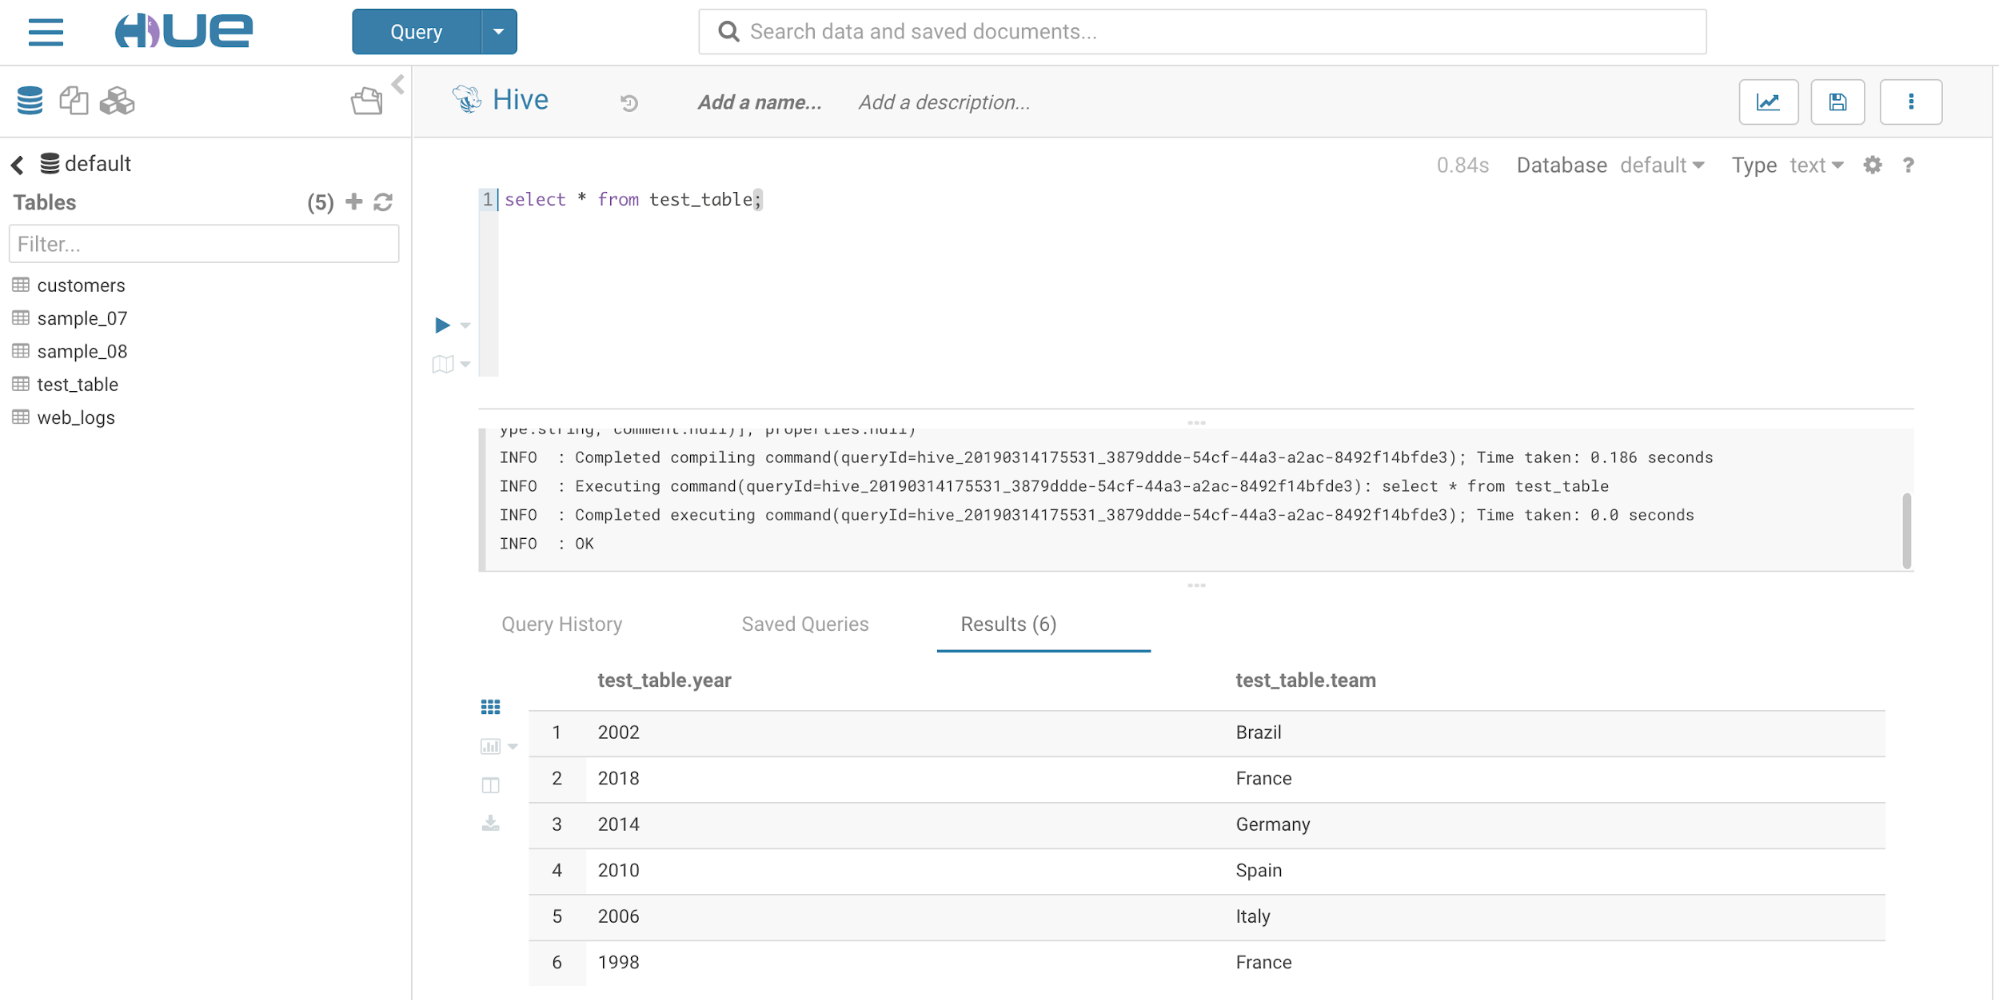
0: jdbc:hive2://localhost:10000/default> select * from test_table;
INFO  : Compiling command(queryId=hive_20190309192621_701914ad-0417-4639-9209-335a63818b82): select * from test_table
command(queryId=hive_20190309192621_701914ad-0417-4639-9209-335a63818b82); Time taken: 0.38 seconds
+------------------+--------------------+
| test_table.year  | test_table.winner  |
+------------------+--------------------+
| 2018             | France             |
| 2014             | Germany            |
| 2010             | Spain              |
| 2006             | Italy              |
+------------------+--------------------+
- Modify the table:
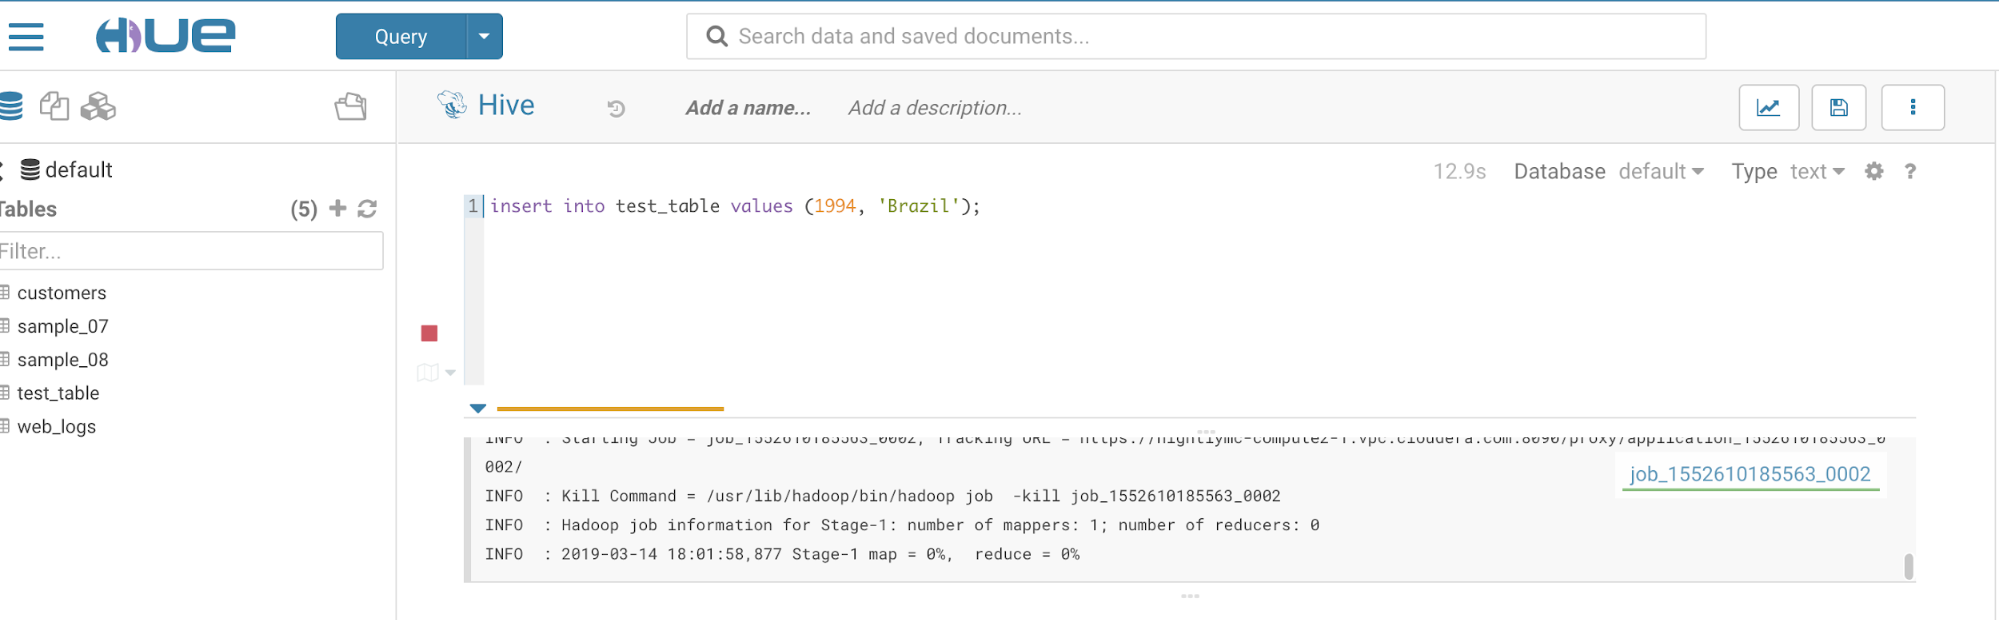
0: jdbc:hive2://localhost:10000/default> insert into test_table values (2002, 'Brazil');
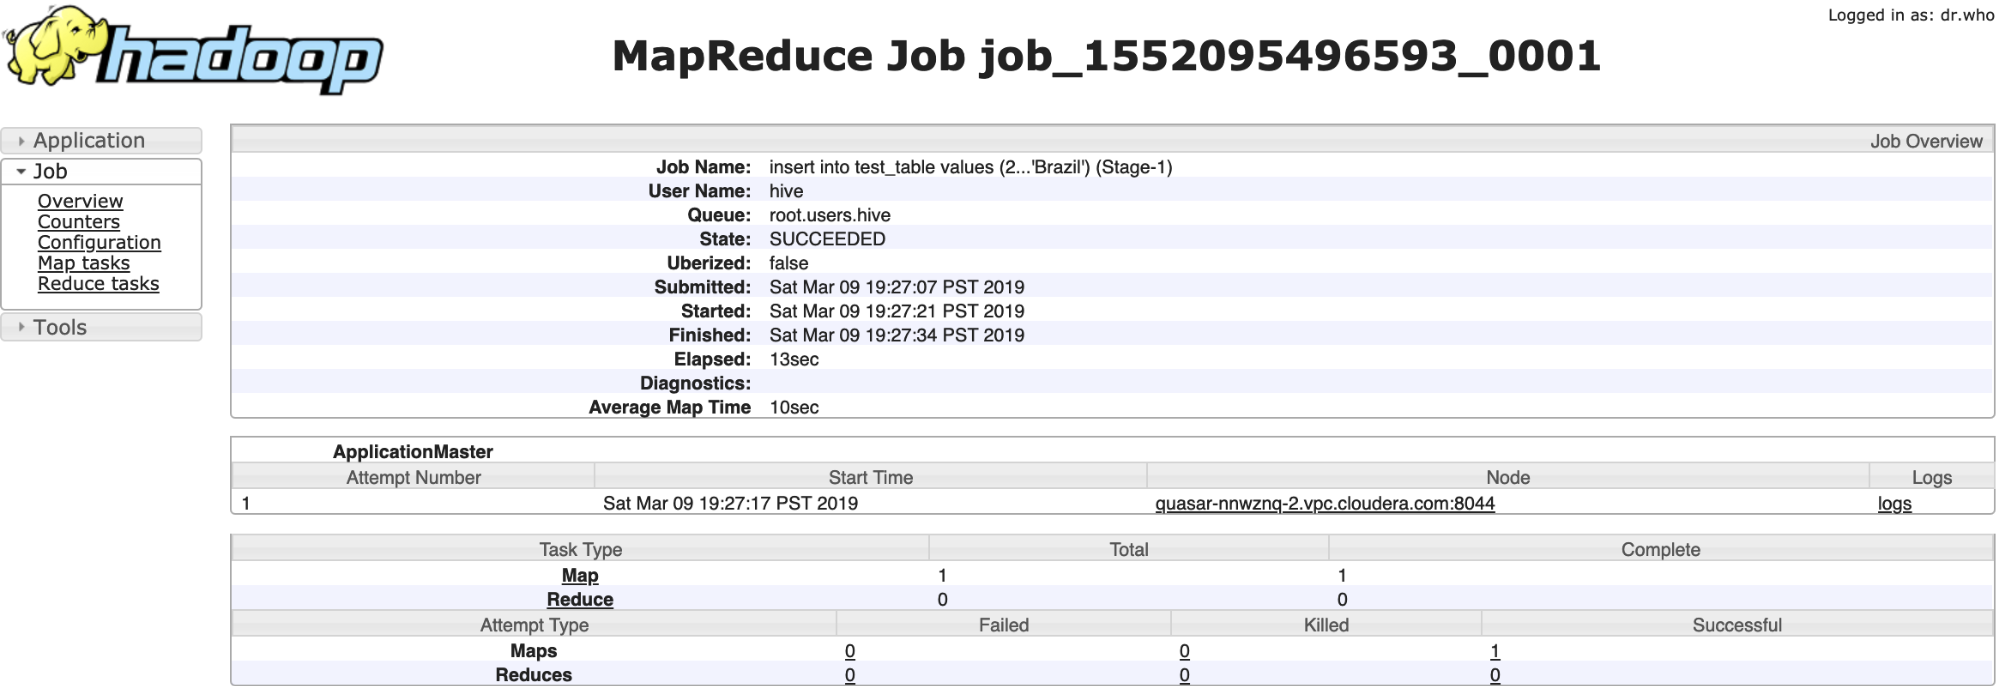
INFO  : Compiling
INFO  : Executing command(queryId=hive_20190309192705_218b79aa-aa94-4102-95ab-a1d4bc7a0381): insert into test_table values (2002, 'Brazil')
WARN  :
INFO  : Query ID = hive_20190309192705_218b79aa-aa94-4102-95ab-a1d4bc7a0381
INFO  : Total jobs = 3
INFO  : Launching Job 1 out of 3
INFO  : Starting task [Stage-1:MAPRED] in serial mode
INFO  : Submitting tokens for job: job_1552095496593_0001
INFO  : The url to track the job: https://vpc_host-nnwznq-1.tut.myco.com:8090/proxy/application_1552095496593_0001/
INFO  : Starting Job = job_1552095496593_0001, Tracking URL = https://vpc_host-nnwznq-1.tut.myco.com:8090/proxy/application_1552095496593_0001/
hdfs://ns1/user/hive/warehouse/test_data.db/test_table/.hive-staging_hive_2019-03-09_19-27-05_193_3963732700280111926-1/-ext-10000 from hdfs://ns1/user/hive/warehouse/test_data.db/test_table/.hive-staging_hive_2019-03-09_19-27-05_193_3963732700280111926-1/-ext-10002
INFO  : Starting task [Stage-0:MOVE] in serial mode
INFO  : Loading data to table test_data.test_table from hdfs://ns1/user/hive/warehouse/test_data.db/test_table/.hive-staging_hive_2019-03-09_19-27-05_193_3963732700280111926-1/-ext-10000
INFO  : MapReduce Jobs Launched:
INFO  : Stage-Stage-1: Map: 1   Cumulative CPU: 2.4 sec   HDFS Read: 4113 HDFS Write: 88 HDFS EC Read: 0 SUCCESS
INFO  : Total MapReduce CPU Time Spent: 2 seconds 400 msec
INFO  : Completed executing command(queryId=hive_20190309192705_218b79aa-aa94-4102-95ab-a1d4bc7a0381); Time taken: 31.097 seconds
INFO  : OK
1 row affected (31.434 seconds)
- Verify and track the Yarn job submitted by the Hive Execution Service using the Cloudera Manager Admin Console by going to .
YARN Job:
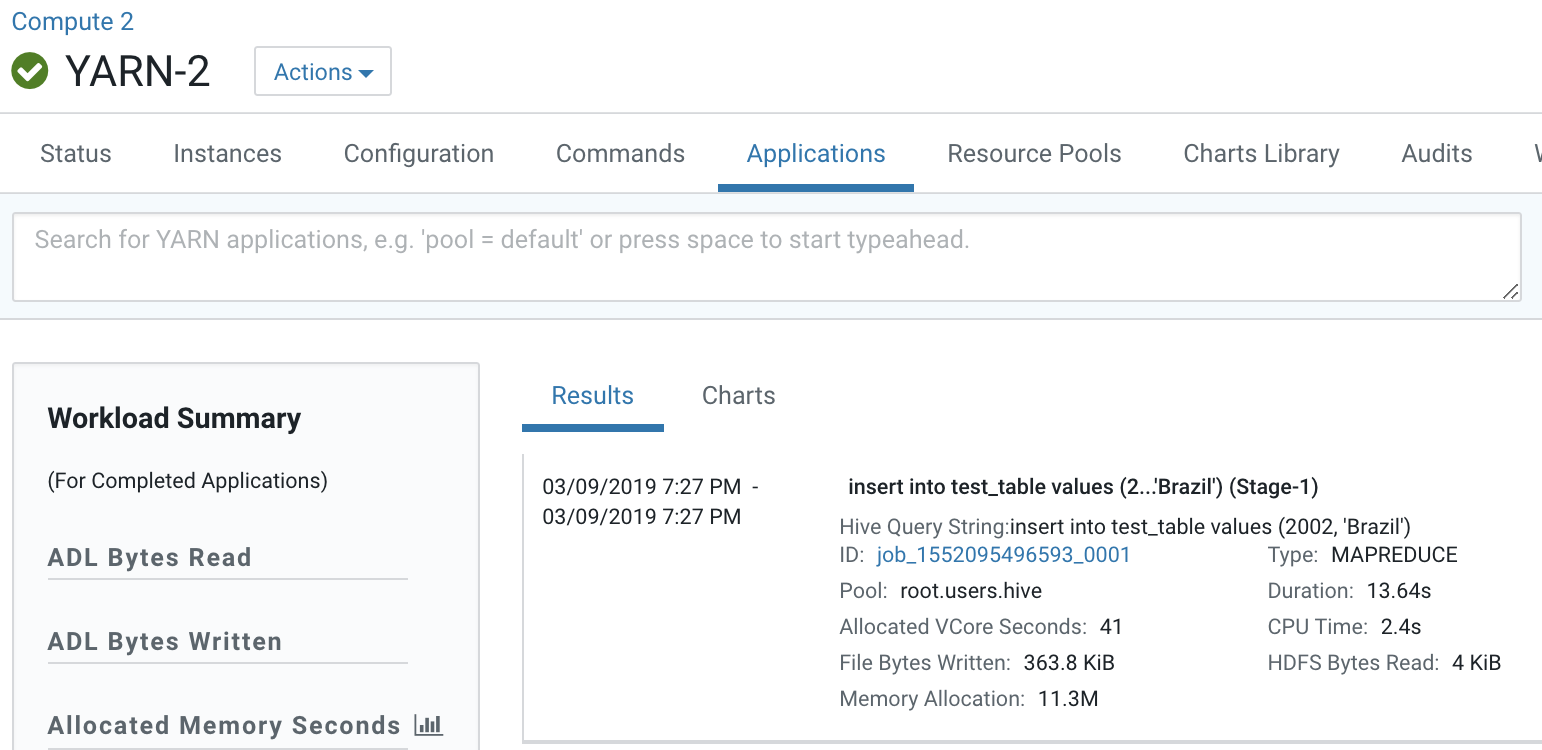
Map Reduce job:
- Verify that new data was added to the table:
0: jdbc:hive2://localhost:10000/default> select * from test_table;
INFO  : Completed executing command(queryId=hive_20190309192752_38d2b5a0-bf12-46b2-9a55-62e06beb9fb9); Time taken: 0.0 seconds
+------------------+--------------------+
| test_table.year  | test_table.winner  |
+------------------+--------------------+
| 2002             | Brazil             |
| 2018             | France             |
| 2014             | Germany            |
| 2010             | Spain              |
| 2006             | Italy              |
+------------------+--------------------+
Workflow #2: View HDFS directory structure of Compute clusters
In a Virtual Private Cluster environment, all Compute clusters have a local HDFS. But, crucial directories (JHS for spark, logging for yarn) for compute services are created in the Base cluster HDFS.
One of the design assumptions of Compute clusters is that they would be transient and so the user should still have a way to access important logs after the Compute clusters have been destroyed.
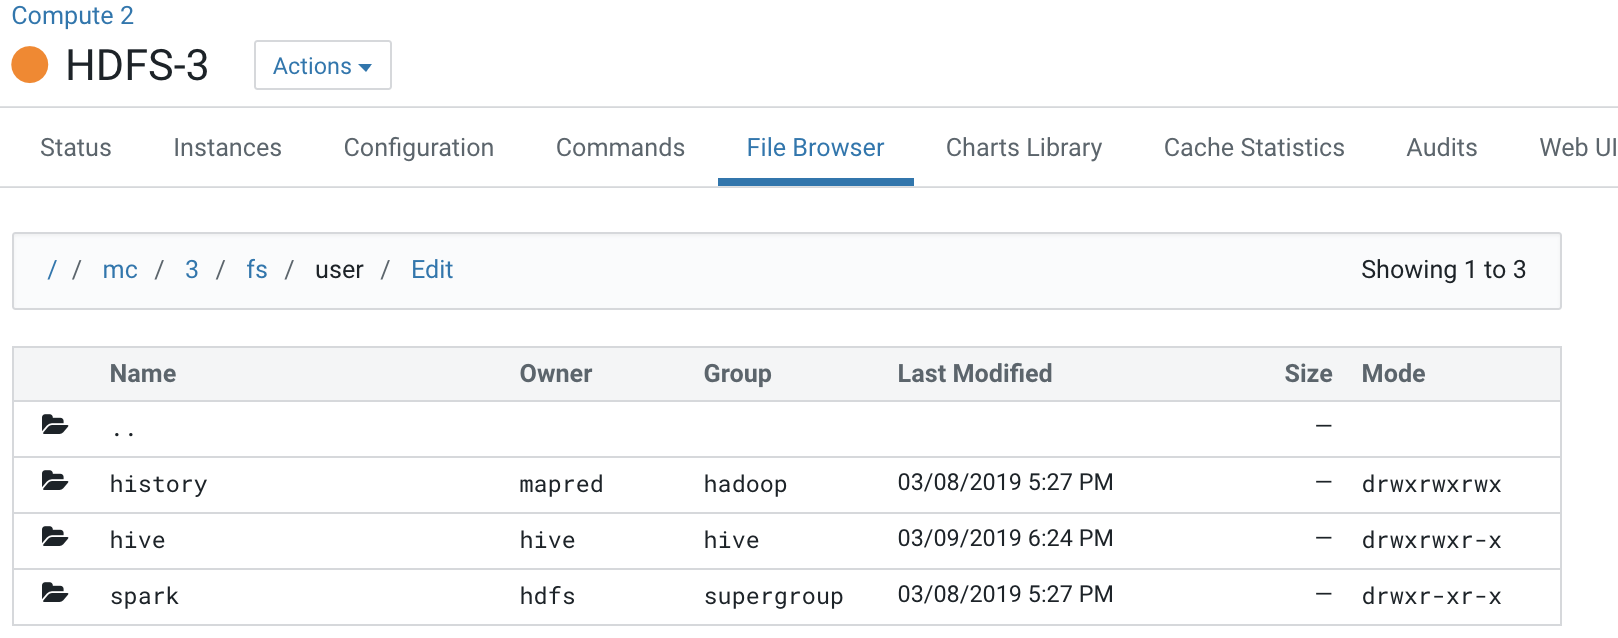
- Open the Cloudera Manager Admin Console and view the HDFS hierarchy on the Base cluster HDFS service by opening the File Browser: .
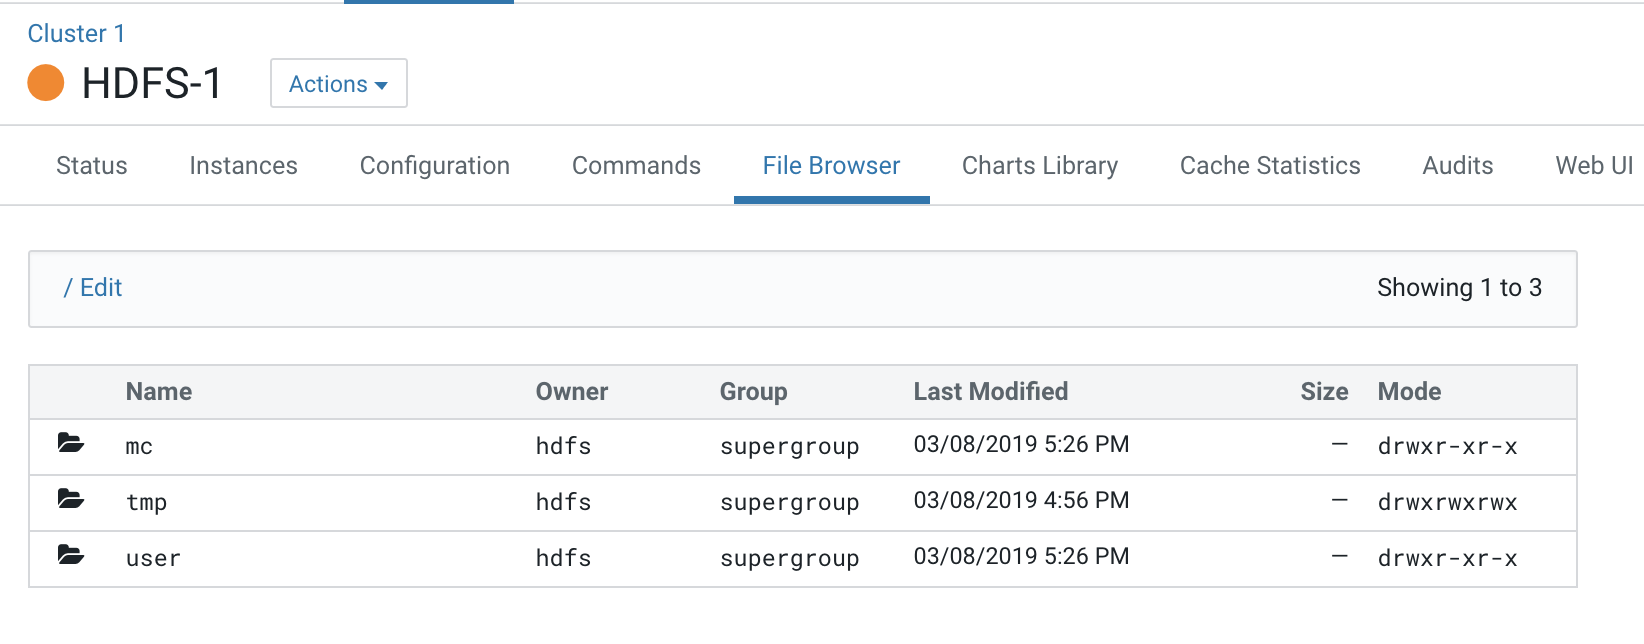
All the logs pertaining to Compute clusters are under the “mc” directory.
This Base cluster has 2 Compute clusters associated with it, Compute 1 and Compute 2.
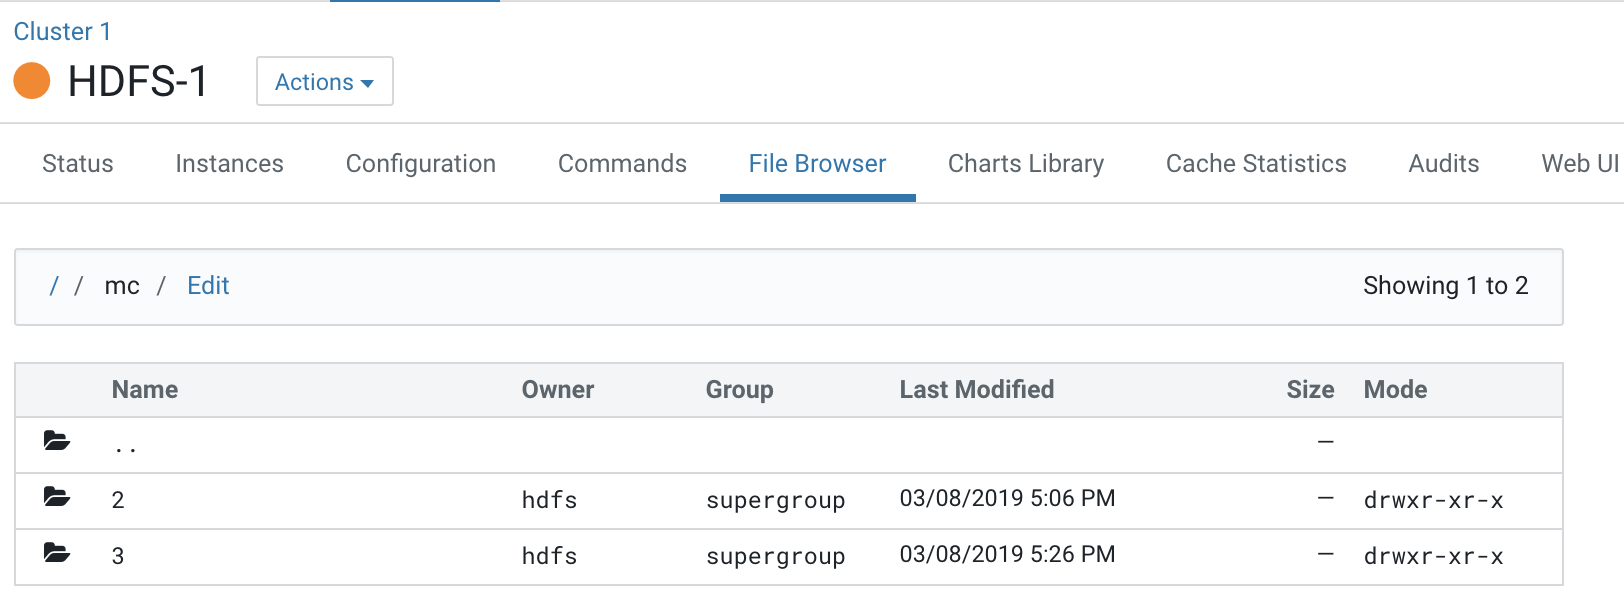
Each Compute cluster (based on its ID) gets a folder under this directory, so folder 2 belongs to Compute 1 and 3 belongs to Compute 2. The ID of the cluster can be identified from the URL used to access the cluster. Click on Compute 1 in the CM Cluster view and inspect the URL.
http://quasar-wfrgnj-1.vpc.cloudera.com:7180/cmf/clusters/2/status
The ID is the segment following /clusters in the URL. This is also the subfolder name under the /mc folder.
This is the directory where all the logs for services in Compute 1 are stored.
- Navigate to the file browser of a Compute cluster.
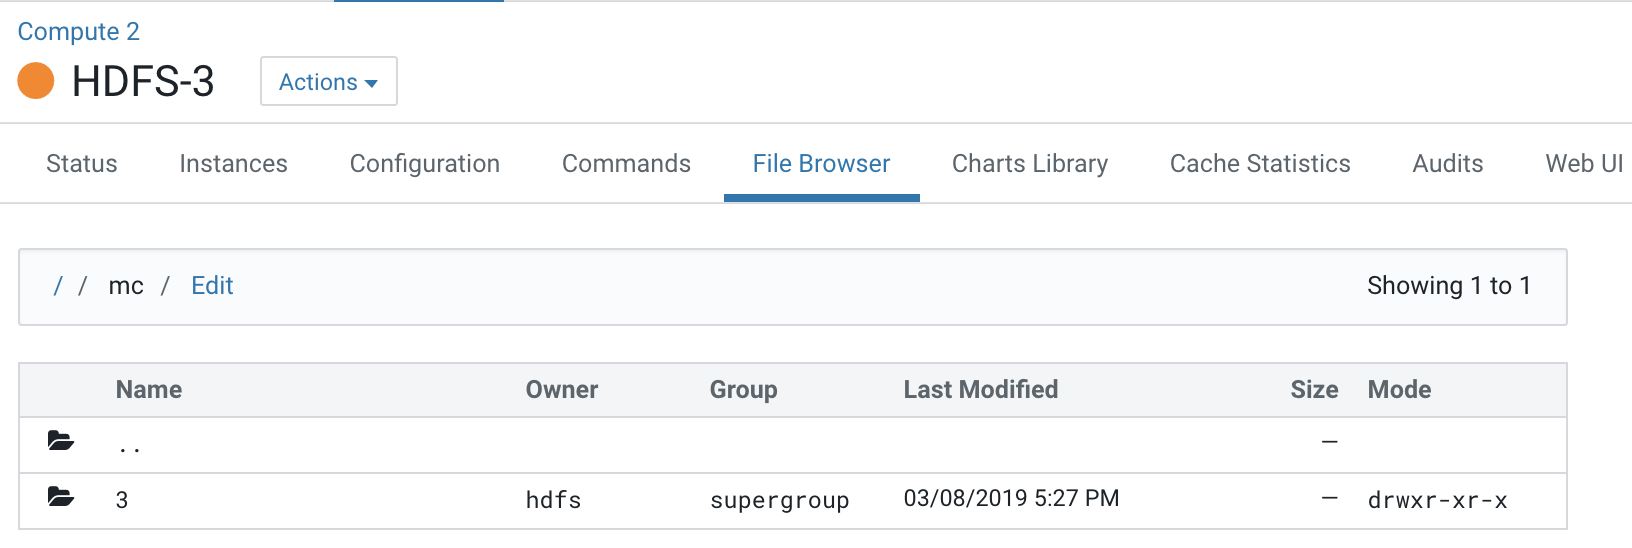
Note that folder 2 which is dedicated for the Compute 1 cluster is not visible to the Compute 2 cluster.
Navigating to folders below this hierarchy, you can see the folders created for services present on the Compute 2 cluster.
Workflow #3: Insert data in test_table through Spark
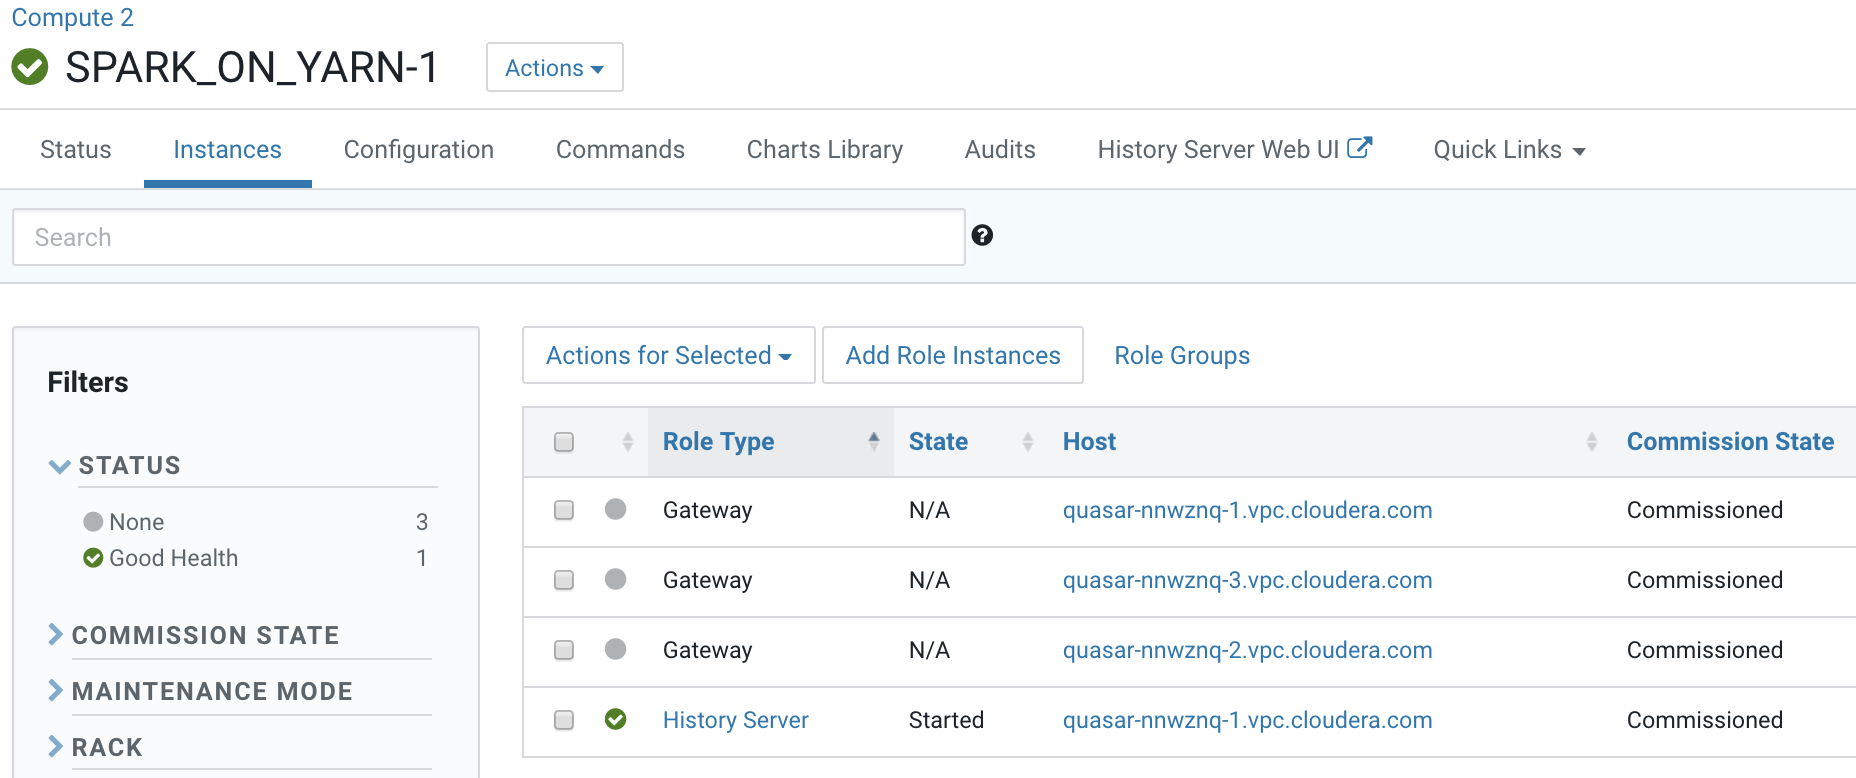
- Identify a host to start a spark-shell on the Compute cluster, Compute 2. Open the Cloudera Manager Admin Console and go to .
- Open a terminal session host <HiveServer2 Host URL>
- Verify access for the user:
Assign the user starting spark-shell to a Linux group that has create/insert access configured in Sentry. .e. hive.
[root@vpc_host-nnwznq-1 ~]# usermod -aG hive systest
The user will also need to be created and added to the group on all the hosts of the Base cluster.
- kinit the user:
[root@vpc_host-nnwznq-1 ~]# kinit -kt /cdep/keytabs/systest.keytab systest
- Start spark-shell:
[root@vpc_host-nnwznq-1 ~]# sudo -u systest spark-shell
Setting default log level to "WARN". Spark context Web UI available at http://vpc_host-nnwznq-1.tut.myco.com:4043 Spark context available as 'sc' (master = yarn, app id = application_1552095496593_0007). Spark session available as 'spark'. Welcome to ____ __ / __/__ ___ _____/ /__ _\ \/ _ \/ _ `/ __/ '_/ /___/ .__/\_,_/_/ /_/\_\ version 2.4.0-cdh6.2.0 /_/ scala> - Insert data into the table:
scala> val insertData = sqlContext.sql("insert into test_data.test_table values (1998, 'France')")19/03/10 00:21:26 WARN shims.HdfsUtils: Unable to inherit permissions for file hdfs://ns1/user/hive/warehouse/test_data.db/test_table/part-00000-f0fc5e0d-daa3-4fe2-9ded-d62e1ef45ca9-c000 from file hdfs://ns1/user/hive/warehouse/test_data.db/test_table insertData: org.apache.spark.sql.DataFrame = []
scala> val tableTestData = sqlContext.sql("select * from test_data.test_table") tableTestData: org.apache.spark.sql.DataFrame = [year: int, winner: string] scala> tableTestData.show() +----+-------+ |year| winner| +----+-------+ |2002| Brazil| |2018| France| |2014|Germany| |2010| Spain| |2006| Italy| |1998| France| +----+-------+ - Verify and track the queries in the Yarn service application on the Compute cluster:

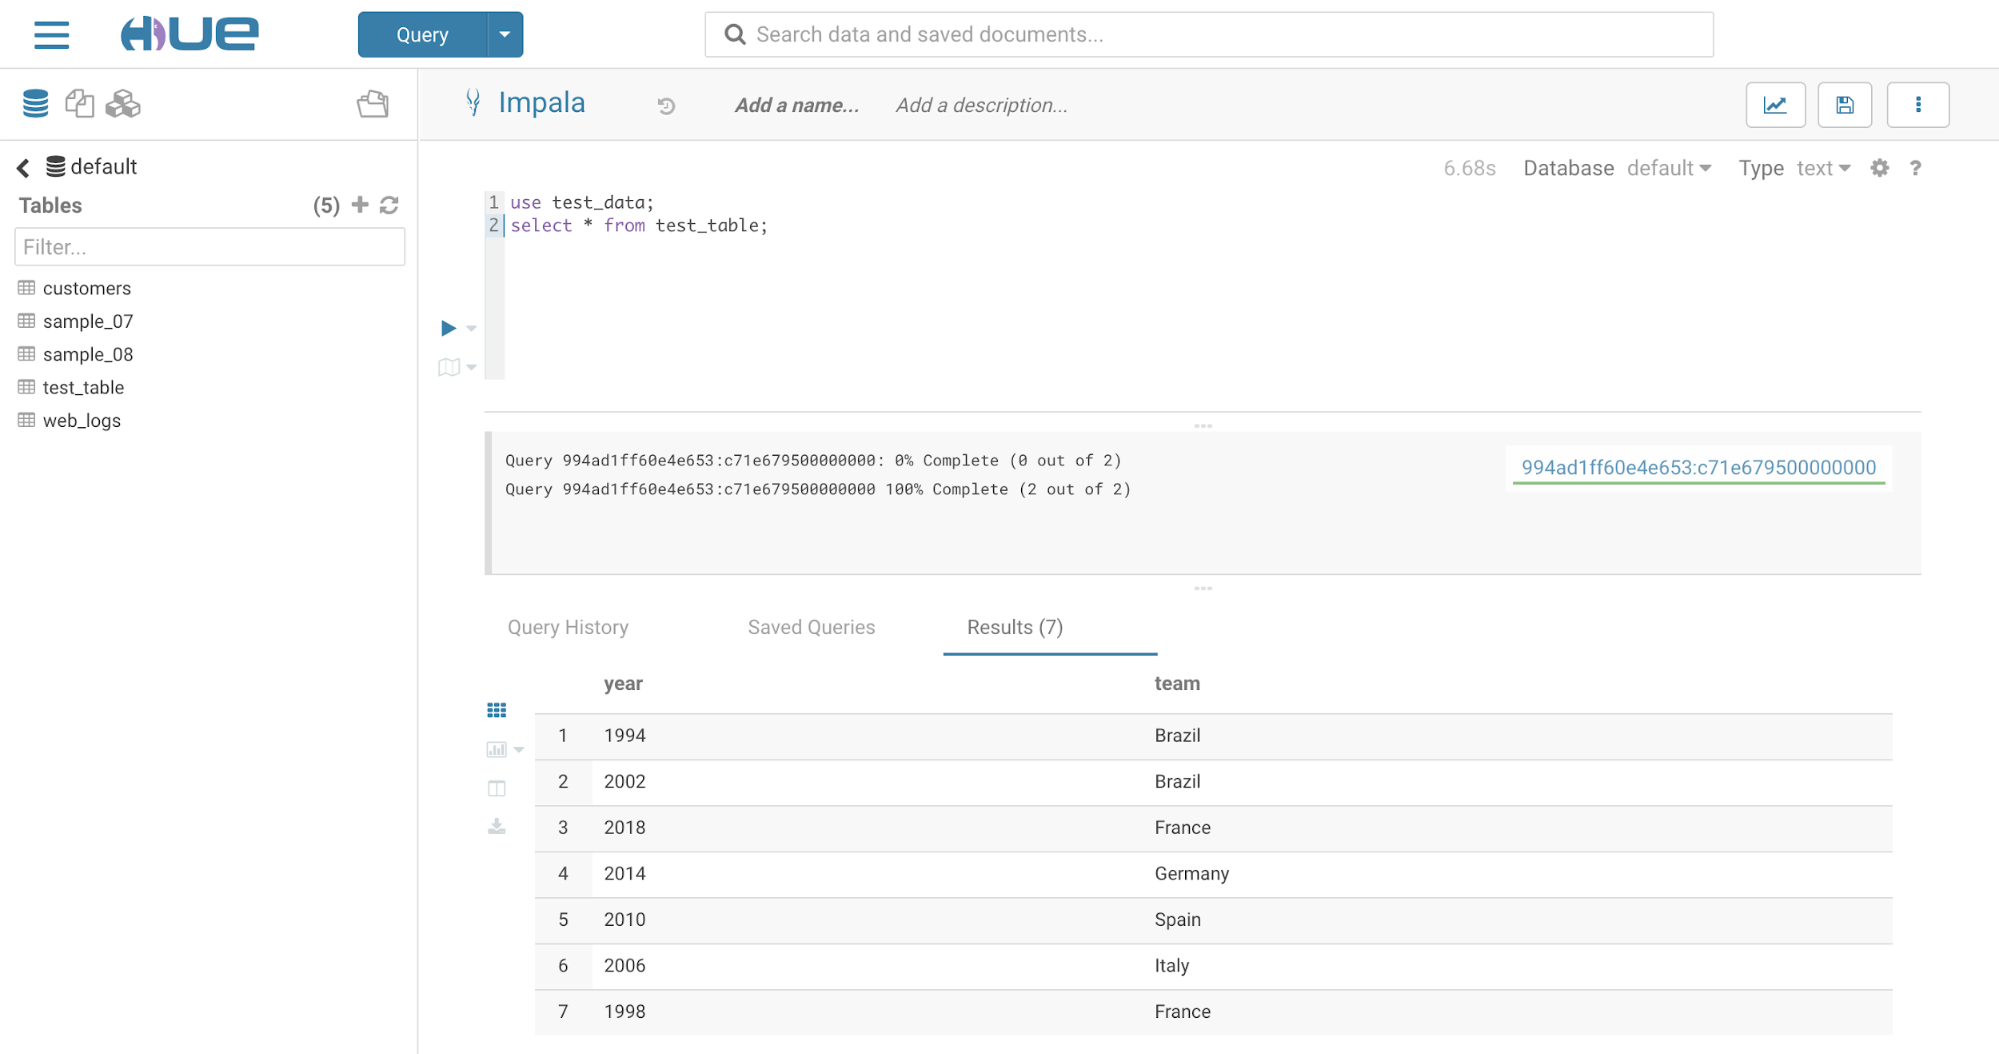
Workflow #4: Hue in a Virtual Private Cluster Environment
- Login into Hue. Open the Cloudera Manager Admin Console and go to .
Note: If the Base cluster uses Sentry, ensure that the logged-in user is a part of a Linux group that has the necessary grants to access the Hive warehouse on the Base cluster.
- Select .
The tables displa in the left panel.
- Run a select query to display data in the test_table previously created:
- Insert data into the table:
- Change the editor to Impala:
Go to .
- Run INVALIDATE METADATA query in the Impala editor.
- Verify the data added from the Hive editor in the test_table shows up in the Impala editor: