How To Back Up and Restore Apache Hive Data Using Cloudera Enterprise BDR
Cloudera Enterprise Backup and Disaster Recovery (BDR) uses replication schedules to copy data from one cluster to another, enabling the second cluster to provide a backup for the first.
This tutorial shows you how to configure replication schedules to back up Apache Hive data and to restore data from the backup cluster when needed.
- A license for Cloudera Enterprise. Cloudera Enterprise BDR is available from the Backup menu of Cloudera Manager Admin Console when licensed for Enterprise.
- The BDR Administrator or Full Administrator role on the clusters involved (typically, a production cluster and a backup cluster).
This tutorial includes the following information:
Best Practices for Back Up and Restore
When configuring replication schedules for Hive back up and restore, follow these guidelines:
- Make sure that the time-frames configured for replication schedules allow the replication process to complete.
- Test your replication schedules for both back up and restore before relying on them in a production environment. To test a restore replication schedule in a production environment, use a different HDFS destination path for the Hive data files than that used for the replica.
- Enable only one replication schedule for the same dataset at the same time. That means you must first disable the backup replication schedule before enabling or creating a restore replication schedule for the same dataset, and vice versa.
- Enable snapshots on the HDFS file system containing the Hive data files. This ensures consistency if changes are still being made during the replication process. See Using Snapshots with Replication for details.
About the Example Clusters
This guide uses the two example clusters listed in the following table:
| Production cluster | Backup cluster |
|---|---|
| http://prod-db-example-1.vpc.cloudera.com | http://backup-example-1.vpc.cloudera.com |
| Source cluster for a backup replication schedule. | Destination cluster for backup replication schedule. |
| Destination cluster for a restore replication schedule. | Source cluster for a restore replication schedule. |
| To restore data from a backup cluster, set peer relationship to backup cluster and configure replication schedule from this cluster. | To back up a production cluster, set peer relationship and configure replication schedule from this cluster. |
The example clusters are not configured to use Kerberos, nor do they use external accounts for cloud storage on Amazon Web Services (AWS). The name of the example production and the example backup cluster have each been changed from the default "Cluster 1" name to Production DB (Main) and Offsite-Backup, respectively.
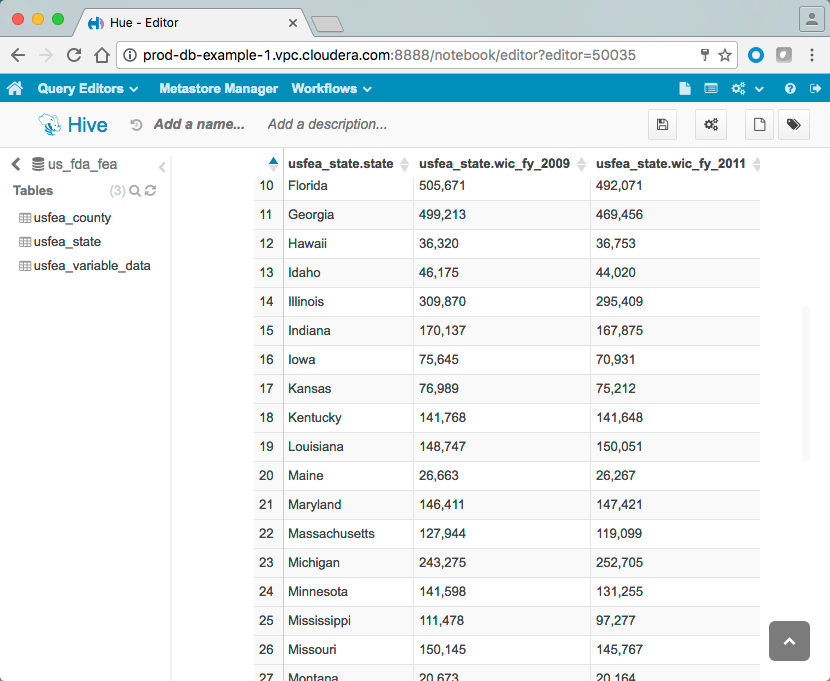
The example production cluster contains the Hive default database and an example database, us_fda_fea, which contains data extracted from the US federal government's open data initiative at data.gov. The us_fda_fea database contains three tables as shown in Hue Web UI:
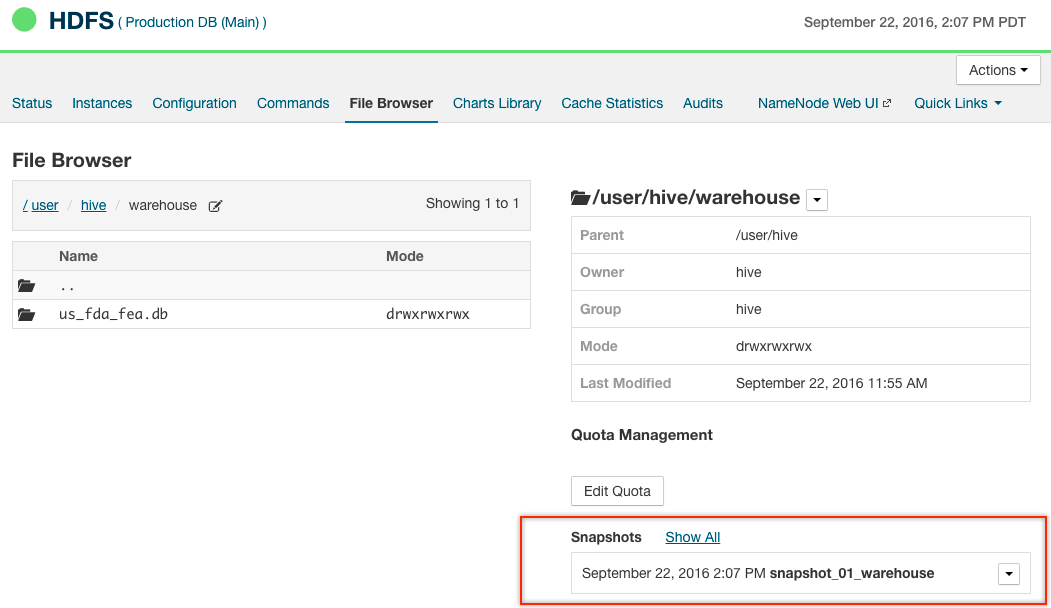
As shown in the screenshot below, snapshots have been configured and enabled on the HDFS system path containing the Hive database files. Using snapshots is one of the Best Practices for Back Up and Restore. See Using Snapshots with Replication for more information.
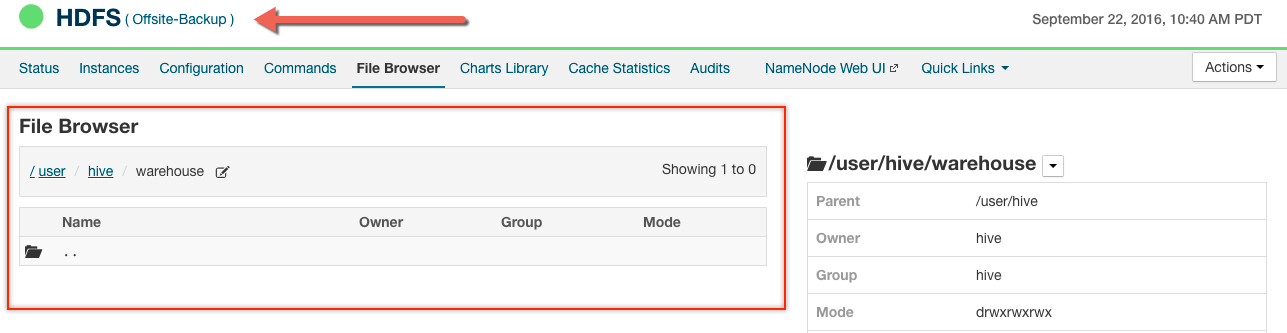
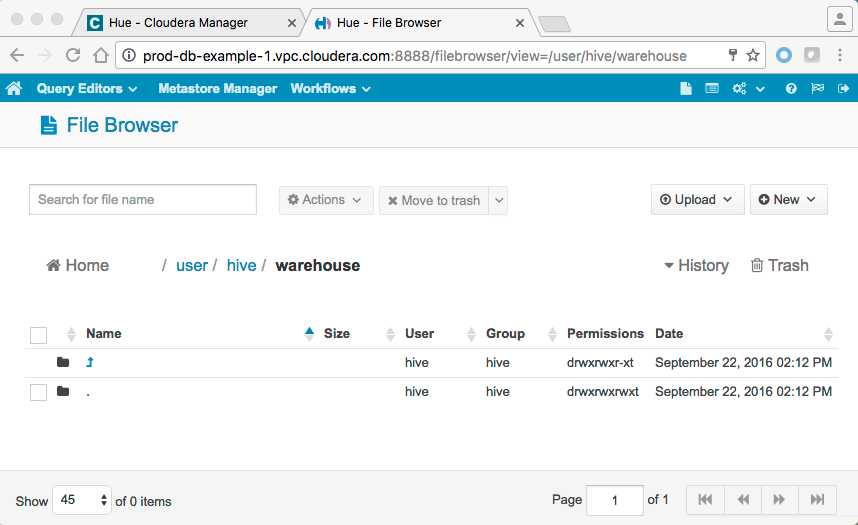
The example backup cluster (Offsite-Backup) has not yet been used for a backup yet, so the Hive default path is empty as shown below:
Backing Up and Restoring Hive Data
This tutorial steps through these two major tasks:
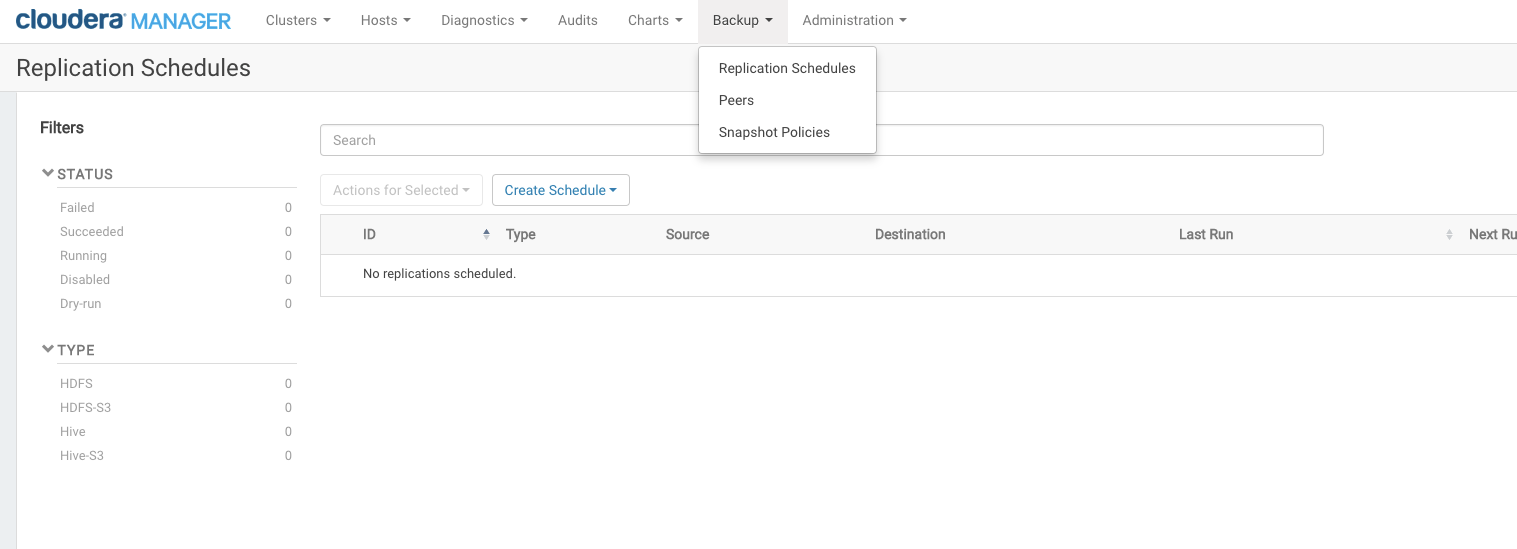
Backup and restore are each configured and managed using Replication Schedules, available from the Backup menu on Cloudera Manager Admin Console:
The backup and restore processes are configured, managed, and executed using replication schedules. Each replication schedule identifies a source and a destination for the given replication process. The replication process uses a pull model. When the replication process runs, the configured destination cluster accesses the given source cluster and transparently performs all tasks needed to recreate the Hive database and tables on the destination cluster.
The destination cluster handles configuration and running the schedule. Typically, creating a backup replication schedule takes place on the backup cluster and creating a restore replication schedule takes place on the production cluster. Thus, as shown in this tutorial, the example production cluster, Production DB (Main), is the source for the backup replication schedule and the destination for the restore replication schedule.
Creating a Backup
Defining the backup replication schedule starts from the Cloudera Manager Admin Console on the destination cluster. For this example, the destination cluster is the cluster being used as the backup and the source is the example production cluster. To create the backup, follow these steps:
Step 1: Establish a Peer Relationship to the Production Cluster
You must have the BDR Administrator or Full Administrator role on both clusters to define a Peer relationship and perform all subsequent steps.
- Log in to Cloudera Manager Admin Console on the master node of the backup cluster.
- Click the Backup tab and select Peers from the menu.
- On the Peers page, click Add Peers.
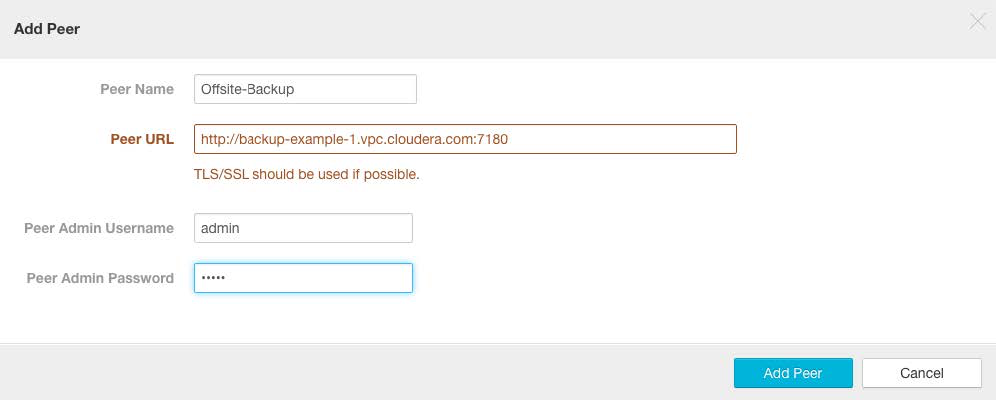
- On the Add Peer page:
- Peer Name - Enter a meaningful name for the cluster that you want to back up, such as Production DB. This peer name becomes available in the next step, to be selected as the source for the replication.
- Peer URL - Enter the URL (including port number) for the Cloudera Manager Admin Console running on the master node of the cluster.
- Peer Admin Username - Enter the name of the administrator account for the cluster.
- Peer Admin Password - Enter the password for the administrator account.
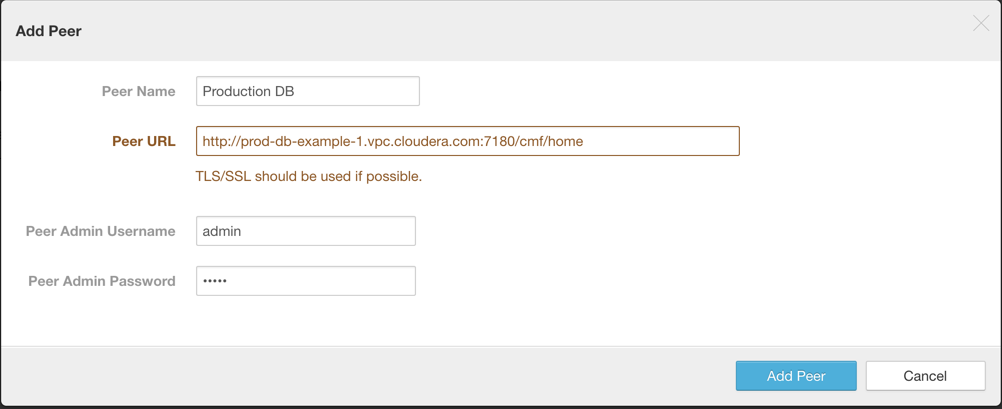
- Click Add Peer to save your settings, connect to the production cluster, and establish this peer relationship.
The Peers page re-displays, showing the Status column as Connected (note the green check-mark):

You can now create a schedule to replicate Hive files from production to the backup cluster.
Step 2: Configure the Replication Schedule
From the Cloudera Manager Admin Console on the backup cluster:
- Click the Backup tab and select Replication Schedules from the menu.
- On the Replication Schedules page, select .
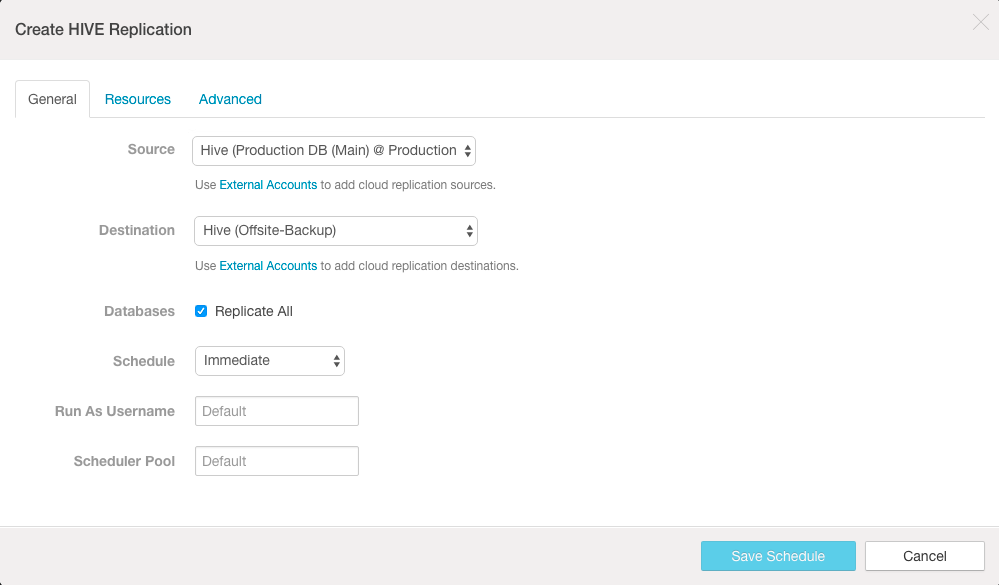
- On the Create Hive Replication page, click the General tab to display the default schedule options:
- Source - Make sure the Hive node selected in the drop-down is the production cluster (the cluster to be backed up).
- Destination - This is the cluster you are logged into, the backup cluster. Select the Hive node on the cluster.
- Databases - Select Replicate All to re-create all Hive databases from the production system to the backup. Or deselect Replicate All and enter specific database name and tables to back up select databases or tables only.
- Schedule - Immediate. For production environments, change this to Recurring and set an appropriate time-frame that can backup the selected dataset completely. For example, do not set an hourly schedule if it takes two hours to back up the dataset.
- Run As Username - Leave as Default.
- Scheduler Pool - Leave as Default.
- Click Save Schedule.
The files are replicated from the source cluster to the backup cluster immediately.
When the process completes, the Replication Schedules page re-displays, showing a green check-mark and time-stamp in the Last Run column:
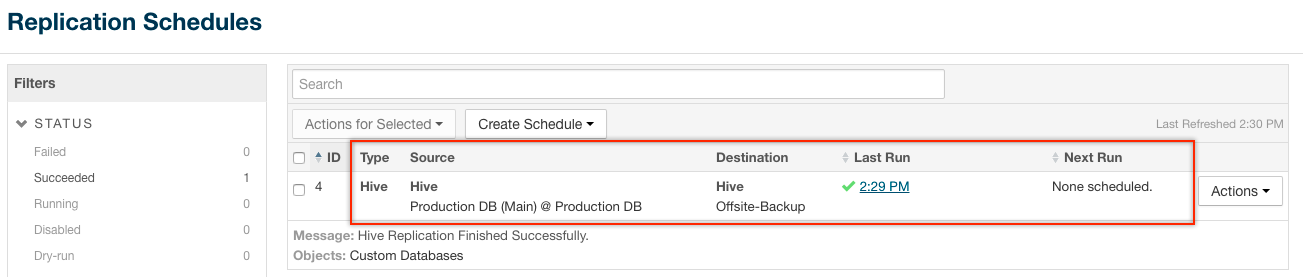
When you set up your own schedules in your actual production environment, the Next Run column will likely also contain a date and time according to your specifications for the schedule.
Step 3: Verify Successful Replication
You can verify that data has been replicated by using Hive commands, the HDFS File Browser, or the Hue Web UI (shown below):
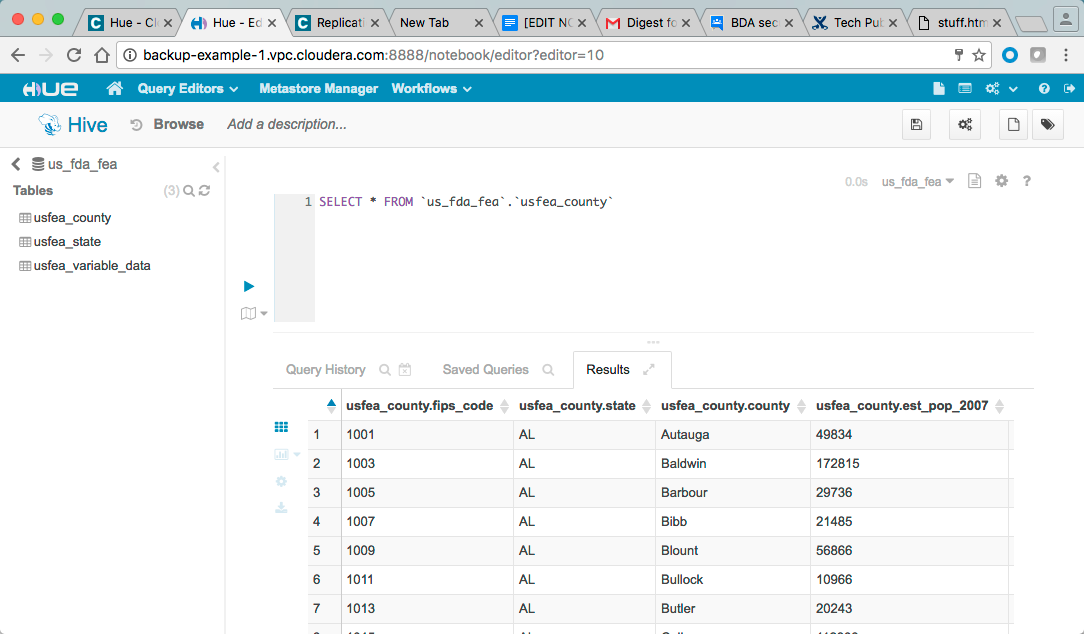
The Hive database is now on both the production and the backup clusters—the source and destination of the backup Replication Schedule, respectively.
At this point if the production cluster has a catastrophic data loss, you can use the backup replica to restore the database to the production cluster.
For example, assume that the us_fda_fea database was inadvertently deleted from the example production cluster as shown in the Hue Web UI:
Whenever you first discover an issue (data loss, corruption) with production data, immediately disable any existing backup replication schedules. Disabling the backup replication schedule prevents corrupt or missing data from being replicated over an existing backup replica is why it is the first step in the restore process detailed in the next set of steps.
Restoring Data from the Backup Cluster
Restoring data from a backup cluster takes place on the production cluster but requires that the backup replication schedule is first disabled. The process includes these steps:
Step 1: Disable Backup Replication Schedule
At the Cloudera Manager Admin Console on the backup cluster:
- Select .
- On the Replication Schedules page, select the schedule.
- From the Actions drop-down menu, select Disable.
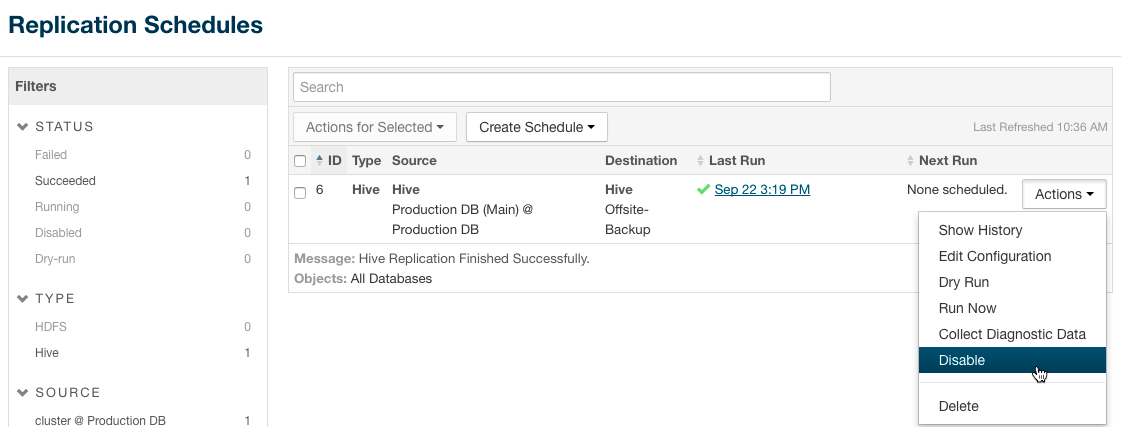
When the Replication Schedules pages refreshes, the word Disabled displays in the Next Run column for the schedule.
With the backup replication schedule temporarily disabled, move to the production cluster to create and run the replication schedule to restore the data as detailed in the remaining steps.
Step 2: Establish a Peer Relationship to the Backup Cluster
Log in to Cloudera Manager Admin Console on the master node of the production cluster.
- Click the Backup tab and select Peers from the menu.
- On the Peers page, click Add Peers button.
- On the Add Peer page:
- Peer Name - Enter a meaningful name for the cluster from which to obtain the backup data.
- Peer URL - Enter the URL for the Cloudera Manager Admin Console (running on the master node of the cluster).
- Peer Admin Username - Enter the administrator user name for the backup cluster.
- Click Add Peer to save your settings. The production cluster connects to the backup cluster, establishes the peer relationship, and tests the connection.
The Peers page redisplays and lists the peer name, URL, and shows its Status (Connected) as shown below:

Step 3: Configure the Restore Replication Schedule
From the Cloudera Manager Admin Console on the production cluster:
- Click the Backup tab and select Replication Schedules from the menu.
- On the Replication Schedules page, select .
- On the General settings tab of the Create Hive Replication page:
- Source - The backup cluster from which to pull the data.
- Destination - The production cluster that needs the data restored.
- Databases - Select Replicate All.
- Schedule - Immediate.
- Run As Username - Leave as Default.
- Scheduler Pool - Leave as Default.
- Click the Advanced tab:
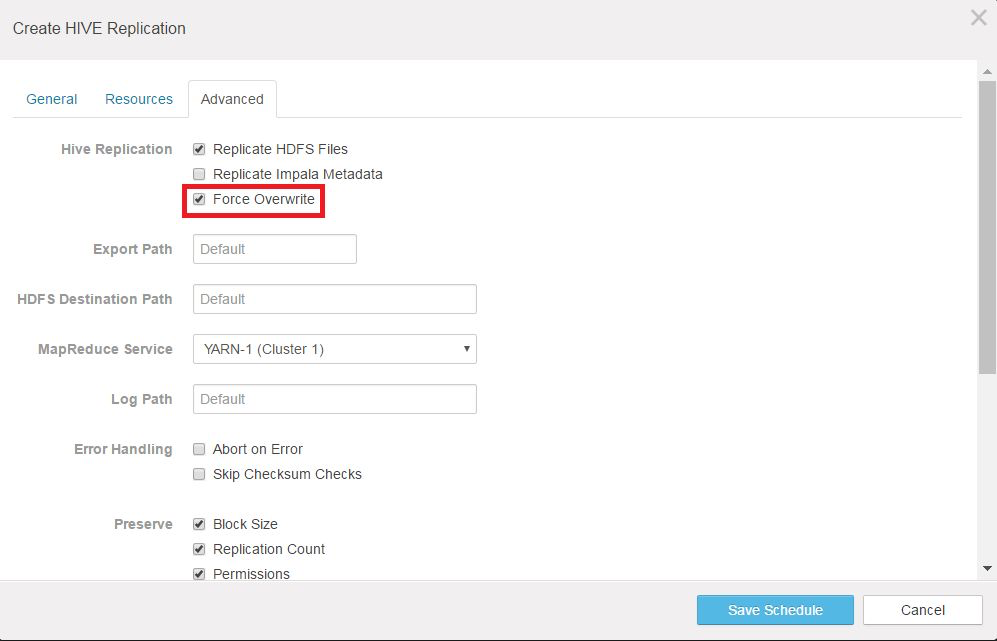
- Select Force Overwrite so that the backup cluster's metadata replaces the metadata on the production cluster. The assumption is that the production cluster's dataset has been corrupted.
- Click Save Schedule.
This schedule runs one time and restores your Hive databases. When the process completes, the Replication Schedules page displays the time-stamp and check-mark in the Last Run column for the schedule.
Step 4: Disable the Replication Schedule
Immediately disable the Replication Schedule used for the restore as soon as it completes. From the Replication Schedules page:
- Select the replication schedule that just completed.
- From the Actions drop-down menu, select Disable.
The page refreshes and displays Disabled in the Next Run column.
Step 5: Verify Successful Replication
Use the Hive command-line, the HDFS File Browser, or the Hue Web UI to verify successful data restore:

The restore process is complete. In a production environment, assuming the restored Hive database and tables are as you want them in a temporary path, you can re-configure the replication schedule to restore the data to the original path.
Step 6: Re-enable the Backup Replication Schedule
On the backup cluster, log in to the Cloudera Manager Admin Console.
- Select .
- On the Replication Schedules page, select the schedule created at the beginning of this process.
- From the Actions drop-down menu, select Enable.
The restore process is complete.
In actual production environments, create replication schedules that regularly back up your production clusters. To restore data, create replication schedules as shown in this tutorial.
Alternatively, you can define replication schedules in advance but leave them disabled. See How To Back Up and Restore HDFS Data Using Cloudera Enterprise BDR for details.
See Backup and Disaster Recovery and BDR Tutorials or more information about Cloudera Enterprise BDR.
