Creating Coordinators and Bundles
You can use a coordinator to schedule a workflow, and you can group coordinators (scheduled workflows) into a bundle to manage the scheduled workflows as a single unit.
See the following content:
| Create a Coordinator |
| Create a Bundle |
Create a Coordinator
Use the coordinator to schedule recurring jobs for a workflow, and to identify any events that you want to trigger the workflow job.
Steps
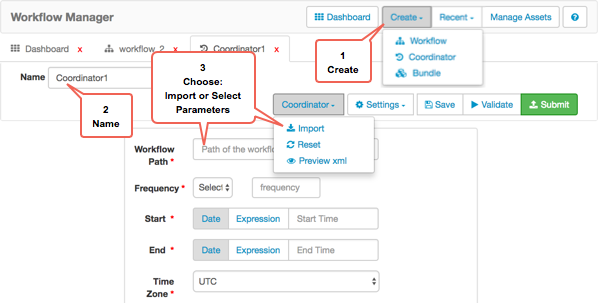
Click Create Coordinator on the Workflow Manager Action Bar.
Enter a name for the coordinator in the Name field.
![[Tip]](../common/images/admon/tip.png)
Tip When you save a workflow, the name you assign is given only to the workflow application file. It does not automatically match the name displayed for the workflow job in the dashboard. WFM assigns to the workflow job the name you enter in the Name filed in the design workspace. If you want the job name and the application file name to match, you must assign the same name in the Name field and to the application file.
Choose one of the following:
Enter the values for the coordinator parameters.
See the Apache Coordinator documentation for details about the parameters.
![[Important]](../common/images/admon/important.png)
Important If entering Frequency in Minutes, the value must be a minimum of 5 minutes.
Click Coordinator > Import to retrieve the parameters from an existing coordinator.
![[Tip]](../common/images/admon/tip.png)
Tip If the File Browser window opens but does not display a directory list, you might have lost network connectivity or the required data node might be unresponsive.
Navigate to the coordinator you want, click on the coordinator file name, and ensure the correct file name is displayed in the Selected Path.
Click Select.
The configuration parameters of the selected coordinator display in the fields of the Create Coordinator window. You can modify the parameters as needed.
Click Save, Validate, or Submit in the Action Bar.
More Information
Create a Bundle
Bundles allow you to group multiple workflows to provide better operational control. You can perform actions such as start, stop, resume, suspend and so forth on the entire bundle of workflows. To be included in a bundle, workflows must first be associated with a coordinator schedule or event. Schedule each workflow in a coordinator, then group the coordinators (scheduled workflows) in a bundle.
Steps
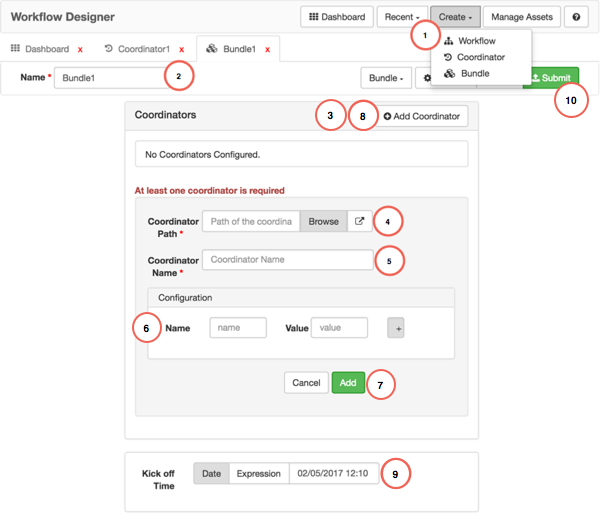
Click Create > Bundle in the Workflow Manager Action Bar.
Enter a name for the bundle in the Name field.
![[Tip]](../common/images/admon/tip.png)
Tip When you save a workflow, the name you assign is given only to the workflow application file. It does not automatically match the name displayed for the workflow job in the dashboard. WFM assigns to the workflow job the name you enter in the Name filed in the design workspace. If you want the job name and the application file name to match, you must assign the same name in the Name field and to the application file.
Click Add Coordinator to display the fields for selecting and configuring the first coordinator in your bundle.
Browse to the path of the first coordinator to include in the bundle.
Enter a name for the coordinator.
Having a unique name for each coordinator can be useful when viewing bundle job details and logs, especially if you use the same coordinator more than once in the bundle.
Optional: Enter any configuration parameters you want applied to the coordinator (the scheduled workflow) at the time the bundle job runs.
These parameters override any parameters set in the workflow or coordinator.
Click Add to include the coordinator in the bundle.
Click Add Coordinator and configure additional coordinators for your bundle.
Optional: Select a Kick-off Time for the bundle.
If you do not select a time to start the bundled job, you can start it manually from the dashboard.
Click Submit.
After submission, the bundle job displays in the dashboard. The job has a status of Prep until it executes.
More Information


