Validate and Save a Workflow
Workflow validation checks that the XML is correctly coded for the workflow. It does not check if the workflow will succeed when run.
During the validation process, the workflow is also saved.
About This Task
Each workflow file must have a unique name within a single directory. If you want to save a workflow into a directory that already contains a workflow of the same name, you must either rename the workflow, add the file to a subdirectory, or overwrite the file during the save procedure.
You can save valid workflows or invalid workflows as drafts. The default name for a saved workflow is always "workflow.xml.draft" for a draft workflow that is not validated or "workflow.xml" for a valid workflow. You can change the workflow file name during the save operation.
![[Tip]](../common/images/admon/tip.png) | Tip |
|---|---|
When you save a workflow, the name you assign is given only to the workflow application file. It does not automatically match the name displayed for the workflow job in the dashboard. WFM assigns to the workflow job the name you enter in the Name filed in the design workspace. If you want the job name and the application file name to match, you must assign the same name in the Name field and to the application file. |
Steps
Click the Validate icon on the workspace Action Menu.

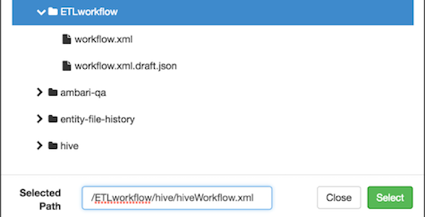
Click Browse to select an HDFS directory in which to save the workflow file.
![[Tip]](../common/images/admon/tip.png)
Tip If the File Browser window opens but does not display a directory list, you might have lost network connectivity or the required data node might be unresponsive.
Navigate to the directory you want, click on the directory name, and expand the directory.
Optional: If a workflow file already exists in the directory:
To overwrite the existing file, click Select, check Overwrite in the Save Workflow dialog box, and then click Validate.
To keep the existing file and the new workflow file, in the Selected Path field, append a new name for the file or append a new subdirectory to the path, click Select, and then click Validate.
![[Important]](../common/images/admon/important.png)
Important The workflow file must use the
.xmlextension.After validation, the new directory is created and contains the renamed workflow.
Select the Execution Settings you want to use.
Enter any Custom Job Properties you want to use.
Click Validate.
More Information


