Getting started with Schema Registry

Get started with Schema Registry in CSP Community Edition.

Schema Registry provides a shared repository of schemas that allows applications to flexibly interact with each other. Applications frequently need a way to share metadata across data format, schema, and semantics. Schema Registry addresses these challenges by evolving schemas such that a producer and consumer can understand different versions of the schemas but still read all information shared between both versions and safely ignore the rest.

The following sections teach you how you can:

  • Create a schema.
  • Evolve a schema.
  • Delete a schema.
  • Integrate your own Java Kafka client with Schema Registry.

Creating a schema

Learn how to create a schema in Schema Registry using the Schema Registry UI.

Creating a schema involves configuring the properties of the schema and uploading the schema itself to Schema Registry. Cloudera recommends that you use your own schema if one is available to you. If you do not have a schema available, an example schema is provided in Step 4.
  1. Access the Schema Registry UI by entering the following in a browser window:
    http://localhost:7788/
  2. Click +.
    The Add New Schema dialog appears.
  3. Configure the schema.
    If you do not have a schema available and plan to use the example schema provided in the next step, provide a NAME and DESCRIPTION for the schema and leave all other properties set to their default values.
    NAME
    Add a unique name for the schema. Used as a key to look up schemas.
    DESCRIPTION
    Add a short description of the schema
    SCHEMA TYPE
    The schema format. Supported formats are Avro and JSON. If you do not have a schema available and plan to use the example provided in this guide, select AVRO
    SCHEMA GROUP
    Add the name of a schema group. Schema Groups allow you to group schemas in any logical order.
    COMPATIBILITY
    Sets the compatibility policy for the schema. A compatibility policy defines the rules of how a schema can be evolved. Once set, this cannot be changed. The policies are as follows:
    • FORWARD - allows evolving a schema by adding information.
    • BACKWARD - allows evolving a schema by removing information.
    • BOTH - allows evolving a schema by adding and removing information.
    • NONE - no policy is applied to the schema, any change to the schema is accepted, compatibility checks are not carried out.
    For a comprehensive description on each policy, see Compatibility Policies.
    EVOLVE
    Controls whether a schema can be evolved later by creating multiple versions. If you deselect this option the schema can only have one version. Leave this set as the next section walks you through schema evolution using the schema you are creating now.
  4. Copy and paste, drag and drop, or browse for your schema in the SCHEMA TEXT area.
    You can use the following example schema if you don't have a schema available.
    {
      "type": "record",
      "namespace": "com.cloudera.examples",
      "name": "MachineData",
      "doc": "Machine utilization metrics",
      "fields": [
        {
          "name": "timestamp",
          "doc": "Metrics timestamp",
          "type": "long"
        },
        {
          "name": "hostname",
          "doc": "Host name of the source machine",
          "type": "string"
        },
        {
          "name": "counters",
          "doc": "Machine counters",
          "type": {
            "type": "array",
            "items": {
              "type" : "record",
              "name" : "Counter",
              "fields" : [
                {
                  "name": "name",
                  "doc": "Name of the counter",
                  "type": "string"
                },
                {
                  "name": "value",
                  "doc": "Value of the counter",
                  "type": "long"
                },
                {
                  "name": "unit",
                  "doc": "Unit of the counter value",
                  "type": ["string", "null"],
                  "default": "null"
                }
              ]
            }
          }
        }
      ]
    }
    
  5. Click Save.

Evolving a schema

Learn how to evolve a schema in Schema Registry using the Schema Registry UI.

​You evolve a schema when you create a new version of it. Schema Registry tracks the changes made to your schema, and stores each set of changes in a separate version of the schema. When multiple versions exist, you can select which version you want to use. Ensure that you understand compatibility policies, as they determine how you can evolve your schemas.

  1. Access the Schema Registry UI by entering the following in a browser window:
    http://localhost:7788/
  2. Identify and select the schema that you want to evolve (version).
  3. Click the icon to open the Edit Version dialog
  4. Add a description of what has changed in this new version of the schema.
    You can view the description in the Schema Registry UI to easily understand what has changed in each version of the schema. As a result, Cloudera recommends that you add as much detail as you can.
  5. Edit the schema in either of the following ways:
    • Edit it directly in the SCHEMA TEXT area.
    • Click Clear and upload a new version.

    If you used the MachineData schema provided as an example in Creating a Schema, add the following schema. This is the evolved version of the Machine data schema.

    {
      "type": "record",
      "namespace": "com.cloudera.examples",
      "name": "MachineData",
      "doc": "Machine utilization metrics",
      "fields": [
        {
          "name": "timestamp",
          "doc": "Metrics timestamp",
          "type": "long"
        },
        {
          "name": "hostname",
          "doc": "Host name of the source machine",
          "type": "string"
        },
        {
          "name": "os_type",
          "doc": "OS type of the source machine",
          "type": "string",
          "default": "UNKNOWN"
        },
        {
          "name": "counters",
          "doc": "Machine counters",
          "type": {
            "type": "array",
            "items": {
              "type" : "record",
              "name" : "Counter",
              "fields" : [
                {
                  "name": "name",
                  "doc": "Name of the counter",
                  "type": "string"
                },
                {
                  "name": "value",
                  "doc": "Value of the counter",
                  "type": "long"
                },
                {
                  "name": "unit",
                  "doc": "Unit of the counter value",
                  "type": ["string", "null"],
                  "default": "null"
                }
              ]
            }
          }
        }
      ]
    }
    
  6. Click Save.
  7. The schema you created will be visible on the UI.
  8. Optional: Click COMPARE VERSIONS.
    In the COMPARE VERSIONS dialog you can compare versions of the schemas. If you have used the MachineData schema example, you will see that in MachineData V2 a new field regarding OS type was added.
    "name": "os_type",
    "doc": "OS type of the source machine",
    "type": "string",
    "default": "UNKNOWN"
    

    Notice that a default value of UNKNOWN is added. This is only needed if the schema compatibility is set to BACKWARD (default). New fields can only be added to backward compatible schemas if a default value is also provided for that field.

Deleting a schema

Learn how to delete a schema from Schema Registry with the Swagger UI or curl.

Schemas can be deleted if you no longer need them. However, unlike schema creation and evolution, schema deletion can not be done using the Schema Registry UI. Instead, you must use the Schema Registry API. The following provides instructions on how to delete a schema using the Swagger UI or curl.

Steps

  1. Go to http://localhost:7788/swagger
  2. Click Schema.
  3. Click DELETE /api/v1/schemaregistry/schemas/{name}.
  4. Click Try it out.
  5. Enter the name of the Schema that you want to delete in the Name field.
  6. Click Execute.
  1. Open a new terminal session.
  2. Run the following command:
    curl -X DELETE "http://localhost:7788/api/v1/schemaregistry/schemas/[***SCHEMA NAME***]" -H "accept: application/json"
    Replace [***SCHEMA NAME***] with the name of the schema that you want to delete

Integrating Schema Registry with a Kafka Java client

Learn how you can integrate existing Kafka Java clients with Schema Registry.

The following steps walk you through how you can integrate an existing Java Kafka client with Schema Registry. Additionally, you will learn about the KafkaAvroSerializer and KafkaAvroDeserializer. These are the Cloudera recommended converters that you should use when integrating clients with Schema Registry. Lastly, you will also learn how you can view the Avro data produced into a topic using Streams Messaging Manager (SMM)

  1. Set up dependencies.
    Any client application that you want to integrate with Schema Registry requires the following dependencies.
    1. Add the Cloudera Runtime Maven repository to the pom.xml of your project.
      <repositories>
              <repository>
                  <id>Cloudera Libs</id>
                  <url>https://repository.cloudera.com/artifactory/libs-release-local/</url>
              </repository>
          </repositories>
      
    2. Add a schema-registry-serdes dependency to the pom.xml of your project.
      <dependency>
            <groupId>com.hortonworks.registries</groupId>
            <artifactId>schema-registry-serdes</artifactId>
      </dependency>
      
    3. Import the following classes.
      import com.hortonworks.registries.schemaregistry.SchemaVersionInfo;
      import com.hortonworks.registries.schemaregistry.client.SchemaRegistryClient;
      import com.hortonworks.registries.schemaregistry.errors.SchemaNotFoundException;
      import static com.hortonworks.registries.schemaregistry.serdes.avro.AvroSnapshotSerializer.SERDES_PROTOCOL_VERSION;
      import static com.hortonworks.registries.schemaregistry.serdes.avro.SerDesProtocolHandlerRegistry.CURRENT_PROTOCOL
      
  2. Configure producers and consumers.
    Producers and consumers require the following configuration properties to be set respectively.
    schema.registry.url=http://localhost:7788
    key.serializer=org.apache.kafka.common.serialization.StringSerializer
    value.serializer=com.hortonworks.registries.schemaregistry.serdes.avro.kafka.KafkaAvroSerializer
    schema.registry.url=http://localhost:7788
    key.deserializer=org.apache.kafka.common.serialization.StringDeserializer
    value.deserializer=com.hortonworks.registries.schemaregistry.serdes.avro.kafka.KafkaAvroDeserializer
    If you are specifying your configuration properties directly within the client application, your code will look similar to the following examples after configuration is complete.
    config.putAll(Collections.singletonMap(SchemaRegistryClient.Configuration.SCHEMA_REGISTRY_URL.name(), props.get(SCHEMA_REGISTRY_URL)));
    config.put(ProducerConfig.KEY_SERIALIZER_CLASS_CONFIG, StringSerializer.class.getName());
    config.put(ProducerConfig.VALUE_SERIALIZER_CLASS_CONFIG, KafkaAvroSerializer.class.getName());
    
    config.putAll(Collections.singletonMap(SchemaRegistryClient.Configuration.SCHEMA_REGISTRY_URL.name(), props.get(SCHEMA_REGISTRY_URL)));
    config.put(ConsumerConfig.KEY_DESERIALIZER_CLASS_CONFIG, StringDeserializer.class.getName());
    config.put(ConsumerConfig.VALUE_DESERIALIZER_CLASS_CONFIG, KafkaAvroDeserializer.class.getName());
    

    The schema.registry.url property specifies where the Schema Registry server is running. In CSP Community Edition this is fixed and will always be http://localhost:7788.

    The serializer/deserializer properties specify what classes the client should use to serialize or deserialize (convert) data. In this specific example key conversion is done using the default StringSerializer and StringDeserializer shipped with Kafka. Value conversion on the other hand is done using the KafkaAvroSerializer and KafkaAvroDeserializer respectively. Both of these are Cloudera provided and are Avro specific. They make it easy to write and read Avro objects to or from Kafka as serialization and deserialization are handled transparently. As a result, they are the Cloudera recommended converters that you should use when you are working with Avro data and are integrating with Schema Registry.

    Both classes are Schema Registry aware. When the KafkaAvroSerializer is used to produce data to a Kafka topic, the serializer will first check with the configured Schema Registry service to ensure the schema being used is compatible with the schema registered for that topic. More specifically one of the following happens:

    • If the topic has no schema registered, the serializer will register the schema on behalf of the client.
    • If there’s already a schema registered for the topic, the serializer will check if the schema being used by the client is either the same or a compatible evolution of that schema.
      • If the schema is the same, the producer will use it for producing messages.
      • If the schema is a new version of the currently registered schema that is compatible with the previous versions, it will be registered with a new version number and will be used for producing messages.
    • If the schema being used by the client is not compatible with the currently registered schema the serializer will throw an exception.

    Additionally, the serializer also adds the schema's identifier from Schema Registry to the message payload, so that the consumer will know what's the correct schema version to fetch.

    Afterwards, when the consumer is consuming the messages with the KafkaAvroDeserializer, the deserializer will fetch that schema using the identifier from the message and will use the schema to correctly deserialize the payload.

  3. Build and run your clients to start producing and consuming data.
  4. View data in SMM.
    1. Access the SMM UI by entering the following in a browser window:
      http://localhost:9991
    2. Click (Topics) in the navigation sidebar.
    3. Find the topic you have been using and click next to the name of a topic.
    4. Go to Data Explorer.
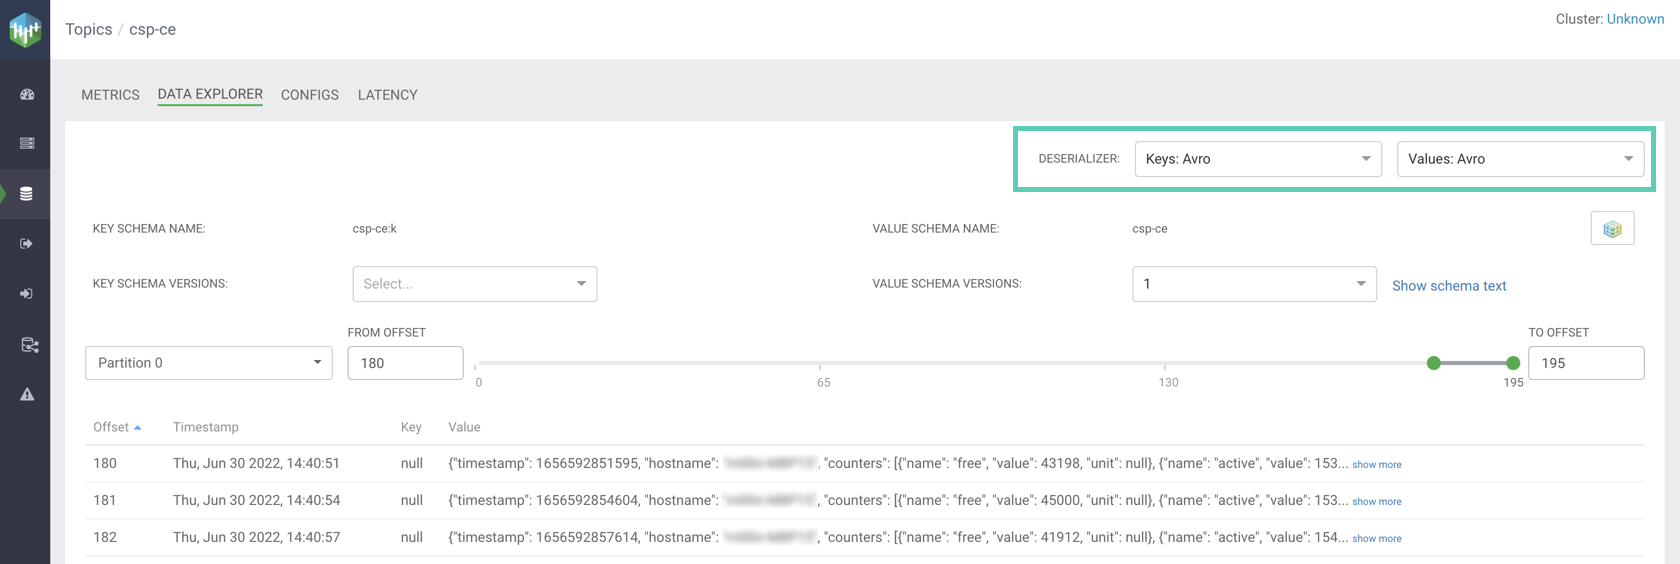
      The messages the producer is producing into the topic should be visible on this page. However, the contents of the messages will not be readable.

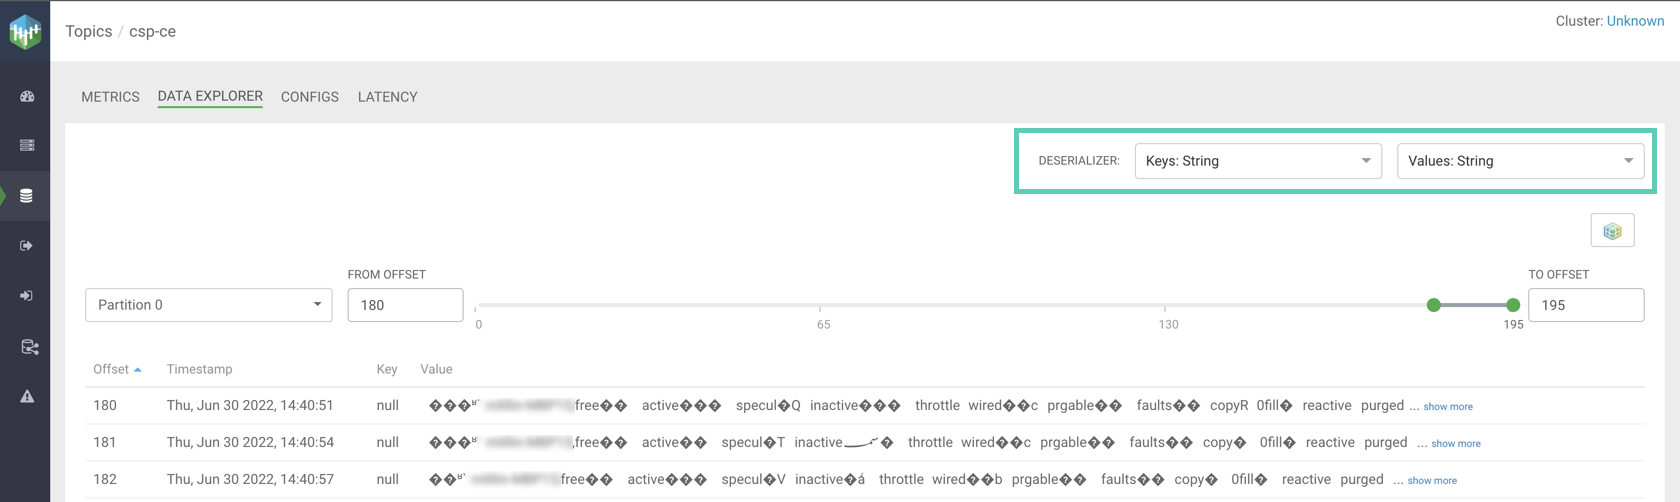
      This is because your producer is producing binary data. However because SMM integrates with Schema Registry, it is capable of decoding the binary data using the schema registered for the topic in Schema Registry. This is done by selecting Avro for the key and/or value deserializer.