Cloudera Management Service
- Activity Monitor - collects information about activities run by the MapReduce service. This role is not added by default.
- Host Monitor - collects health and metric information about hosts
- Service Monitor - collects health and metric information about services and activity information from the YARN and Impala services
- Event Server - aggregates relevant Hadoop events and makes them available for alerting and searching
- Alert Publisher - generates and delivers alerts for certain types of events
- Reports Manager - generates reports that provide an historical view into disk utilization by user, user group, and directory, processing activities by user and YARN pool, and HBase tables and namespaces. This role is not added in Cloudera Express.
Cloudera Manager manages each role separately, instead of as part of the Cloudera Manager Server, for scalability (for example, on large deployments it's useful to put the monitor roles on their own hosts) and isolation.
In addition, for certain editions of the Cloudera Enterprise license, the Cloudera Management Service provides the Navigator Audit Server and Navigator Metadata Server roles for Cloudera Navigator.
Continue reading:
- Displaying the Cloudera Management Service Status
- Starting the Cloudera Management Service
- Stopping the Cloudera Management Service
- Restarting the Cloudera Management Service
- Starting and Stopping Cloudera Management Service Roles
- Configuring Management Service Database Limits
- Adding Cloudera Navigator Roles
- Deleting Cloudera Navigator Roles
Displaying the Cloudera Management Service Status
- Do one of the following:
- Select .
- On the tab, in Cloudera Management Service table, click the Cloudera Management Service link.
Starting the Cloudera Management Service
Minimum Required Role: Cluster Administrator (also provided by Full Administrator)
- Do one of the following:
-
- Select .
- Select .
-
- On the tab, click
 to the right of Cloudera Management Service and select Start.
- On the tab, click
-
- Click Start to confirm. The Command Details window shows the progress of starting the roles.
- When Command completed with n/n successful subcommands appears, the task is complete. Click Close.
Stopping the Cloudera Management Service
Minimum Required Role: Cluster Administrator (also provided by Full Administrator)
- Do one of the following:
-
- Select .
- Select .
-
- On the tab, click to the right of Cloudera Management Service and select Stop.
- On the tab, click
-
- Click Stop to confirm. The Command Details window shows the progress of stopping the roles.
- When Command completed with n/n successful subcommands appears, the task is complete. Click Close.
Restarting the Cloudera Management Service
Minimum Required Role: Cluster Administrator (also provided by Full Administrator)
- Do one of the following:
-
- Select .
- Select .
- On the tab, click to the right of Cloudera Management Service and select
Restart.
-
- Click Restart to confirm. The Command Details window shows the progress of stopping and then starting the roles.
- When Command completed with n/n successful subcommands appears, the task is complete. Click Close.
Starting and Stopping Cloudera Management Service Roles
Minimum Required Role: Navigator Administrator (also provided by Full Administrator)
- Do one of the following:
- Select .
- On the tab, in Cloudera Management Service table, click the Cloudera Management Service link.
- Click the Instances tab.
- Check the checkbox next to a role.
- Do one of the following depending on your user role:
-
Minimum Required Role: Full Administrator
Choose and action:- Select and click Start to confirm.
- Select and click Stop to confirm.
-
Minimum Required Role: Navigator Administrator (also provided by Full Administrator)
- Click a Cloudera Navigator Audit Server or Cloudera Navigator Metadata Server link.
- Choose an action:
- Select and click Start this XXX to confirm, where XXX is the role name.
- Select and click Stop this XXX to confirm, where XXX is the role name.
-
Configuring Management Service Database Limits
Minimum Required Role: Cluster Administrator (also provided by Full Administrator)
Each Cloudera Management Service role maintains a database for retaining the data it monitors. These databases (as well as the log files maintained by these services) can grow quite large. For example, the Activity Monitor maintains data at the service level, the activity level (MapReduce jobs and aggregate activities), and at the task attempt level. Limits on these data sets are configured when you create the management services, but you can modify these parameters through the Configuration settings in the Cloudera Manager Admin Console. For example, the Event Server lets you set a total number of events to store, and Activity Monitor gives you "purge" settings (also in hours) for the data it stores.
There are also settings for the logs that these various services create. You can throttle how big the logs are allowed to get and how many previous logs to retain.
- Do one of the following:
- Select .
- On the tab, in Cloudera Management Service table, click the Cloudera Management Service link.
- Click the Configuration tab.
- Select Scope and then one of the following.
- Activity Monitor - the Purge or Expiration period properties are found in the top-level settings for the role.
- Host Monitor - see Data Storage for Monitoring Data.
- Service Monitor
- Select to view log file size properties.
- Edit the appropriate properties.
To apply this configuration property to other role groups as needed, edit the value for the appropriate role group. See Modifying Configuration Properties Using Cloudera Manager.
- Click Save Changes.
Adding Cloudera Navigator Roles
Minimum Required Role: Navigator Administrator (also provided by Full Administrator)
- Do one of the following:
- Select .
- On the tab, in Cloudera Management Service table, click the Cloudera Management Service link.
- Click the Instances tab.
- Click the Add Role Instances button. The Customize Role Assignments page displays.
- Assign the Navigator role to a host.
- Customize the assignment of role instances to hosts. The wizard evaluates the hardware configurations of the hosts to determine the best hosts for each role. The wizard assigns all
worker roles to the same set of hosts to which the HDFS DataNode role is assigned. You can reassign role instances.
Click a field below a role to display a dialog box containing a list of hosts. If you click a field containing multiple hosts, you can also select All Hosts to assign the role to all hosts, or Custom to display the hosts dialog box.
The following shortcuts for specifying hostname patterns are supported:- Range of hostnames (without the domain portion)
Range Definition Matching Hosts 10.1.1.[1-4] 10.1.1.1, 10.1.1.2, 10.1.1.3, 10.1.1.4 host[1-3].company.com host1.company.com, host2.company.com, host3.company.com host[07-10].company.com host07.company.com, host08.company.com, host09.company.com, host10.company.com - IP addresses
- Rack name
Click the View By Host button for an overview of the role assignment by hostname ranges.
- Range of hostnames (without the domain portion)
- Customize the assignment of role instances to hosts. The wizard evaluates the hardware configurations of the hosts to determine the best hosts for each role. The wizard assigns all
worker roles to the same set of hosts to which the HDFS DataNode role is assigned. You can reassign role instances.
- When you are finished with the assignments, click Continue.
- Choose the database type:
- Keep the default setting of Use Embedded Database to have Cloudera Manager create and configure required databases. Record the auto-generated
passwords.
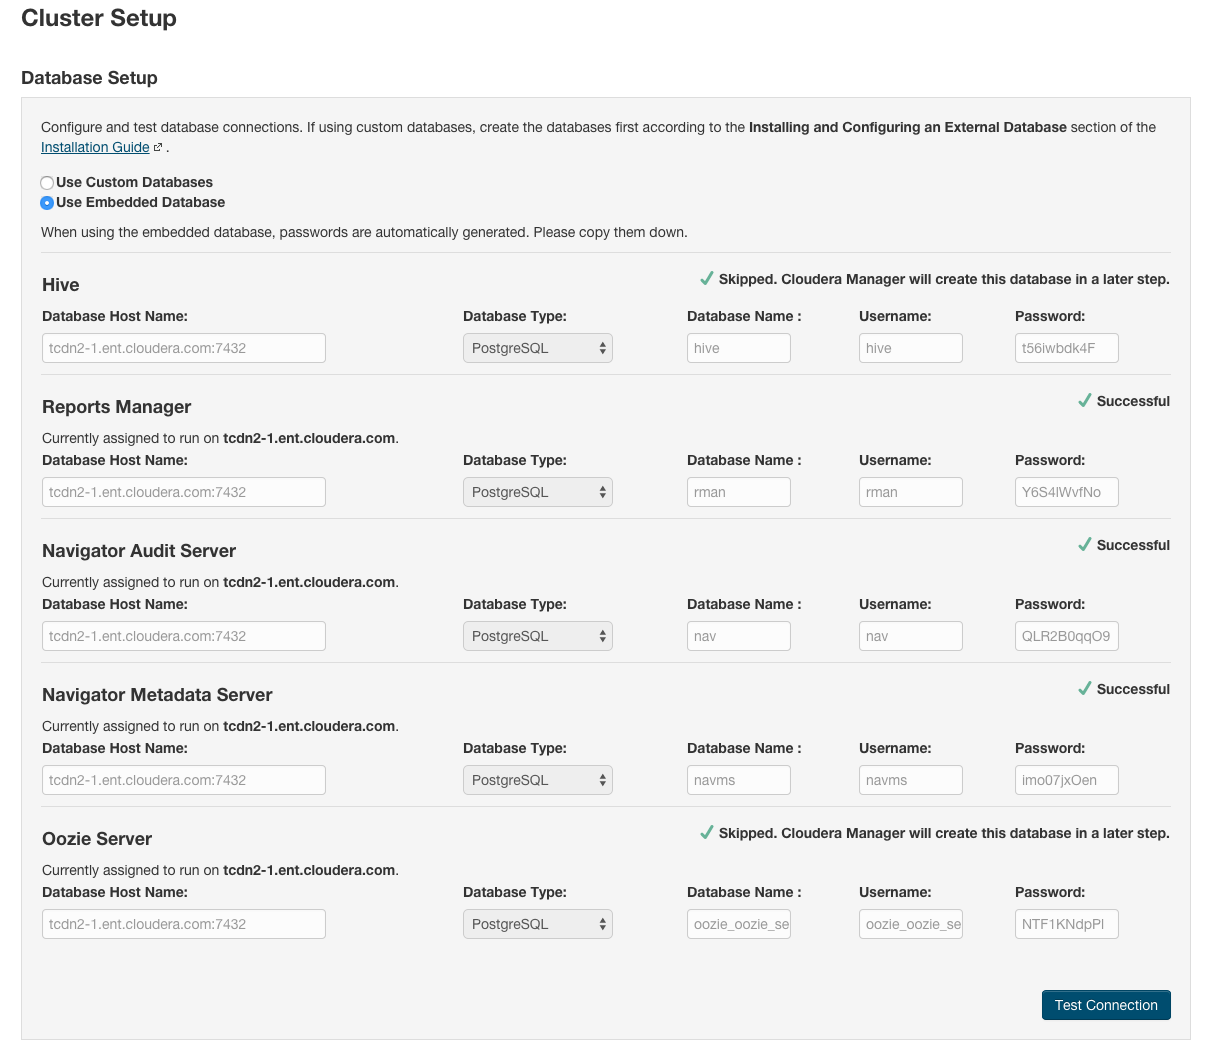
- Select Use Custom Databases to specify the external database host and enter the database type, database name, username, and password for the custom database.
- If you are adding the Oozie service, you can change your Oozie configuration to control when data is purged to improve performance, reduce database disk usage, improve upgrade performance, or to keep the history for a longer period of time. See Configuring Oozie Data Purge Settings Using Cloudera Manager.
- Keep the default setting of Use Embedded Database to have Cloudera Manager create and configure required databases. Record the auto-generated
passwords.
- Click Test Connection to confirm that Cloudera Manager can communicate with the database using the information you have supplied. If the test succeeds in
all cases, click Continue; otherwise, check and correct the information you have provided for the database and then try the test again. (For some servers, if you are
using the embedded database, you will see a message saying the database will be created at a later step in the installation process.)
The Cluster Setup Review Changes screen displays.
- Click Finish.
Deleting Cloudera Navigator Roles
Minimum Required Role: Navigator Administrator (also provided by Full Administrator)
- Do one of the following:
- Select .
- On the tab, in Cloudera Management Service table, click the Cloudera Management Service link.
- Click the Instances tab.
- Check the checkboxes next to the Navigator Audit Server and Navigator Metadata Server roles.
- Do one of the following depending on your role:
-
Minimum Required Role: Full Administrator
- Check the checkboxes next to the Navigator Audit Server and Navigator Metadata Server roles.
- Select and click Stop to confirm.
-
Minimum Required Role: Navigator Administrator (also provided by Full Administrator)
- Click the Navigator Audit Server role link.
- Select and click Stop this Navigator Audit Server to confirm.
- Click the Navigator Metadata Server role link.
- Select and click Stop this Navigator Metadata Server to confirm.
-
- Check the checkboxes next to the Navigator Audit Server and Navigator Metadata Server roles.
- Select . Click Delete to confirm the deletion.
