Installation Path A - Automated Installation by Cloudera Manager (Non-Production Mode)
In Installation Path A, Cloudera Manager automates the installation of the Oracle JDK, Cloudera Manager Server, embedded PostgreSQL database, Cloudera Manager Agent, CDH, and managed service software on cluster hosts. Cloudera Manager also configures databases for the Cloudera Manager Server and Hive Metastore and optionally for Cloudera Management Service roles.
Cluster Host Requirements:
The hosts you intend to use must satisfy the following requirements:
- Designate one of your hosts as the Cloudera Manager Server host. Provide the ability to log in to this host using a root account or an account that has password-less sudo permission.
- Allow the Cloudera Manager Server host to have uniform SSH access on the same port to all hosts.
- All cluster hosts must have access to standard package repositories and either archive.cloudera.com or a local repository with the required installation files.
The general steps in the procedure for Installation Path A follow.
- Before You Begin
- Download and Run the Cloudera Manager Server Installer
- (On RHEL/CentOS 5 only) Install Python 2.6/2.7 and psycopg2 for Hue
- Start and Log into the Cloudera Manager Admin Console
- Use the Cloudera Manager Wizard for Software Installation and Configuration
- Configure Database Settings
- Review Configuration Changes and Start Services
- Change the Default Administrator Password
- Test the Installation
Before You Begin
(Optional) Install Oracle JDK
If you choose not to have Oracle JDK installed by Cloudera Manager, install the JDK on all hosts in the cluster according to the following instructions: Java Development Kit Installation.Configure an HTTP Proxy
The Cloudera Manager installer accesses archive.cloudera.com by using yum on RHEL systems, zypper on SLES systems, or apt-get on Debian/Ubuntu systems. If your hosts access the Internet through an HTTP proxy, you can configure yum, zypper, or apt-get, system-wide, to access archive.cloudera.com through a proxy.
To do so, modify the system configuration on every cluster host as follows:
| OS | File | Property |
|---|---|---|
| RHEL-compatible | /etc/yum.conf | proxy=http://server:port/ |
| SLES | /root/.curlrc | --proxy=http://server:port/ |
| Ubuntu or Debian | /etc/apt/apt.conf | Acquire::http::Proxy "http://server:port"; |
Download and Run the Cloudera Manager Server Installer
Download the Cloudera Manager installer to the cluster host to which you are installing the Cloudera Manager Server. By default, the automated installer binary (cloudera-manager-installer.bin) installs the highest version of Cloudera Manager.
- Download the Cloudera Manager Installer
- Open Cloudera Manager Downloads in a web browser. In the Cloudera Manager box, click Download Now.
- You can download either the most recent version of the installer or select an earlier version from the drop-down. Click GET IT NOW!.
- Either sign in or complete the product interest form and click Continue.
- Accept the Cloudera Standard License agreement and click Submit.
- Run the following command on the designated Cloudera Manager server host to download the installer:
wget https://archive.cloudera.com/cm5/installer/latest/cloudera-manager-installer.bin
- Run the Cloudera Manager Installer
- Change cloudera-manager-installer.bin to have executable permission:
chmod u+x cloudera-manager-installer.bin
- Run the Cloudera Manager Server installer:
sudo ./cloudera-manager-installer.bin
For Airgapped Clusters: Install Cloudera Manager packages from a local repository:sudo ./cloudera-manager-installer.bin --skip_repo_package=1
- Change cloudera-manager-installer.bin to have executable permission:
- Read and Accept the Associated License Agreements
- Read the Cloudera Manager README and then press Enter to proceed.
- Read the Cloudera Express License and then press Enter to proceed. Use the arrow keys and press Enter to choose Yes to confirm.
- Read the Oracle Binary Code License Agreement and then press Enter to proceed. Use the arrow keys and press
Enter to choose Yes to confirm.
The installer performs the following tasks:
- Installs the Oracle JDK and the Cloudera Manager repository files.
- Installs the Cloudera Manager Server and embedded PostgreSQL packages.
- Starts the Cloudera Manager Server and embedded PostgreSQL database.
- Exit the Installer
- You might need to wait several minutes for the Cloudera Manager Server to start. To observe the startup process, run tail -f /var/log/cloudera-scm-server/cloudera-scm-server.log on the Cloudera Manager Server host.
- When the installation completes, the complete URL for the Cloudera Manager Admin Console displays, including the port number, which is 7180 by default. Make a note of this URL.
- Press Enter to choose OK to exit the installer.
(On RHEL/CentOS 5 only) Install Python 2.6/2.7 and psycopg2 for Hue
## Navigate to Hue within your specific CDH parcel version
cd /opt/cloudera/parcels/`ls -l /opt/cloudera/parcels | grep CDH | tail -1 | awk '{print $9}'`/lib/hue/build/env/bin
./python2.6
>>>> import psycopg2
or create a symbolic link:
cd /opt/cloudera/parcels/`ls -l /opt/cloudera/parcels | grep CDH | tail -1 | awk '{print $9}'`/lib/hue/build/env/lib/python2.6/site-packages/
ln -s /usr/lib64/python2.6/site-packages/psycopg2 psycopg2
Start and Log into the Cloudera Manager Admin Console
Cloudera Manager URL
http://Server host:portwhere Server host is the fully qualified domain name (FQDN) or IP address of the host where the Cloudera Manager Server is installed, and port is the port configured for the Cloudera Manager Server. The default port number is 7180.
- In a web browser, enter the Cloudera Manager URL. The login screen for Cloudera Manager Admin Console displays.
- Log into Cloudera Manager Admin Console. The default credentials are:
- Username: admin
Cloudera Manager does not support changing the admin username for the default account. However, you can add a new user, assign administrative privileges to the new user, and then delete the default admin account.
- Password: admin.
You will be asked to change this password later on in the procedure.
- Username: admin
- After you log in, the End User License Terms and Conditions page displays. Read the terms and conditions and then select Yes to accept them.
- Click Continue. The Welcome to Cloudera Manager page displays where you can select the edition you want to install.
Use the Cloudera Manager Wizard for Software Installation and Configuration
Choose Cloudera Manager Edition
From the Welcome to Cloudera Manager page, you can select the edition of Cloudera Manager to install and, optionally, install a license:
- Choose which edition to install.
- Cloudera Express, which does not require a license, but provides a limited set of features.
- Cloudera Enterprise Trial, which does not require a license, but expires after 60 days and cannot be renewed.
- Cloudera Enterprise, which requires you to purchase a Cloudera Enterprise license from Cloudera.
See the Cloudera Enterprise Datasheet for a complete set of features included in each edition.
-
If you choose Cloudera Express or Cloudera Enterprise Trial, you can skip ahead to the next step and begin the installation process. You will still have the option to upgrade to Cloudera Enterprise at a later time.
If you choose Cloudera Enterprise, you must upload a license key now.- Purchase a Cloudera Enterprise license from Cloudera.
- Click Select License File.
- Go to the location of your license file, select the file, and click Open.
- Click Upload.
- Information is displayed indicating what the installation includes. Click Continue to proceed with the installation.
Select Cluster Hosts in Cloudera Manager
Use Cloudera Manager to search for cluster hosts that will run CDH and managed services:
-
To enable Cloudera Manager to automatically discover hosts, enter the cluster hostnames or IP addresses and click Search.
You can search for specific hosts by entering multiple addresses and address ranges by separating them with commas, semicolons, tabs, or blank spaces, or by placing them on separate lines.
Alternatively, you can also specify hostname and IP address ranges. For example:
Range Definition Matching Hosts 10.1.1.[1-4] 10.1.1.1, 10.1.1.2, 10.1.1.3, 10.1.1.4 host[1-3].company.com host1.company.com, host2.company.com, host3.company.com host-[4-6].company.com host-4.company.com, host-5.company.com, host-6.company.com host[07-10].company.com host07.company.com, host08.company.com, host09.company.com, host10.company.com -
When you click Search, Cloudera Manager identifies the hosts on your cluster that are ready to be configured with CDH services. If there are a large number of hosts on your cluster, wait a few moments to allow them to be discovered and shown in the wizard.
Once a scan is complete, if you want to find any additional hosts, click New Search, add the host names or IP addresses and click Search again.
- Verify that the number of hosts shown matches the number of hosts where you want to install services. Clear host entries that do not exist and clear the hosts where you do not want to install services.
Choose Software Installation Method and Install Software
Cloudera offers two types of installations: Parcels and Packages. Cloudera recommends the use of parcels for installation over packages, because parcels enable Cloudera Manager to easily manage the software on your cluster, automating the deployment and upgrade of service binaries. Electing not to use parcels will require you to manually upgrade packages on all hosts in your cluster when software updates are available, and will prevent you from using Cloudera Manager's rolling upgrade capabilities.
- In the Choose Method section select one of following types of installation:
- Use Parcels
- Select the version of CDH to be installed.
- Select any additional parcels to install. You can also use the following steps to add parcels for previous versions of CDH components.
- Click the More Options button.
- Configure the Remote Parcel Repository URLs property. Click
 and
enter the URL of the repository. For example, previous CDH 5 parcels can be found at https://archive.cloudera.com/cdh5/parcels/.
and
enter the URL of the repository. For example, previous CDH 5 parcels can be found at https://archive.cloudera.com/cdh5/parcels/. - Click OK. Parcels available from the configured remote parcel repository URLs are now displayed in the parcels list.
- (Optional) To modify the default parcel directory on cluster hosts, or to modify proxy server settings, click More Options to access the relevant properties.
- Use Packages
- Select the major release of CDH to install.
- Select the specific release of CDH to install. Make sure the CDH version you specify is supported by the Cloudera Manager version you are running. See CDH/Cloudera Manager Compatibility.
- Select the specific releases of other services to install. Choose None if you do not want to install a particular service.
- Use Parcels
-
Select the release of Cloudera Manager Agent to be installed. You can choose either the version that matches the Cloudera Manager Server you are currently using or specify a version in a custom repository. If you opt to use custom repositories for installation files, you can provide a GPG key URL that applies for all repositories.
-
Click Continue. The Cluster Installation JDK Installation Options screen displays.
-
Select Install Oracle Java SE Development Kit (JDK) to allow Cloudera Manager to install the JDK on each cluster host. If you have already installed the JDK, do not select this option.
If your local laws permit you to deploy unlimited strength encryption, and you are running a secure cluster, select the Install Java Unlimited Strength Encryption Policy Files checkbox. - Click Continue.
- Specify your cluster hosts' SSH login credentials:
- Select root or enter the username for an account that has password-less sudo permission.
- Select an authentication method:
- If you choose password authentication, enter and confirm the password.
- If you choose public-key authentication, provide a passphrase and path to the required key files.
- You can specify an alternate SSH port. The default value is 22.
- You can specify the maximum number of host installations to run at once. The default value is 10.
- Click Continue. Depending on the method of installation you chose, Cloudera Manager performs the following
tasks:
-
Using Parcels - Installs the Oracle JDK, installs the Cloudera Manager Agent packages, and starts the Agent. Click Continue. On this page, the wizard installs, distributes and activates the parcels selected in the previous step.
OR
-
Using Packages - Configures package repositories, installs the Oracle JDK, CDH and managed service and the Cloudera Manager Agent packages, and starts the Agent. Click Continue. On this page, the wizard installs the packages selected in the previous step.
Wait for the Continue button at the bottom of the screen to turn blue. This means the installation process is complete.
If the installation has completed successfully on some hosts but failed on others, you can click Continue to skip installation on the failed hosts and continue to the next screen to start configuring services on the successful hosts.
-
- Click Continue. The Host Inspector will now validate the installation and provides a summary of the results, including all the versions of the installed components. If the validation is successful, click Finish.
Add Services
- On the first page of the Add Services wizard, choose the combination of services to install. You can also choose whether you want to install Cloudera
Navigator at this time. Points to note:
- Some services depend on other services; for example, HBase requires HDFS and ZooKeeper. Cloudera Manager tracks dependencies and installs the correct combination of services.
- In a Cloudera Manager deployment of a CDH 5 cluster, the YARN service is the default MapReduce computation framework. Choose Custom Services to install MapReduce v1, or use the Add Service functionality to add MapReduce after installation completes.
- The Flume service can be added only after your cluster has been set up.
- Click Continue.
-
Customize the assignment of role instances to hosts. The wizard evaluates the hardware configurations of the hosts to determine the best hosts for each role.
You can reassign role instances if needed. Click a field below a role to display a dialog box containing a list of hosts. If you click a field containing multiple hosts, you can also select All Hosts to assign the role to all hosts, or Custom to display the hosts dialog box.
Click the View By Host button for an overview of the role assignment by hostname ranges.
- When you are finished with the assignments, click Continue.
Configure Database Settings
Keep the default setting of Use Embedded Database to have Cloudera Manager create and configure required databases. Record the auto-generated
passwords.
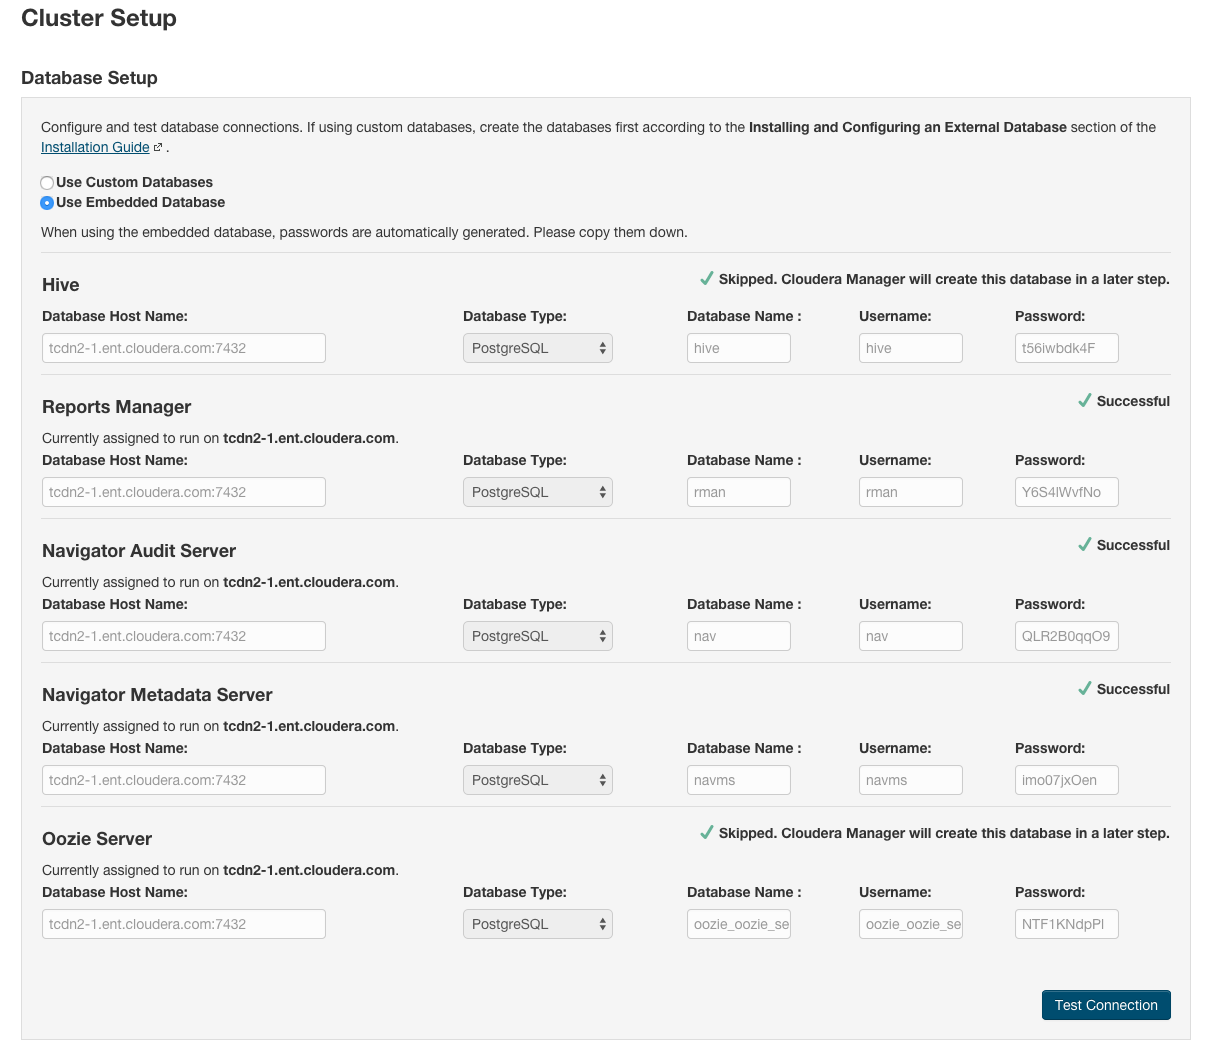
- Click Test Connection. When all the tests are successful the Continue button turns blue.
- Click Continue. The Cluster Setup Review Changes screen displays.
Review Configuration Changes and Start Services
- Review the configuration changes to be applied. Confirm the settings entered for file system paths. The file paths required vary based on the services to be installed.
- Click Continue. The wizard starts a First Run of the services.
- When all of the services are started, click Continue. You will see a success message indicating that your cluster has been successfully started.
- Click Finish to proceed to the Cloudera Manager Admin Console Home Page.
Change the Default Administrator Password
- Click the logged-in username at the far right of the top navigation bar and select Change Password.
- Enter the current password and a new password twice, and then click OK.
Test the Installation
You can test the installation following the instructions in Testing the Installation.
