
Configuring your target processor
You can use the PutHDFS or the PutCDPObjectStore processor to move your data to Ozone, and you can select and configure the processor that best suits your use case.
The following examples step-by-step instructions for configuring each processor. They serve as a foundation for your setup and can be customized further. For more information on these Apache NiFi processors, see the Apache NiFi documentation.
PutHDFS
- Right-click PutHDFS and click Configure Processor.
- In the Hadoop Configuration Resources field, specify the
Hadoop file system configuration.The path depends on where your configuration files are located. In this example, /etc/ozone/conf/core-site.xml,/etc/ozone/conf/ozone-site.xml is used.
- Provide your Kerberos credentials:
- Kerberos Principal
- Kerberos Keytab or Kerberos Password
- Set the Directory field to your output directory.For example: ofs://ozone1/vol1/buck1
- Click Apply.
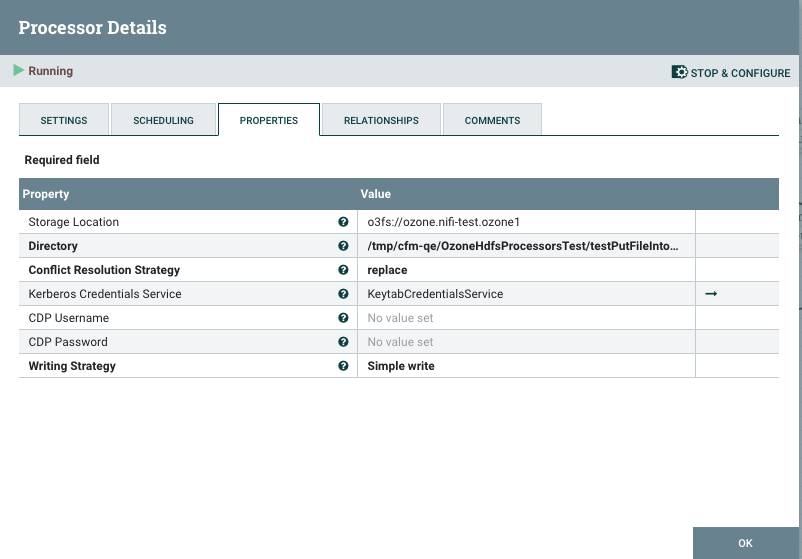
PutCDPObjectStore
- Right-click PutCDPObjectStore and click Configure Processor.
- Specify the Storage Location property. You can use this to set the desired fs.defaultFS value. For example: ofs://ozone1
- Set the Directory property field to your output directory. For example: /vol1/buck1
- Set the Conflict Resolution Policy. With this property, you define what should happen when a file with the same name already exists in the target directory. Possible values are fail, ignore, and replace.
- For the credentials, you have two options:
- Provide a Kerberos Principal and its Keytab using a Kerberos Credentials Service.
- Provide a principal / username and password using the CDP Username and Password properties.
- Define the Writing Strategy. For example: simple write
- Click Apply.
Sample PutCDPObjectStore processor configuration:
After you have configured your processors, start your dataflow and confirm success.
