Creating jobs in Cloudera Data Engineering
A job in Cloudera Data Engineering consists of defined configurations and resources (including application code). Jobs can be run on demand or scheduled.
In Cloudera Data Engineering, jobs are associated with virtual clusters. Before you can create a job, you must create a virtual cluster that can run it. For more information, see Creating virtual clusters.
- In the Cloudera Management Console, click the Data Engineering tile and click Overview.
- In the Cloudera Data Engineering Services column, select the service that contains the virtual cluster that you want to create a job for.
- In the Virtual Clusters column on the right, locate the virtual cluster that you want to use and click the View Jobs icon.
- In the left hand menu, click Jobs.
- Click the Create Job button.
- Provide the Job Details:
- Select Spark for the job type. For Airflow job types, see Apache Airflow in Cloudera Data Engineering.
- Specify the Name.
-
Select Resources, URL, or
Repository for your application file, and provide or specify
the file. You can upload a new file or select a file from an existing resource.
If you select URL and specify an Amazon AWS S3 URL, add the following configuration to the job:
config_key:
spark.hadoop.fs.s3a.delegation.token.bindingconfig_value:
org.apache.knox.gateway.cloud.idbroker.s3a.IDBDelegationTokenBindingIf you want to use files from a repository, you must first create a repository. Once the repository is created, you can select Repository, click Add from Repository and select the file. Then, click Select File. - If your application code is a JAR file, specify the Main Class.
- Specify arguments if required. You can click the Add Argument button to add multiple command arguments as necessary.
-
Enter Configurations if needed. You can click the
Add Configuration button to add multiple configuration
parameters as necessary.
Optionally, for AWS virtual clusters, set the
spark.workspace.creationStrategy.copyproperty to bypass the default hardlinking strategy and enforce the safer file-copying method. This override applies only to AWS virtual clusters because, in Azure, the default workspace creation strategy is already the file-copying method.true– Activates the override. The job workspace is created using the file-copying method to avoid the hardlink limit on AWS.false– The default hardlinking strategy is used in AWS.
In Azure, the file-copying method is used regardless of this property setting.
- If your application code is a Python file, select the Python Version, and optionally select a Python Environment.
- Click Advanced Configurations to display
more customizations, such as additional files, initial executors,
executor range, driver and executor cores and memory.By default, the executor range is set to match the range of CPU cores configured for the virtual cluster. This improves resource utilization and efficiency by allowing jobs to scale up to the maximum virtual cluster resources available, without manually tuning and optimizing the number of executors per job.
In the Compute configuration section, in the On-Demand/Spot Settings field, if the Override - Enabled label is displayed, to enhance flexibility, you have the option to overwrite the defaults on a per-job basis. You can modify the instance type for the job by selecting the Spot or On-Demand option from the drop-down menu.
If you enable the the Job-level Instance Type Override feature [Technical preview], you can perform the following actions:
- For Spark, you can override the default virtual cluster settings to choose specific node types for Spark drivers and executors.
- For Airflow, you can override the default virtual cluster settings to choose specific node types for Airflow workers.
If the Override - Disabled label is displayed, the instance types are read-only.
For instructions on enabling the job-level instance type override, see Viewing and managing virtual cluster details.
- Click Schedule to display scheduling
options.You can schedule the application to run periodically using the Basic controls or by specifying a Cron Expression.
- If you provided a schedule, click Schedule to create the job. If you did not specify a schedule, and you do not want the job to run immediately, click the drop-down arrow on Create and Run and select Create. Otherwise, click Create and Run to run the job immediately.
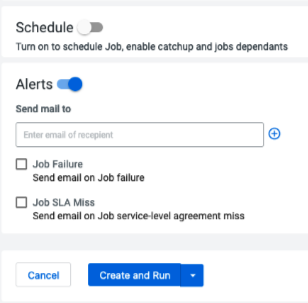
-
Optional: Toggle Alerts to send mail to
the email address that you choose. You have the option to select Job Failure to send an
email upon job failure, and Job SLE Miss to send an email on a Job service-level agreement
miss.