Deploying an MLflow model as a Cloudera AI Workbench Model (Legacy)
In the future, you will be able to register models to a Cloudera AI Registry and then deploy Model REST APIs with those models. Today, these models can be deployed using the following manual process instead
- Navigate to your project. Note that models are always created within the context of a project.
- Click Open Workbench and launch a new Python 3 session.
- Create a new file within the project if one does not already exist:
cdsw-build.shThis file defines the function that will be called when the model is run and will contain the MLflow prediction information. - Add the following information to the
cdsw-build.shfile:pip3 install sklearn mlflow pandas - For non-Python template projects and old projects check the following.
- Check to make sure you have a .gitignore file. If you do not have the file, add it.
- Add the following information to the .gitignore file:
!.experiments
- Create a Python file to call your model artifact using a Python function. For example:
- Filename: mlpredict.py
- Function: predict
- Copy the MLflow model file path from the Make Predictions pane in the
Artifacts section of the Experiments/Run details
page and load it in the Python file. This creates a Python function which accepts a dictionary
of the input variables and converts these to a Pandas data frame, and returns the model
prediction. For example:
import mlflow import pandas as pd logged_model = '/home/cdsw/.experiments/7qwz-l620-d7v6-1922/glma-oqxb-szc7-c8hf/artifacts/model' def predict(args): # Load model as a PyFuncModel. data = args.get('input') loaded_model = mlflow.pyfunc.load_model(logged_model) # Predict on a Pandas DataFrame. return loaded_model.predict(pd.DataFrame(data)) - Deploy the predict function to a REST endpoint.
- Go to the project Overview page
- Click .
- Give the model a Name and Description
- Enter details about the model that you want to build. In this case:
- File:
mlpredict.py - Function:
predict - Example Input:
{ "input": [ [7.4, 0.7, 0, 1.9, 0.076, 11, 34, 0.9978, 3.51, 0.56, 9.4] ] } - Example output:
[
5.575822297312952
]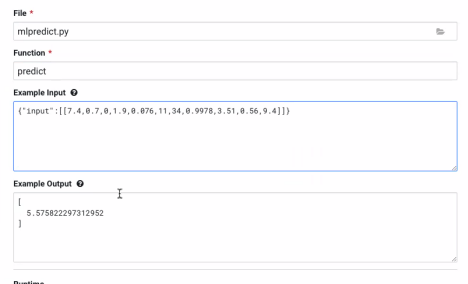
- File:
- Select the resources needed to run this model, including any replicas for load balancing.
- Click Deploy Model.
- Click on the model to go to its Overview page.
- Click Builds to track realtime progress as the model is built and
deployed. This process essentially creates a Docker container where the model will live and
serve requests.
- Once the model has been deployed, go back to the model Overview page and use the Test Model widget to make sure the model works as expected. If you entered example input when creating the model, the Input field will be pre-populated with those values.
- Click Test. The result returned includes the output response from the
model, as well as the ID of the replica that served the request.
Model response times depend largely on your model code. That is, how long it takes the model function to perform the computation needed to return a prediction. It is worth noting that model replicas can only process one request at a time. Concurrent requests will be queued until the model can process them.
- If you want to register the model to Cloudera AI Registry , see Registering a model using MLflow SDK.
1.0 and 2.0 scoring API differences
The format for calling the model has changed between MLflow versions 1.0 and 2.0.
The MLflow Model scoring protocol has changed in MLflow version 2.0. If you are seeing an
error, you are likely using an outdated scoring request format. To resolve the error, either
update your request format or adjust your MLflow Model's requirements file to specify an
older version of MLflow (for example, change the 'mlflow' requirement specifier to
mlflow==1.30.0). If you are making a request using the MLflow client (for
example, using mlflow.pyfunc.spark_udf()), upgrade your MLflow client to a
version >= 2.0 in order to use the new request format.
For more information about the updated MLflow Model scoring protocol in MLflow 2.0, see MLflow Models.