Migrating from generic NFS to Azure Files NFS in Cloudera AI
Cloudera AI enables you to migrate from generic NFS solutions (for example NetApp files) to Azure Files NFS for better performance and tighter integration. Migrating to the Azure ecosystem also allows Cloudera AI to provide the same full fledged backup-restore functionality for Azure, as it does for AWS.
- Set up a blank Azure file NFS instance.
You would need an empty Azure files volume to boot with. The size of the volume should be equal to or greater than the current NFS size in production use with your workbench. As with Azure files, the IOPS and network bandwidth increases with the capacity being provisioned. For more information on how to provision Azure files, see Network Planning for Cloudera AI on Azure.
- Ensure that the workbench is in a steady state by scaling the web pods to 0. This will ensure
that the workbench APIs become unavailable, and no read/writes are taking place in the workbench
during copying of data.
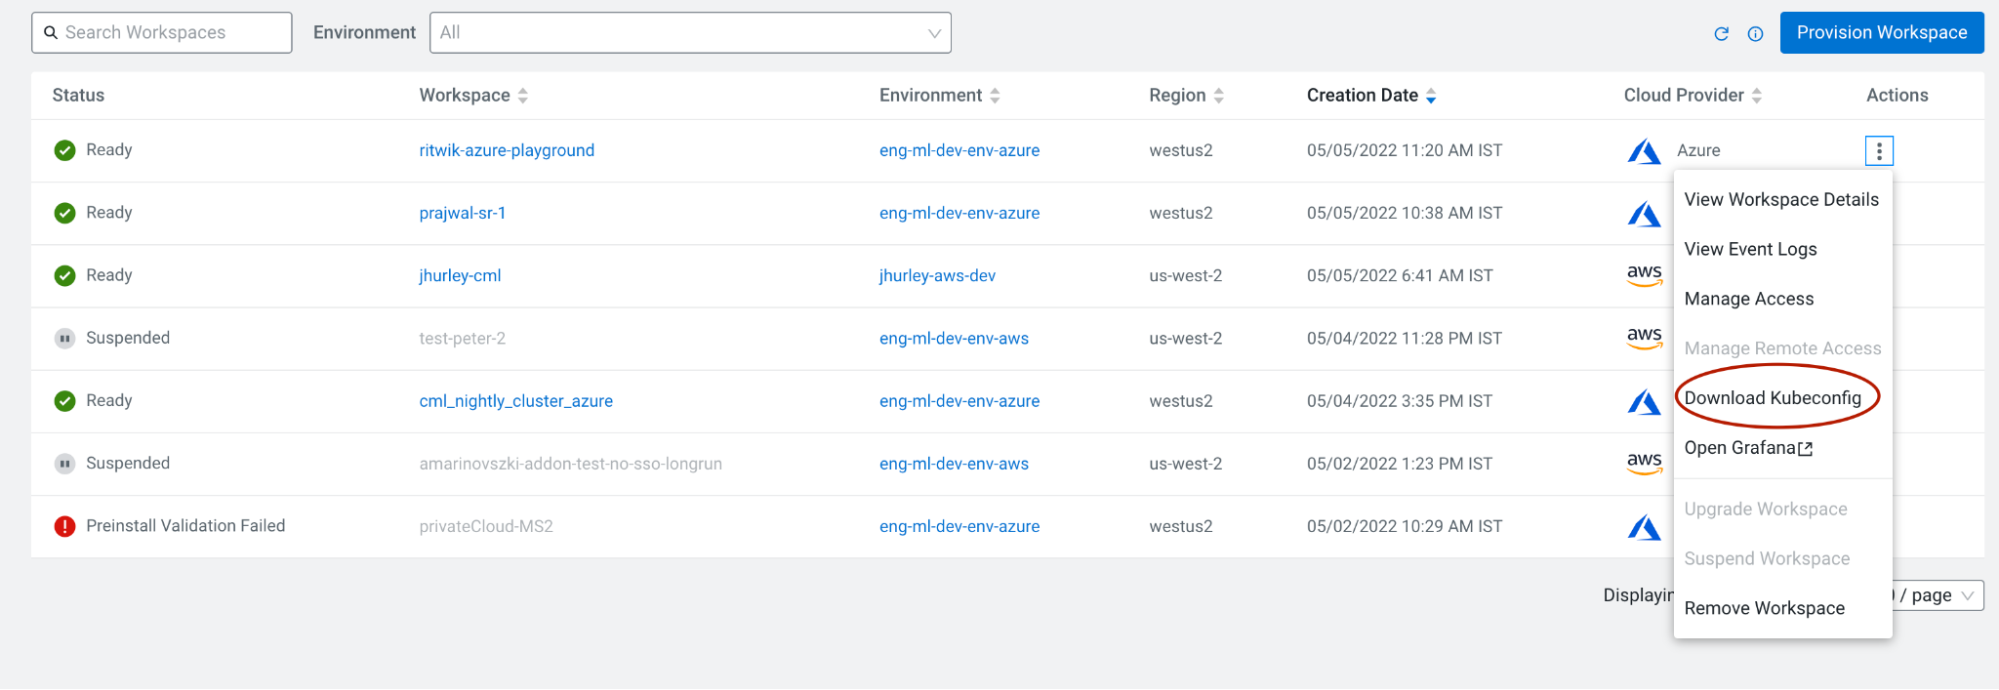
- Download the kubeconfig from the Cloudera AI control pane, open a terminal session and set the
environment variable “KUBECONFIG” to the path where the kubeconfig is downloaded by export
KUBECONFIG=<path to kubeconfig> .

- To scale the web pods to 0, enter the following command.
kubectl scale deployment/web -n mlx --replicas=0 - Retrieve the definition for your current NFS Persistent volume (PV) by entering the following command:
kubectl get pv projects-share -o yaml
- Download the kubeconfig from the Cloudera AI control pane, open a terminal session and set the
environment variable “KUBECONFIG” to the path where the kubeconfig is downloaded by export
KUBECONFIG=<path to kubeconfig> .
- From the yaml file, note the values marked in bold in the following example:
$ kubectl get pv projects-share -o yaml apiVersion: v1 kind: PersistentVolume metadata: annotations: meta.helm.sh/release-name: mlx-mlx meta.helm.sh/release-namespace: mlx pv.kubernetes.io/bound-by-controller: "yes" creationTimestamp: "2022-05-05T09:36:59Z" finalizers: - kubernetes.io/pv-protection labels: app.kubernetes.io/managed-by: Helm name: projects-share resourceVersion: "5319" uid: ab4ff905-2c21-4cf6-9c31-6bd91ddc4fc8 spec: accessModes: - ReadWriteMany capacity: storage: 50Gi claimRef: apiVersion: v1 kind: PersistentVolumeClaim name: projects-pvc namespace: mlx resourceVersion: "4747" uid: 2f58761d-2b13-4eb8-80eb-f2b97c77407f mountOptions: - nfsvers=3 #<oldNFSVersion>(this can be either 3 or 4.1) nfs: path: /eng-ml-nfs-azure/test-fs # <oldNFSPath> server:10.102.47.132 # <oldNFSServer> persistentVolumeReclaimPolicy: Retain volumeMode: Filesystem - Note the server and path values from Azure files that are provisioned.
For example, if the Azure Files NFS path is
azurenfsv4.file.core.windows.net:/azurenfsv4/test-fsthen:- AzureFileNFSServer = azurenfsv4.file.core.windows.net
- AzureFileNFSPath = /azurenfsv4/test-fs
- AzureFileNFSVersion = 4.1 (This is the only option Azure files offers)
Ideally, you want a pod on which you can mount both NFS directories in a single pod, and copy over the contents. So you need to create PVs and PVCs.
- Create a persistent volume (PV) by creating a yaml file and populating it with the following
information: Replace the fields marked in bold with the variables defined in the previous step.
# nfs-migration-pv.yaml (the file name/location doesn’t matter) apiVersion: v1 kind: PersistentVolume metadata: name: source-pv spec: accessModes: - ReadWriteMany capacity: storage: 50Gi mountOptions: - nfsvers=<oldNFSVersion> nfs: path: <oldNFSPath> server: <oldNFSServer> persistentVolumeReclaimPolicy: Retain volumeMode: Filesystem --- apiVersion: v1 kind: PersistentVolume metadata: name: destination-pv spec: capacity: storage: 10Gi accessModes: - ReadWriteMany persistentVolumeReclaimPolicy: Retain mountOptions: - nfsvers=4.1 nfs: Server: <AzureFileNFSServer> path: <AzureFileNFSPath> volumeMode: Filesystem - Create a persistent volume claim (PVC) by creating a yaml file and populating it with the
information in the following example.
# nfs-migration-pvc.yaml apiVersion: v1 kind: PersistentVolumeClaim metadata: name: source-pvc namespace: mlx spec: accessModes: - ReadWriteMany resources: requests: storage: 10Gi storageClassName: "" volumeMode: Filesystem volumeName: source-pv --- kind: PersistentVolumeClaim apiVersion: v1 metadata: name: destination-pvc namespace: mlx spec: accessModes: - ReadWriteMany resources: requests: storage: 10Gi storageClassName: "" volumeName: destination-pv volumeMode: Filesystem - Apply the kubernetes specs using the following commands:
$ kubectl apply -f nfs-migration-pv.yaml $ kubectl apply -f nfs-migration-pvc.yaml - Create a helper pod to mount the PVCs created in the previous step and copy data from one NFS workbench to another.
- Create a yaml file and populate it with the following information.
# nfs-migration-helper-pod.yaml apiVersion: v1 kind: Pod metadata: name: static-pod namespace: mlx spec: imagePullSecrets: - name: jfrog-dev restartPolicy: Never volumes: - name: source-claim persistentVolumeClaim: claimName: source-pvc - name: destination-claim persistentVolumeClaim: claimName: destination-pvc containers: - name: static-container image: container.repository.cloudera.com/cloudera/cdsw/cdsw-ubi-minimal:<current Cloudera AI version> command: - "/bin/sh" - "-c" args: - "trap : TERM INT; sleep 9999999999d & wait" volumeMounts: - mountPath: /source name: source-claim - mountPath: /destination name: destination-claim - Apply the kubernetes spec using the following command:
$ kubectl apply -f nfs-migration-helper-pod.yaml
- Create a yaml file and populate it with the following information.
- After deploying the pod, wait for the pod to be in “running” status, then copy the shell into the pod using the following command:
kubectl exec -it -n mlx static-pod — sh . - Use rsync to copy the contents from the source (Generic NFS) to the destination (Azure
files). Because the image does not come packaged with rsync, install it using the following
command:
yum install -y rsyncAfter installing rsync, copy the contents by using the following command:rsync -a -r -p --info=progress2 source/ destinationAfter the contents are copied, you can take a backup of the original workbench. Note that the backup only backs up the Azure disks (block volumes), therefore you had to back up the NFS manually.
