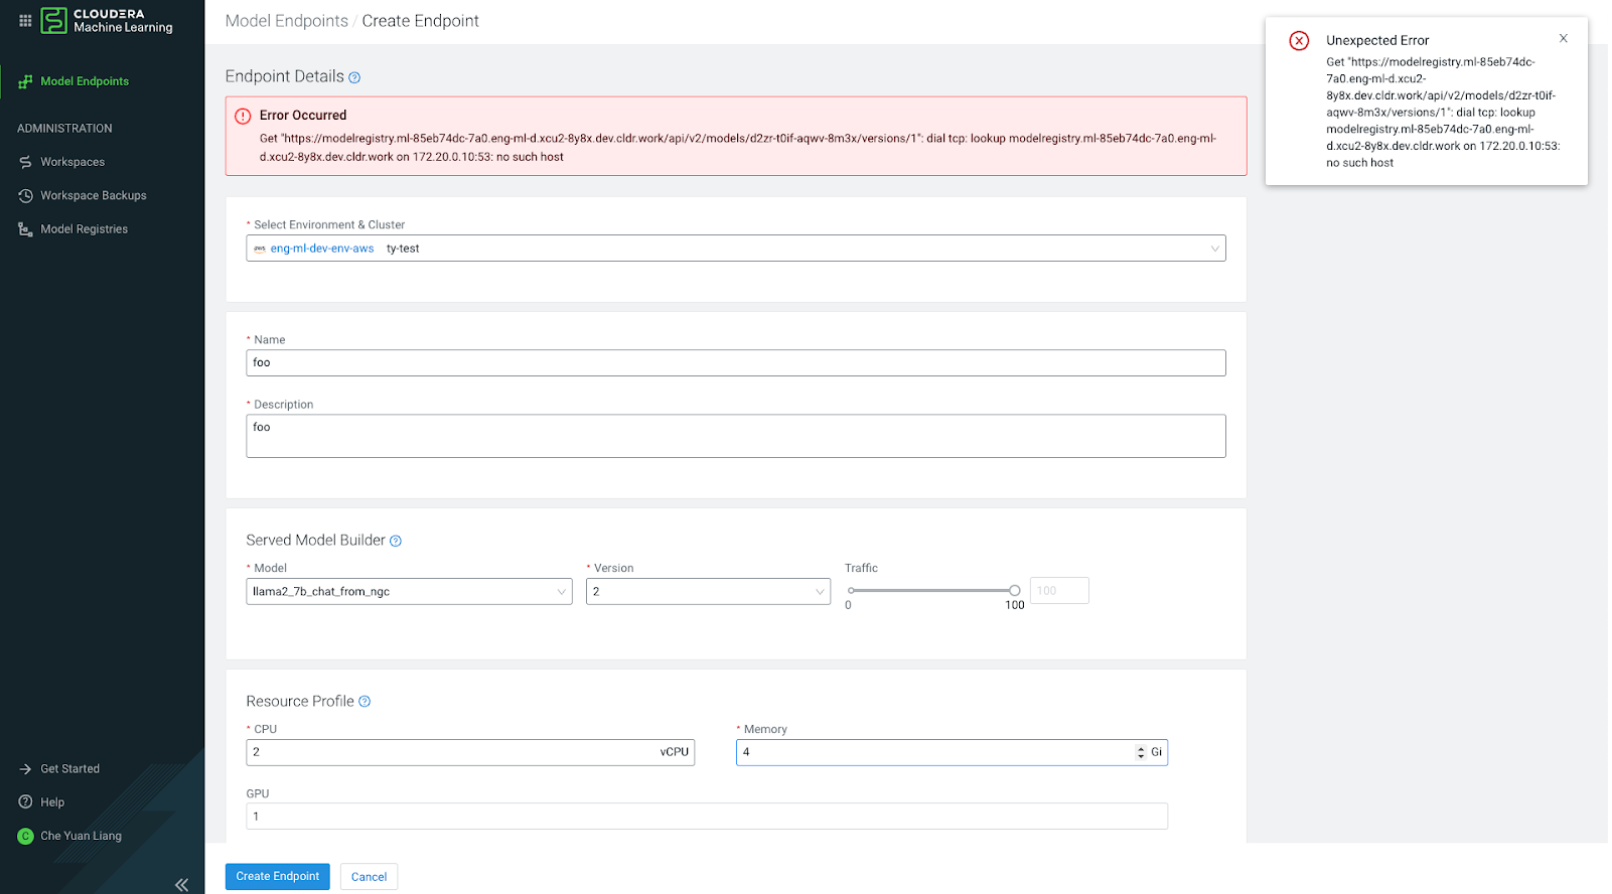
Cloudera AI Inference service cannot discover Cloudera AI Registry
Learn about scenarios or issues that may be resolved by using the steps in the Manually updating Cloudera AI Registry configuration solution.
- ML Serving installed before Cloudera AI Registry
If the Cloudera AI Registry has not been created yet, when ML Serving is installed it will not be able to generate the ConfigMap.
- Cloudera AI Registry upgraded after ML Serving
installed
When the Cloudera AI Registry is upgraded, it will require an updated ConfigMap.
- Cloudera AI Registry certificate expiredAfter 90 days, Cloudera AI Registry will have a certificate update, it will require an updated ConfigMap.
Manually updating Cloudera AI Registry configuration
If you upgrade the Cloudera AI Registry after creating your Cloudera AI Inference service cluster, the Cloudera AI Registry configuration stored by the Cloudera AI Inference service will get out of synchronization. Follow the steps below to manually reconcile the configuration, so that Cloudera AI Inference service will be able to connect to Cloudera AI Registry.
- Get
KubeConfigfor ML Serving Cluster.- In a terminal where Cloudera
CLI is installed, run the
cdp ml
                        list-ml-serving-apps
command. - Find the appCrn of the ML Serving instance you
wish to update.

- Retrieve the
KubeConfigwith this command:cdp ml get-ml-serving-app-kubeconfig --app-crn <YOUR-APP-CRN> |jq .kubeconfig|yq --prettyPrintHere:
-
cdp ml get-ml-serving-app-kubeconfig --app-crn <YOUR-APP-CRN> : returns raw json response containing
KubeConfig. -
|jq .kubeconfig: returns only the actual
KubeConfig(removes json wrapper). -
|yq --prettyPrint: prints the k
KubeConfigresponse into a format both machine and user-readable.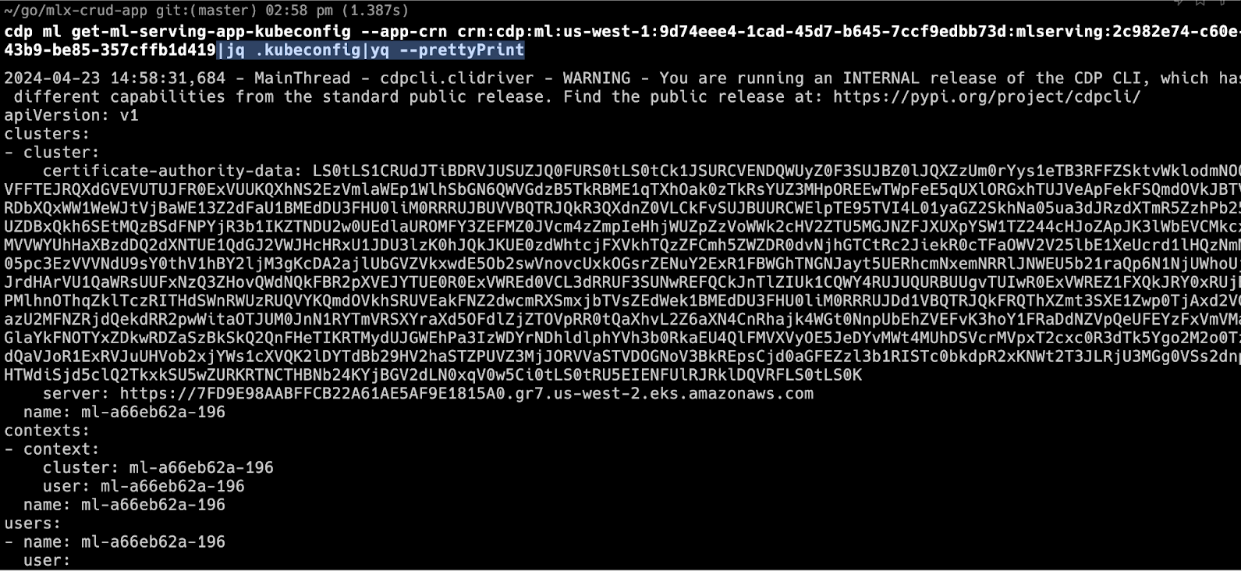
-
- Direct the output to the standard
KubeConfiglocation:cdp ml get-ml-serving-app-kubeconfig --app-crn <YOUR-APP-CRN> |jq .kubeconfig|yq --prettyPrint>~/.kube/configMake sure this is the active
KubeConfigby running the kubectl config view command. The output of the above command shall now show theKubeConfigdata returned above.
- In a terminal where Cloudera
CLI is installed, run the
- Grant your user ML Serving App access.Add your cloud provider user identifier to the ML Serving App access control list. Use the following command, with your ARN, or other cloud provider user identifier.
cdp ml grant-ml-serving-app-access --resource-crn crn:cdp:ml:us-west-1:9d74eee4-1cad-45d7-b645-7ccf9edbb73d:mlserving:2c982e74-c60e-43b9-be85-357cffb1d419 --identifier <Your Cloud Provider User ID> - Get new ConfigMap data.
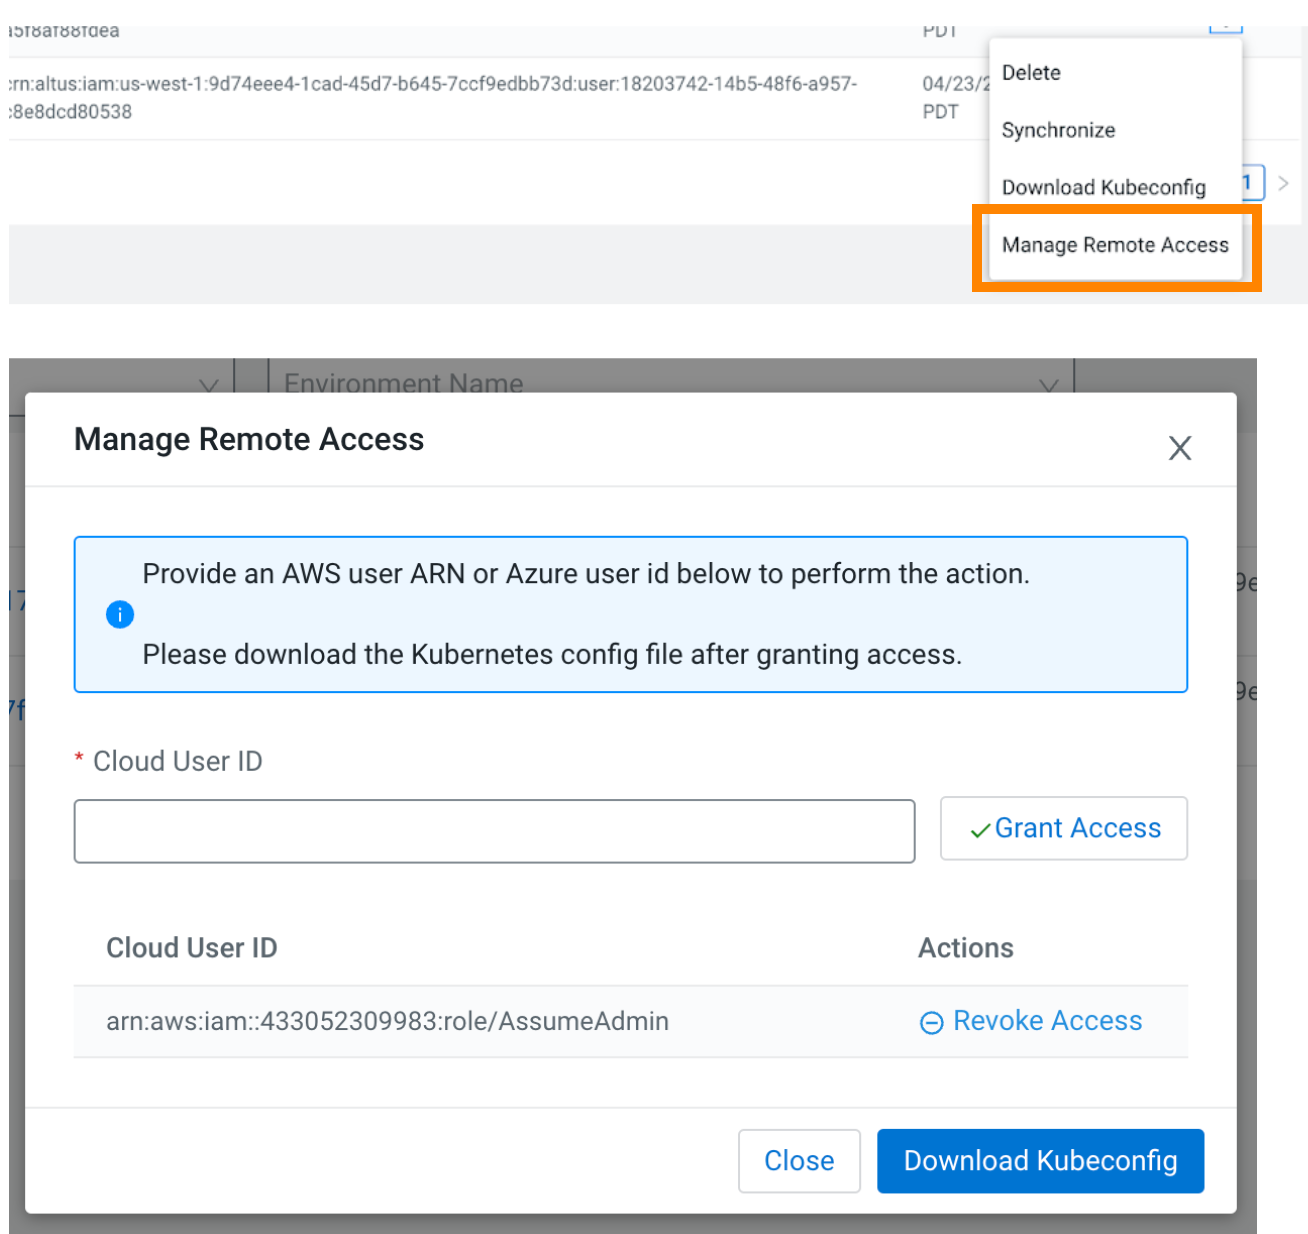
- Find the new Cloudera AI Registry ConfigMap. Use the
grant-model-registry-access API in CDP CLI to add your user name to the new
Cloudera AI Registry, or use the UI, as shown:
- After your user ARN has been granted access to the Cloudera AI Registry, get the ConfigMap data in the following
way:
- Download the Cloudera AI Registry
KubeConfig. - Set the Cloudera AI Registry
KubeConfig(save it to ~/.kube/config). - kubectl get cm -n mlx: lists all the available ConfigMaps.
- kubectl describe cm jwks-rootca -n mlx: Returns the TLS Certificate for Cloudera AI Registry.
- cdp ml list-model-registries: The response will contain the domain for the updated Cloudera AI Registry.
- Download the Cloudera AI Registry
- Copy the entire
rootca.pemoutput from the command.kubectl describe cm jwks-rootca -n mlx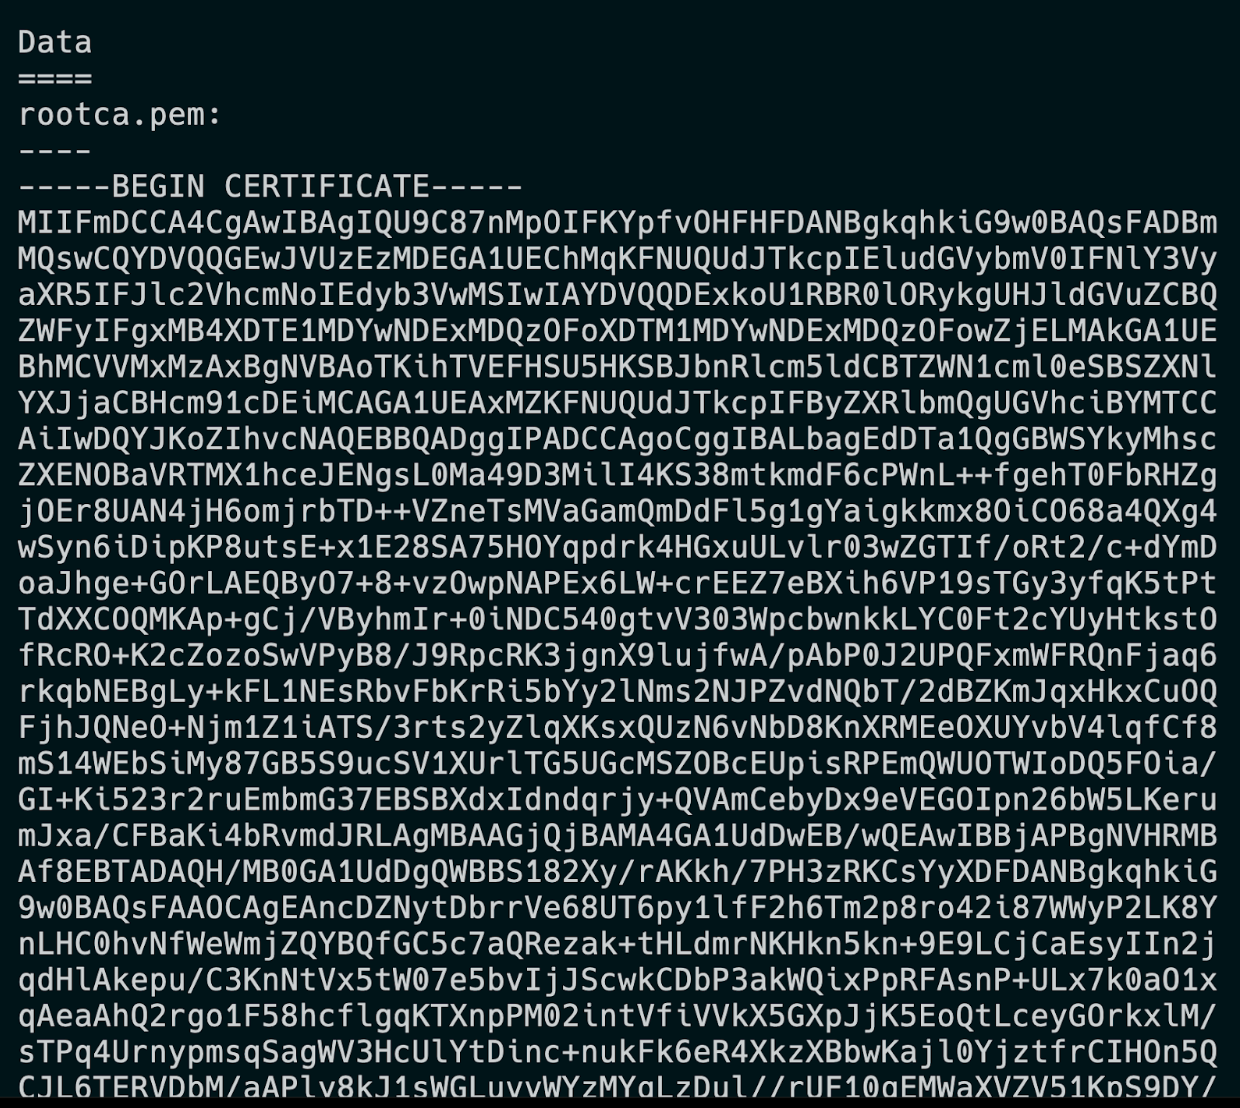 The domain of the new Cloudera AI Registry is contained in the
list-model-registriesresponse: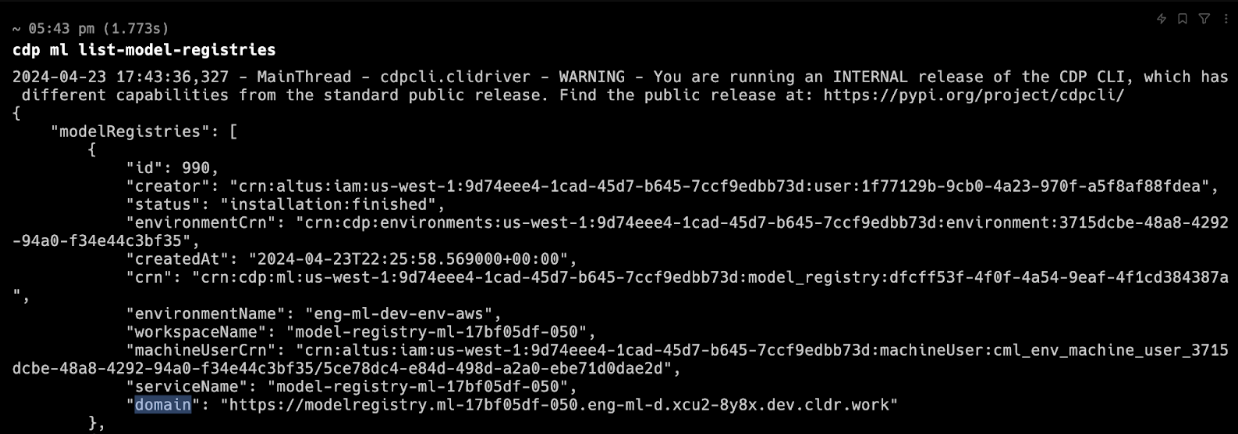
- Find the new Cloudera AI Registry ConfigMap. Use the
grant-model-registry-access API in CDP CLI to add your user name to the new
Cloudera AI Registry, or use the UI, as shown:
- Apply
ConfigMapUpdate.- Update the
KubeConfigback to the ML ServingKubeConfig. - Edit the ConfigMap of the ML Serving Cluster:
- kubectl edit cm modelregistry-config-controlplane -n serving: Update tls.crt with the data from above.
-
kubectl describe cm api-config -n serving: Update model.registry.url with the data from above.
- Restart the deployment to force the Cloudera Manager changes
to take effect.
- kubectl scale deployment api -n serving --replicas=0
- kubectl scale deployment api -n serving --replicas=1
- Update the