AWS quickstart (Deprecated)
If you've reached the Cloudera landing page for the first time, you've come to the right place! In this quickstart, we'll show you step-by-step how to connect Cloudera to your AWS account, so that you can begin to provision clusters and workloads.
- The Cloudera console pictured above
- The AWS console
The steps that we will perform are:
Step 0: Verify the AWS prerequisites
Step 1: Create a provisioning credential
Step 2: Register an AWS environment in Cloudera
Verify AWS cloud platform prerequisites
Before getting started with the AWS onboarding quickstart, review and acknowledge the following:
- This AWS onboarding quickstart is intended for simple Cloudera evaluation deployments only. It may not work for scenarios where AWS resources such as VPC, security group, storage accounts, and so on, are pre-created or AWS accounts have restrictions in place.
- Users running the AWS onboarding quickstart should have:
- AWS Administrator permissions on the AWS account that you would like to use for Cloudera.
- Rights to create AWS resources required by Cloudera. See list of AWS resources used by Cloudera.
- Cloudera Admin role or Power User role in Cloudera subscription.
- This AWS onboarding quickstart uses a CloudFormation template that automatically creates the required resources such as buckets, IAM roles and policies, and so on.
- Cloudera on cloud relies on several AWS services that should be available and enabled in your region of choice. Verify if you have enough quota for each AWS service to set up Cloudera in your AWS account. See list of AWS resources used by Cloudera.
If you have more complex requirements than those listed here, contact Cloudera Sales Team to help you with the Cloudera onboarding.
Create a Cloudera credential
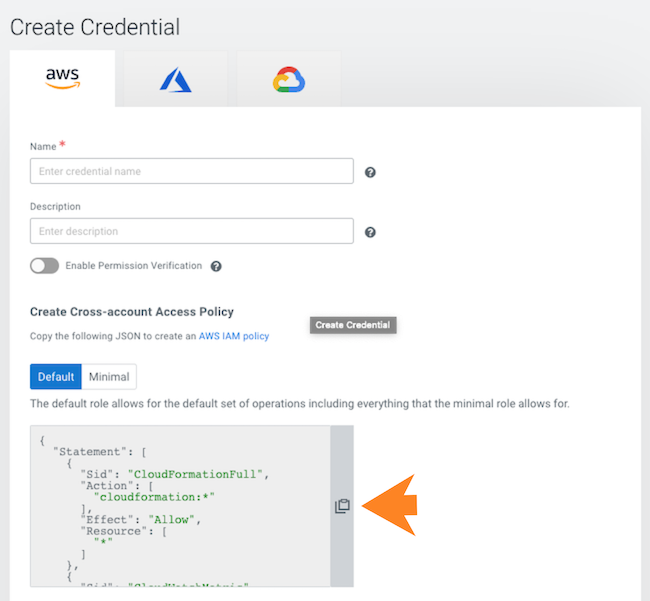
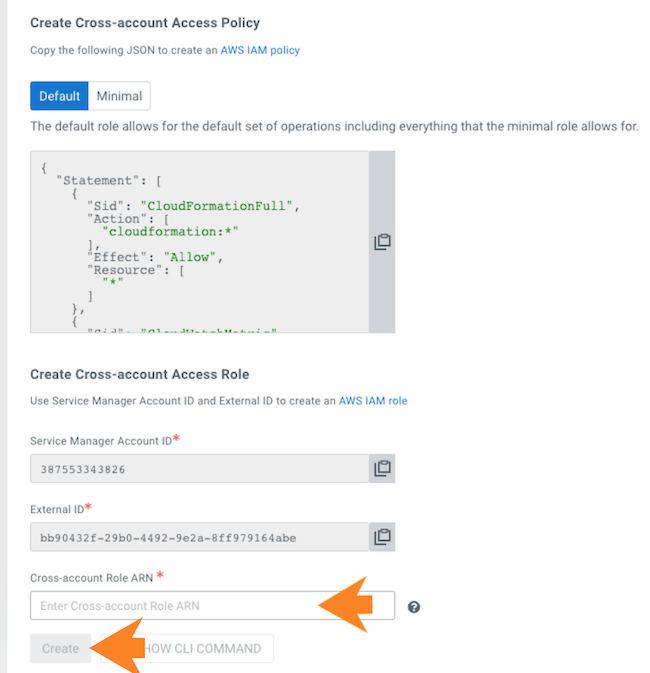
In the Cloudera console, the first step is to create a Cloudera credential. The Cloudera credential is the mechanism that allows Cloudera to create resources inside of your cloud account.
- Click the Copy icon to the right of the Create
Cross-account Access Policy text box.
- In a second browser tab, open the AWS Console and navigate to
. Click
Create Policy.
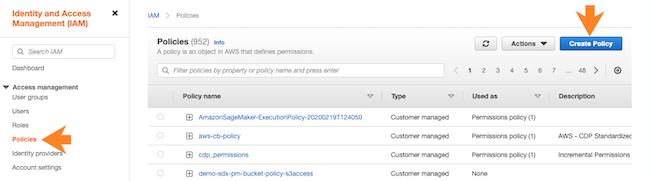
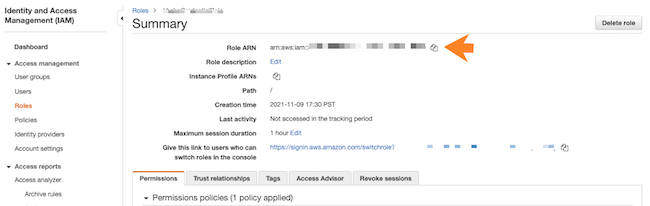
- Copy the Role ARN at the top of the
Summary page.
- Paste the Role ARN that you copied from the AWS console into the
Cross-account Role ARN field, then click Create.
 Now that you've created a cross-account role, proceed to creating a Cloudera environment.
Register a Cloudera environment
Before you register an environment, you'll want to create specific IAM roles and policies so that Cloudera can operate in a secure manner.
-
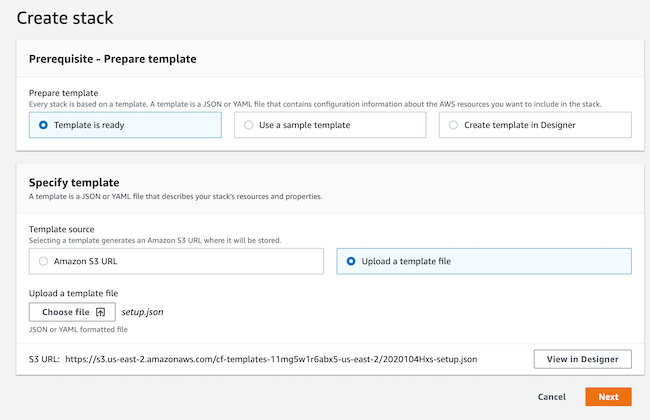
In the AWS console, deploy the CloudFormation template:
-
Select Template is ready and then
Upload a template file.
-
Under Parameters, complete the following
fields:
- BackupLocationBase: Choose an unused bucket name and
path for the FreeIPA backups. Cloudera will be creating
the bucket for you. The same bucket can be used for
BackupLocationBase, LogsLocationBase, and
StorageLocationBase. By default this is set to
my-bucket/my-backups. - CrossAccountARN: Do not change the default value. This parameter is only required when encryption is enabled, but since in this quickstart we do not enable encryption, you should leave this value as is.
- LogsLocationBase: Choose an unused bucket name and
path for the logs. Cloudera
will be creating the bucket for you. The same bucket can be
used for BackupLocationBase, LogsLocationBase, and
StorageLocationBase. By default this is set to
my-bucket/my-logs. - StorageLocationBase: Choose an unused bucket name and
path for the data. Cloudera
will be creating the bucket for you. The same bucket can be
used for BackupLocationBase, LogsLocationBase, and
StorageLocationBase. By default this is set to
my-bucket/my-data. - Prefix: A short prefix of your choosing, which will be added to the names of the IAM resources Cloudera will be creating. We chose "cloudera" as an example.
- s3KmsEncryption: Encryption will be disabled for the created bucket. You don't need to change this value.
For example:
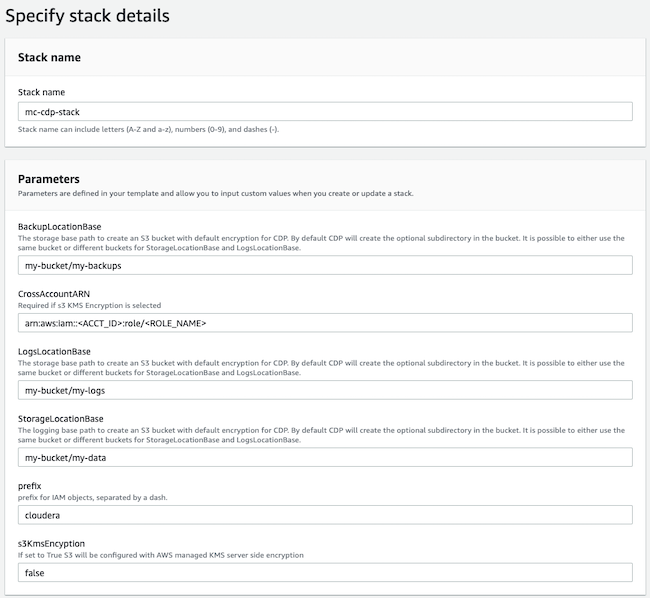
Make a note of the BackupLocationBase, LogsLocationBase, StorageLocationBase, and Prefix that you define. You will need them later.
- BackupLocationBase: Choose an unused bucket name and
path for the FreeIPA backups. Cloudera will be creating
the bucket for you. The same bucket can be used for
BackupLocationBase, LogsLocationBase, and
StorageLocationBase. By default this is set to
-
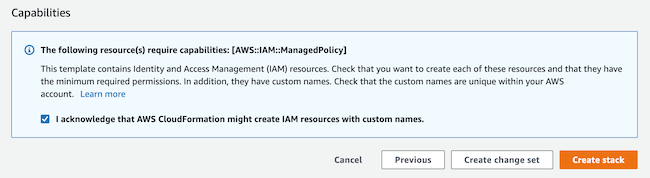
At the bottom of the Review page, under
Capabilities, click the checkbox next to I acknowledge that
AWS Cloudformation might create IAM resources with custom
names, as that is exactly what we will be doing.
-
Select Template is ready and then
Upload a template file.
-
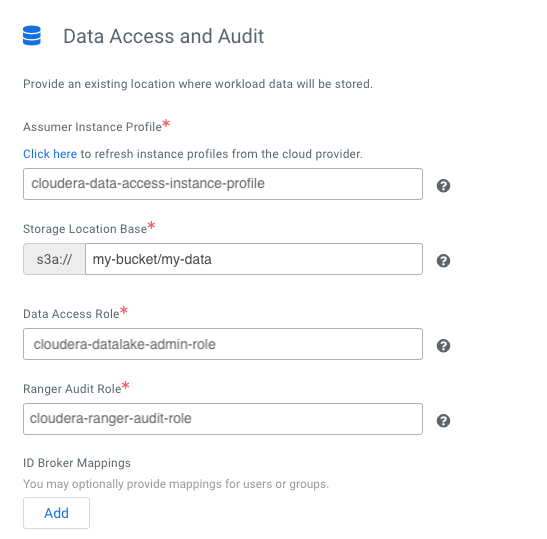
Under Data Access and Audit:
- Choose prefix-data-access-instance-profile>
- For Storage Location Base, choose the StorageLocationBase from the cloud formation template.
- For Data Access Role, choose prefix-datalake-admin-role.
- For Ranger Audit Role, choose prefix-ranger-audit-role, where "prefix" is the prefix you defined in the Parameters section of the stack details in AWS.
For example:
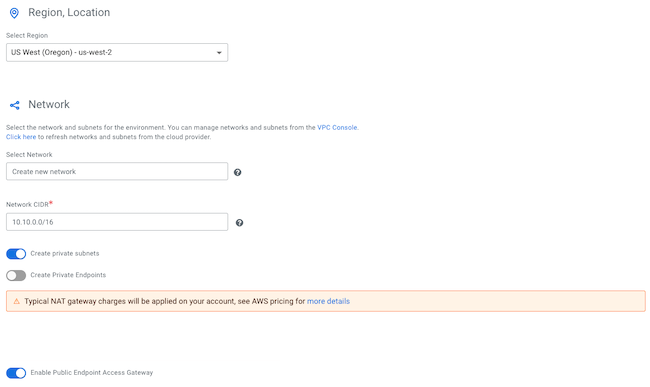
-
Click the toggle button to enable Enable Public Endpoint Access
Gateway.
For example:
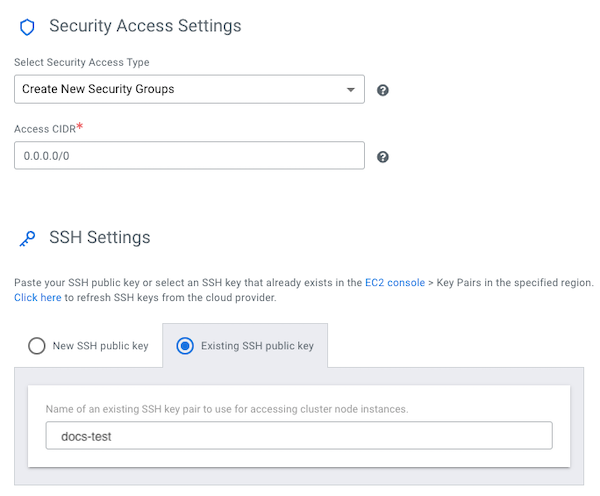
- Under SSH Settings, choose the SSH key you created
earlier.
For example:
-
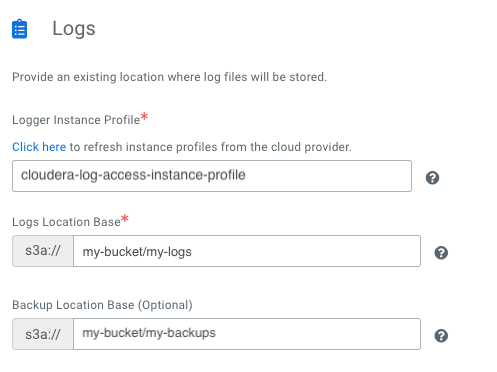
Under Logs:
- Choose the Instance Profile titled prefix-log-access-instance-profile, where "prefix" is the prefix you defined in the Parameters section of the stack details in AWS.
- For Logs Location Base, choose the LogsLocationBase from the CloudFormation template.
- For Backup Location Base, choose the BackupLocationBase from the CloudFormation template.
For example, using the parameters we defined earlier: