ADLS Gen2 account for storing operating system images
Cloudera uses an ADLS Gen2 storage account for storing operating system images used for VMs. By default, Cloudera creates this account during environment registration, but you can optionally pre-create it. If needed, you can also copy the VHD files and create image resources manually.
Cloudera uses an ADLS Gen2 for storing operating system images used for VMs. These images are used for:
- Data Lake and Cloudera Data Hub clusters (A single image is used for both)
- FreeIPA (A separate image is used)
For each of these, there is one image for each Runtime version and for each Azure region.
Preparing images for VMs on Azure is a three-step process, involving the following steps:
- Creating a new storage account in your subscription. The storage account is reachable from all networks so that Cloudera can access it (although the storage container is private).
- Copying one or more virtual hard disks (VHDs) from Cloudera’s regional storage account to your storage account created earlier.
- Creating an image resource from each copied VHD.
By default, these steps are performed automatically by Cloudera during the “Setting up Cloudera image” and the “Creating infrastructure” steps of launching a stack. However, if due to your organization’s security policies, you do not want Cloudera to create your storage account or you do not want the storage account to be publicly available, you have two alternatives:
| Scenario | Solution | Steps |
|---|---|---|
| You do not want Cloudera to create a storage account in your Azure subscription or Cloudera is not granted the permission to create new storage accounts in your Azure subscription, but you are willing to provide Cloudera access to the storage account once it exists. | Manually pre-create a storage account that is available from all networks, and once it exists, Cloudera can copy VHD files and create the image resources. | Refer to Creating the storage account for images manually. |
| Image copying by Cloudera is not possible because the storage account should not be publicly available. | You should perform all three steps manually. | See all three steps linked in this section. |
If you would like to perform these manual steps, refer to the following instructions.
Creating a storage account for operating system images manually
In some cases where your organization’s security policies require it, you may want to manually pre-create the storage account that Cloudera uses for storing operating system images.
Steps
- Create a resource group on Azure with the name “cloudbreak-images”.
- Create a storage account on Azure.
- The name is the concatenation of the following elements. It is different
depending on whether or not you would like to use your existing resource group for Cloudera:
Table 1. Naming convention Single existing resource group Enter a name that is a simple concatenation of the following four elements: - “cbimg”
- Region identifier: The starting letters of the region where the SA is. For example, “eu” for East US, or “eu2” for East US 2
- The adler32 checksum without leading zeroes of the Subscription ID, without hyphens ('-') and all lowercase. For example a9d4456e-349f-46f5-bc73-54a8d523e504 => a9d4456e349f46f5bc7354a8d523e504 => 8e63086f
- The adler32 checksum without leading zeroes of the resource group name. For example rg-my-cool-single-rg => 4e23077c
When you put these together, if the storage account is in East US 2 region in a resource group called “rg-my-cool-single-rg” and with a Subscription ID of a9d4456e-349f-46f5-bc73-54a8d523e504, the storage account name would be cbimgeu28e63086f4e23077c
For the adler32 calculation, you can use the Online ADLER32 Hash Calculator.Multiple resource groups created by Cloudera Enter a name that is the concatenation of the following three elements: - “cbimg”
- Region identifier: The starting letters of the region where the SA is. For example, “eu” for East US, or “eu2” for East US 2
- Subscription ID, without hyphens ('-') and all lowercase. For example, if your subscription ID is a9d4456e-349f-46f5-bc73-54a8d523e504, you should convert it to a9d4456e349f46f5bc7354a8d523e504
- Disable hierarchical namespace. Make sure not to omit this setting as it cannot be changed after the storage account is created.
- The name is the concatenation of the following elements. It is different
depending on whether or not you would like to use your existing resource group for Cloudera:
Copying an image manually
In some cases where your organization’s security policies require it, you must manually copy images to the storage account designated for image storage.
When copying the images, follow these high-level steps:
- Create a container named “images” and copy all images to that container. Make sure
to create a page blob.
- Note the URL of the created container. You will need it to perform the copying process.
- Identify the FreeIPA image that needs to be copied. You should use the latest image from the FreIPA image catalog available at https://cloudbreak-imagecatalog.s3.amazonaws.com/v3-prod-freeipa-image-catalog.json.
-
Identify the Data Lake and Cloudera Data Hub image(s) that need to be copied and note the VHD URLs. Both Data Lake and Cloudera Data Hub use the same image, so there is one image used for both for each Runtime version. There are two ways to find these images in the Cloudera image catalog:
- In Cloudera web interface > Cloudera Management Console > Shared Resources > Image Catalogs > cdp-default > search for your Cloudera Runtime version > Click on UUID of your selected entry (For each Cloudera Runtime version, there should be only one entry for Azure cloud platform) > You will see VHD URLs, one per region.
-
At https://cloudbreak-imagecatalog.s3.amazonaws.com/v3-prod-cb-image-catalog.json.
-
Use azcopy tool to copy the images. When copying the images via the azcopy tool, you have two options for authentication and authorization:
-
Azcopy login: Perform azcopy login with a service principal that has the permission to copy into images container.
-
SAS token: Create a SAS token for the images container.
-
Option 1: Azcopy login
Issue the following command and it will perform an interactive login:
azcopy loginIf you want to set up an automatic script then you can use:
azcopy login --service-principal \
 --application-id <YOUR_APPLICATION_ID> \
--tenant-id <YOUR_TENANT_ID>To run azcopy, use:
azcopy copy \
 'https://<SOURCE_BLOB_URL>' \
 'https://<DESTINATION_BLUB_URL>
As mentioned earlier, the https://<SOURCE_BLOB_URL> can be found in the
image catalog.
Option 2: SAS-token
Go to the Azure portal and generate a SAS-token. Then, you can issue azcopy:
azcopy copy \
 'https://<SOURCE_BLOB_URL>' \
 'https://<DESTINATION_BLUB_URL>?<YOUR_SAS_TOKEN>'
As mentioned earlier, the https://<SOURCE_BLOB_URL> can be found in the
image catalog.
For more information about Azure copy syntax and examples, refer to Get started with AzCopy in Azure docs.
Creating an image resource
After the copying process is complete, create an image resource from each copied VHD.
In Azure Portal you can do that as follows:
- Navigate to Images and click on Add.
- Provide the following information:
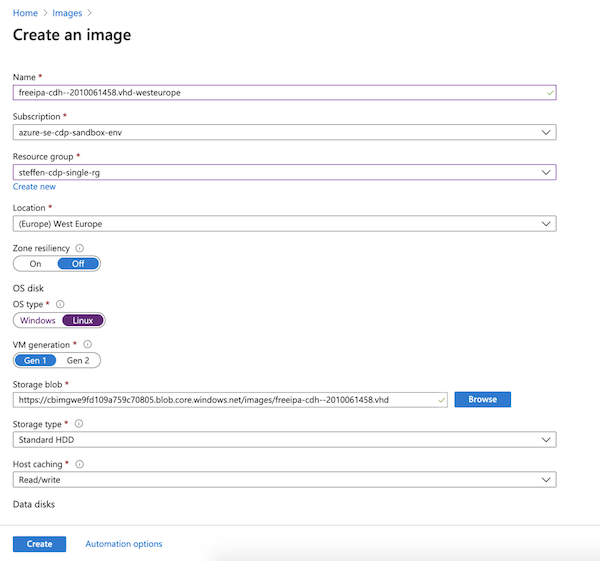
- Once done, click Create.