Minimal setup for AWS cloud storage
This minimal secure setup uses one S3 bucket for each Data Lake, and multiple IAM roles and policies.
The example setup includes:
- One S3 bucket with a sub-directory named after your data lake such as s3a://my-bucket/my-dl.
- Four IAM roles and two instance profiles:
IDBROKER_ROLErole and instance profileLOG_ROLErole and instance profileRANGER_AUDIT_ROLEDATALAKE_ADMIN_ROLE
- Nine IAM policies:
- One AssumeRole ipolicy (
idbroker-assume-role) that can be used by the IDBroker component of the data lake cluster to assume each of the following roles:RANGER_AUDIT_ROLEandDATALAKE_ADMIN_ROLE. - A shared policy for accessing S3:
aws-cdp-bucket-access-policy
- Five (or six) policies for specific bucket directory
access:
- Log storage (
aws-cdp-log-policy) - Ranger audit (
aws-cdp-ranger-audit-s3-policy) - Data Lake admin and RAZ
(
aws-cdp-datalake-admin-s3-policy) - Data Lake backups (
aws-datalake-backup-policy) - Data Lake restore (of backups)
(
aws-datalake-restore-policy) - (Optional) FreeIPA backup storage - if using a separate bucket
(
aws-cdp-backup-policy)
- Log storage (
- Two trust policies:
aws-cdp-ec2-role-trust-policyaws-cdp-idbroker-role-trust-policy
- One AssumeRole ipolicy (
Required cloud storage
One S3 bucket with a sub-directory named after your data lake such as s3a://my-bucket/my-dl is required for this setup.
During Data Lake creation, Cloudera automatically creates a location for Ranger audits, Data Lake, Cloudera Data Hub and FreeIPA logs, and FreeIPA and Data Lake backups. The location for each of these depends on the supplied storage location base and logs location base. The directory structure is created automatically by Cloudera within these base directories:
| s3a://my-bucket/ | s3a://my-bucket/my-dl | |
| Ranger Audit Logs | s3a://my-bucket/ranger/audit | s3a://my-bucket/my-dl/ranger/audit |
| s3a://my-bucket/ | s3a://my-bucket/my-dl | |
| FreeIPA Logs | s3a://my-bucket/cluster-logs/freeipa | s3a://my-bucket/my-dl/cluster-logs/freeipa If your environment was created prior to February 2021, this is s3a://my-bucket/my-dl/freeipa |
Backup Location Base examples
| s3a://my-bucket/ | s3a://my-bucket/my-dl | |
| FreeIPA Backup | s3a://my-bucket/cluster-backups/freeipa | s3a://my-bucket/my-dl/cluster-backups/freeipa |
Required IAM resources
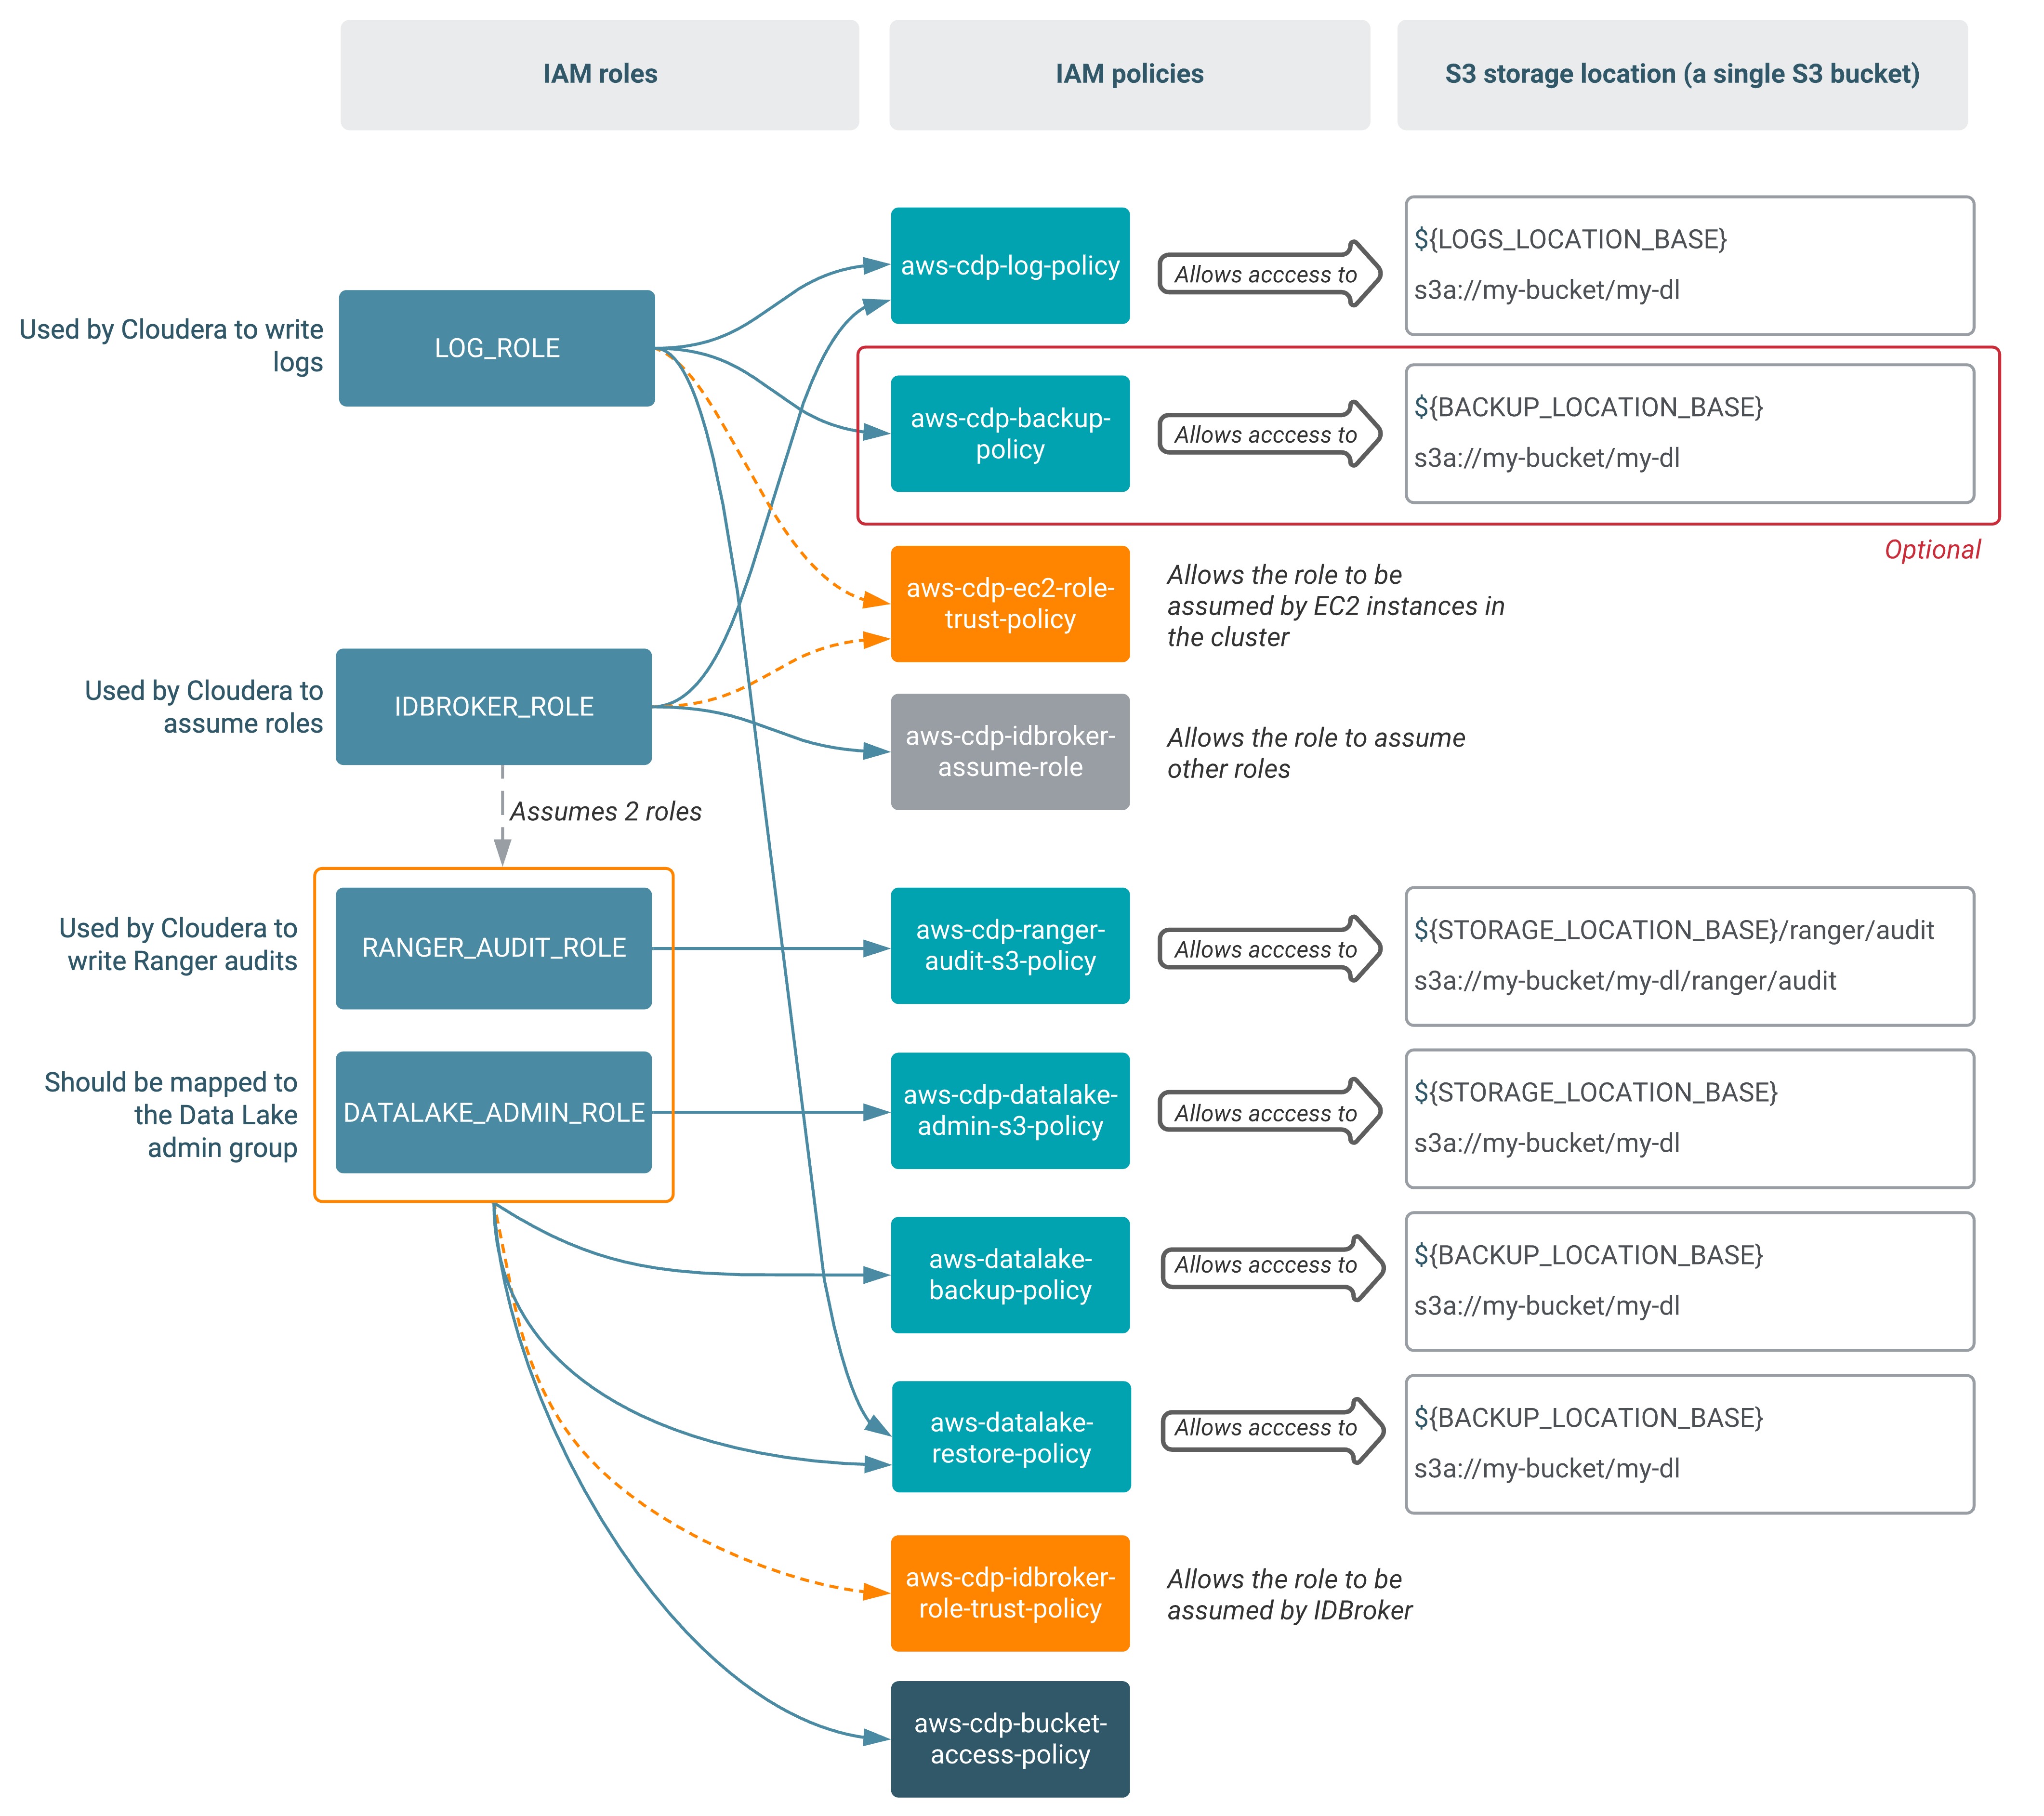
The following table lists the IAM roles and IAM policies that need to be created on AWS, and describes which policies should be assigned to which roles (as presented in the diagram, in some cases policies should be assigned to multiple roles). The policy definitions are provided in IAM policy definitions:
| Role | Permissions policy | Trust policy | Description |
|---|---|---|---|
IDBROKER_ROLE |
|
aws-cdp-ec2-role-trust-policy |
The assume role permissions policy must, at a minimum, allow the
IDBROKER_ROLE to assume the
RANGER_AUDIT_ROLE and the
DATALAKE_ADMIN_ROLE. This policy must also
allow the IDBROKER_ROLE to assume any other role
for which a user or group mapping exists in the IDBroker.
Furthermore, the The trust policy allows the role to be assumed by the IDBroker EC2 instance. |
LOG_ROLE |
|
aws-cdp-ec2-role-trust-policy |
This role uses the aws-cdp-log-policy
permissions policy to provide Cloudera with access to the specific location called Logs Location
Base for logs. If your Backup Location
Base is in a separate bucket or folder, you also need to
provide the The trust policy allows the role to be assumed by EC2 instances in the cluster. When using lower versions than
Cloudera Public Cloud 7.2.17, the
When using Cloudera Public Cloud 7.2.17 or higher
versions, the |
RANGER_AUDIT_ROLE |
|
aws-cdp-idbroker-role-trust-policy |
This role uses the four permissions policies to provide write
access to the Ranger audit sub-directory that Cloudera creates within the
Storage Location Base. The trust policy allows the role to be assumed by IDBroker. The
The
|
DATALAKE_ADMIN_ROLE |
|
aws-cdp-idbroker-role-trust-policy |
This role uses the four permissions policies to provide the Data
Lake admin with full access to the whole Storage Location
Base. Additionally, if you choose to configure Fine-grained access control, RAZ uses this role to orchestrate the access control. The trust policy allows the role to be assumed by IDBroker. The
The
|
The following diagram summarizes the roles, policies, and S3 bucket directories in this example setup:
- Creating an S3 bucket if you don't have one already
- Creating permissions policies for the minimal setup
- Creating the required IAM roles and their associated trust policies
- Providing the parameters in the Cloudera UI
Create an S3 bucket
You need to provide an S3 location that Cloudera can use for logs and data storage. If you don't already have an S3 bucket, you can create one from the AWS S3 console or AWS CLI.
Steps
- In the AWS web interface, navigate to the S3 console.
- Click on Create bucket.
- Enter bucket name.
- Select the region where the bucket should be created.
- Edit additional settings if needed. For example:
- Enable encryption
- Add tags if required by your organization.
- Click on Create bucket.
aws s3api create-bucket --bucket <BUCKET-NAME>See AWS documentation linked below for more information.
Create permissions policies for the minimal setup
You need to create permissions policies that can be assigned to specific roles required by Cloudera. You can create these IAM permissions policies from the AWS IAM console or AWS CLI.
Before you begin
Obtain the relevant IAM policy definitions from IAM policy definitions. You need to replace all the placeholders in the policy with actual values.
Steps
- In the AWS web interface, navigate to the AIM console.
- From the navigation pane, select Policies and then click on Create Policy
- Choose the JSON tab.
- Paste the appropriate JSON policy document.
- Click Next.
- Add tags if required by your organization.
- Click Next.
- Type a Name and an optional Description.
- Click Create policy.
aws iam create-policy --policy-name <NAME> --policy-document <JSON-DOCUMENT> Repeat these steps for all permissions policies that need to be created. For more detailed instructions on how to create IAM policies, refer to the AWS documentation linked below.
Create the IAM roles and establish trust relationships: IDBROKER_ROLE and LOG_ROLE
You can create the IDBROKER_ROLE and LOG_ROLE IAM
roles from the IAM console or AWS CLI.
Before you begin
Review the minimal setup for cloud storage outlined above and make sure that you understand which policies you need to attach to which roles.
Steps

- In the AWS web interface, navigate to the IAM console.
- From the navigation pane, select Roles.
- Click on Create Role.
- Under "Select type of trusted entity" select AWS service.
- Under "Choose a use case" select EC2.
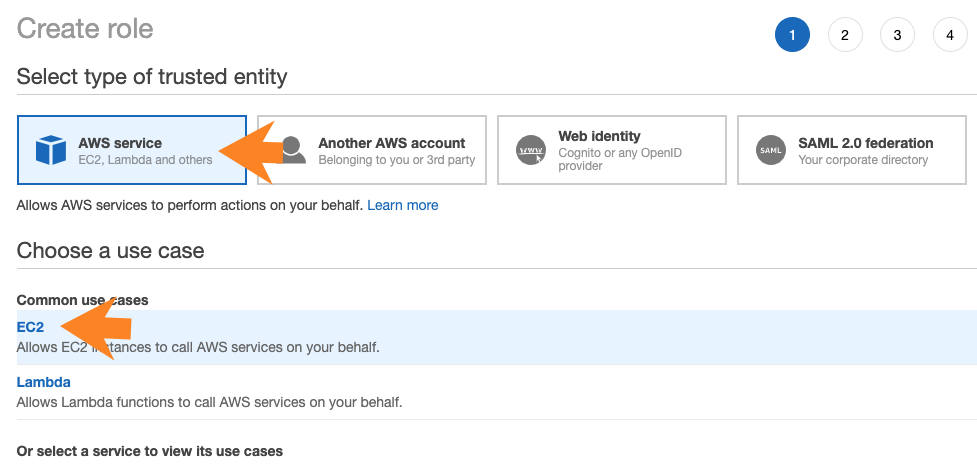
- Click Next.
- Attach the permissions policies required for the role that you are creating. Make sure to attach all required policies.
- Click Next.
- Add tags if required by your organization.
- Click Next.
- Provide a name and an optional description for your role, and verify that you have attached all required permissions policies.
- Click on Create role. This creates an IAM role and instance profile.
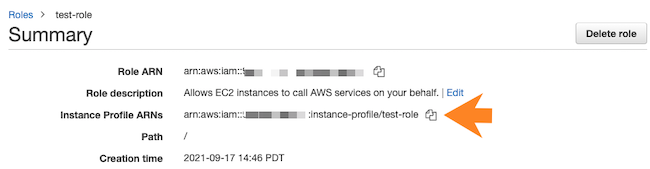
- Click on the role to see its details.
- Verify that the "Instance Profile ARN" is present:
- Click on the Trust relationships tab.
- Click on Edit trust relationship.
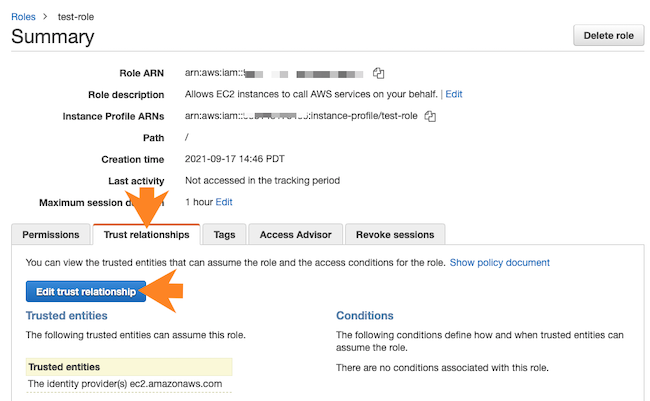
- Verify that the JSON declaring a trust policy is the same as described in the minimal setup. If it isn't, replace it with the correct trust policy definition.
- Click on Update trust policy.
Repeat these steps to create both roles.
Use these commands to create the required IAM roles and instance profiles via AWS CLI:
aws iam create-role --role name <ROLE-NAME> --assume-role-policy-document <TRUST-POLICY>
     aws iam attach-role-policy --role name <ROLE-NAME> --policy-arn <PERMISSIONS-POLICY-ARN>
     aws iam create-instance-profile --instance-profile-name <IP-NAME>
     aws iam add-role-to-instance-profile --instance-profile-name <IP-NAME> --role-name <ROLE-NAME>
You should assign the appropriate policies described in the minimal setup. Note that the
aws iam attach-role-policy command needs to be executed separately for
each policy that needs to be attached.
Create the IAM roles and establish trust relationships: RANGER_AUDIT_ROLE and DATALAKE_ADMIN_ROLE
Use the following steps to create the
RANGER_AUDIT_ROLEDATALAKE_ADMIN_ROLE.
Before you begin
Review the minimal setup for cloud storage outlined above and make sure that you understand which policies you need to attach to which roles.
Steps

- In the AWS web interface, navigate to the IAM console.
- From the navigation pane, select Roles.
- Click on Create Role.
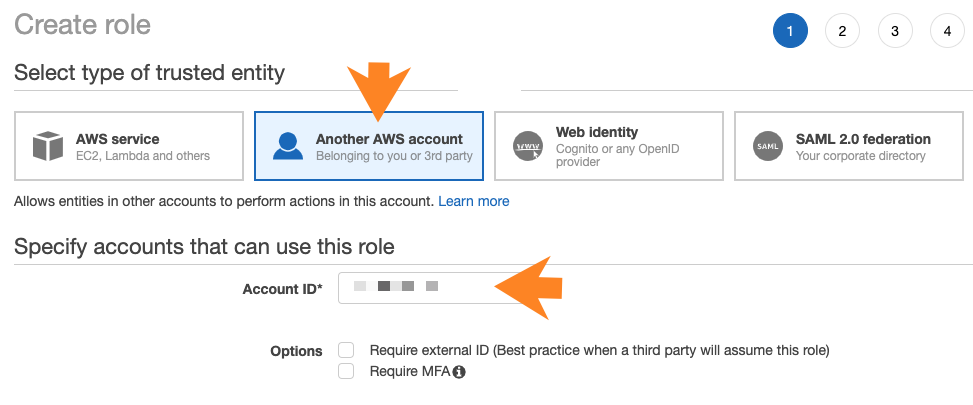
- Under "Select type of trusted entity" select Another AWS account.
- Under "Account ID", enter your AWS account ID. You can obtain it by clicking on your user
name in the top bar.
- Click Next.
- Attach the permissions policies required for the role that you are creating. Make sure to attach all required policies described in the minimal setup
- Click Next.
- Add tags if required by your organization.
- Click Next.
- Provide a name and an optional description for your role, and verify that you have attached all required permissions policies.
- Click on Create role. This creates an IAM role. No instance profile is created in this case.
- Click on the role to see its details.
- Click on the Trust relationships tab.
- Click on Edit trust relationship.
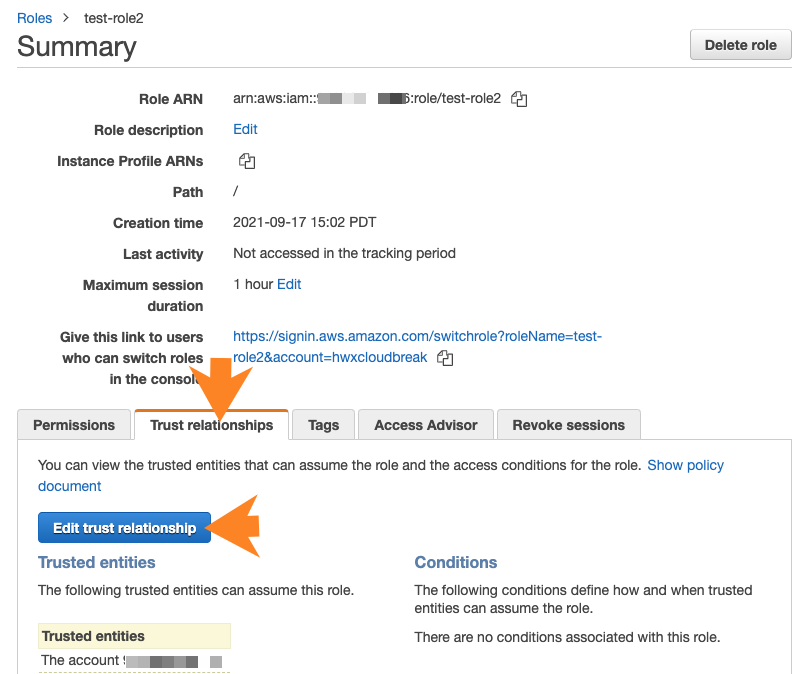
- Paste the JSON declaring a trust policy in place of the default policy. Use the appropriate policy described in the minimal setup.
- Click on Update trust policy.
Repeat these steps for both roles.
Use these commands to create the required IAM roles via AWS CLI:
aws iam create-role --role name <ROLE-NAME> --assume-role-policy-document <TRUST-POLICY>
aws iam attach-role-policy --role name <ROLE-NAME> --policy-arn <PERMISSIONS-POLICY-ARN> aws iam attach-role-policy command needs to be repeated if there are
multiple policies to attach. You should assign the appropriate policies described in the
minimal setup.Providing the parameters in the Cloudera UI
Once you’ve created the S3 bucket and the required IAM policies, roles, and instance profiles, provide the information related to these resources in the Register Environment wizard.
|
Parameter |
Description |
Example |
|---|---|---|
| Data Access and Audit | ||
| Assumer Instance Profile | Select the IDBROKER_ROLE instance profile created earlier during IDBROKER_ROLE role creation. | IDBROKER_ROLE |
| Storage Location Base | Enter the Storage Location Base S3 bucket location created earlier. | my-bucket/my-dl |
| Data Access Role | Select the DATALAKE_ADMIN_ROLE created earlier. | DATALAKE_ADMIN_ROLE |
| Ranger Audit Role | Select the RANGER_AUDIT_ROLE created earlier. | RANGER_AUDIT_ROLE |
| Fine-grained access control on ADLS Gen2 | ||
| Enable Ranger authorization for ADLS Gen2 | If you would like to use Fine-grained access control, click on "Enable Ranger authorization for ADLS Gen2". Next, select the DATALAKE_ADMIN_ROLE created earlier. | DATALAKE_ADMIN_ROLE |
| Select Azure managed identity for Ranger authorization | ||
| Logs | ||
| Logger Instance Profile | Select the LOG_ROLE instance profile created earlier during LOG_ROLE role creation. | LOG_ROLE |
| Logs Location Base | Enter the Logs Location Base S3 bucket location created earlier. | my-bucket-/my-dl |
| Backup Location Base (Optional) | If you created it, enter the Backup Location Base S3 bucket location. This is optional. If you don't provide this, FreeIPA and Data Lake backups will be stored in the Logs Location Base. | my-bucket-/my-dl |