Minimal setup for Azure cloud storage
This minimal secure setup uses one Azure Data Lake File System Gen2 (ADLS Gen2) storage account with multiple containers in it, and multiple managed identities where each managed identity has at least one role assigned.
ADLS Gen2 storage account
You should create one ADLS Gen2 storage account with two containers within it (one for Storage Location Base and another for Logs Location Base). Additionally, you can specify a container for Backup Location Base to store FreeIPA and Data Lake backup data separately from logs:
- One ADLS Gen2 container is required to use as Storage Location Base such as
abfs://storagefs@mydatalake.dfs.core.windows.netwheremydatalakeis your storage account name andstoragefsis your container name. The Storage Location Base is used for storing workload data and Ranger audits. - One ADLS Gen2 container is required to use as Logs Location Base such as
abfs://logsfs@mydatalake.dfs.core.windows.netwheremydatalakeis your storage account name andlogsfsis your container name. The Logs Location Base is used for Data Lake, FreeIPA and Data Hub logs, and FreeIPA and Data Lake backups. - (Optional) One optional ADLS Gen2 container to use as Backup Location Base such as
abfs://backupfs@mydatalake.dfs.core.windows.netwheremydatalakeis your storage account name andbackupfsis your container name. The Backup Location Base is used for FreeIPA and Data Lake backups. If a separate container is not provided, the backups are stored in the Logs Location Base.
Storage Location Base examples
| abfs://storagefs@mydatalake.dfs.core.windows.net | |
| Ranger Audit Logs | abfs://storagefs@mydatalake.dfs.core.windows.net/ranger/audit |
| abfs://logsfs@mydatalake.dfs.core.windows.net | |
| FreeIPA Logs | abfs://logsfs@mydatalake.dfs.core.windows.net/cluster-logs/freeipa If your environment was created prior to February 2021, this is abfs://logsfs@mydatalake.dfs.core.windows.net/freeipa |
Backup Location Base examples
If you specify a separate container for FreeIPA backups, the backups are written to that container:
| abfs://backupfs@mydatalake.dfs.core.windows.net | |
| FreeIPA Backup |
abfs://backupfs@mydatalake.dfs.core.windows.net/cluster-backups/freeipa |
If the separate container is not provided, the FreeIPA backups are written to the Logs
Location Base. In both cases, the same cluster-backups/freeipa directory
structure is created within the container.
Managed identities
You should create four managed identities.
The IDBroker component of Cloudera uses user-assigned managed identities for controlling access to ADLS Gen2 and stores and manages the mappings between the services/users and the corresponding managed identities. The following managed identities must be created:
| Managed identity | Description | Steps |
|---|---|---|
| Assumer (Required) | During Data Lake cluster creation, Cloudera attaches this identity to the IDBroker VM. IDBroker then uses it to attach the other managed identities to the IDBroker VM. Once these identities are attached to the VM, IDBroker can acquire an access token for them (to eliminate the need to store credentials in the application). |
|
| Data Lake Admin (Required) | This managed identity is used for Cloudera services to access data. |
|
| Ranger Audit Logger (Required) | This managed identity is used by Ranger to write audits. |
|
| Logger (Required) | This managed identity is used by Cloudera to write telemetry logs. |
|
| Ranger RAZ (Optional) | This managed identity is only required if you are planning to use Fine-grained access control. It is used by Cloudera to orchestrate fine-grained access control to your data storage location. |
|
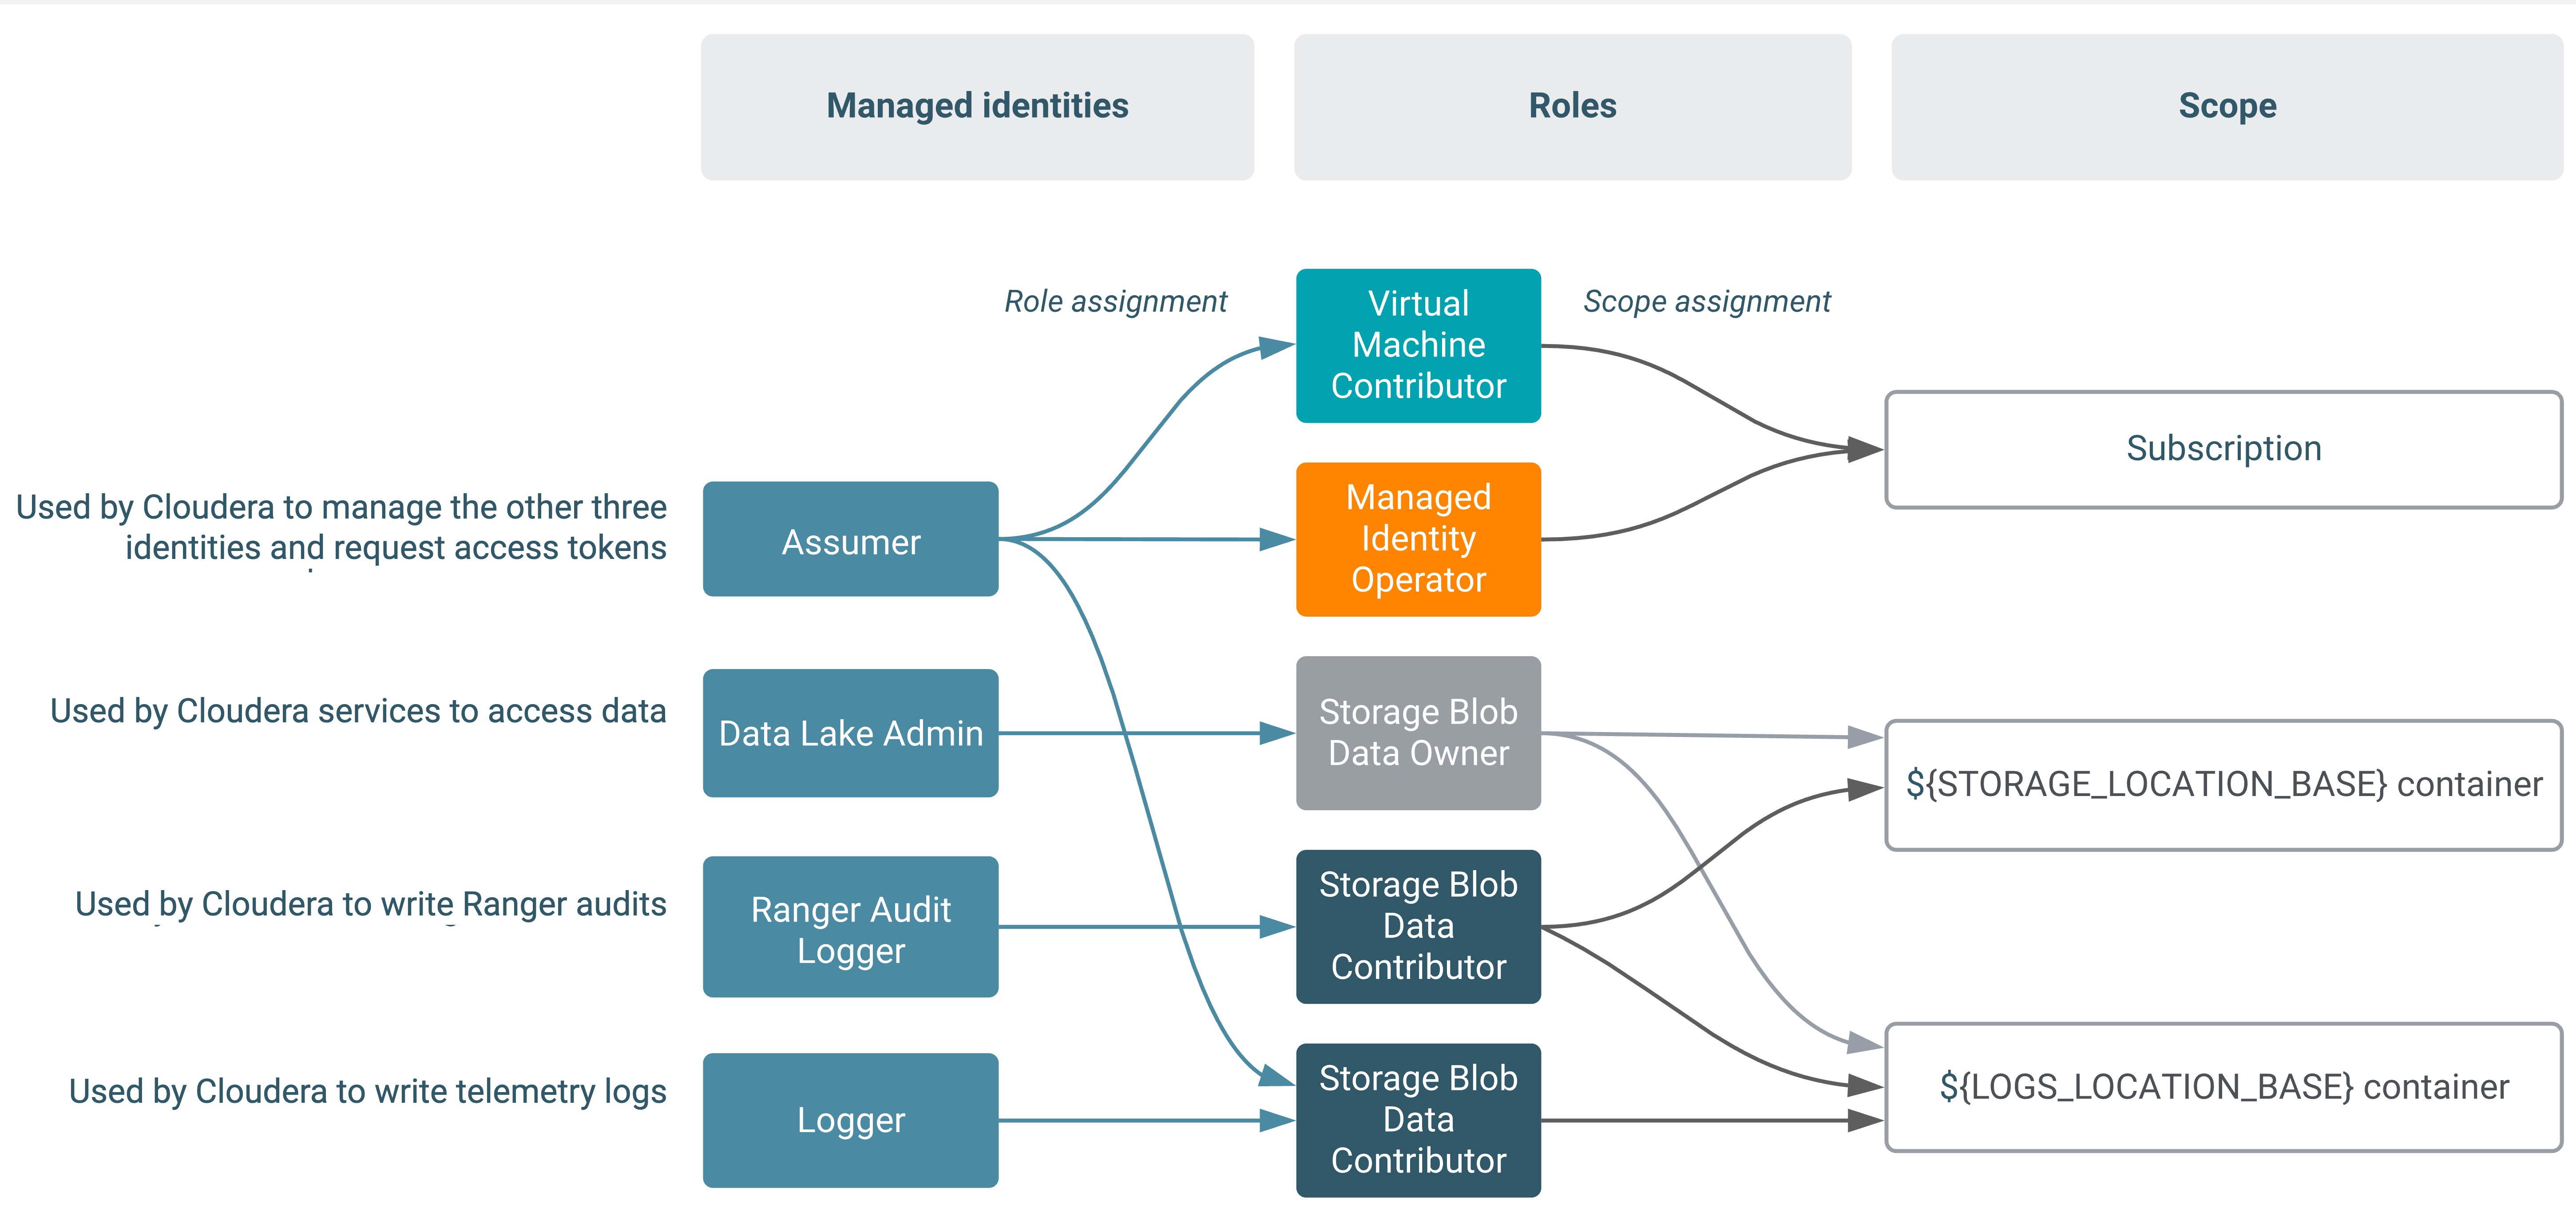
The following diagram illustrates the minimal required setup where Backup Location Base is in the same location as the Logs Location Base:
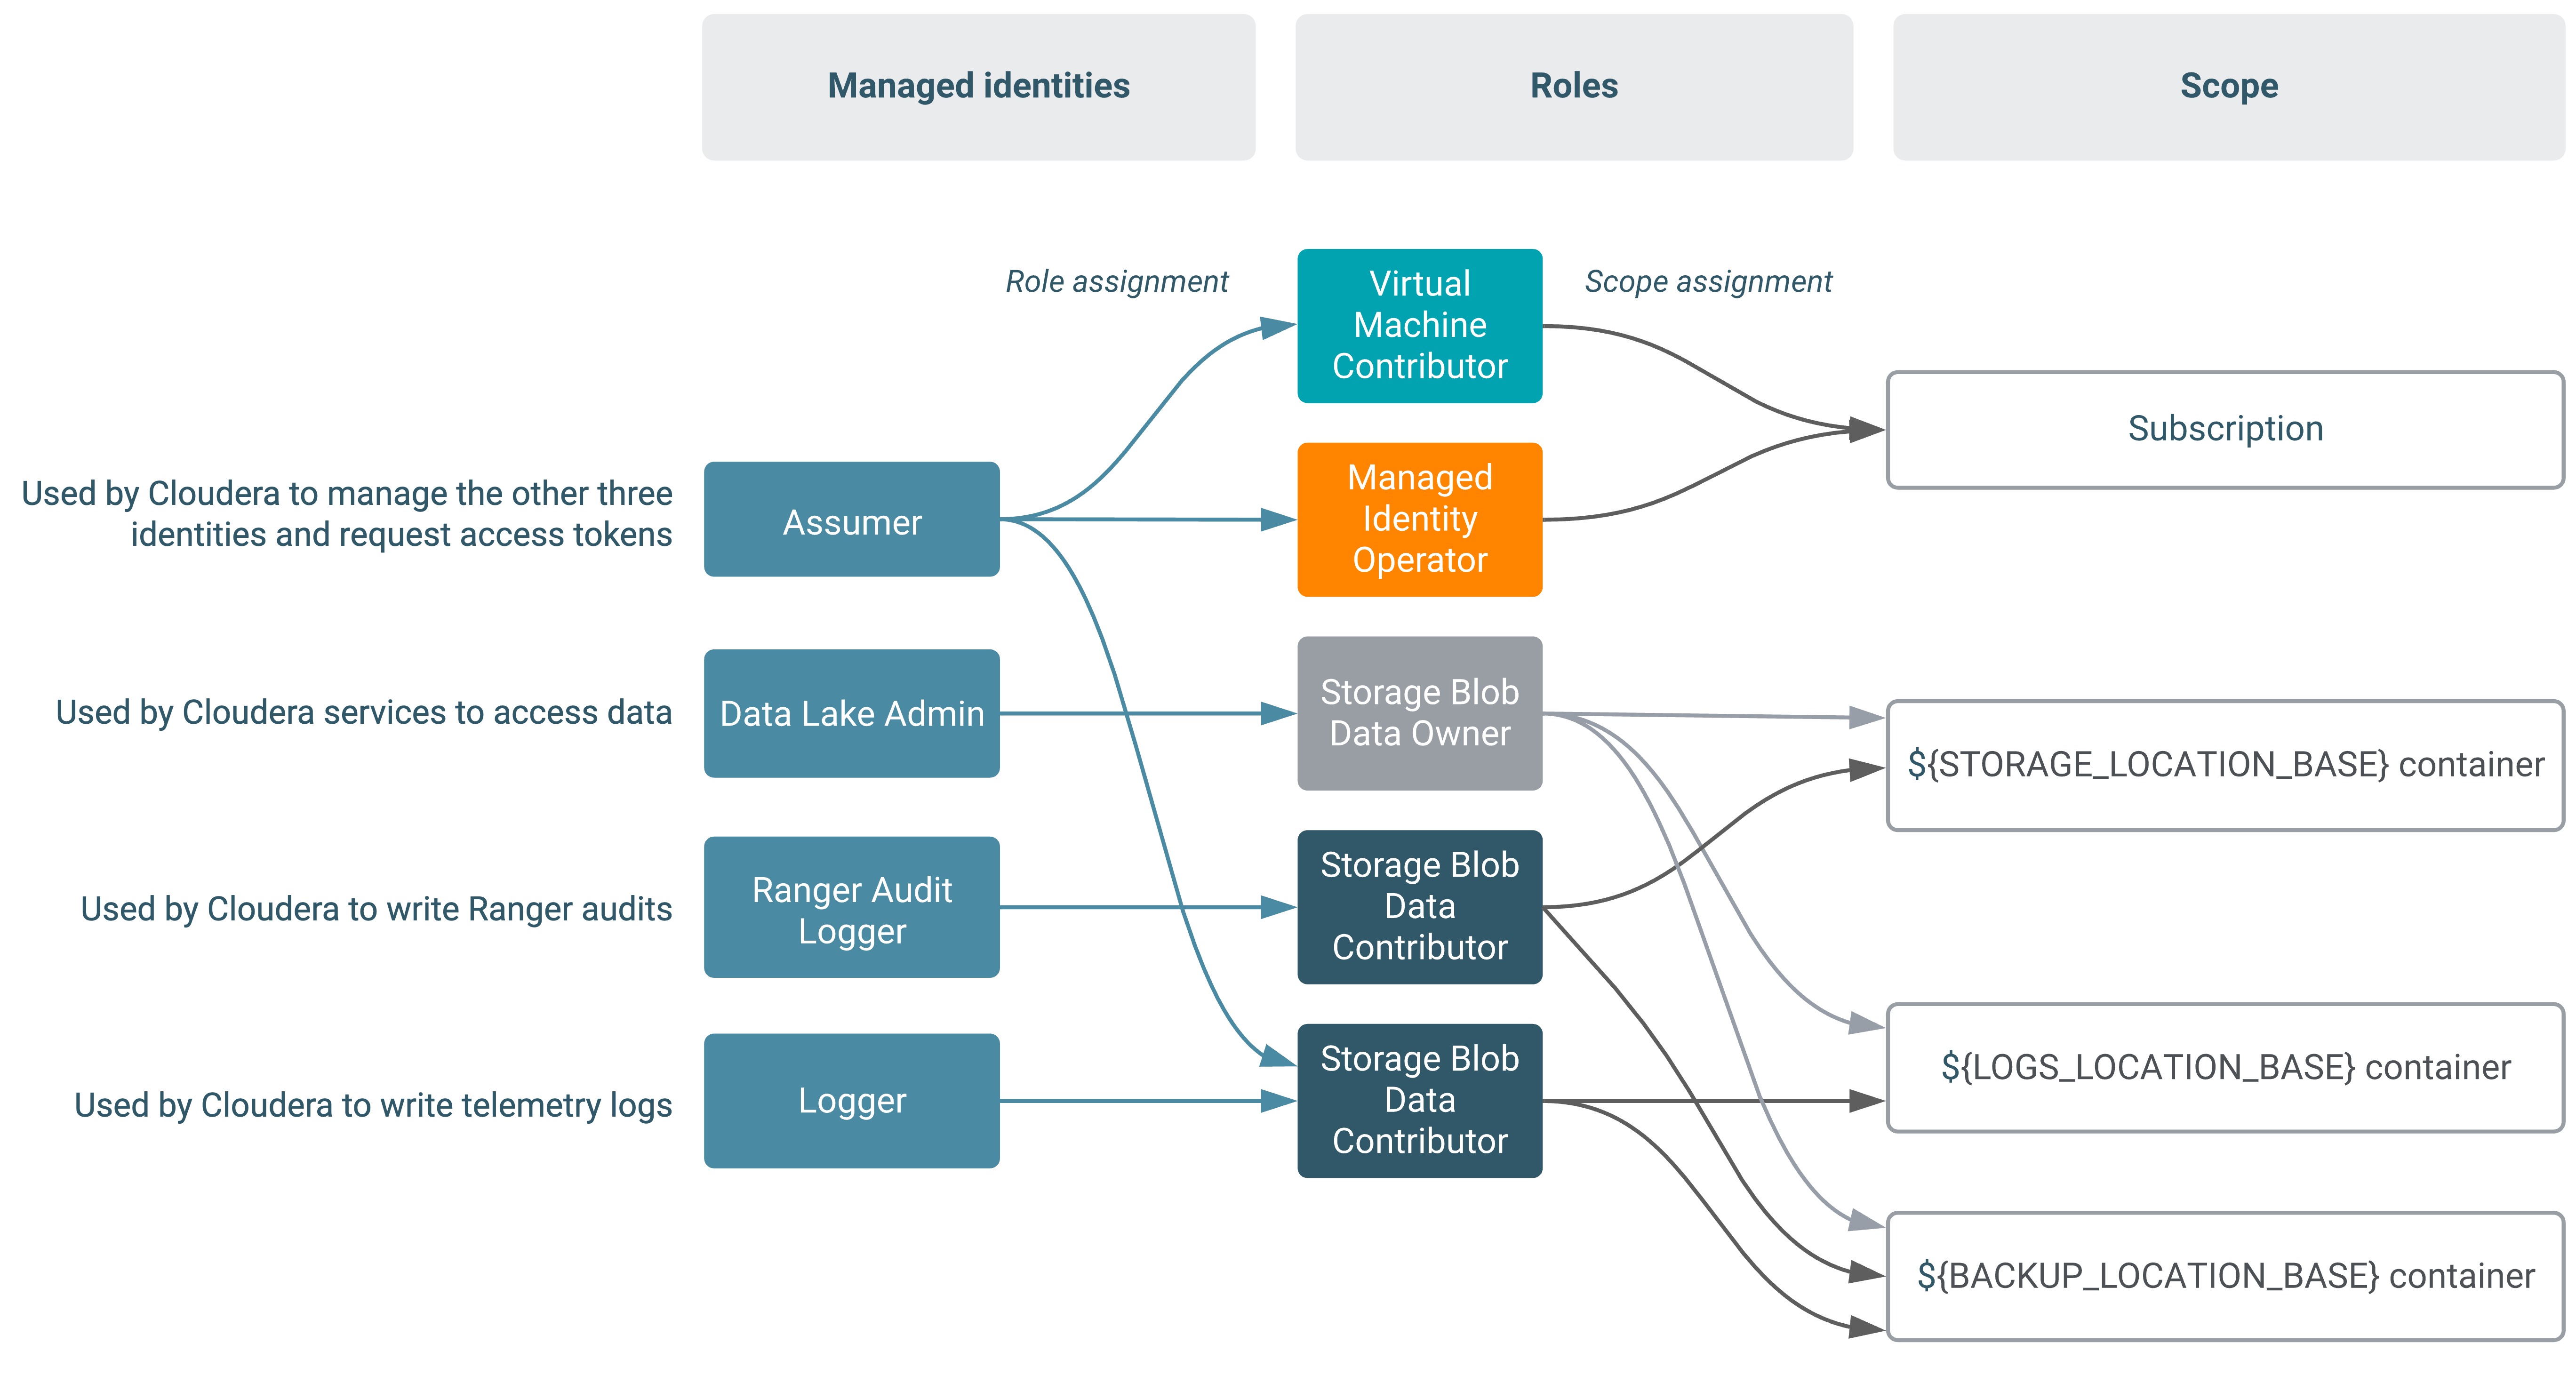
The following diagram illustrates the minimal required setup where Backup Location Base and Logs Location Base are separate:
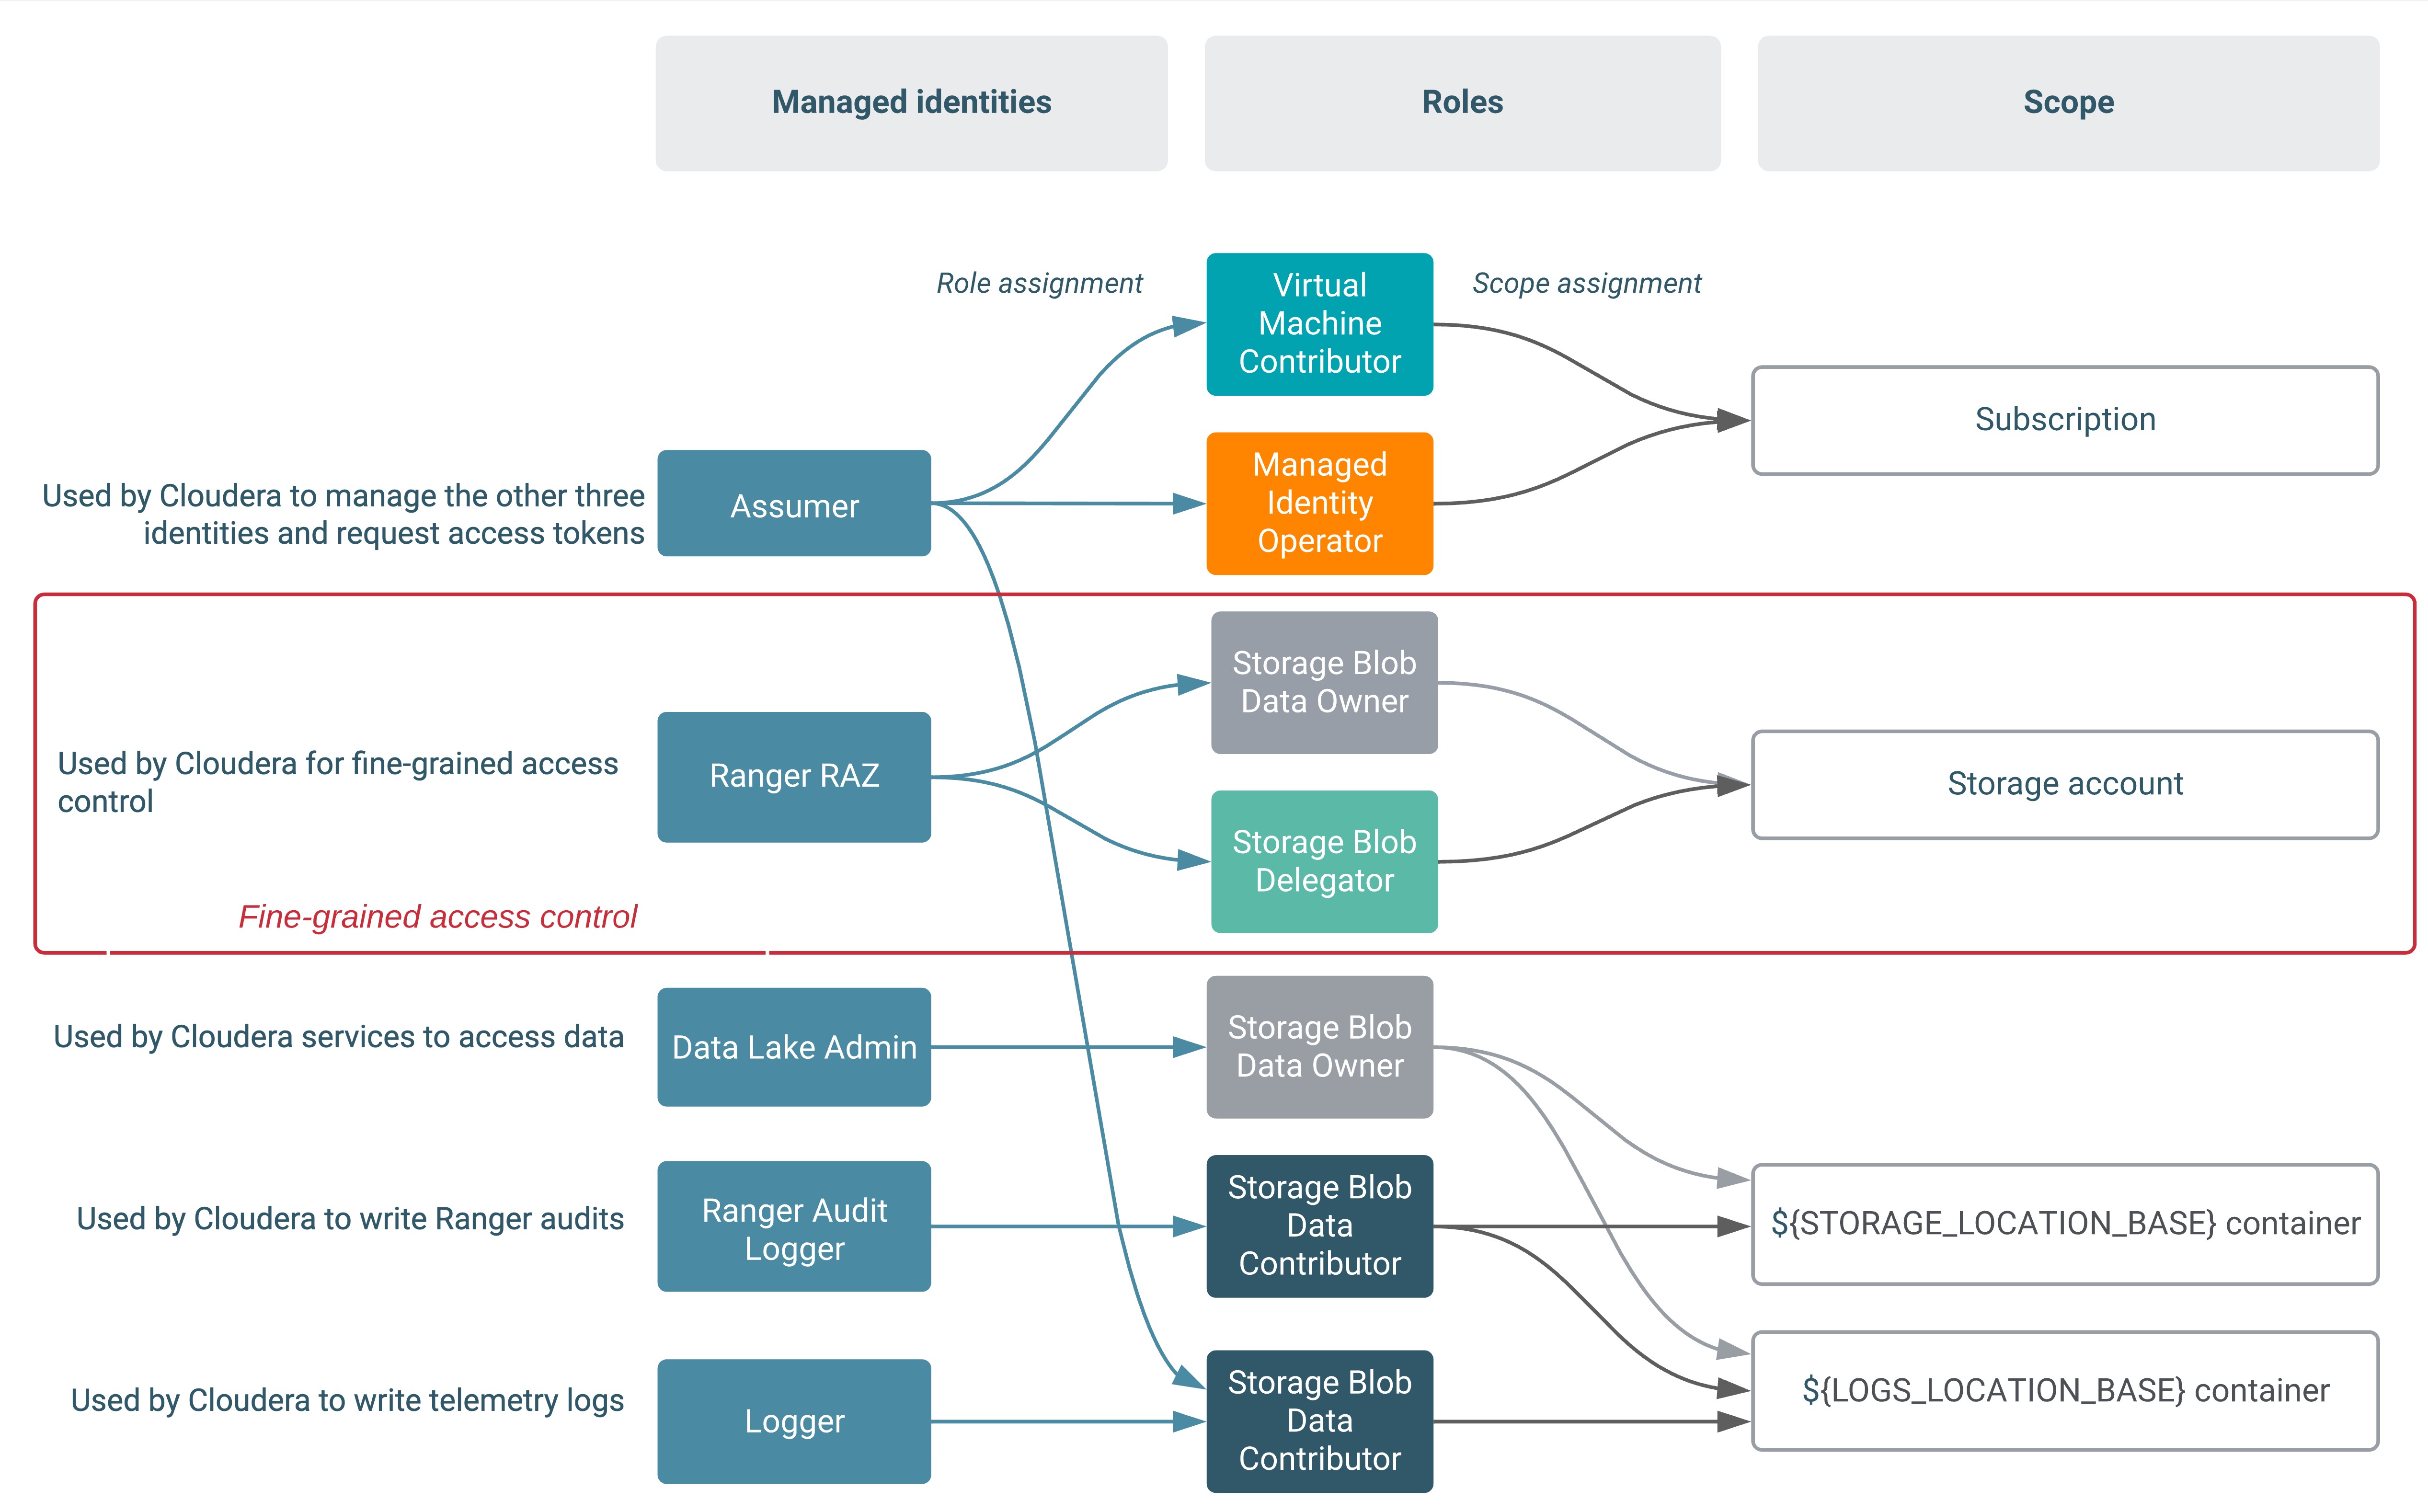
If you are planning to use fine-grained access control, one additional managed identity is required, as illustrated in the following diagrams.
The first diagram illustrates the scenario where Backup Location Base is in the same location as the Logs Location Base:
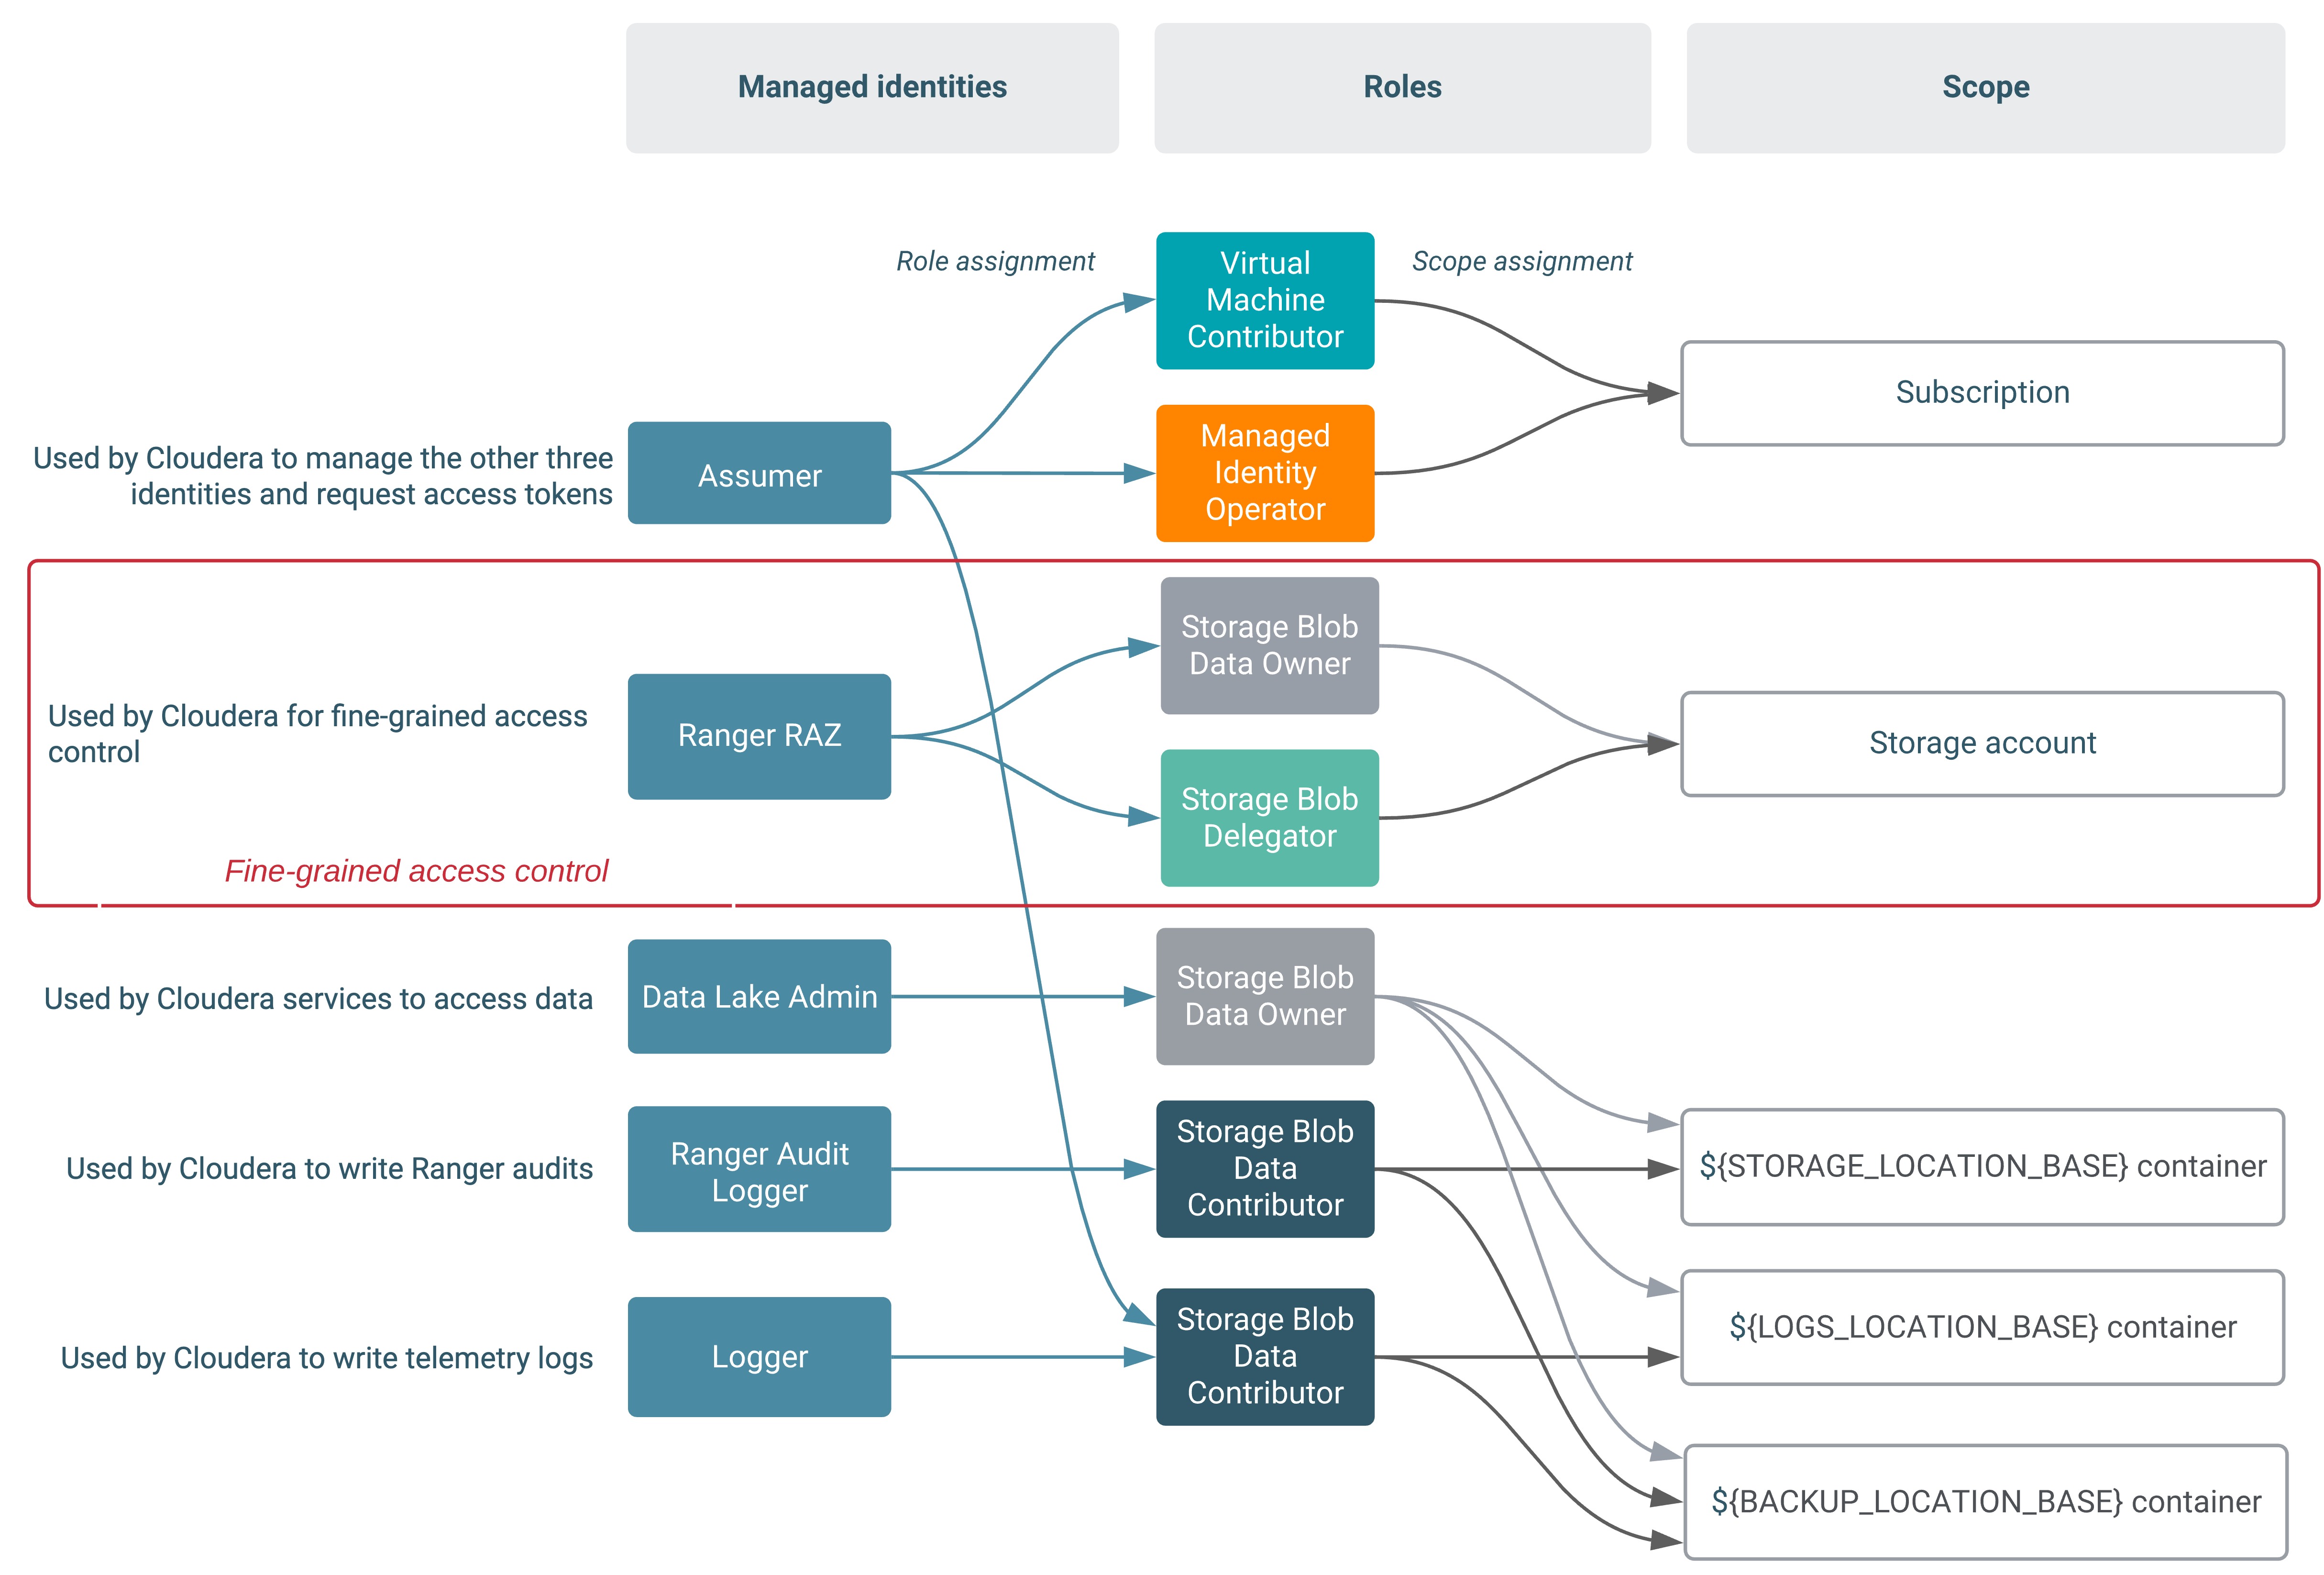
The second diagram illustrates the scenario where Backup Location Base and Logs Location Base are separate:
- Creating an ADLS Gen2 storage account and containers
- Creating managed identities for the minimal setup
- Providing the parameters in the Cloudera UI
Creating ADLS Gen2 storage account and containers
Create a resource group and then create a storage account and two containers within it. The storage account must have the hierarchical namespace enabled.
- First, create a resource group that can act as a logical grouping of storage accounts. To create the resource group, follow the steps described in Create resource groups in Azure docs. Make sure to create it in the specific region that you would like to use for your environment.
-
Next, create an ADLS Gen2 storage account. In our example setup, the storage account name is
my-datalake. To create the storage account, follow the Create an account using the Azure portal in Azure docs. In the Advanced > Data Lake Storage Gen2 section, make sure to Enable hierarchical namespace: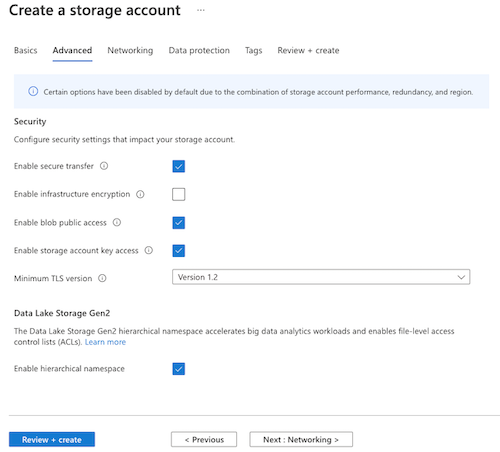
- After creating an ADLS Gen 2 storage account, create two containers within it (one for
Storage Location Base and another for Logs Location Base). You can also
optionally create a third container for Backup Location Base.
To create a container, follow the usual steps:
- On Azure Portal, navigate to Storage Accounts > your newly created storage account > Containers > +Container.
- Provide a name for your container and click OK.
Repeat these steps to create all required containers. In our example setup, the containers are called
storagefs,logsfs, andbackupfs.
Once you have created the storage account and container, note the created resources in the following format:
abfs://$[container-name]@$[storage-account-name].dfs.core.windows.net
For example, in our example setup, we created the following two containers:
abfs://storagefs@mydatalake.dfs.core.windows.net
abfs://logsfs@mydatalake.dfs.core.windows.net
abfs://backupfs@mydatalake.dfs.core.windows.net
Creating Azure managed identities
Once you’ve created the storage account and file system within it, create the managed identities and then assign roles with specific scopes to these identities.
You can reuse the same resource group that you created for the storage account or you can optionally create a new resource group that can act as a logical grouping of managed identities.
You need to create four or five managed identities (Assumer, Data Lake Admin, Ranger Audit Logger, Logger, and optionally the Ranger RAZ). Use the following steps to create these managed identities:
- On Azure Portal, navigate to Managed Identities.
- Click +Add.
- Specify managed identity name and select the resource group that you created earlier.
Repeat these steps to create each of the four managed identities. Once you’ve created these managed identities, assign roles with specific scopes (subscription or storage account) to these identities as follows.
Create the Assumer identity
Assign the Virtual Machine Contributor role and the Managed Identity Operator role to the Assumer managed identity on either the subscription or resource group level, and then assign the Storage Blob Data Contributor on the scope of the container created earlier for Logs Location Base.
Steps
- Navigate to Subscriptions > your subscription > Access Control (IAM).
- Click +Add.
- Under Add role assignment:
- Under Role, select Virtual Machine Contributor.
- Under Assign access to, select User assigned managed identity.
- Under Select, select the Assumer managed identity created earlier.
- Click Save.
- Repeat the role assignment steps 2-3, but this time assign the Managed Identity Operator role to the Assumer Identity.
- Navigate to Storage accounts > your storage account > Containers > your container > Access Control (IAM).
- Click +Add > Add role assignment.
- Under Add role assignment:
- Under Role, select Storage Blob Data Contributor.
- Under Assign access to, select User assigned managed identity.
- Under Select, select the Assumer managed identity created earlier.
- Click Save.
Create the Data Lake Admin identity
Assign the Storage Blob Data Owner role to the Data Lake Admin managed identity on the scope of the two containers created earlier for Storage Location Base and Logs Location Base, and to the Backup Location Base container if it exists. You need to do this separately for each of the containers.
Steps
- Navigate to Storage accounts > your storage account > Containers > your container > Access Control (IAM).
- Click +Add > Add role assignment.
- Under Add role assignment:
- Under Role, select Storage Blob Data Owner.
- Under Assign access to, select User assigned managed identity.
- Under Select, select the Data Lake Admin managed identity created earlier.
- Click Save.
Repeat the steps for the second container and for the third container (if you created it).
Create the Ranger Audit Logger identity
Assign the Storage Blob Data Contributor role to the Ranger Audit Logger managed identity on the scope of the container created earlier for Storage Location Base. If you created a separate container for Backup Location Base, you should also repeat these steps on the container created earlier for Backup Location Base. Otherwise, they should be repeated on the Logs Location Base container.
Steps
- Navigate to Storage accounts > your storage account > Containers > your container > Access Control (IAM).
- Click +Add > Add role assignment.
- Under Add role assignment:
- Under Role, select Storage Blob Data Contributor.
- Under Assign access to, select User assigned managed identity.
- Under Select, select the Ranger Audit Logger managed identity created earlier.
- Click Save.
Create the Logger identity
Assign the Storage Blob Data Contributor role to the Logger managed identity on the scope of the container created earlier for Logs Location Base. If you created a separate container for Backup Location Base, you should also assign the same role to the same managed identity on the scope of the container created earlier for Backup Location Base.
Steps
- Navigate to Storage accounts > your storage account > Containers > your container > Access Control (IAM).
- Click +Add > Add role assignment.
- Under Add role assignment:
- Under Role, select Storage Blob Data Contributor.
- Under Assign access to, select User assigned managed identity.
- Under Select, select the Logger managed identity created earlier.
- Click Save.
- If you created a separate container for Backup Location Base, you should perform steps 1-3 to also assign the Storage Blob Data Contributor role to the Logger managed identity on the scope of the container created earlier for Backup Location Base.
Create the Ranger RAZ identity (Optional)
If you would like to use Fine-grained access control, you should create the Ranger RAZ managed identity. Assign the Storage Blob Data Owner role and the Storage Blob Delegator role to the Ranger RAZ managed identity on the scope of the storage account that you created earlier (which contains the Storage Location Base and Logs Location Base).
Steps
- Navigate to Storage accounts > your storage account > Access Control (IAM).
- Click +Add > Add role assignment.
- Under Add role assignment:
- Under Role, select Storage Blob Data Owner.
- Under Assign access to, select User assigned managed identity.
- Under Select, select the Ranger RAZ managed identity created earlier.
- Click Save.
- Repeat the role assignment steps 2-3, but this time assign the Storage Blob Delegator role to the Ranger RAZ managed identity.
After performing these steps, you should have the required managed identities created and their roles assigned on the correct scope.
Providing the parameters in the Cloudera UI
Once you’ve created the ADLS Gen2 location and the required managed identities, provide the information related to these resources in the Register Environment wizard.
|
Parameter |
Description |
|---|---|
| Data Access and Audit | |
| Assumer Identity | Select the Assumer identity created earlier. |
| Storage Location Base | Enter the Storage Location Base created earlier. In our example this was
abfs://storagefs@mydatalake.dfs.core.windows.net, so you should
enter storagefs@mydatalake. |
| Data Access Identity | Select the Data Lake Admin identity created earlier. |
| Ranger Audit Identity | Select the Ranger Audit identity created earlier. |
| Fine-grained access control on ADLS Gen2 | |
| Enable Ranger authorization for ADLS Gen2 | If you would like to use Fine-grained access control, click on "Enable Ranger authorization for ADLS Gen2". Next, select the Ranger RAZ identity created earlier. |
| Select Azure managed identity for Ranger authorization | |
| Logs | |
| Logger Identity | Select the Logger identity created earlier. |
| Logs Location Base | Enter the Logs Location Base created earlier. In our example this was
abfs://logsfs@mydatalake.dfs.core.windows.net, so you should
enter logsfs@mydatalake. |
| Backup Location Base (Optional) | If you created it, enter the Backup Location Base. In our example this was
abfs://backupfs@mydatalake.dfs.core.windows.net, so you should
enter backupfs@mydatalake. This is optional. If you don't provide
this, FreeIPA and Data Lake backups will be stored in the Logs Location
Base. |