In this quickstart, we will show you step by step how to connect Cloudera to your Google Cloud Platform (GCP) account, so that you can
begin to provision clusters and workloads.
To complete this quickstart, you will need access:
The Cloudera console pictured above
The GCP console
The steps that we will perform are:
Step 0: Verify the GCP prerequisites
Step 1: Create a provisioning credential
Step 2: Create GCP prerequisites
Step 3: Register a GCP environment in Cloudera
Verify GCP cloud platform prerequisites
Before getting started with the Google Cloud Platform (GCP) onboarding quickstart,
review and acknowledge the following:
This GCP onboarding quickstart is intended for simple Cloudera evaluation deployments only. It may not work for
scenarios where GCP resources such as VPC network, firewall rules, storage accounts, and
so on, are pre-created or GCP accounts have restrictions in place.
Users running the GCP onboarding quickstart should have Cloudera Admin role or Power User role in Cloudera subscription.
The following APIs should be enabled in the project that you would like to use to
run the quickstart: GCP APIs.
In order to run the quickstart, the Google APIs service agent user must be set to
Owner. For instructions on how to check or update the Google APIs service agent
permissions, see Grant permissions to the Google APIs service
account.
If your organization's policies don't allow you to assign the Owner role, and you
are required to use granular roles or permissions instead, you should make sure to assign,
among other roles, the Role Administrator role (or equivalent granular permissions
allowing access to the Deployment Manager).
This GCP onboarding quickstart uses a Deployment Manager template that
automatically creates the required resources such as the VPC network, firewall rules,
storage buckets, service accounts, and so on.
Clouderaon cloud relies on several GCP services that should be
available and enabled in your project of choice. Verify if you have enough quota for each
GCP service to set up Cloudera. See list of GCP resources used by Cloudera.
If you have more complex requirements than those listed here, contact Cloudera Sales Team to help you with the onboarding
process.
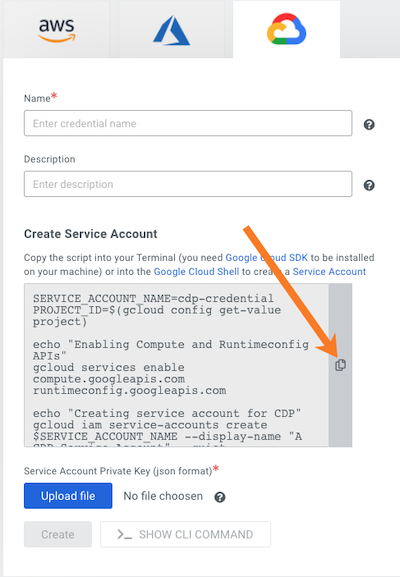
Create a provisioning credential
The first step is to create a provisioning credential. The Cloudera credential is the mechanism that allows Cloudera to create resources inside of your GCP account.
Steps
Log in to the Cloudera web interface.
From the Cloudera home screen, click the Cloudera Management Console icon.
In the Cloudera Management Console, select Shared Resources >
Credentials from the navigation pane.
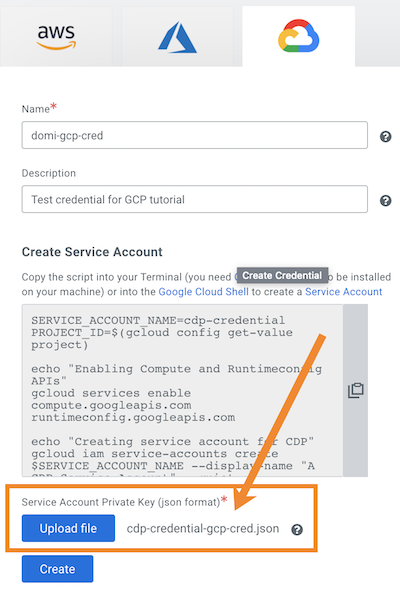
Click on the "Create Credential" button.
Select the (Google Cloud Platform) tab.
Give your credential a name and description.
Copy the script provided under “Create Service Account”:
This script can create the service account that is a prerequisite for the Cloudera credential.
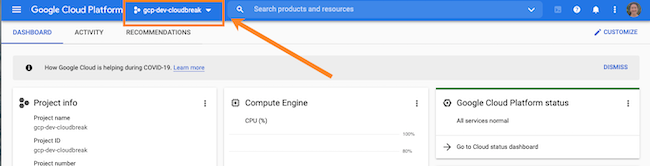
Verify that you are in the project that you would like to use for Cloudera. Switch projects if needed:
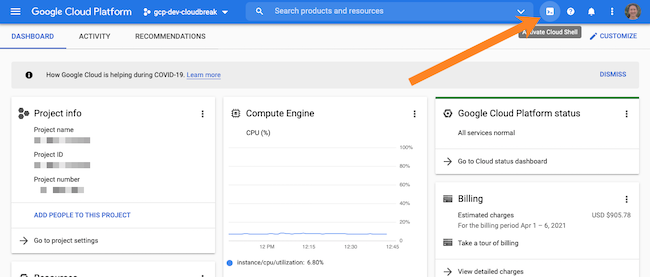
Open the Cloud Shell (available from upper right corner):The Cloud Shell window opens in the bottom of the browser window.
Paste the script directly into the Cloud Shell terminal.
When prompted, click Authorize.
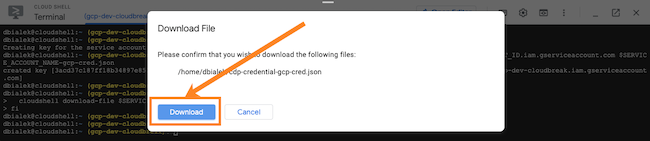
The script will run and then end by prompting you to download the credential file
to your local machine. Click Download to download the file:
Head back to the Cloudera console and upload the
JSON credential file you just downloaded from the GCP console:
Click the "Create" button and you're done!
Create GCP prerequisites
The second step is to create the Cloudera prerequisites
in your GCP project. To get this done quickly, we will use a script that creates a VPC network, a
subnet, firewall rules, service accounts, storage buckets, and so on.
Steps
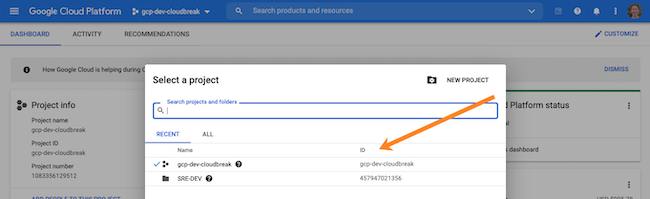
Navigate to the browser tab with the GCP console.
Click on the project navigation widget:
A window appears, allowing you to select a project. Copy the ID of the project
where you created your credential earlier:You will need it in a later step
In the GCP console, download the following files gcp-script.sh and
gcp_param.yml:
Prefix - A prefix to prepend to names of all resources that the
script creates for you. For example, if your chosen prefix is "cloudera", Cloudera prepends "cloudera-" to the names of all created
resources.
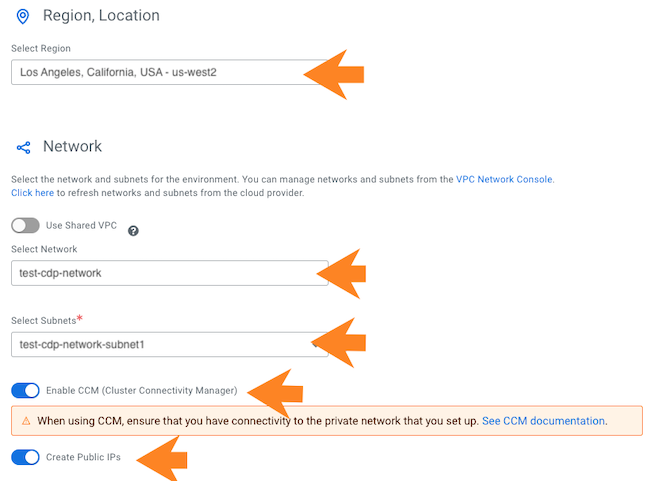
Region - A GCP region where you would like to deploy your
environment. For a list of supported regions, see Supported GCP regions.
Project ID - The project ID that you obtained in an earlier
step. This is the project where you will deploy the resources required for a Cloudera environment.
CIDR-to-whitelist - The IPv4 CIDR range for SSH and UI
access.
For
example:
bash gcp-script.sh test us-east4 gcp-dev 73.221.71.0/24
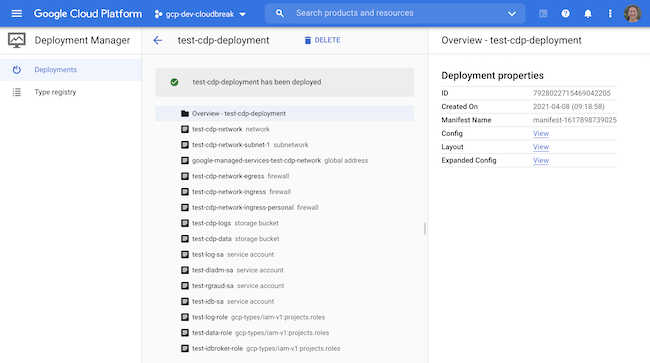
The script creates a new deployment called <prefix>-cdp-deployment in the
Deployment Manager and creates resources in your GCP account:
The script does the following:
Verify that the correct number of arguments were supplied.
Replace the Deployment Manager config parameters with those arguments that you
supplied.
Check for the existence of a custom IAM role with the provided prefix (i.e. check
if you have run this script before with the same prefix).
Run the Deployment Manager (which creates resources such as a VPC network, a
subnet, firewall rules, service accounts, storage buckets, and so on).
Add policy bindings to the created service accounts
Change GCS bucket permissions for created service accounts
Create a VPC peering to servicenetworking.googleapis.com (for purposes of the
CloudSQL DB that Cloudera creates).
Once the deployment is ready, you will see a message “<prefix>-cdp-deployment has
been deployed”. At that point, you can proceed to the next step.
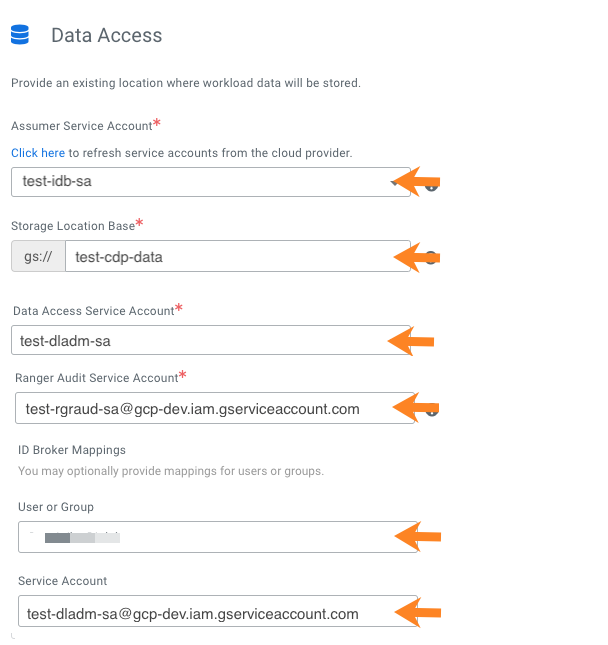
Register a Cloudera environment
The third (and last) step is to register your GCP environment in Cloudera. You will:
Use the credential created in Step1.
Point Cloudera to the resources created in Step
2.
You have two options for performing the environment registration step:
Option 1: Cloudera web interface
Option 2: CDP CLI
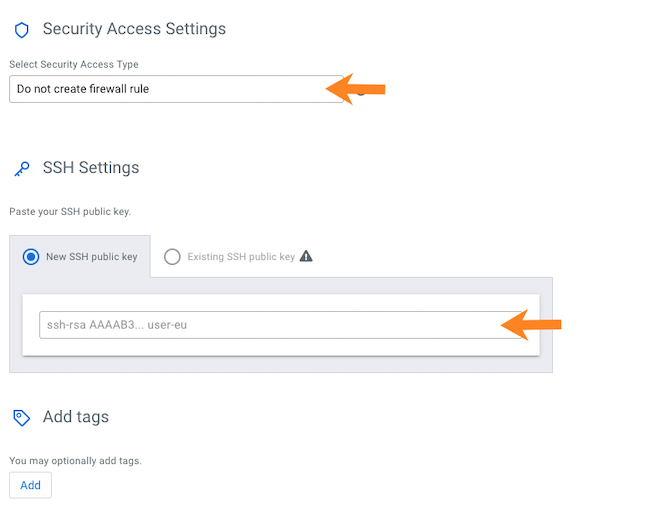
Prerequisites
You need an RSA key pair. You will be asked to provide a public key and you will use the
matching private key for admin access to Cloudera
instances.
Register a GCP environment using Cloudera web
interface
 (Google Cloud Platform) tab.