Using a non-transparent proxy
Refer to this section if your environment requires all internet traffic to go through an internet proxy. You can use a proxy server to control the connections that are allowed from your VPC or VNet and block unauthorized connections initiated from your environment.
When creating a Cloudera environment, you can set up an HTTP proxy such as Squid or a comparable product. For a majority of use cases, this is enough to direct the traffic through a proxy.
Proxy servers can be used for:
- FreeIPA backups: Backups created on an hourly basis are uploaded to cloud storage S3/ADLS Gen2.
- Parcel downloads: Although Cloudera currently only supports pre-warmed images, it is a requirement to download parcels from archive.cloudera.com when an upgrade is performed.
- Cluster Connectivity Manager: Communication via Cluster Connectivity Manager v2.
- TLS and Deep Packet Inspection (DPI): TLS and DPI Inspection can be performed through the use of a proxy. To see how to configure this, refer to the Setting up a web proxy for TLS inspection section below.
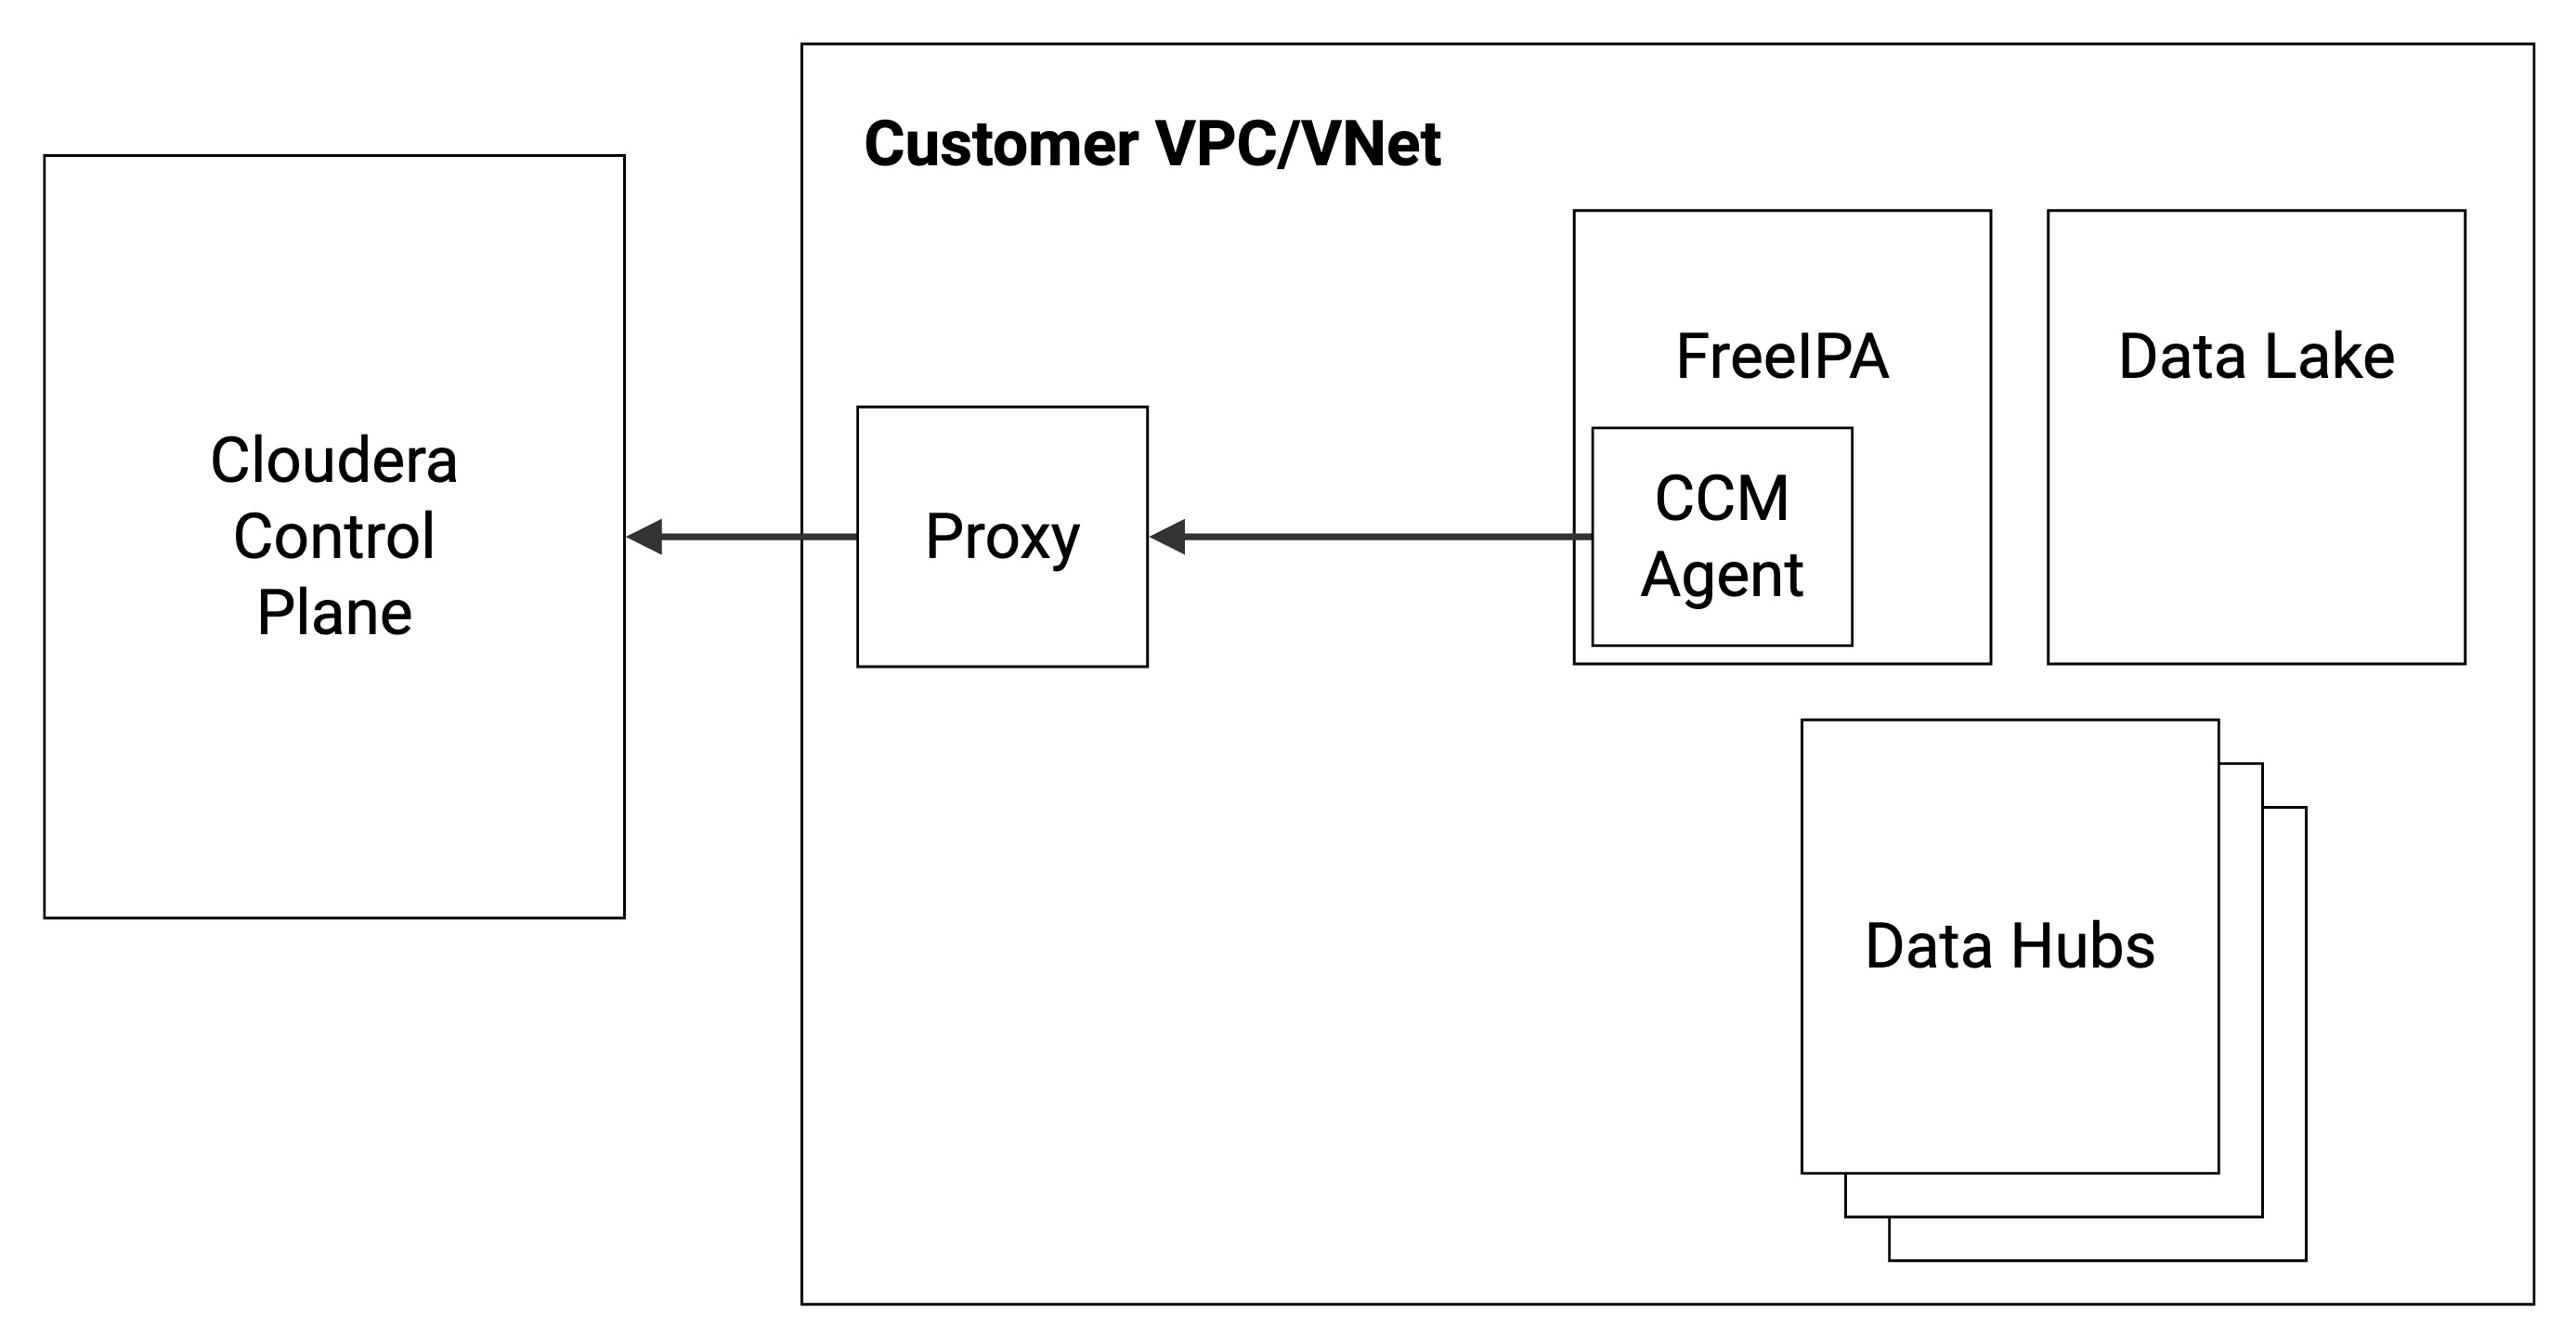
The following diagram illustrates the communication between the customer’s Cloudera environment and the Cloudera Control Plane in a cloud provider network (VPC/VNet) via a web proxy:
Supported Cloudera services
The following Cloudera services allow the use of a web proxy:
| CDP service | AWS | Azure | GCP |
|---|---|---|---|
| Data Lake | GA | GA | GA |
| FreeIPA | GA | GA | GA |
| Cloudera Data Engineering | GA | ||
| Cloudera Data Hub | GA | GA | GA |
| Cloudera Data Warehouse | GA | ||
| Cloudera DataFlow | GA | ||
| Cloudera AI | GA | GA | |
| Cloudera Operational Database |
Note that in order to use a non-transparent proxy with Cloudera data services (such as Cloudera Data Engineering, Cloudera Data Warehouse, Cloudera DataFlow, and Cloudera AI), you must first configure it at the environment level and then once again when enabling/activating the Cloudera data service.
Setting up a non-transparent proxy in Cloudera
To set up a proxy server you can register an http proxy server as a shared resource and then add that shared resource when you set up your environment.
Required role: EnvironmentCreator can register a proxy in Cloudera and manage user access to the proxy. Owner or SharedResourceUser can view the proxy details. Owner can delete the proxy registration from Cloudera.
Steps
-
Log in to the Cloudera web interface.
- Navigate to the Cloudera Management Console.
-
Select from the left navigation pane.
-
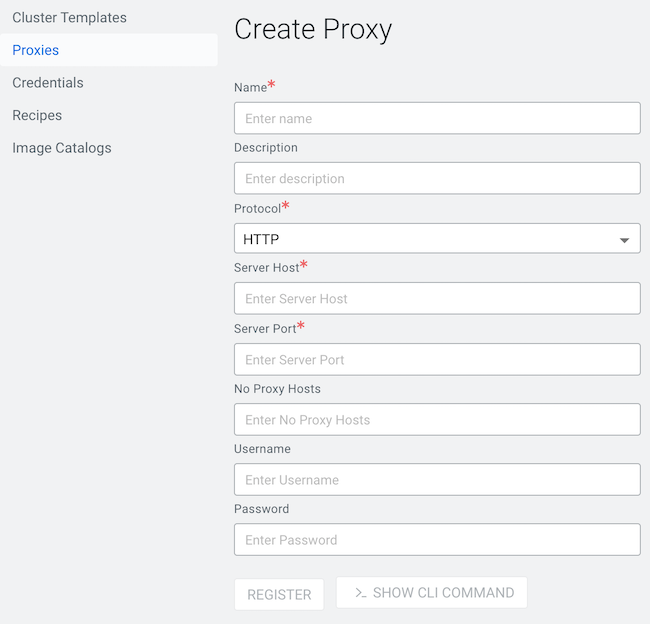
Click Create Proxy Configuration.
-
Enter the information for your proxy server:
Parameter Description Name (Required) Provide a name for the proxy. The name will be used for this specific proxy in CDP. Description You can optionally specify a longer description for this proxy. Protocol (Required) Select the protocol used by the proxy: HTTP or HTTPS. Server Host (Required) Provide proxy server's host. Server Port (Required) Provide the proxy server's port. No Proxy Hosts The no-proxy field allows you to designate specific IP addresses, domains, or subdomains that bypass the proxy. This setting can be useful for locally resolvable and internal endpoints, for example the CCMv2 agent or the metering agent.
Enter the values for this field in a comma-separated list. For example:
172.100.0.110,domainname.com,my.host.comNote the following guidelines:- The period character (".") is allowed as a prefix for domain names only
- CIDR notation is not allowed
Inbound Proxy CIDR Provide a custom CIDR IP range to allow inbound communication. Required when you use an FQDN instead of an IP address to define your proxy. Without providing the CIDR IP range security groups cannot be adjusted to allow communication with the proxy and Kubernetes server. User name If needed, provide a user name to access the proxy. Password If needed, provide a password to access the proxy. - Click REGISTER.
-
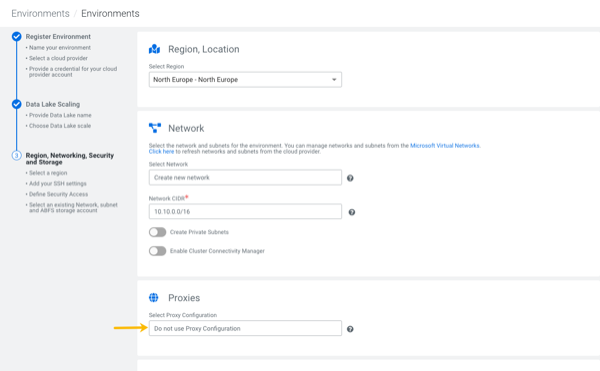
Click Environments in the left navigation pane, then click Register Environment.
-
Add your environment information, navigating through the Register Environment and Data Lake Scaling steps.
-
When you reach the Region, Networking and Security steps, choose the Proxy you registered.
-
Finish setting up your Environment.
-
Use the following commands:
cdp environments create-proxy-config \ --proxy-config-name companyProxy \ --host 10.102.0.19 \ --port 3128 \ --user squid \ --password squid \ --protocol http -
Provide the
proxyConfigNamein the environment JSON:... "subnetIds": [ "subnet-1", "subnet-2", "subnet-3" ], "proxyConfigName": "companyProxy" must be on the root level } -
Or in the
--proxy-config-nameargument of the environment creation command, enter the following:AWS:
cdp environments create-aws-environment \ --cli-input-json '{...}' \ --proxy-config-name companyProxyAzure:cdp environments create-azure-environment \ --cli-input-json '{...}' \ --proxy-config-name companyProxy
Setting up a web proxy for TLS inspection
After setting up the proxy server in Cloudera, you can further configure it to perform TLS interception and Deep Packet Inspection (DPI).
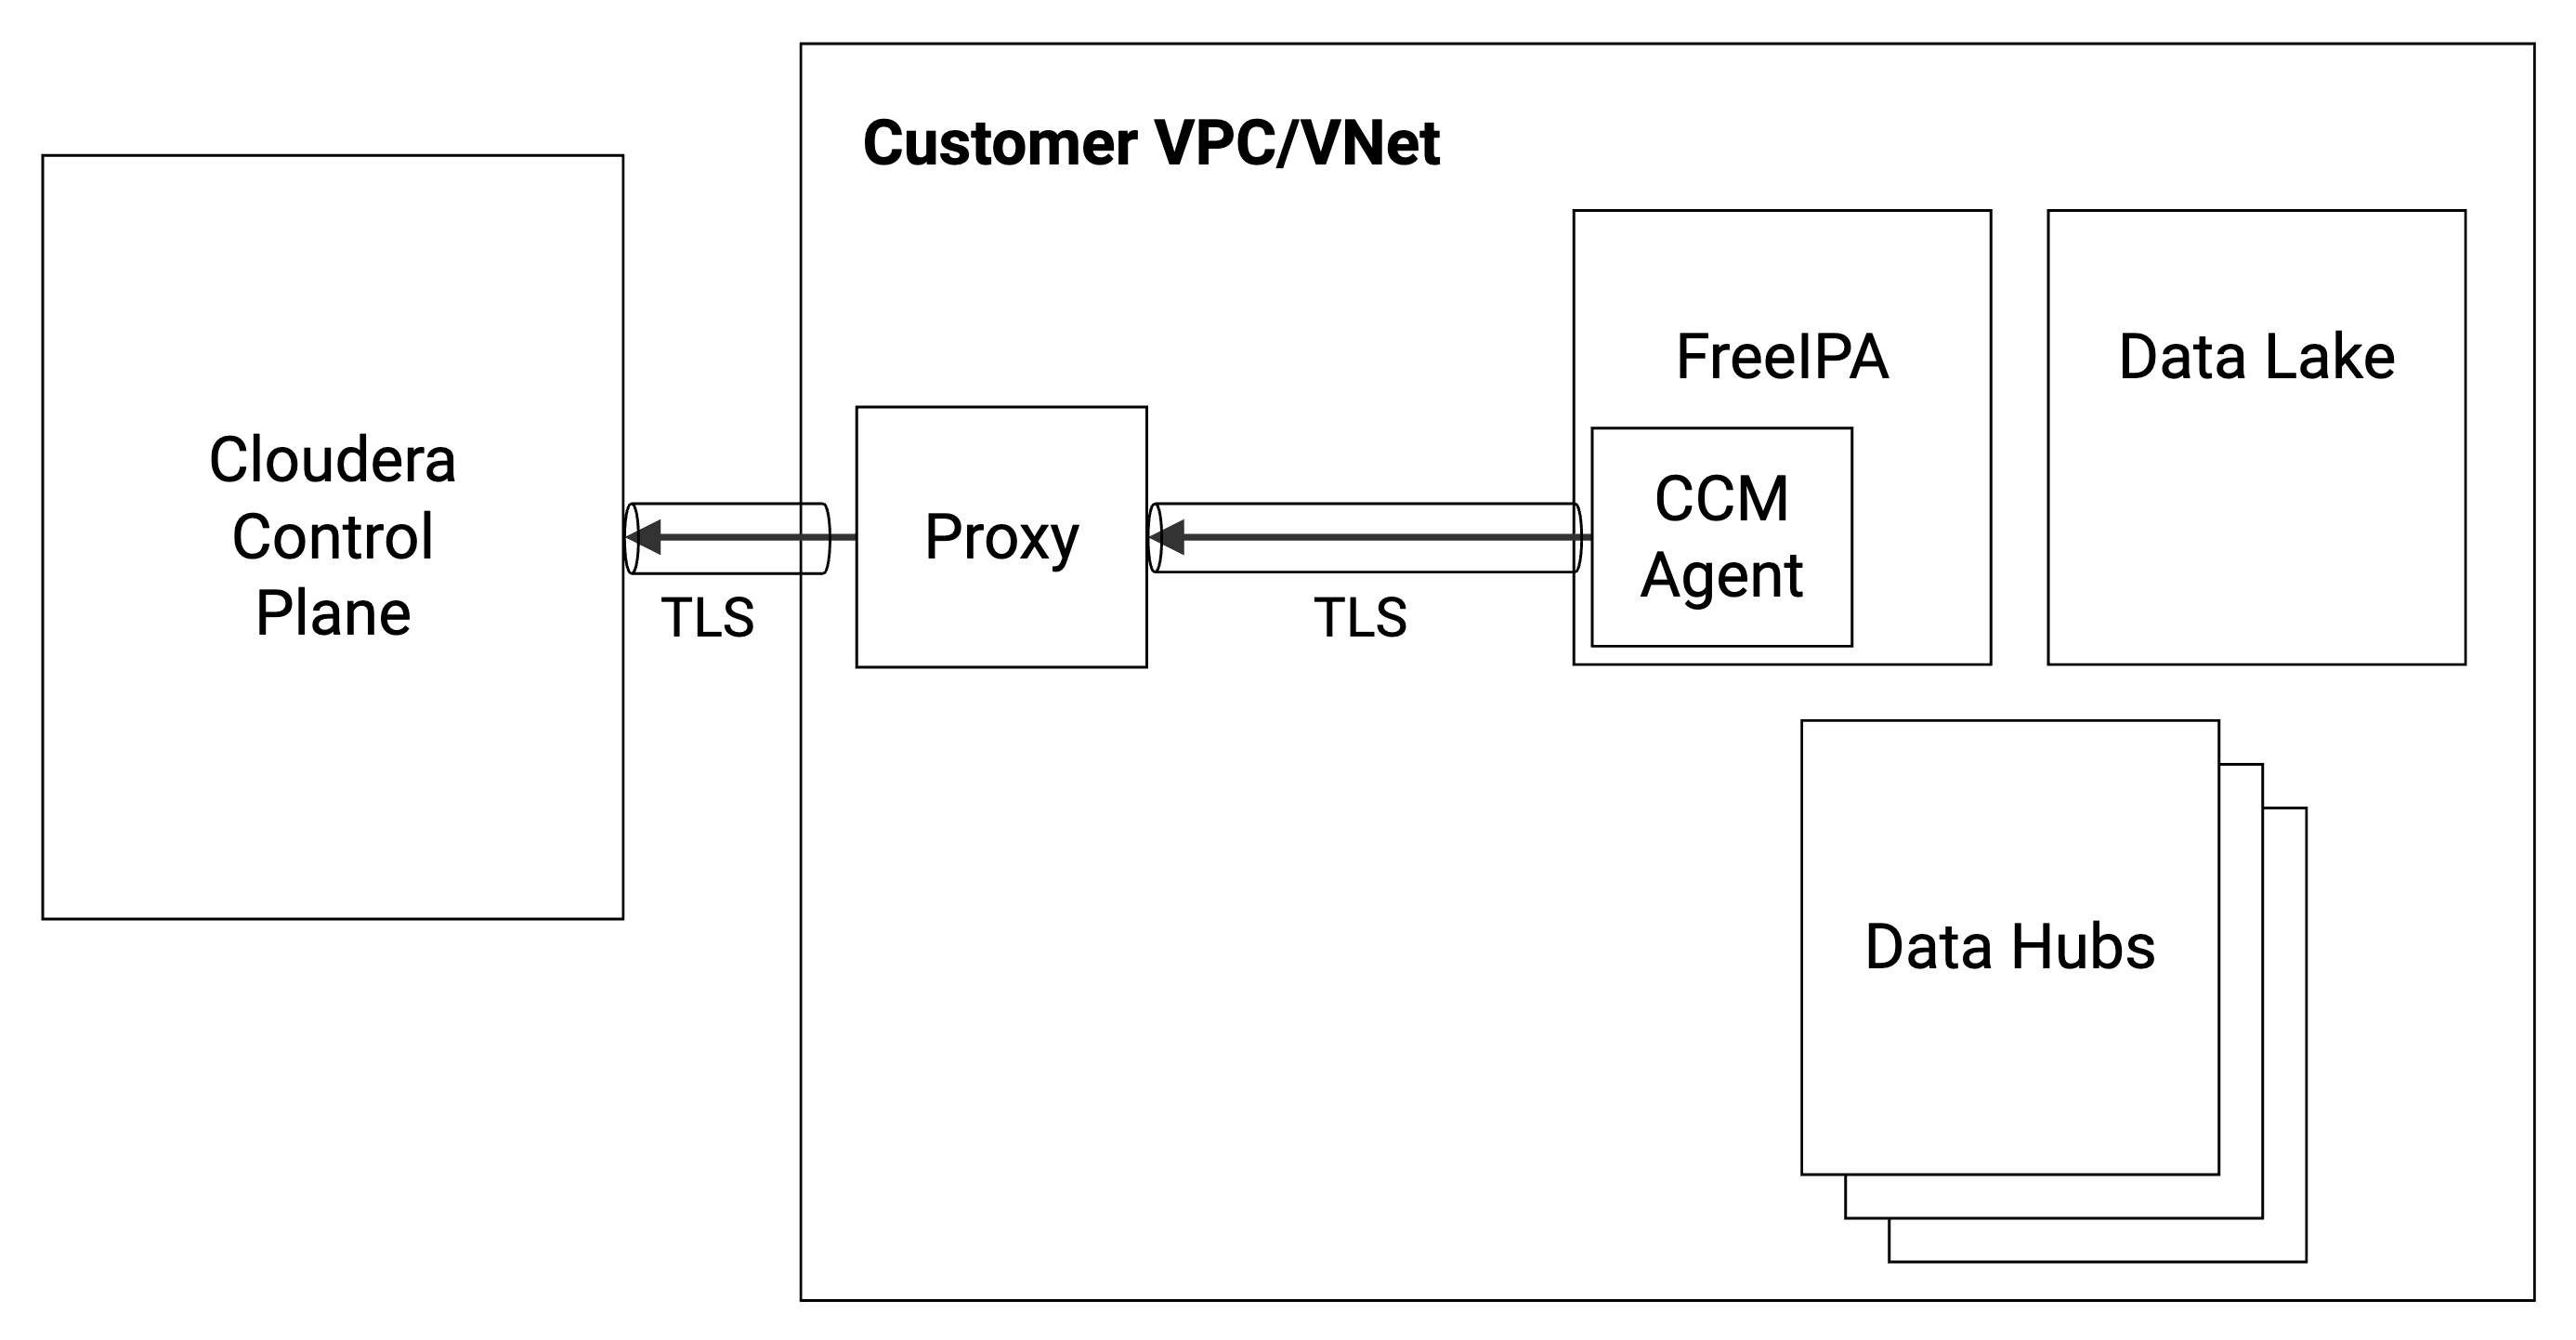
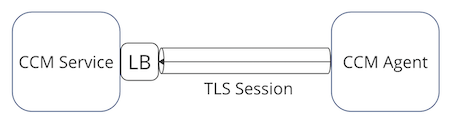
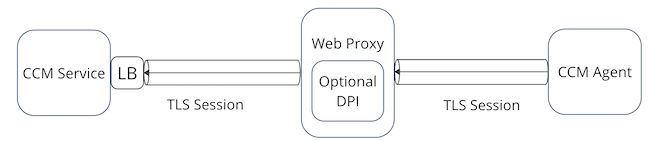
Without a web proxy, a single TLS session is initiated from the Cluster Connectivity Manager agent and terminated at the Cluster Connectivity Manager server within the Cloudera Control Plane. With the introduction of the web proxy, there are two TLS sessions: (1) a TLS session initiated from the Cluster Connectivity Manager agent terminating at the proxy and (2) a TLS session initiated from the proxy terminating at the Cluster Connectivity Manager server within the Cloudera Control Plane. The web proxy decrypts the packets of the TLS session, performs any operations on the clear text (such as DPI), and re-encrypts the packets onto the second TLS session. Thus the proxy behaves as a man-in-the-middle (MITM) that is able to view the communications between the Cluster Connectivity Manager agent and the Cluster Connectivity Manager server using TLS inspection.
The following diagram illustrates the communication between the customer’s Cloudera environment and the Cloudera Control Plane in a cloud provider network (VPC/VNet) via a web proxy:
The Cloudera architecture with and without proxy-based TLS inspection is illustrated in the following two diagrams.
The following diagram illustrates Cluster Connectivity Manager communication without a web proxy as MITM:
The following diagram illustrates Cluster Connectivity Manager communication with a web proxy as MITM:
To configure TLS inspection, you need to set up your proxy to trust the certificate of Cluster Connectivity Manager, and, in turn, make sure that Cluster Connectivity Manager trusts the proxy’s CA certificate.
Steps
-
Register a new Cloudera environment.
-
After the FreeIPA nodes are running, SSH into the FreeIPA nodes and perform the following set of steps:
-
Get the CA certificate from
/etc/jumpgate/config.tomland grab the pinned CA certificate from theagent.relayServerCertificateparameter. -
Configure your proxy server to trust this certificate for the Cluster Connectivity Manager traffic.
-
Copy your proxy server’s CA certificate and replace the contents of
agent.relayServerCertificatein/etc/jumpgate/config.toml. -
Configure your proxy to start MITM-ing the underlying TLS connection.
-