Custom NAR configs
On the Custom NAR Configs tab you can reassign and validate Custom NAR configs.
Validating a custom NAR config
You can validate custom NAR files and their locations in the Resources view.
- Make sure that you have DFDeveloper permission to perform this task. For information on account and resource roles, see Cloudera Data Flow Authorization.
-
Click
 [More] >
  Validate.
Cloudera Data Flow displays a message about the validity of the NAR config and its storage location.
Validate.
Cloudera Data Flow displays a message about the validity of the NAR config and its storage location.
Reassigning a custom NAR config to a different project
Learn how to reassign a custom NAR config to another project.
- Make sure that you have DFDeveloper permission to perform this task. For information on account and resource roles, see Cloudera Data Flow Authorization.
You cannot reassign an inbound connection that is currently used by a deployment. You have to teminate the deployment using it making sure that the Delete assigned endpoint hostname option is not selected before you can reassign it to a different project.
-
Click
 Apply Changes.
Best practices for building custom components
Learn about general guidelines concerning the creation of custom NiFi archives (NARs).
The goal is to build your code once against a baseline version of Apache NiFi and it can be deployed to any flow you need using any version of Cloudera Data Flow powered by any NiFi deployment equal to or greater than the version it was built against, bar major version changes.
Apache NiFi extensions are packaged in NARs. A NAR allows several components and their dependencies to be packaged together into a single package. NiFi provides Maven archetypes for creating custom processor and controller service bundle project structures. For detailed information, see the Maven Projects for Extensions Apache NiFi wiki page.
- If directly specifying the
nifi-nar-maven-plugin, ensure you use the most recent version when compiling your custom code. - If inheriting the
nifi-nar-maven-plugin, Cloudera recommends that the parent version ofnifi-nar-bundleshas the same major and minor version as the selected NiFi runtime version. For example, If the CFM Version is 1.18.0.2.3.7.1 (NiFi Major Version: 1, NiFi Minor Version: 18) the recommended compilation version is 1.18.0 (The first two version numbers must be equal to, or less than the CFM version).
<parent> <groupId>org.apache.nifi</groupId> <artifactId>nifi-nar-bundles</artifactId> <version>1.18.0.2.3.7.1-1</version> </parent> - Ensure your NAR
pomonly depends on another NARpomfor a controller service API NAR. Generally, do not extend from implementation NARs likenifi-standard-nar. - Ensure your components
jarpommarks API dependencies as provided in order to obtain them at runtime through the appropriate NAR dependency.
Best practices for packaging custom Python processors [Technical Preview]
Depending on complexity and possible shared dependencies, you need to decide whether to create your custom processor as a single file or as a package.
This documentation describes your options on packaging your custom Python processor and making it available for flow deployments in Cloudera Data Flow, and is based on the official Apache NiFi 2 documentation. For additional best practices on writing a custom Python processor for a NiFi 2.x flow, consult the official Apache NiFi documentation. Python processors can be packaged either as a single Python file, or as a Python package.
Single Python File
If the processor is simple and does not share dependencies with any other custom processor, it is easiest to have a single Python file named after the processor, like CreateFlowFile.py. In the single Python file format dependencies are specified directly in the processor.
For example:
class PandaProcessor(FlowFileTransform)
    class Java:
        implements = ['org.apache.nifi.pythonprocessor.FlowFileTransform']
    class ProcessorDetails:
        version = '0.0.1-SNAPSHOT',
        dependencies = ['pandas', 'numpy==1.20.0']
Python package
If more than one custom Python processor uses the same dependencies, or if you have a helper module that you want to use in one or more Python processors, a Python package is required. Structure your code as follows:
my-python-package/
┃
┣━ __init__.py
┃
┣━ ProcessorA.py
┃
┣━ ProcessorB.py
┃
┣━ HelperModule.py
┃
┗━ requirements.txt
In this example, all requirements across the processors and helper modules appear in
requirements.txt, and both ProcessorA and
ProcessorB can reference code in the helper module in a way similar to the
following:
from HelperModule import my_helper_functionWhen uploading a Python package to cloud storage for use in Cloudera Data Flow, add the package directory (my-python-package in this example) directly
inside the cloud storage directory that you are going to specify during deployment.
For example, if you specify s3a://bucket-name/custom-python as your cloud
storage directory in the wizard, the following files should exist in cloud storage:
s3://my-bucket/custom-python/my-python-package/__init__.py
s3://my-bucket/custom-python/my-python-package/ProcessorA.py
s3://my-bucket/custom-python/my-python-package/ProcessorB.py
s3://my-bucket/custom-python/my-python-package/HelperModule.py
s3://my-bucket/custom-python/my-python-package/requirements.txt
Making the processor available for Cloudera Data Flow
In order to make a custom Python processor available to Cloudera Data Flow, upload it to cloud storage as described in Preparing cloud storage to deploy custom processors.
In the deployment wizard, specify this directory as Custom Python processor Storage Location.
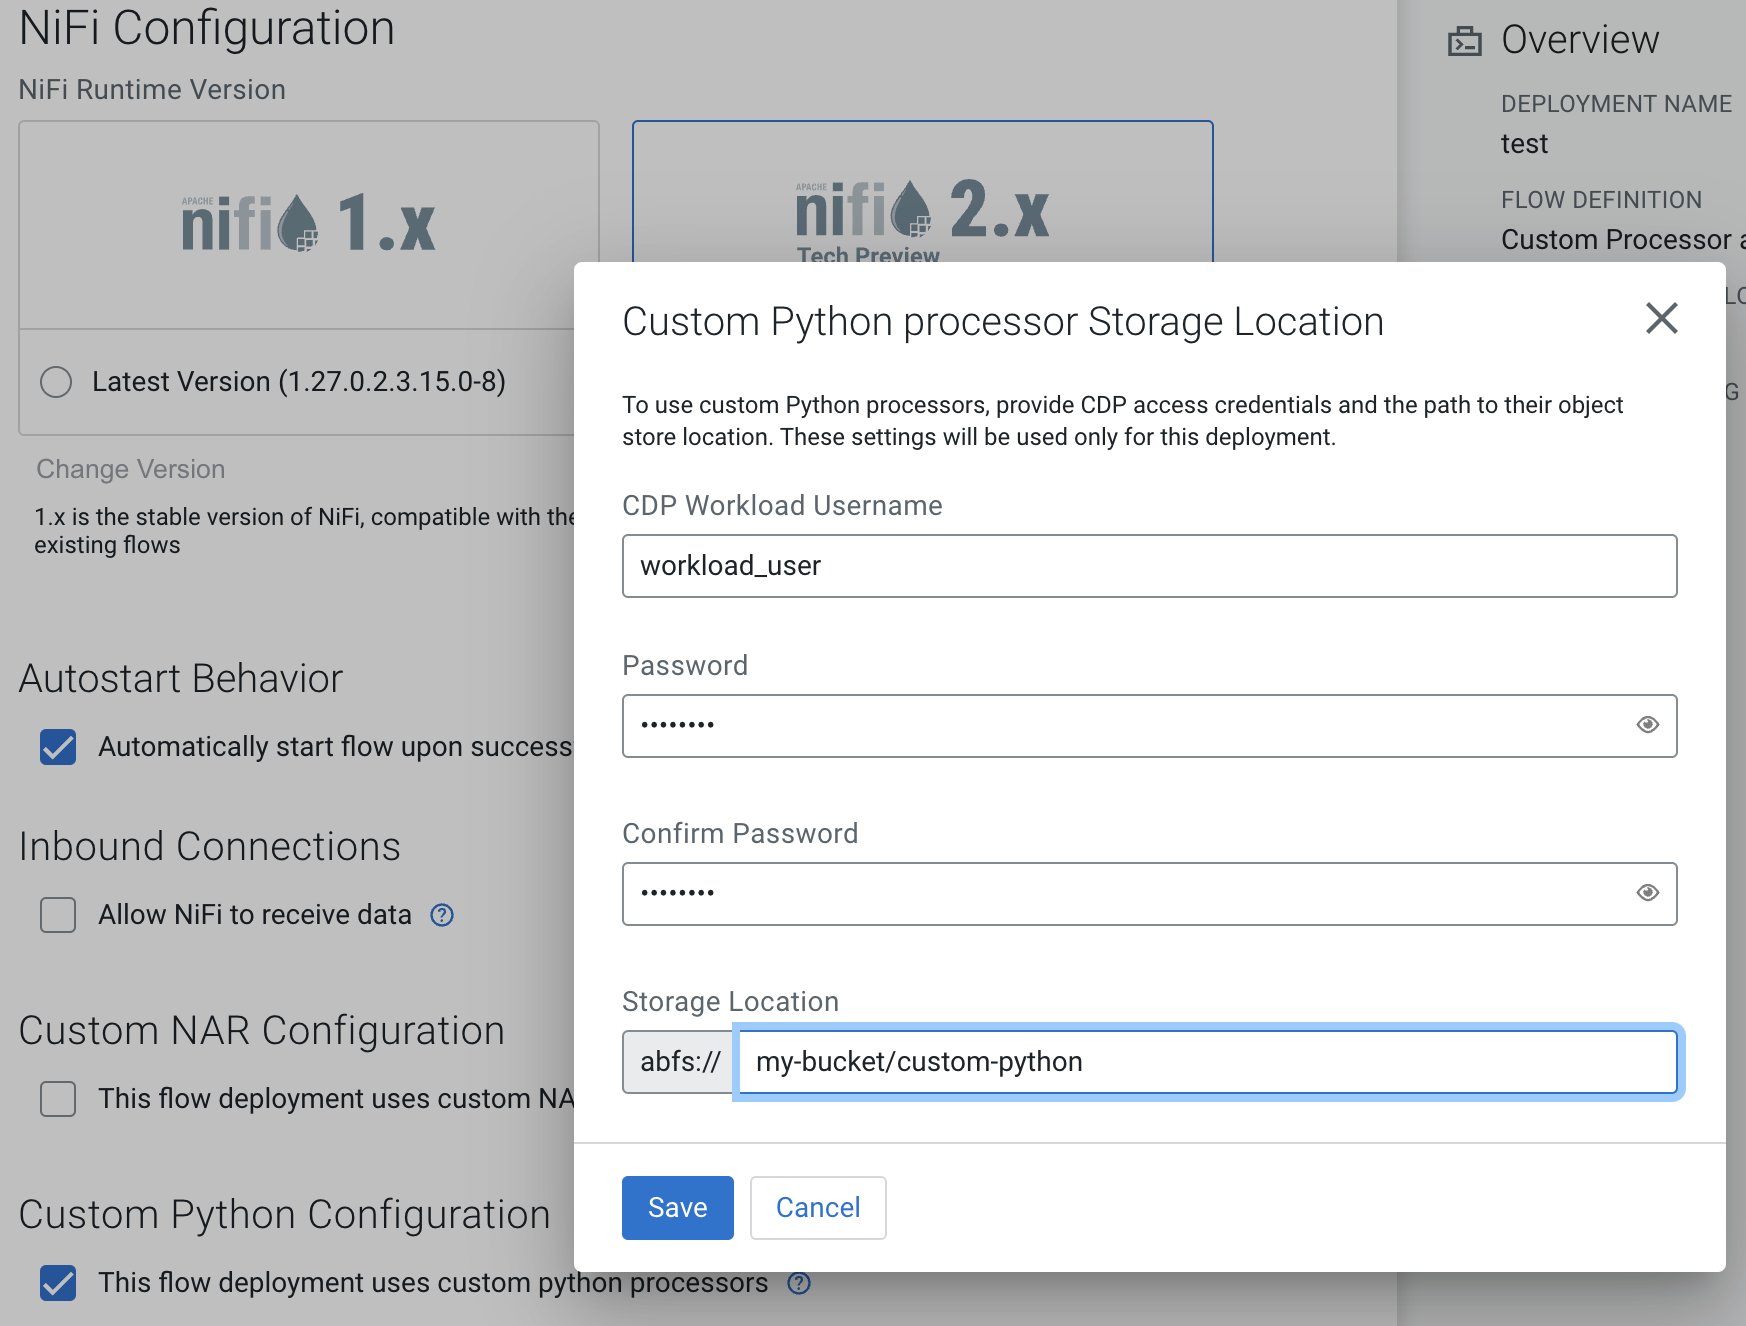
Preparing cloud storage to deploy custom processors
To use a custom Apache NiFi processor or controller service in one of your Cloudera Data Flow flow deployments, add the NiFi Archive (NAR), Python file, or Python package containing the custom processor or controller service to a cloud storage location for later use during a flow deployment.
Once you have added the NAR files to a cloud storage location, you are ready to launch the Deployment Wizard and deploy a flow.