Azure Function triggers
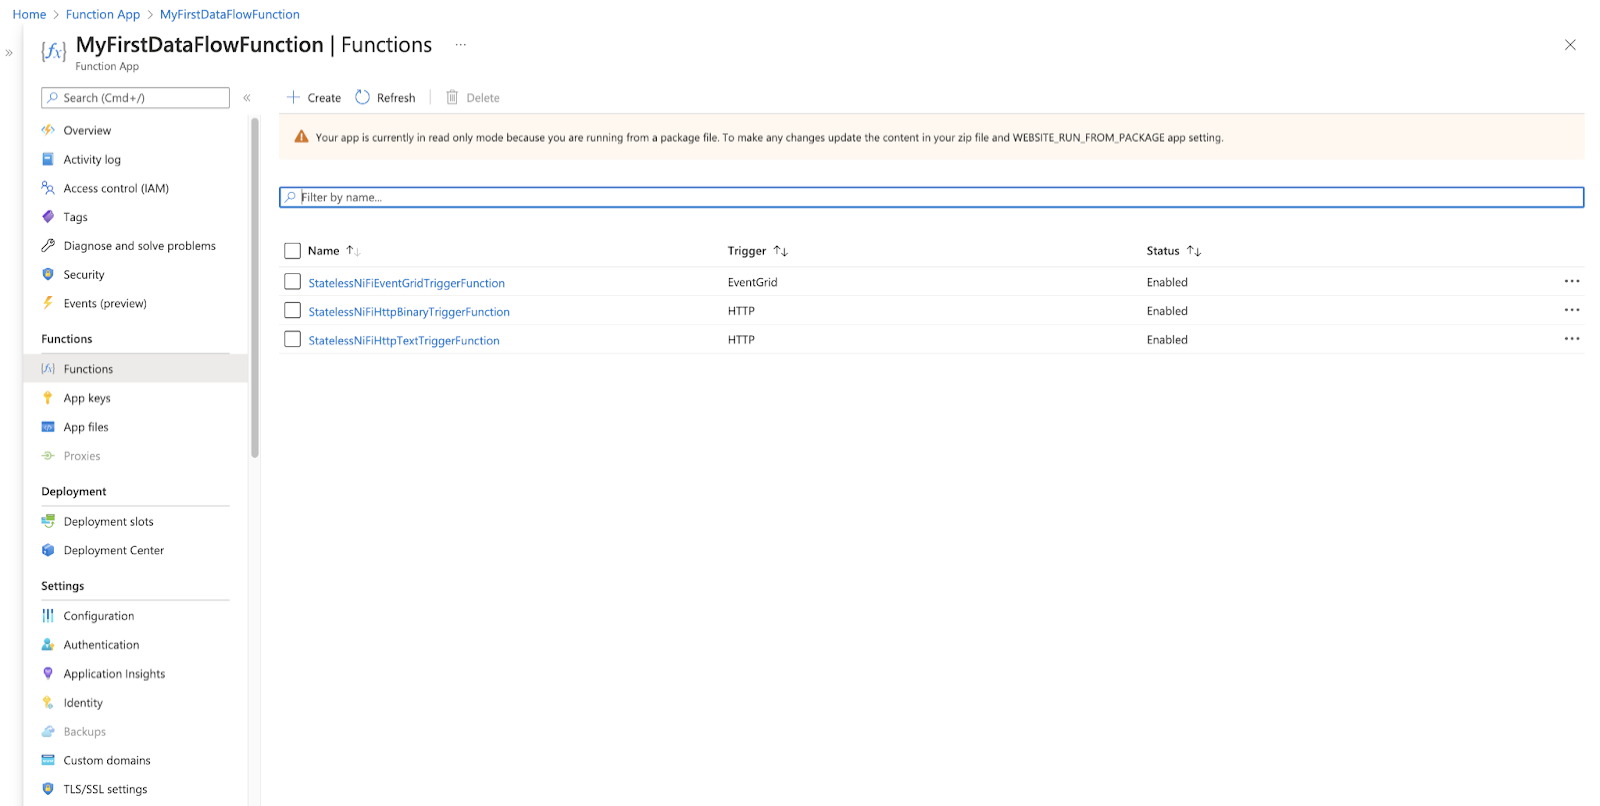
After you fully deploy your Function App, you can go to the Functions blade to view the different Functions that are available in Cloudera Data Flow Functions.
Overview
- StatelessNiFiEventGridTriggerFunction
- Triggers based on an Azure EventGrid event. This allows a wide range of possible events to trigger your Function App. For more information configuring Event Grid to interact with your Function App, see the section on Event Grid Functions.
- StatelessNiFiHttpBinaryTriggerFunction
- Triggers in response to an HTTP request with a binary payload (
Content-Type:
              application/octet-stream
). See the section on HTTP Functions for more information on this trigger type. - StatelessNiFiHttpTextTriggerFunction
- Identical to the StatelessNiFiHttpBinaryTriggerFunction, but supports text-based
payloads such as JSON (
Content-Type: application/json), XML (Content-Type: application/xml), and so on.
Event Grid Functions
The StatelessNiFiEventGridTriggerFunction can be used to trigger based on an Event Grid event, responding to a variety of Azure signals.
To set up an Event Grid Subscription for your Function App, follow these steps:
-
Navigate to the Event Grid System Topics service, and click Create in the top-left.
-
Select the Topic Type based on what service you want to trigger your Function App.
For example, if you want your Function to trigger every time a file is dropped into a Storage Container, select Storage Accounts (Blob & GPv2). After that select the Subscription of the Resource you want to target, and select the Resource Group and Resource accordingly.
-
Enter a name for your System Topic, and check the Enable system assigned identity box.
-
Click Review + create, and then Create.
-
When the deployment completes, click Go to resource.
Although you could have created an Event Grid Subscription directly, creating a System Topic to house the Subscription allows additional diagnostics to be configured, such as routing information about DeliveryFailures to a Storage account, which is particularly useful in troubleshooting. Check the Diagnostic settings blade for more information on configuring this setting.
-
On the Event Grid System Topic Overview blade, click + Event Subscription in the top-left.
-
Enter a name for the subscription.
-
Select the Event schema, which specifies the format of metadata sent as input to your NiFi data flow.
For details on event grid properties and schema, see Azure Event Grid event schema. For details on the Cloud Event Schema, see CloudEvents v1.0 schema with Azure Event Grid.
-
Optionally, select the Event Types (for example, "Blob Created" for Storage accounts).
-
For Endpoint Details, select Azure Function, and click the Select an endpoint link.
Your function will likely be automatically selected, but if not, you can select the appropriate Function from the right panel, and then click Confirm Selection.
- Click Create.
You can now monitor the subscription from the System Topic, and should see any activity in the Overview blade.
HTTP Functions
With HTTP functions, the Function is invoked by submitting an HTTP request, and the Function output from the data flow is returned as the HTTP response, with specific Output Port semantics. For more information, see HTTP Function Output Ports.
This is an example of invoking the StatelessNiFiHttpTextTriggerFunction using
curl:
curl https://<function-app-name>.azurewebsites.net/api/StatelessNiFiHttpTextTriggerFunction \
     -H 'Content-Type: application/json' \
     --data-binary @my-file.json
The StatelessNiFiHttpBinaryTriggerFunction invocation is very similar, but allows binary data to be submitted:
curl https://<function-app-name>.azurewebsites.net/api/StatelessNiFiHttpBinaryTriggerFunction \
     -H 'Content-Type: application/octet-stream' \
     --data-binary @my-file.pdf
In any successful response, the mime.type flowfile attribute
will be used as the Content-Type of the response. Conversely, the HTTP
request Content-Type will be added as the mime.type
attribute of the input flowfile.
There are two Application Settings that can be configured to customize the HTTP response:
- HEADER_ATTRIBUTE_PATTERN
- can provide a regular expression matching any flowfile attributes to be included as HTTP response headers. This means that any attributes to be included as headers should be named as the headers themselves.
- HTTP_STATUS_CODE_ATTRIBUTE
- specifies a flowfile attribute that sets the HTTP status code in the response. This allows a code other than 200 for 'success' or 500 for 'failure' to be returned. If this environment variable is specified but the attribute is not set, the status code in the HTTP response will default to 200.
In the "failure" scenario, the HTTP_STATUS_CODE_ATTRIBUTE is not
used. Therefore, if a non-500 status code is required, it must be provided in a successful
data flow path. For example, If a 409 Conflict is desired, it could be
achieved as follows:
-
In the data flow, include an UpdateAttribute processor that sets an arbitrary attribute, for example
http.status.code, to the value409. -
Optionally, add a ReplaceText processor that sets the contents of the flowfile using Always Replace to whatever HTTP response body is desired.
-
Route this part of the flow to the main Output Port used for the success case.
-
Set
HTTP_STATUS_CODE_ATTRIBUTEtohttp.status.code.
The same method may also be used to set a non-200 success code.
All HTTP headers sent in the HTTP request will be imported as Flowfile attributes in the
data flow, with an attribute name like
azure.http.header.<lowercaseHeaderName>. For example, submitting a
request with a header X-My-Test-Header: test will result in the flowfile
having an attribute named azure.http.header.x-my-test-header with a value
of test.