Inbound connections
An Inbound Connection Endpoint allows you to stream data from an external source application to a flow.
An Inbound Connection Endpoint provides a stable hostname that can be used to send data to a Cloudera Data Flow deployment located in the same environment. You can create an Inbound Connection Endpoint during deployment, provided that the flow definition supports creating such endpoints.
Endpoints exist within the environment where they were created. They cannot be moved between environments. If the environment is deleted, the endpoint gets deleted as well, and cannot be reused.
One endpoint can be assigned to one deployment at a time. To reassign an existing inbound connection endpoint, you need to first terminate the deployment to which it is currently assigned, then assign the existing endpoint to a new deployment in the NiFi configuration step during flow deployment.
Setting up an Inbound Connection Endpoint is a complex task, affecting how you develop a flow definition in NiFi and how you deploy it in Cloudera Data Flow. Once your flow has been deployed, you need to configure your client, be it directly an external application or through an external load balancer, to communicate with the Inbound Connection Endpoint of your flow deployment.
-
In the Workspace Resources view select the Inbound
Connections tab.
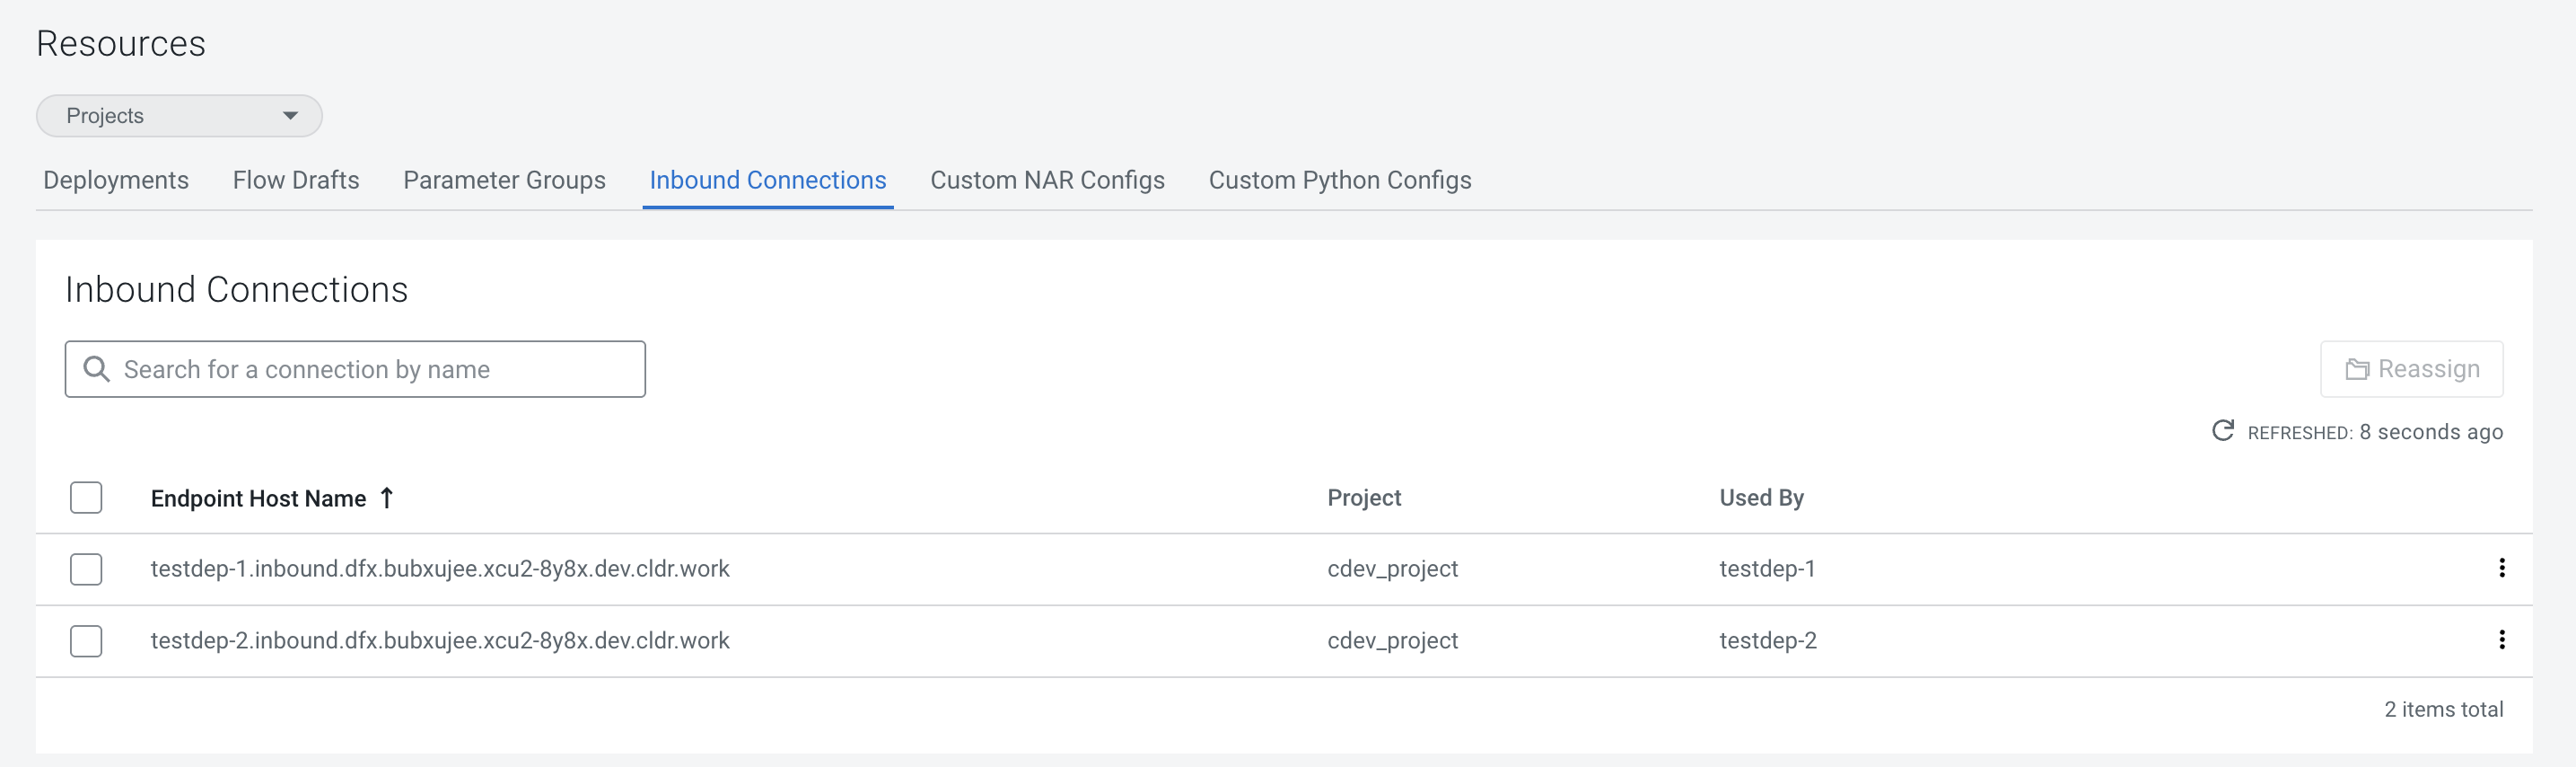
Adding an inbound connection to an existing deployment
Learn how to add an inbound connection to an existing deployment.
-
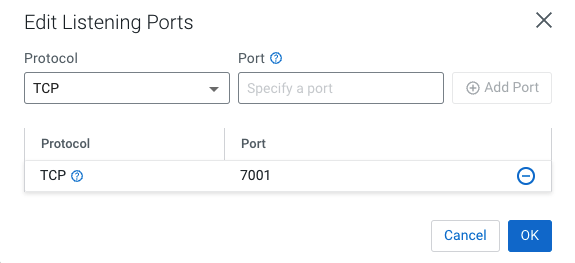
Add Listening Ports.
Select a protocol and add a port, then click
 Add Port. Repeat this
step for each port where your flow will listen to incoming data. Using ports
with mixed protocols (TCP and UDP) is not allowed.
Add Port. Repeat this
step for each port where your flow will listen to incoming data. Using ports
with mixed protocols (TCP and UDP) is not allowed.When you are finished adding ports, click OK.
-
Specify Trusted IP Addresses.
Specify a comma-separated list of trusted CIDRs or IP ranges, then click
Add.To allow all traffic, select the Allow all traffic option.
-
To promote the changes you made, click
 Apply Changes.
Deployment status changes to
Apply Changes.
Deployment status changes to Updating.
Renewing the certificate for an inbound connection endpoint
If you need to replace an X.509 certificate for an inbound connection endpoint before it expires, you can do so manually.
- If you have renewed the NiFi Inbound SSL Context Service:
- You have to take no further action.
- If you have renewed the Client SSL Context:
- After your Cloudera Data Flow deployment has restarted, you switch to the NiFi Configuration pane to download the Client Certificate and the Client Private Key. You can then add these to your client.
Reassigning an inbound connection endpoint to a different project
Learn how to reassign an inbound connection to another project.
- Make sure that you have DFDeveloper permission to perform this task. For information on account and resource roles, see Cloudera Data Flow Authorization.
You cannot reassign an inbound connection that is currently used by a deployment. You have to terminate the deployment using it making sure that the Delete assigned endpoint hostname option is not selected before you can reassign it to a different project.
-
Click Apply Changes.
Using Inbound Connections with an external load balancer
Once a Cloudera Data Flow deployment with an Inbound Connection Endpoint
is available, you can go on and connect an external load balancer to start sending data. 
Inbound Connection Endpoints are created in Cloudera Data Flow with an internal Layer 4 (L4) load balancer (LB). Nevertheless, it is also possible to use your own native Layer 7 (L7) LB (Application Gateway on Azure, Application Load Balancer on AWS, respectively) in front of the Cloudera managed L4 LB.
Cloudera recommends achieving this by
configuring your L7 LB to use the Cloudera Data Flow deployment LB as a backend.
Enabling TLS between your LB and the Cloudera Data Flow LB is recommended, but
mTLS is not possible for the backend connection. This means that your Listen Processor (e.g.,
ListenHTTP) in your NiFi flow cannot be configured with Client Auth = Required
when using an external LB as a gateway.
You may configure the listening side of your LB and routing rules according to the requirements of your organization.
Alternatively, you may be required to use a L4 LB provided by your organization in front of the Cloudera managed LB. This is also possible, although Cloudera recommends directly using the Cloudera managed L4 LB when possible.
Typically, when using an external load balancer to act as a gateway, the internal managed load balancer should stay private. This can be accomplished by deselecting the “Use Public Endpoint” option when enabling Cloudera Data Flow for your environment, which limits Cloudera Data Flow to only use private subnets for all resources. If public access is needed, that would be done by exposing private resources via the external gateway load balancer.
Configuration workflow
Currently, an Inbound Connection Endpoint can only be created during flow deployment, and cannot be reassigned without terminating the flow deployment for which it was created.
To configure an external load balancer, you need to go through the following steps:
Configure an Application Gateway in Azure
Learn about the settings required to set up an Azure Application Gateway to communicate with an Inbound Connection Endpoint.
Create an Azure Application Gateway service (you find it in the Networking services category) using the following settings:
Tutorial: MiNiFi to Cloudera Data Flow flow deployment
This tutorial walks you through creating an inbound connection endpoint in Cloudera Data Flow used by a flow deployment to receive data from one or more MiNiFi agents managed by Edge Flow Manager.
-
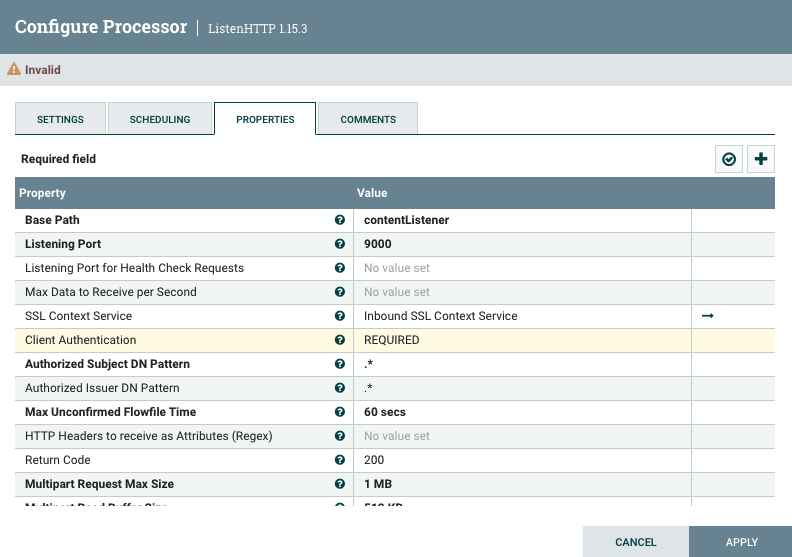
Configure the listen processor:
- Base Path
- This tutorial uses the default contentListener.
- Listening Port
- Define a value that is valid for your use case. This tutorial uses port 9000.
- SSL Context Service
- Select Inbound SSL Context Service.
- Client Authentication
- Select REQUIRED.
-
Deploy the flow.
-
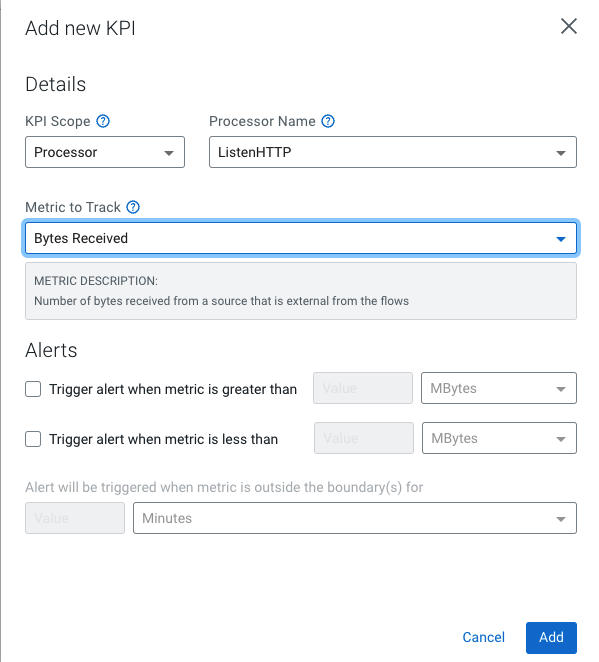
Add a KPI on the ListenHTTP processor to monitor how many bytes it is
receiving, by clicking Add new KPI.
Make the following settings:
- KPI Scope
- Processor
- Processor Name
- ListenHTTP
- Metric to Track
- Bytes Received
Soon after the flow deployment has started, the client certificate and private key required for sending data to the NiFi flow become available for the flow deployment that is being created.
-
Add a KPI on the ListenHTTP processor to monitor how many bytes it is
receiving, by clicking Add new KPI.
-
Start designing your MiNiFi flow in EFM.
To design a flow for your MiNiFi C++ agent class:
-
Copy the downloaded client-private-key-encoded key and client-certificate-encoded.cer certificate files to the host with the running MiNiFi C++ agent, so they are accessible by filepath from the agent.
- Create a Service of type SSL Context
Service with the following configuration:
- Service Name
- Specify a name for this service. This tutorial uses Client SSL Context Service.
- CA Certificate
- Leave it empty. As Cloudera Data Flow uses Let's Encrypt as a Certificate Authority, the certificate will be accepted automatically, without additional configuration.
- Client Certificate
[***/PATH/TO/***]client-certificate-encoded.cerFor example, /opt/minifi/minifi-test/client-certs/client-certificate-encoded.cer.
- Passphrase
- Set no value.
- Private Key
[***PATH/TO/***]client-private-key-encodedFor example, /opt/minifi/minifi-test/client-certs/client-private-key-encoded
- Use System Cert Store
- Keep the default False value.
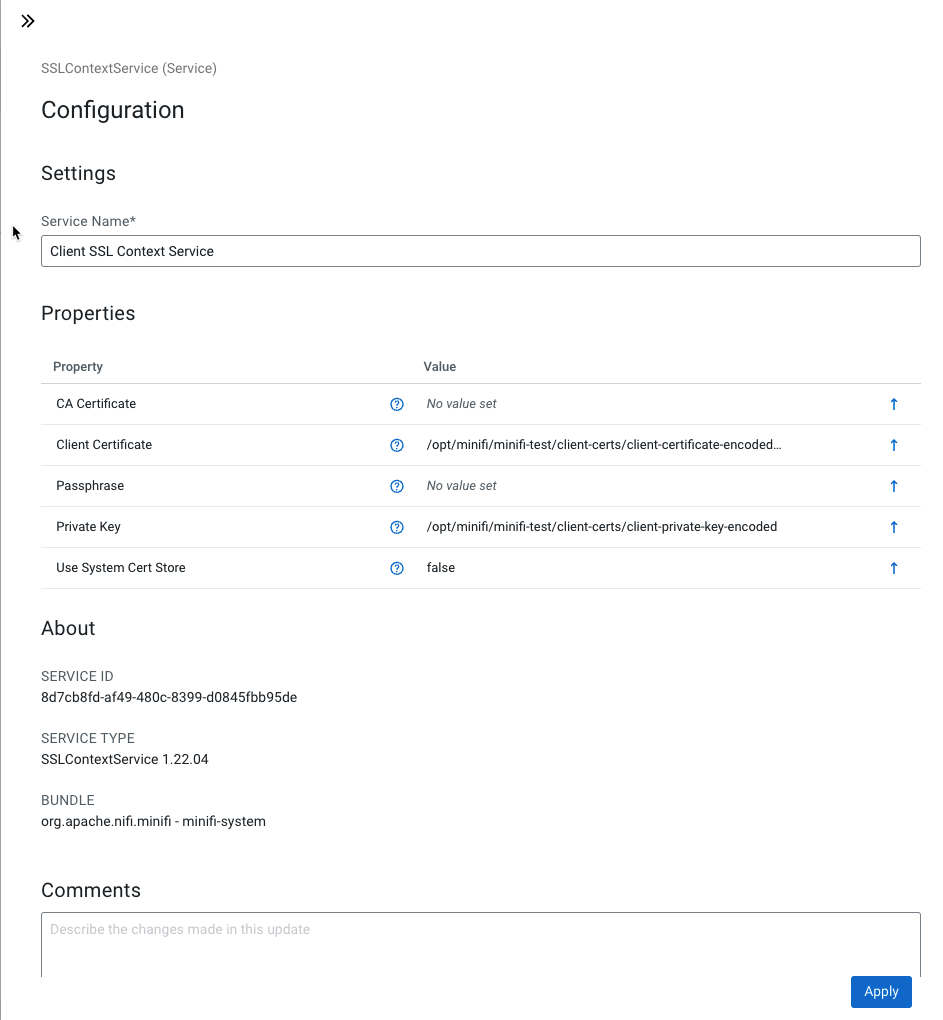
- Click Apply.
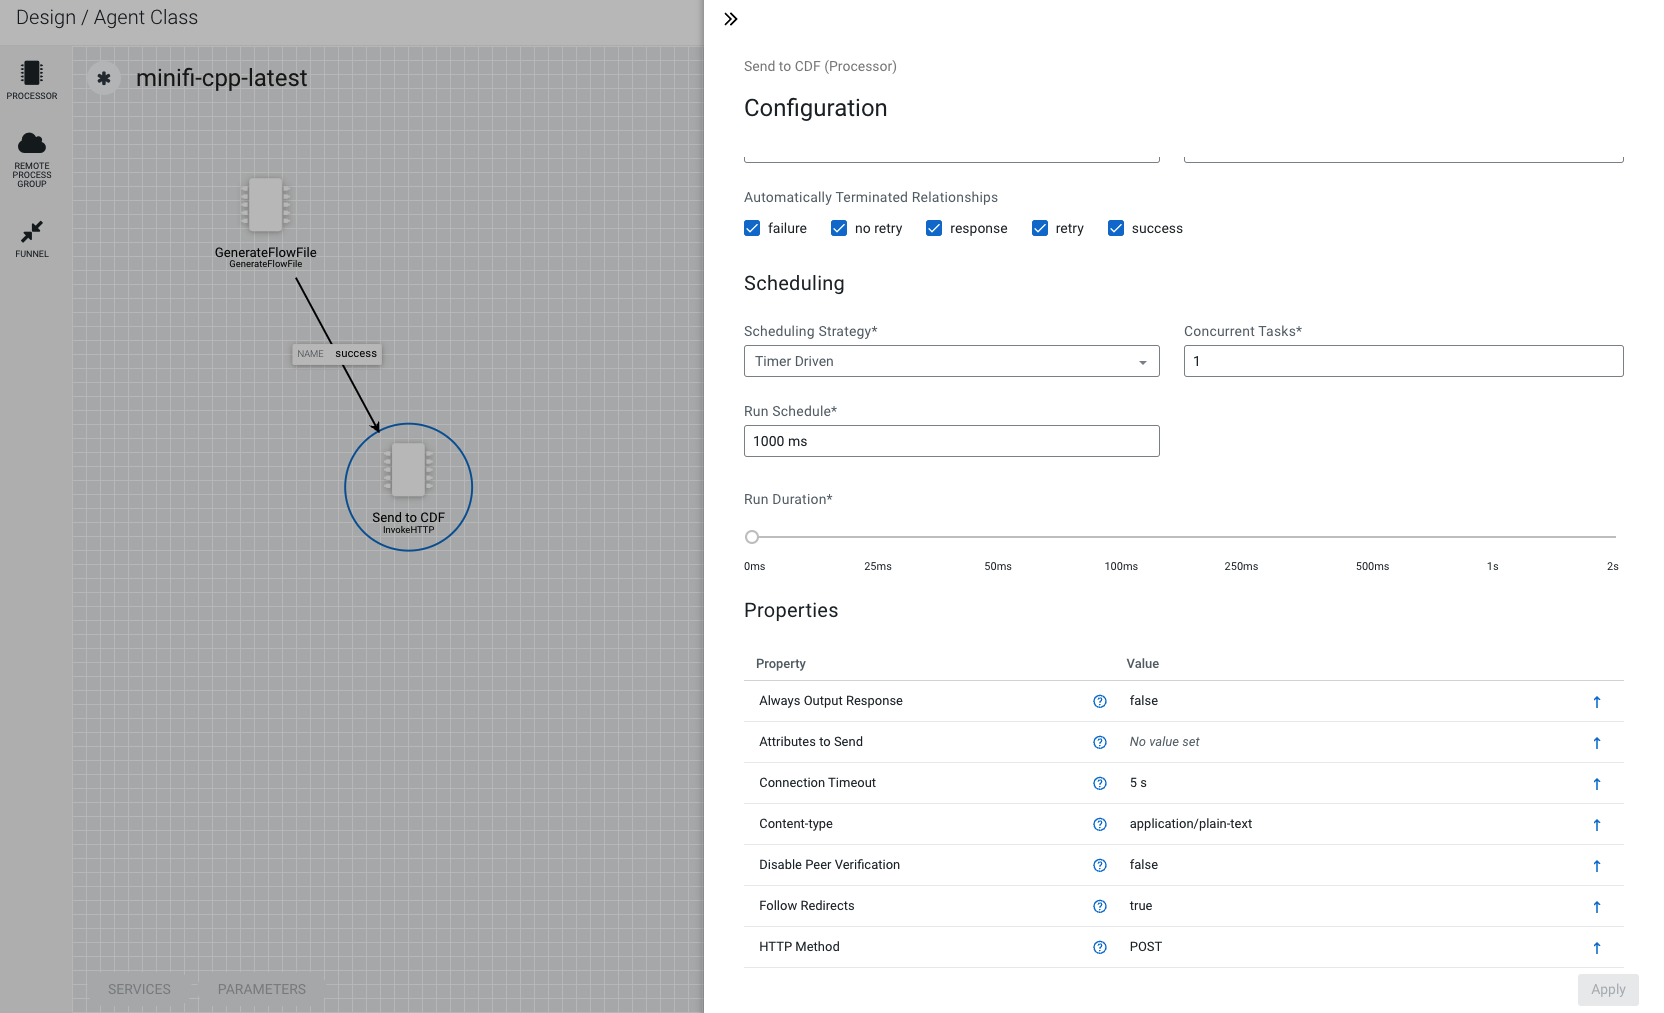
- Create an InvokeHTTP processor named Send to
CDF with the following configuration:
- Automatically Terminated Relationships
- Select all relationships.
- Content-type
- Depends on your flow file data type. This tutorial uses text/plain.
- HTTP Method
- POST
- Remote URL
- https://[***ENDPOINT HOSTNAME COPIED FROM
CLOUDERADATAFLOW FLOW DEPLOYMENT
MANAGER***]:9000/contentListener
For example,
https://my-flow.inbound.my-dfx.c94x5i9m.xcu2-8y8z.mycompany.test:9000/contentListener - SSL Context Service
- Client SSL Context Service
To design a flow for your MiNiFi Java agent class:
- Convert the downloaded
client-private-key-encodedkey andclient-certificate-encoded.cercertificate files to a JKS Keystore:-
Create a PKCS12 keystore:
openssl pkcs12 -export -in client-certificate-encoded -inkey client-private-key-encoded -out client-keystore.p12
-
Convert the PKCS12 keystore to a JKS keystore:
keytool -importkeystore -srckeystore client-keystore.p12 -srcstoretype pkcs12 -destkeystore client-keystore.jks
-
- Copy the resulting client-keystore.jks file to the host with the running MiNiFi Java agent, so they are accessible by filepath from the agent.
- Obtain the CA root cert and add it to truststore
client-truststore.jks, by running the following commands:wget https://letsencrypt.org/certs/isrgrootx1.pem keytool -import -file isrgrootx1.pem -alias isrgrootx1 -keystore client-truststore.jksMiNiFi Java requires you to specify an explicit truststore for inbound connections. Remember the password you used for creating
client-truststore.jks, as you will need it . - Create a Service of type Restricted SSL Context
Service with the following configuration:
- Service Name
- Specify a name for this service. This tutorial uses Client SSL Context Service.
- Keystore Filename
- [***/PATH/TO/***]client-truststore.jks
- Keystore Password
- [***THE PASSWORD YOU PROVIDED WHEN CREATING THE JKS STORE***]
- Key Password
- [***THE PASSWORD YOU PROVIDED WHEN CREATING THE JKS STORE***]
- Keystore Type
- JKS
- Truststore Filename
- client-truststore.jks
- Truststore Type
- JKS
- Truststore Password
- [***THE PASSWORD YOU PROVIDED WHEN CREATING THE CLIENT TRUSTSTORE***]
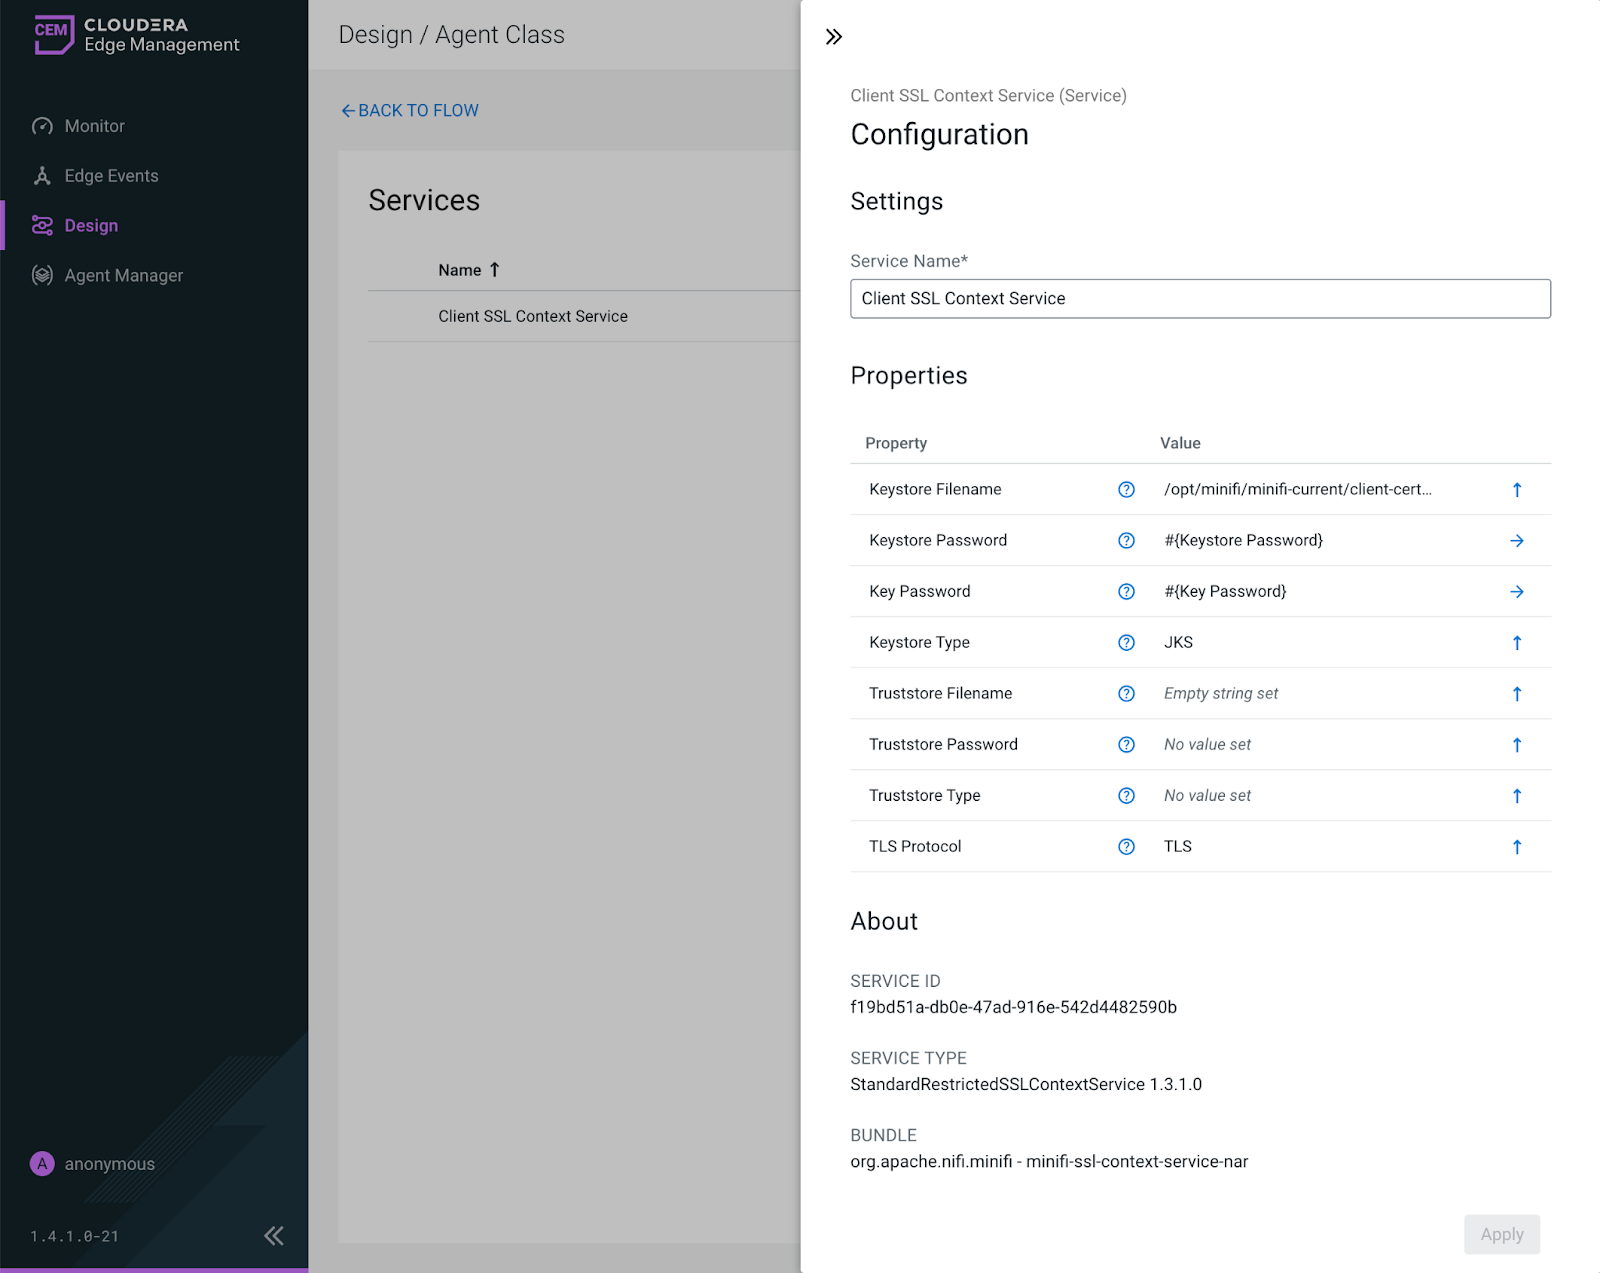
- Click Apply.
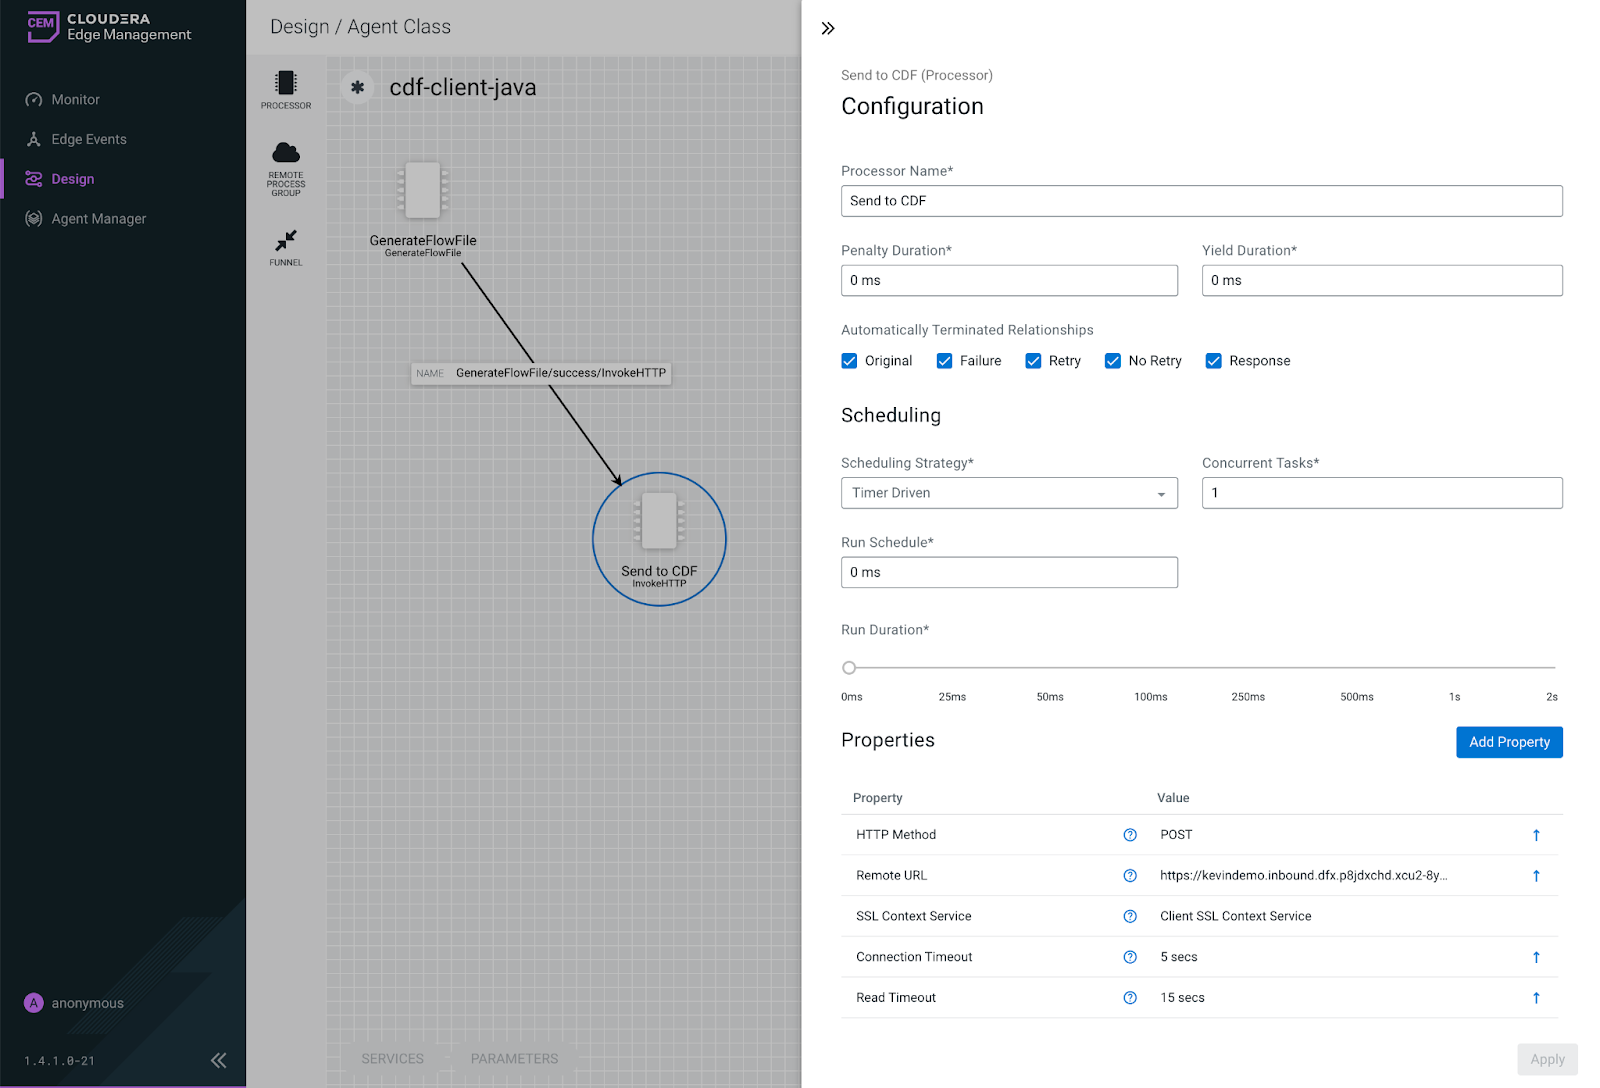
- Create an InvokeHTTP processor named Send to
CDF with the following configuration:
- Automatically Terminated Relationships
- Select all relationships.
- Content-type
- Depends on your flow file data type. This tutorial uses text/plain.
- HTTP Method
- POST
- Remote URL
- https://[***ENDPOINT HOSTNAME COPIED FROM
CLOUDERA DATAFLOW FLOW DEPLOYMENT
MANAGER***]:9000/contentListener
For example,
https://my-flow.inbound.my-dfx.c94x5i9m.xcu2-8y8z.mycompany.test:9000/contentListener - SSL Context Service
- Client SSL Context Service
-
-
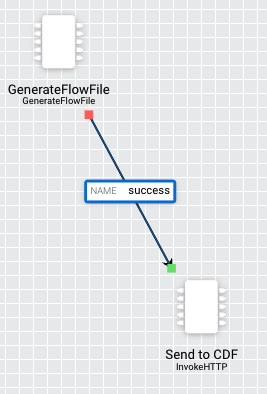
Build the rest of your data flow to read data and send to your Cloudera Data Flow flow deployment using InvokeHTTP. As a
simple example, this tutorial uses the GenerateFlowFile processor, with the
following settings:
- Run Schedule
- Set to 10000 ms (10 seconds).
- Custom Text
- The message you type here will be sent to the ListenHTTP Flow you have created, with the frequency specified by Run Schedule. For example, Hello DFX! This is MiNiFi.
- Data Format
- Set to Text.
- Unique FlowFiles
- Set to false.

-
Connect the GenerateFlowFile processor to the InvokeHTTP processor.
Tutorial: Invoking an HTTP endpoint with curl
This tutorial walks you through invoking an HTTP Inbound Connection Endpoint with curl using the ListenHTTP filter to Kafka ReadyFlow from the ReadyFlow Gallery.
-
Deploy the ListenHTTP filter to Kafka Ready Flow.
- Navigate to the ReadyFlow Gallery, locate the ListenHTTP filter to Kafka ReadyFlow and click View Added Flow Definition.
- Click Deploy and select your target environment to start the Deployment Wizard for the latest version of this ReadyFlow.
- Specify a deployment name, for example, Inbound Connections curl and click Next.
- Select Allow NiFi to receive data checkbox to configure an endpoint host.
- Accept the automatically created endpoint hostname and automatically discovered port by clicking Next.
- Optional: This ReadyFlow performs schema validation for
incoming events using Cloudera’s Schema Registry before sending the
events to a Kafka topic. If you have a Streams Messaging cluster
available, fill in the Kafka and Schema Registry connection
properties.
If you only want to validate inbound connection endpoint connectivity, enter dummy values for the empty parameters, set the Input and Output format to JSON while keeping the Listening Port set to 7001.
- At Sizing & Scaling select the Extra Small NiFi Node Size and click Next.
Add a KPI on the ListenHTTP processor to monitor how many bytes it is receiving, by clicking Add new KPI.
Make the following settings:- KPI Scope
- Processor
- Processor Name
- ListenHTTP
- Metric to Track
- Bytes Received
- Click Next.
- Review the information provided and click
Deploy.
Soon after the flow deployment has started, the client certificate and private key required for sending data to the NiFi flow become available for the flow deployment that is being created.
Connecting applications to an endpoint
Once a Cloudera Data Flow deployment with inbound connection is available, you can go on and connect an external application to start sending data.
-
A deployment with inbound connection is available.
-
A network connection through which the client can reach the deployment endpoint is available.
- You have been assigned at least the DFFlowUser role for the environment to which you want to configure the inbound connection.
TLS keys and certificates
When using Inbound Connection Endpoints, sensitive information is sent over the network between Cloudera Data Flow (CDF) and external data sources including configuration files that contain passwords. To secure this transfer, Cloudera strongly recommends that you configure mutual Transport Layer Security (TLS) encryption.
TLS is an industry standard set of cryptographic protocols for securing communications over a network.
Configuring TLS involves creating a private key and a public key for use by server and client processes to negotiate an encrypted connection. In addition, TLS can use certificates to verify the trustworthiness of keys presented during the negotiation to prevent spoofing and mitigate other potential security issues.