Installing Atlas in the Cloudera Manager upgrade wizard
You can use the wizard in Cloudera Manager to transition from CDH to , install Apache Atlas and its dependencies, and to generate customized commands to initiate the migration phases. After the wizard is complete, you can run the migration commands from the host where Atlas is installed.
This page describes the Cloudera Manager wizard steps that help you to setup Atlas and its service dependencies.
When a cluster is upgraded from CDH 5 or CDH 6 to CDP 7, by default the
atlas.metadata.namespace property is set to cm.
If a different namespace property needs to be set, for example: cluster1, the same
needs to be set while running the nav2atlas script as "-clusterName"
parameter and also in the atlas-application properties in the upgrade
wizard.
Post-upgrade, note that the different value "cluster1" is not
automatically updated in Hooks for services like Hive,
HBase, Impala, Spark,
and Kafka. You must make sure that before you upgrade your cluster and
once the services are installed, you must set the value "cluster1" for
all the available services. And later complete the upgrade process.
As an example process, follow these steps if namespace other than default "cm" needs to be set:
- Provide the namespace ("
cluster1") in the transformation step of Nav2Atlas script. - Add
atlas.metadata.namespace =cluster1inatlas-application propertiesin the following window of the upgrade wizard for Atlas. - Open another tab of the Cloudera Manager while upgrade process
is in progress and add
atlas.metadata.namespace =cluster1inSafety Valve of atlas-application.propertiesfor all the Hook services (Hive, HiveServer2 , Spark , HBase, Impala, and Kafka). - Perform all the other steps in the upgrade wizard and complete the upgrade.
- Remove Atlas from the migration mode.
To return to the main wizard documentation, go to Upgrading a CDH 6 Cluster.
Follow instructions in the upgrade wizard "Install Services" section
See Step 10: Run the Upgrade Cluster Wizard.
- Enable Atlas install.
If the CDH cluster being upgraded was running Navigator, the upgrade wizard shows a note recommending that you enable Atlas in the new cluster. Check the Install Atlas option.

- Install Atlas
dependencies.
The wizard steps through the installation for Atlas' dependencies, assuming these services haven't already been included in the installation:
- ZooKeeper. Assign one or more hosts for the ZooKeeper role.
- HDFS. Already included in the installation.
- Kafka. Select the optional dependency of HDFS. Atlas requires configuring the Broker service only, not MirrorMaker, Connect, or Gateway.
- HBase. Atlas requires configuring HBase Master and RegionServers only, not REST or Thrift Server. Assign a Master role on at least one host. Assign RegionServers to all hosts.
- Solr. Assign a host for the Solr Server role. Set the Java Heap Size of Solr Server in Bytes property to 12 GB (to support the migration operation).
For recommendations on where in the cluster to install the service roles, see Runtime Cluster Hosts and Role Distribution.
- Click
Add Atlas Service. The wizard steps through
choosing a host and setting migration details.
- Set the host for the Atlas server roles and click Continue.
- The Atlas Migrate Navigator Data screen
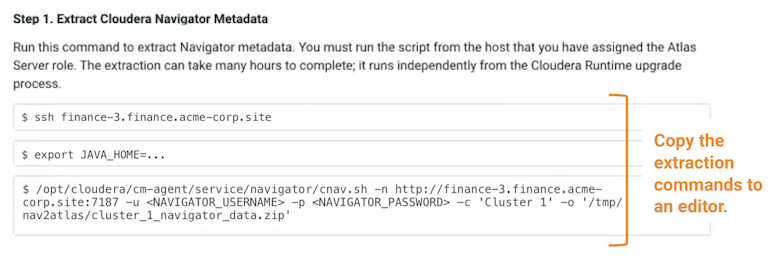
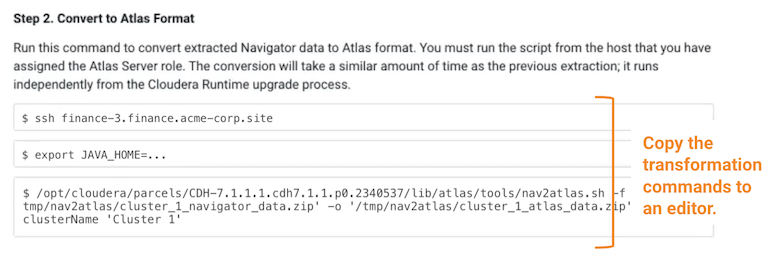
displays. This screen contains migration commands that are customized to your environment. When you fill in the output file paths, the command text changes to incorporate your settings.
- Set migration data-staging locations.
The migration process creates two data files on the local file system on the host where Atlas is installed. Make sure there is enough disk space to hold these files; see Estimating the time and resources needed for transition.
- Copy the
extraction command text to an editor.

- Copy the transformation command
text to an editor.

- Confirm the output file location. This is the location where Atlas will look for the content to import. Make sure it matches the location you plan to use for the output of the transformation command.
- Click Continue.
- Set migration data-staging locations.
- The Atlas Enable Migration Mode screen
displays. Review the Atlas Safety Valve content and click
Continue.
After the migration is complete, you will manually remove these settings to start Atlas in normal operation.
- The Atlas Review Changes screen displays.
Review the configurations and make any necessary changes.You must
provide a value for the following:
- Admin Password – choose a password for the preconfigured admin user.
- Atlas Max Heapsize – set the max
heapsize to the default value by clicking the curved blue
arrow. If you plan to migrate content from Cloudera Navigator
to Atlas, consider setting the heapsize to 16 GB.

- Click Continue.
To complete the Navigator-to-Atlas migration outside of the CDP Runtime upgrade, see Transitioning Navigator data using customized scripts.
Continue with the upgrade wizard
The Cloudera Manager upgrade wizard continues with "Other Tasks" and "Inspector Checks" sections. The wizard steps for installing Atlas are complete at this point and you can continue to complete the Cloudera Runtime upgrade.
