Step 5: After You Upgrade Cloudera Manager
Loading Filters ... 6.3.4 6.3.3 6.3.1 6.3.0 6.2.1 6.2.0 6.1.1 6.1.0 6.0.1 6.0.0 7.11.3 7.7.3 7.7.1 7.6.7 7.6.1 7.4.4 6.3.4 6.3.3 6.3.2 6.3.1 6.3.0 6.2.1 6.2.0 6.1.1 6.1.0 6.0.2 6.0.1 7.1.9.1000 7.1.9 7.1.8 7.1.7.3000 7.1.7.2000 7.1.7.1000 7.1.7
Minimum Required Role: Cluster Administrator (also provided by Full Administrator)
Perform Post-Upgrade Steps
- If you upgraded the JDK, do the following:
- If the Cloudera Manager Server host is also running a Cloudera Manager Agent, restart the Cloudera Manager Server:
- Restart the
Server.
sudo systemctl restart cloudera-scm-server - Open the Cloudera Manager Admin Console and set the
Java Home Directory property in the host configuration:
- Go to .
- Set the value to the path to the new JDK.
- Click Save Changes.
- Restart all services:
- On the
tab, click
 next to the cluster name, select Restart and
confirm.
next to the cluster name, select Restart and
confirm.
- On the
tab, click
- Start the Cloudera Management Service and
adjust any configurations when prompted.
- Log in to the Admin Console.
- Select .
- Select .
- Add and configure the Stub DFS
service and reset the dependent services:
- Add the Stub DFS service to each cluster managed by Cloudera
Manager that contains the services returned by the query you ran
when upgrading the Cloudera Manager server. (Step 4, on the Upgrade the Cloudera Manager Server page.)
- In the Cloudera Manager Admin Console, go to the status page the cluster.
- Click the Actions menu and select Add Service.
- Select the Stub DFS service.
- Click Continue.
The Assign Roles page displays.
- Accept the role assignments, or change them if necessary.
- Click Continue.
Cloudera Manager adds the Stub DFS service.
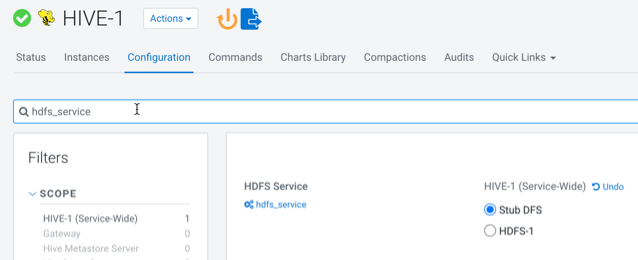
- In the Cloudera Manager Admin Console, for each of these
services, go to the Configuration tab and
set the configuration property
hdfs_serviceto Stub DFS. For example:
- Add the Stub DFS service to each cluster managed by Cloudera
Manager that contains the services returned by the query you ran
when upgrading the Cloudera Manager server. (Step 4, on the Upgrade the Cloudera Manager Server page.)
- If your deployment
uses LDAP, you may see that its health test has a
Disabled status, you can configure an LDAP
Bind Distinguished Name and password to enable the health test. In the Cloudera Manager Admin Console, go to and set the following parameters:
- LDAP Bind Distinguished Name for Monitoring
- LDAP Bind Password for Monitoring
If these parameters are left blank, Cloudera Manager attempts to use the bind credentials specified for authentication.
- If you have deployed Apache Atlas in the cluster, restart the Apache Atlas service.
- If you have deployed Kafka in the cluster, perform a rolling restart the Kafka service.
- If Cloudera Manager reports stale configurations after the upgrade, you might
need to restart the cluster services and redeploy the client configurations. If any
managed cluster includes the Hive and YARN components, this is required. If you will also
be upgrading CDH, this step is not required.
Stale configurations can occur after a Cloudera Manager upgrade when a default configuration value has changed, which is often required to fix a serious problem. Configuration changes that result in Cloudera Manager reporting stale configurations are described the Cloudera Manager 7.7.1 release notes:
- If you are using Streams Messaging Manager, you need to configure
database related configuration properties.
- Select the Streams Messaging Manager service.
- Go to Configuration.
- Find and configure the following properties:
- Streams Messaging Manager Database User Password
- Streams Messaging Manager Database Type
- Streams Messaging Manager Database Name
- Streams Messaging Manager Database User
- Streams Messaging Manager Database Host
- Streams Messaging Manager Database Port
- Click Save Changes.
- If you are using Schema Registry, you need to configure database
related configuration properties.
- Select the Schema Registry service.
- Go to Configuration.
- Find and configure the following properties:
- Schema Registry Database User Password
- Schema Registry Database Type
- Schema Registry Database Name
- Schema Registry Database User
- Schema Registry Database Host
- Schema Registry Database Port
- Click Save Changes.
- On the
tab, click next to the cluster name,
select Restart and confirm.
- On the
tab, click next to the cluster name,
select Deploy Client Configuration and confirm.
- If you disabled any backup or snapshot jobs before the upgrade, now is a good time to re-enable them
- If you deleted any Hive Replication schedules before the Cloudera Manager upgrade, re-create them now.
- Check if you have set
allow_weak_cryptoto true in /etc/krb5.confduring JDK upgrade. If yes, proceed to the last step to complete the Cloudera Manager Upgrade, else proceed to the next step to set the kerberos encryption type. - If you have upgraded to Cloudera Manager 7.11.3, and are using JDK 11 or higher, and
Cloudera Manager is managing the krb5.conf (when is enabled) then,
- Stop the cluster.
- Set the value of to any 'AES'. Cloudera recommends setting it to aes256-cts.
- If MIT is in use, make sure the KDC version is greater than 1.18.2 to support any
aes256 encryption type and:
- Edit the
kdc.confand addaes-256tosupported_enctypes. - Restart KDC.
- Edit the
- If, and only if, Active Directory (KDC) server is in use, then set to 'True'.
- Complete the Deploy Kerberos Client Configuration wizard OR call the CM API deployClusterClientConfig.
- Regenerate the credentials. Go to tab, select all and click .
- Start the cluster.
- The Cloudera Manager upgrade is now complete. If Cloudera Manager is not working correctly, or the upgrade did not complete, see Troubleshooting a Cloudera Manager Upgrade.